Monday 31 July 2017

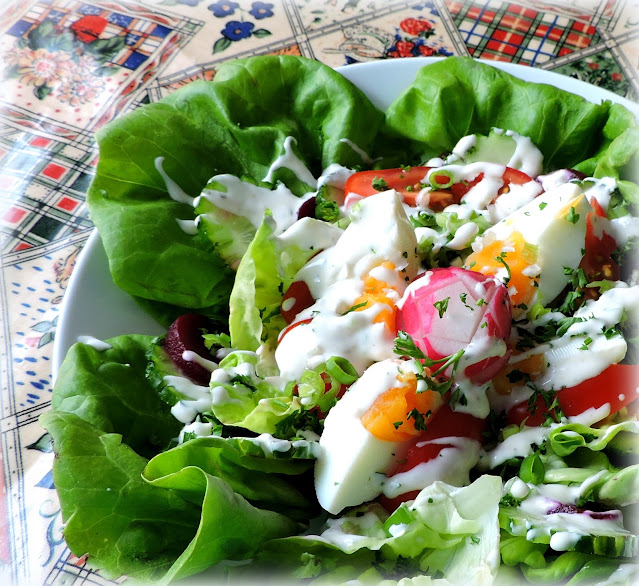
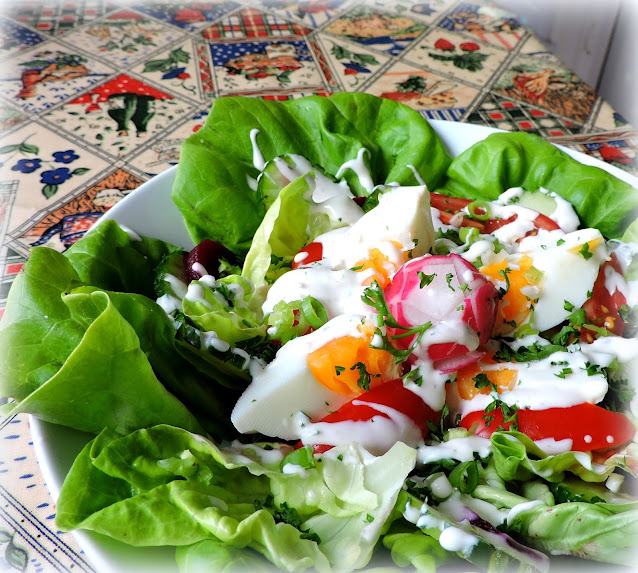
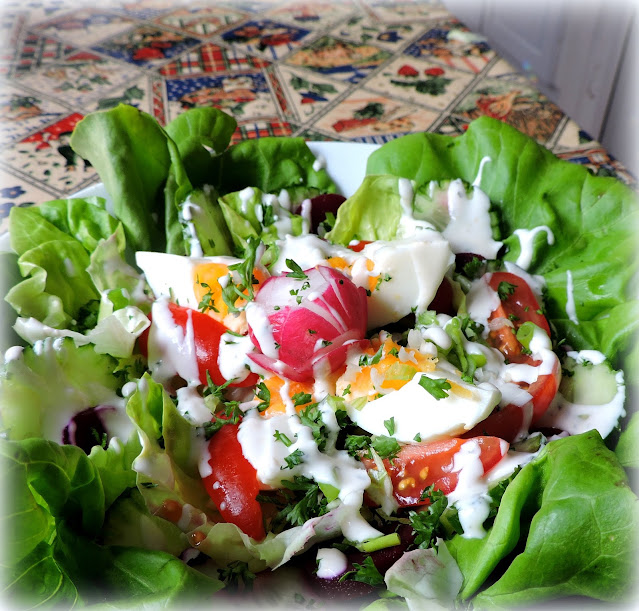
Buttermilk Dressed Rose Salad Bowl

Buttermilk Dressed Rose Salad Bowl

I think you all must know by now how very much I love salad.  I eat it all the year through. When we were first married my husband was not convinced that salad was a very good thing . . .  he called it rabbit food.  

He has come to actually like them through the years however.  As he says, I never make a boring salad!  That is a high compliment coming from him! He is a man of very few words.

Buttermilk Dressed Rose Salad Bowl

Actually he pretty much eats whatever I put in front of him and if he doesn't like it . . .  he won't say much of anything at all about it, or  . . .  if pressed . . .  he will simply say, "It was not one of my favourites."  How is that for being a gentleman.

Buttermilk Dressed Rose Salad Bowl

This salad here today is a recipe I adapted to what I had on hand from the Supper cookbook by the late Marion Cunningham.

She adapted from a salad she had eaten which was created by her friend Myrtle Allen of the Ballymaloe Inn and Cooking School in Country Cork, Ireland.  Those Allens are great cooks!

Buttermilk Dressed Rose Salad Bowl

It has long been on my bucket list to go to the Ballymalloe Inn.  I have all of Rachel Allen's cookery books and I have one by her MIL Darina Allen, called The Forgotten Skills of Cooking.  Good cooking runs in the family.

Buttermilk Dressed Rose Salad Bowl

When I saw the recipe for this salad, it intrigued me.  A salad composed of crisp lettuce leaves interspersed with fresh and colourful vegetables and topped with a buttermilk dressing. It sounded delicious and as pretty as a picture. 

Buttermilk Dressed Rose Salad Bowl

We eat with our eyes as much as we do our stomachs and tastebuds, in fact it is what we see that first appeals to our appetites' . . . 

Something might taste really delicious, but if it is visually disgusting looking and highly unappealing to the eye, it takes a really brave person to get past all of that and dig in.  We truly do eat with our eyes first.

Buttermilk Dressed Rose Salad Bowl

There are only two of us and so I adapted this to smaller bowls for just us . . .  you could do the same thing for four lucky individuals, or you could do as the original recipe and compose it in a large shallow salad bowl. 

Its all up to you.  The Radish rose in the centre is my addition. I thought it would add a pretty and colorful touch, and  . . . it did!

Hang onto your hats!  You are going to literally love this!
 

Buttermilk Dressed Rose Salad Bowl

Buttermilk Dressed Rose Salad Bowl

Yield: 4
Author: Marie Rayner
Prep time: 24 H & 20 MTotal time: 24 H & 20 M
This is a very pretty salad. You will need to begin the night before with preparing the lettuce. You can either prepare this in a large shallow salad bowl, or in four individual wide pasta bowls.

Ingredients

For the dressing:
  • 120 ml buttermilk (1/2 cup)
  • 120g mayonnaise (1/2 cup)
  • 2 tsp grated garlic
  • 1/2 tsp salt
  • freshly ground black pepper to taste
For the Salad:
  • 1 head of round lettuce or iceberg lettuce
  • 4 cooked beetroot, pickled if desired
  • 1 bunch watercress
  • 2 ripe tomatoes
  • 1/2 English cucumber
  • 1 bunch spring onions
  • 4 hard boiled eggs
  • 4 radishes, made into roses (see note below)

Instructions

  1. Prepare the lettuce the night before. Core the lettuce and submerge, cored end down, into a bowl of ice cold water. Remove and shake any excess water away. Wrap in several layers of paper kitchen towelling and place in the refrigerator over night.
  2. Make the dressing by putting all of the ingredients into a jar and shaking them together to blend well. Chill in the refrigerator until you need it.
  3. When you are ready to make the salad, carefully separate the salad leaves. Remove any woody stems from the watercress and discard. Cut the tomatoes into wedges. Peel the hard boil eggs and cut into wedges. Slice the beetroot into rounds. Chop the spring onions.
  4. Arrange larger salad leaves like a rose in the salad bowl (s). Place some of the smaller leaves in the centre. Tuck the sprigs of water cress, tomato wedges, cucumber slices, egg wedges and beetroot slices in amongst the petals (lettuce leaves). Place the radish roses in the centre and drizzle with some of the dressing. Pass the remainder at the table.
Did you make this recipe?
Tag @marierayner5530 on instagram and hashtag it #marierayner5530
Created using The Recipes Generator 


How to make radish roses

To make radish roses:
Wash and clean your radishes.  Dry well.  Cut off the tops and root ends so that both are flat.  Taking a sharp knife begin at the top end of the radish and make several slashes, overlapping them slightly almost all the way to the bottom, but leaving the bottom intack.  Place in some lightly salted cold water for about fifteen minutes until they open up.  Drain and pat dry.  Use immediately.

To see a video on how to do this click here.


Buttermilk Dressed Rose Salad Bowl

If you are out to impress your loved ones with a salad that is as visually appealing as it is delicious, then this is the salad for you!

Buttermilk Dressed Rose Salad Bowl 

This content (written and photography) is the sole property of The English Kitchen. Any reposting or misuse is not permitted. If you are reading this elsewhere, please know that it is stolen content and you may report it to me at mariealicejoan at aol dot com.  

Follow my blog with Bloglovin

Sunday 30 July 2017

Double Chocolate Chunk Cookies


This is a chocolate chip cookie recipe I adapted from a soft back cookbook/magazine I bought several years back called Delicious Baking, put out by Delicious magazine.  I love Delicious magazine.  It is one of my favourites.  I used to have a subscription to it, but when I lost my job a few years back I had to cut back and magazine subscriptions was one of the first things to go.  *sniff *sniff*

So what makes this chocolate chunk cookie different than other chocolate chunk cookies?  How does it shine? 


There is nothing unsual about chocolate chunks, or even about using two types of chocolate  . . .  the difference is that you use DARK chocolate in these, which counterbalances the sweetness of the white chocolate perfectly . . .


I think you will agree with me that white chocolate can sometimes be somewhat cloying, which is why you often find it paired with things which are not so sweet such as rasperries and cranberries. 


Another difference is that it uses DARK soft brown sugar, which gives these cookies a light whiff of molasses smokiness . . .  oh so good.


Crispy edged . . .  with sweet vanilla chunks and bitter dark chocolate . . .  with a slight chewiness in the middle.  I think you will agree with me when I say that those things all tip these cookies over the edge towards spectacular!


*Double Chocolate Chunk Cookies*
Makes about 16 - 17
Crisp, buttery and loaded with not one but two chocolates.  Dark and white.  Make sure you use a good quality of both! 

125g butter, softened (1/2 cup +1 TBS)
250g soft dark brown sugar (1 cup +2 TBS)
1 tsp vanilla extract
1 medium free range egg
225g plain flour (1 1/2 cups + 1 TBS)
1/2 tsp baking powder
100g good quality dark chocolate, coarsley chopped (3 1/2 ounces)
100g good quality white chocolate, coarsely chopped (3 1/2 ounces) 

Preheat the oven to 180*C/350*F/ gas mark 4.  Line several baking sheets with baking paper.  Set aside. 

Cream together the butter and sugar until light and fluffy.  Beat in the vanilla and egg.  Sift together the flour and baking powder.  Stir into the creamed mixture until well combined.  Stir in both chocolates.  Drop by heaped TBS onto the baking sheets, leaving 2 inches between each. 

Bake for 15 - 18 minutes until golden brown.  Remove from the oven and cool for 5 minutes on the pan prior to scooping off onto a wire rack to cool completely.  Store in an airtight container.


Now you might not think the fact that this recipe only makes about sixteen large cookies is a bonus . . .  but to me, who has absolutely no self control at all, this is a big plus.  There is a lot less cookie danger for me to be tempted by!! Bon Appetit!


Saturday 29 July 2017

Raspberry Almond Coffee Cake


 With raspberry season being in full swing at the moment I had a real hankering for a raspberry cake!  Oh, I do love raspberries any way I can get them, but they really shine in cakes!


Especially this one which had a delightful homemade raspberry sauce baked right into the middle of it.  Just look at that sweet tart lucious raspberry oooze  . . .


Oh boy but this is some good.   The batter is a sour cream coffee cake type of batter.  Not as in coffee flavoured batter, but as in a cake batter for a cake that you would want to enjoy with a nice hot drink either in the morning or for your break time . . . this batter is flavoured with almond and vanilla, not coffee.


Its equally as tasty for dessert however  . . .  with a scoop of ice cream on top or a dollop of softly whipped cream . . . the kids are sure to love LOVE this one and so will your dear hubby!


This cake just screams winner!  It is not officially raspberry season until I bake it at least once!!  mmmm . . .  moist almond flavoured cake with a beautiful sweet/tart seam of raspberry deliciousness running through the middle.

 
Another really good thing about this cake is that you can also bake it in the depths of winter with frozen berries . . .  ahhh . . .  a sweet taste of summer.  You just got to love that!

 
*Raspberry Amond Coffee Cake*
Serves 8 to 12

This is a moist and delicious cake with a tender crumb, a moreish raspberry filling and a brown sugar crumb topping.   

For the raspberry layer:
375g fresh or frozen raspberries (2 1/2 cups)
65g granulated sugar (1/3 cup)
60ml cold water (1/4 cup)
1 TBS fresh lemon juice
2 TBS cornflour 

For the cake:
120g butter, softened (1/2 cup)
190g granulated sugar (1 cup)
2 large free range eggs, lightly beaten
2 tsp almond extract
1 tsp pure vanilla extract
140g plain flour (1 cup)
pinch salt
1/2 tsp baking powder
1/2 tsp bicarbonate of soda
120g dairy sour cream (1/2 cup) 

For the topping:
60g butter (1/4 cup) cut into bits
90g plain flour (2/3 cup)
65g soft light brown sugar (1/3 cup packed) 

First make the raspberry layer.  Place all of the ingredients into a saucepan and bring to the boil, stirring constantly, over medium heat.  Reduce to a simmer and cook over low heat fir abiyt 5  minutes, giving it a stir every now and then.  Set aside to cool a bit while you make the cake batter. 

To make the topping, mix together the brown sugar and the flour.  Drop in the butter and rub it in with your fingertips until it  clumps together. 


Preheat the oven to 180*C/350*F/ gas mark 4.  Butter an 8 inch square cake tin really well.  Set aside. 

Cream together the butter and sugar until light and fluffy.  Beat in the eggs, almond extract and vanilla.  Sift together the flour, soda, salt and baking powder.  Stir this into the creamed mixture along with the sour cream and combine to give you a smooth batter.


Spread half of the cake batter into the prepared pan.  Smooth it out.  Spoon the raspberry filling over top, smoothing it over evenly.  Dollop the remaining cake batter over the raspberry filling and smooth it out as best as you can.   Sprinkle the crumb mixture evenly over top. 

Bake for 40 to 45 minutes until lightly browned and a toothpick inserted in the centre comes out clean.  Allow to cool completely before cutting into squares to serve.


I did dust some icing sugar on top to serve  . . . just to dress it up a bit.  Every gal shines a bit more in her frills don't they!  Bon Appetit!


Friday 28 July 2017

Sweet & Spicy Chicken Thighs

This is a chicken recipe which I have had to adapt since I moved over here to the UK.  My kids always loved this chicken.  It has wow flavours and is moist and tender, with a lovely crisp and flavourful skin. 


The original recipe used dried Italian salad dressing mix (in its unmixed, dry form) along with brown sugar and some butter for dotting.  We don't have dried Italian salad dressing mixes over here.  It is possible to get it at a premium price from some sites which carry North American goods, but generally speaking it doesn't exist.


 This chicken is really, really good however, and so I had to come up with a way to adapt it to what I could get over here because it is a chicken I just crave every now and then!


I combined a mix of herbs and powders to approximate the same flavours I might get from the dressing mix . . .  garlic and onion powders, basil, oregano, thyme, salt and cracked black pepper  . . . a bit of dried pepper flakes for some heat.  All the flavour, but none of the preservatives.

 
It actually might even be better than using the dry mix because of that.   This mixture gets mixed with some brown sugar and then sprinkled over bone in, skin on chicken thighs, dotted with butter and baked until all those flavours penetrate the chicken and that skin gets all sticky crisp and finger licking good!


Sure, it's not a low fat kind of a dish, but once in a blue moon this makes a really tasty treat. You could use chicken breasts if you really wanted to, but be sure to cut the bake time way down, and of course you won't get that lovely crispy skin.  You can also use one package of dry Italian Salad Dressing Mix if you want to instead of my combination of flavours.  Just mix it in with the brown sugar as per the recipe and leave my additions out.


*Sweet and Spicy Chicken Thighs*
Serves 4 - 6
 
I used to make a quick and easy chicken dish back home using dry Italian Salad Dressing mix, which we can't get over here, and so I made up my own combination with delicious results. 

3-4 pounds bone-in skin-on chicken thighs
1/2 tsp garlic powder
1/2 tsp onion powder
1 tsp dried oregano
1 tsp dried basil
1 tsp dried parsley flakes
1/4 tsp dried thyme
1/2 tsp salt
1/2 tsp coarse black pepper
healthy pinch crushed red pepper flakes
100g soft light brown sugar (1/2 cup packed)
2 TBS softened butter


 Preheat the oven to 180*C/350*F/ gas mark 4.  Have ready a baking dish large enough to hold all your chicken pieces.


Mix together the garlic powder, onion powder, basil, oregano, parsley, thyme, salt and black pepper.  Rub this mixture into the brown sugar.  Place the chicken pieces, skin side up into the baking dish. Sprinkle the brown sugar mixture evenly over top. Dot with butter.


Bake in the preheated oven for 35 to 40 minutes, until the skin is nicely crisped and the juices run clear.  Serve hot with your favourite side dishes.  We like rice and a green vegetable with this.


I think this is sure to become one of your favourites as well.  If it doesn't well . . .  there is just no accounting for taste eh?  We are all different.  Bon Appetit!

Thursday 27 July 2017

Tuna Melt Tart


Tuna has always been a real favourite of mine.  I confess I am not overly fond of strong flavoured fishes . . . I don't like mackeral or any type of fish which is really fishy, although I do like Tuna and I will eat  fresh Salmon ever now and then.  I do however like tinned salmon and tuna, which makes them great store cupboard ingredients for me.  If I have them in my larder, I know I always have a meal to hand. 


I confess I am really, really fussy about the tuna I buy however.  I only ever buy Albacore . . .  white tuna, sustainably sourced. I know it costs a bit more than normal tinned tuna, but it is worth every penny in flavour.  It just tastes sooooo much better than the cheap stuff.  This is a case where you really do get what you pay for.


I used to buy the really cheap stuff, years ago when I had a house full of children, thinking I was doing a good thing.  I was in the grocery store one day buying my groceries, and an Italian Nonna saw what I was buying in horror. She told me to never, ever buy that cheap tuna, that it was garbage fish . . .  to only ever buy albacore and she was so sincere, that I bought the albacore that day, even though it was a bit  more.  I have to say though that after tasting the difference, I have never bought cheap tuna again.  She was right. It is garbage in comparison.


We humans are such funny creatures.  We will think nothing of paying 3 or 4 pounds for a pound of minced beef, but when it comes to a tin of tuna we balk at spending 3 pounds for that!


 A tin of tuna goes just as far when properly prepared and you don't pour half it down the drain, and let me tell you . . .  a tin of solid pack Albacore white tuna in spring water is worth every little penny!  Trust me on this.  That same Italian Nonna told me to only ever buy blunt nosed carrots.  She said they were sweeter, and once again she was right.  You have to trust those Italian Nonna's.  They know what they are talking about!


Back to the tart. This is such a simple bake and really won't heat your kitchen up that much.  The bake time in total is only about  10 to 12 minutes.  And it is sooooo good!  Simple and good!


The crust is made from baking mix and boiling water, which gives you something almost like a bread, but there is none of the waiting for rising etc.  I use my own homemade baking mix, which works very well.  You can find that recipe here.
 
I keep mine in the freezer, which makes it really handy and prevents it from going off before I can use it all.  With a small family this is what works for me. You could also use a store brand baking/scone  mix if you wanted to.  They work great.


You just roll it out and make a rim and bake it for a few minutes until golden and then top with the tuna melt mixture some sliced tomatos and cheese slices and then bake it for a few minutes longer.  This is absolutely delicious!  A salad on the side and dinner is served.  Your family will think you slaved all day! Kids love this easy bake!


*Tuna Melt Tart*
Serves 6
 
This fabulous tart is so simple to make and so delicious.  All you need  on the side is a mixed salad! 

185g baking mix (I use my own homemade mix, you can find the recipe here:
https://sites.google.com/site/oakcottagerecipes/homemade-baking-mix) (1 1/2 cups)
80ml boiling water (1/3 cup)
220g tin of albacore tuna in spring water, drained and flaked (12 ounce)
60g prepared ranch salad dressing (1/4 cup)
3 TBS finely chopped spring onions
salt and black pepper to taste
6 baby plum tomatoes, sliced thinly
3 slices strong cheddar cheese, sliced in half diagonally 

Preheat the oven to 225*/425*F/ gas mark 7.  Line a baking tray with some baking paper.  Set aside. 

Stir the boiling water into the baking mix to make a soft dough. (You may need a bit more water. You want it to be a tiny bit tacky.) Shape into a ball.  Roll out to a 13 inch round on a lightly floured surface using a floured rolling pin.  Transfer to the baking tray.Roll up the edges 1/2 inch all around to make a rim.  Bake for 6 to 8 minutes until light golden brown. 

While it is baking flake the tuna into a bowl.  Mash it together with the spring onion and ranch dressing.  Taste and adjust seasoning as needed with some salt and black pepper. 
 

Remove the crust from the oven. Spread the tuna mixture over top thinly, covering it completely. Top with the tomato and cheese slices in a decorative manner.  Return to the oven for 3 to 4 minutes to melt the cheese.  Cut into wedges to serve.  Serve hot.


I really hope you will try this out.  Its simple, easy and so tasty!  It makes a perfect summer supper!  Bon Appetit!

Tuesday 25 July 2017

Simple Turkey Burgers


Burger night tonight with Simpe Turkey Burgers.  Nothing fancy here, but so delicious, especially if you make the Cranberry Mayonnaise to go along with them!


Its a very easy burger mix . . .  just ground turkey, with a minced red onion, some minced parsley, salt, pepper and garlic.


Nothing fancy, but it doesn't need to be . . . more often than not, simple ingredients put together in the proper proportion and way taste utterly fabulous . . .  proof positive that there is no need to really complicate things!


Do make the cranberry mayo however . . .  it's just perfect with these tasty burgers, giving them just a little bit of extra oomph!


My turkey patties today were extra thin, and so melted Dutch Masaam cheese on top and layered them double decker style in the bun . . .


That cheese is so holey that two slices don't make up much more than one slice of cheese anyways . . .  just look at how delicious these look  . . .  I added some shredded lettuce on top of that delicious mayo . . . and with a bit of additional chopped red onion on top, these were nothing short of perfection!

 
*Simple Turkey Burgers*
Makes 4 - 6 burgers
Printable Recipe

Simple flavours put together in a simple way make these moist and tasty burgers nothing short of perfection!
 
1 lb. ground turkey meat
1 medium red onion, peeled and finely chopped
1 large bunch of fresh parsley, washed, drained and finely chopped (about 1/2 cup)
1 tbsp garlic powder
1 tsp salt
1 tsp pepper
cheese (optional)
toasted buns to serve
your favourite burger toppings to serve

Mix the ground turkey together with the onion, parsley, garlic powder, salt and black pepper.  Shape into patties. Grill over medium heat for 6 to 7 minutes per side.  A couple of minutes before they are finished slap on a slice of cheese. Serve on toasted buns along with your favourite burger toppings.
*Cranberry Mayonnaise*
This goes perfectly with simple turkey burgers.
110g mayonnaise (1/2 cup)
3 TBS cranberry sauce
1 TBS lemon juice
salt and black pepper to taste
Mix all of the ingredients together and store in a covered container. Will keep for up to 1 week.


This delicious Cranberry Mayo is also fabulous on chicken or turkey sandwiches.  We just love it!   I served these with a  delicous Caesar salad on the side.  You can look forward to that recipe tomorrow! Bon Appetit!