Thursday 30 November 2017

Lemon & Cardamom Drizzle Loaf


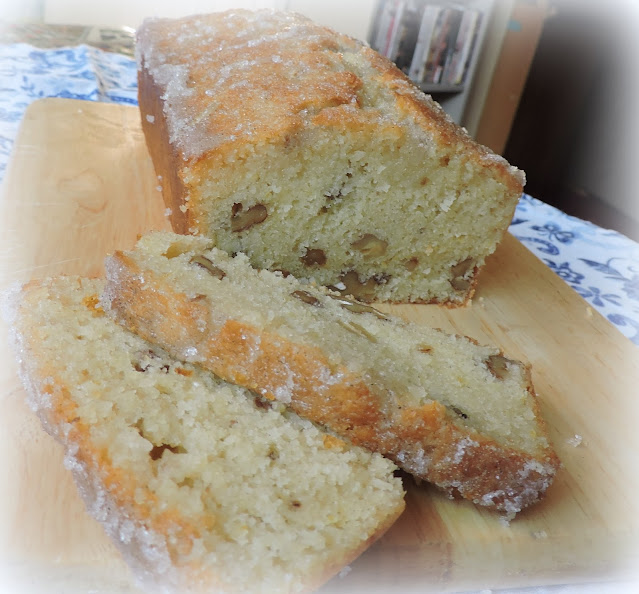
Lemon Cardamom Drizzle Loaf. If you are a fan of Lemon Drizzle Cake or loaves prepare yourself to fall in love. Yes, another Lemon Drizzle cake, but this one is amazing.
 
This is a variation of my ex mother in law Elizabeth's recipes.  My ex MIL was such a wonderful cook.  Basic, but a really good cook, with sound and reliable recipes. I have been baking this lovely loaf of hers for nigh onto 41 years now!


The only thing different I do than to what she did  is that I added some ground cardamom.  Cardamom and lemon go really well together doncha know! 

I quite adore it in almost anything, but especially in baked goods.


If you leave this lush loaf to sit overnight it slices beautifully.  That is the hardest part for me, leaving something overnight without digging into it. I am such a glutton!
 
 It has plenty of walnuts in it. I like to toast the walnuts before adding them.  (Make sure you cool them down before adding them to the batter.)  Toasting nuts always really brings out their delicious nuttiness!


This has lovely lemon flavours . . .  both in the batter and in the sugar drizzle with you pour over top while the loaf is still warm.


It soaks into the surface of the bread and creates a crispy sugar crackle surface that is oh so tangy/sweet tasty!


This also makes a great loaf for gift giving.  I can't think of anyone that wouldn't like to receive one of these.  Its so moist and delicious!


You could wrap it up in some cling film, and tie it with a pretty ribbon, and then present it in a bread basket with a pretty napkin for lining the basket, and some nice herbal or otherwise teas.

Lemon & Cardamom Drizzle Loaf

You could also include a nice handwritten recipe card with the recipe on it and a pretty mug or cup.  Now that sounds like a lovely gift, I think!


*Lemon & Cardamom Drizzle Loaf*
Makes one medium loaf
An old recipe from my MIL that I added cardamom to with most delicious results.  I also added some lemon extract for even more lemon flavour. 

6 TBS butter, softened
190g sugar (1 cup)
the finely grated zest of one lemon
2 large free range eggs, beaten
210g plain flour (1 1/2 cups)
1/2 tsp salt
1 tsp baking powder
1/2 tsp ground cardamom
1 tsp lemon extract
120ml milk (1/2 cup)
60g chopped walnuts, toasted (1/2 cup) 


For the glaze:
the juice of one lemon
65g sugar (1/3 cup)
1/4 tsp ground cardamom 


Preheat the oven to 165*C/325*F/ gas mark 3.  Line a buttered medium loaf tin with baking paper. Set aside. 


Whisk together the lemon juice cardamom and sugar for the glaze and set aside. 


Take your sugar and rub in the lemon zest until very fragrant. Cream together the butter, salt, and lemon sugar until light.  Beat in the eggs one at a time.  Stir in the lemon extract.


Whisk together the flour, baking powder and cardamom.  Stir in the walnuts.  Add this to the creamed mixture, alternately with the milk to combine.  Spoon into the prepared baking tin.  Bake for 1 hour until well risen and the top springs back when lightly touched.  A toothpick inserted in the centre should also come out clean.


While the loaf is still warm and still in the pan, pour the glaze ingredients over top, allowing them to settle in.  Let cool in the tin for about 10 minutes before lifting out to a wire rack to cool completely. Cut into slices to serve.  Store in an airtight container.


I love these old recipes.  They are such treasures!  This is a great bread for the holidays for sure!  Bon Appetit! 


This content (written and photography) is the sole property of The English Kitchen. Any reposting or misuse is not permitted. If you are reading this elsewhere, please know that it is stolen content and you may report it to me at mariealicejoan at aol dot com. 


Wednesday 29 November 2017

Spaghetti Francisco


You are going to just love this recipe I am showing you today! 

No doubt this is a recipe which has been served again and again to countless people through the years at covered dish suppers, potlucks, church socials and the like!


The original recipe comes from a very old paperback cookbook that I have had since 1976, called The Sunset Cook Book of Favorite Recipes.  

It originally cost me $2.45 which was probably a considerable amount at that time, but which seems like peanuts now! 

It is worth every penny I paid however as I have been cooking from it and enjoying the recipes in it for some41 years now! My goodness this book is almost as old as my oldest son now!


My goodness but the years have just flown by. We've gone from Disco Balls and bell bottom flares to anything goes!  

This book is filled with a lot of gems and a lot of tried and trues and a lot of happy family memories.  

My enchilada recipe is adapted from one I found in this book.  Those are the kinds of recipes in it . . .  good steady recipes that you can adapt and make your own!


Dependable and unsually appealing like this dish called Spaghetti Francisco which has been a real favourite of my family since the beginning!  

It is a great storecupboard casserole, using things that most people have to the ready most of the time.


Creamed corn, tomato soup, onions, mushrooms, peppers, streaky bacon and tomato passata (tomato sauce) . . . cheese and spaghetti!


The original recipe called for canned mushrooms, but I use fresh these days.  I don't think I have touched a tinned mushroom in years. 

 Fresh are so readily available now and taste so much better!  In 1976 they were probably a lot harder to come by.


I also use whole wheat spaghetti when I make mine.  Much healthier and with more fibre than the regular spaghetti.  

To be honest I never notice much of a flavour different myself.  I like whole wheat pasta most of all.


It uses streaky bacon, but truth be told, I have also used leftover bits of ham in this as well.  Proscuitto works also, and pancetta.  

Anything smoky, except for maybe smoked oysters. (Blecch!!)  Did your family get in tins of smoked oysters at Christmas when you were growing up?  Mine did.  Shudder . . .  I am so not a fan of oysters.


The original recipe has instructions for making this to feed up to 40 people, so apparently it was a very popular pot luck type of dish.   

We have always loved it.  Its simple, easy and quick to make and quite delicious!


*Spaghetti Francisco*
Serves 6 to 8
 
A baked meal in one which is great for covered dish suppers and pot lucks. You can also divide it between two casserole dishes and freeze one for later. 

225g uncooked spaghetti, broken (8 ounces)
60ml salad oil (1/4 cup)
1 (428g) tin of creamed corn (1 pound tin)
2 slices streaky bacon, diced
1 small onion, peeled and chopped
1/2 medium sized green pepper, seeded and chopped
120ml tomato passata (1/2 cup tomato sauce)
1/2 (295g tin) condensed tomato soup (1/2 10 3/4 ounce tin)
1/2 pound mushrooms, sliced
salt and pepper to taste
225g grated strong cheddar cheese (2 cups)


Preheat the oven to 180*C/350*F/gas mark 4.  Butter a 9 by 13 inch baking dish.  Sprinkle 1/3 of the grated cheese on the bottom.  Set aside. 


Cook the spaghetti al dente according to the package direction.  Drain well and rinse, drain again.  Cook the bacon in a pan until amost crisp.  Add the chopped onion, pepper and mushrooms. Cook, stirring frequently, until all vegetables have softened.  Add the creamed corn, tomato passata and the tomato soup.  Stir well and bring to the boil.  

Stir in the spaghetti to combine well, season to taste and then pour into the prepared baking dish. Scatter the remaining cheese over top.  Cover and bake for about 30 minutes, uncover and bake for 10 to 15 minutes longer, until hot and bubbly.  Let stand 10 minutes before serving. 


I made this last week when we had company, and it went down a real treat.  I served it with a Caesar salad and some crusty bread on the side.  The recipe went home with my company!  I think this is one that will go down really well with your family also!  Some of these older recipes are real treasures!  Bon Appetit!  


Spaghetti Francisco

This content (written and photography) is the sole property of The English Kitchen. Any reposting or misuse is not permitted. If you are reading this elsewhere, please know that it is stolen content and you may report it to me at mariealicejoan at aol dot com. 

Follow my blog with Bloglovin

Tuesday 28 November 2017

Sweet Mustard Chicken


I picked up a couple of corn fed free range chicken breasts the other day for a quick supper and wanted to do something a bit out of the ordinary and a little bit special with them.


The thing I love about chicken breasts is that they are almost a blank canvas that you can use to paint with a multitude of flavours and seasonsings.


I used a mix of grainy mustard, maple, cider vinegar, brown sugar and herbs on this occasion. It tastes and looks special, but is really a very simple bake.  You just season the chicken and pop it into a baking dish . . .


The remaining ingredients are whisked together, poured over top.  It bakes in the oven for fifteen minutes at a high temperature, and then fifteen minutes at a lower temperture.  The end result is perfectly cooked, moist chicken breasts with a delicious sweet and tangy sauce!


This looks like you have slaved for hours over it, but in reality its a real doddle.  I would even feed this to company. It truly is finger licking good!


*Sweet Mustard Chicken*
Serves 4
Delicious chicken dish which is as simple to make as throwing the sauce ingredients together, pouring them over the chicken and baking them in the oven.  Easy peasy lemon squeasy! 


4 boneless, skinless, chicken breasts
125g of grainy Dijon mustard (1/2 cup)
60ml of Maple syrup (1/4 cup)
2 TBS soft light brown sugar
2 TBS apple cider vinegar
1/4 tsp each, thyme leaves, crumbled sage leaves, parsley flakes, rosemary
salt and black pepper to taste


Preheat the oven to 220*C/425*F/ gas mark 7.  Line a baking tin large enough to hold the chicken breasts in one layer with aluminium foil.  Don't skip this as you will regret it.  


Lay the chicken in the pan.   Season with salt and black pepper and sprinkle all of the herbs over top.


Whisk together the mustard, maple syrup and vinegar.  Pour this over top of the thighs, lifting them to allow the sauce to also pour underneath.  


Roast for 15 minutes.  Baste with the pan juices. Reduce the oven temperature to 200*C/400*F/ gas mark 6.   Return the chicken to the oven and roast a further 15 minutes, until the juices are bubbly and golden brown, and the chicken is glazed and its juices run clear.  


Serve hot with some of the pan juices spooned over top.  There won't be a lot at that point, but what there is, is quite, quite delicious!


You could also cook thighs or legs with this easy glaze, however they will take a bit longer.  I would also cover then for the first part of the cooking process.  I would do 20 minutes covered and then 20 - 25 minutes, uncovered, basting every 10 minutes or so at the lower temperature.  I served this delicious chicken with steamed basmati rice and peas. Bon Appetit!

Monday 27 November 2017

Easy Oven Mac & Cheese


I had some guests for a meal one day last week and I wanted to make them something a tiny bit different than what I usually make and I also wanted to use up some bits and pieces. 


 My old friend Leona used to make the loveliest mac and cheese and there was no sauce recipe involved. She simply threw everything into a casserole dish and away it went.


I decided to do something very similar, but I switched it a bit by changing a few things around, with the end result being gorgeously decadently delicious! We all really enjoyed it.


She used to just mix cooked macaroni with some cubed cheese and put it in a dish and pour milk over top and some buttered crumbs on top of that.


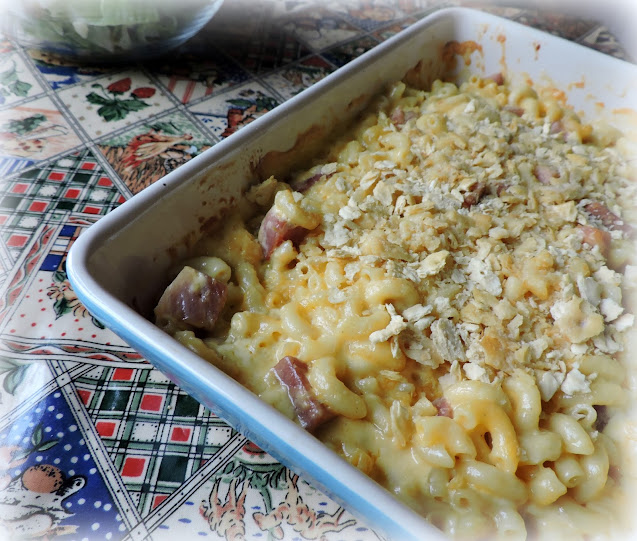
I used a generous mix of cubed strong cheddar cheese and orange processed cheese.  (Yes, plastic cheese, but it works well here. It really does)


I added a touch of grated onion, just for some extra flavour . . . besides the salt and pepper.  You want to use plenty of black pepper.  It just enhances the cheese flavours so much.


Instead of just milk, I used a mix of milk and cream.  I know  . . .  a tad bit decadent, but it totally was worth it in the flavour and consistency at the end.  It worked fabulously!  


I also added some leftover cubed ham that I had frozen a while back.  Tony declared it a success and went back for seconds!  I love it when that happens!


*Easy Oven Mac & Cheese*
Serve 4 to 6

This is rich and delicious and oh so easy.  It is a once in a blue moon treat and doesn't involve any making of a sauce.  You just stir everything together and pour it into the dish and bake. 

175g elbow macaroni, uncooked (1 1/2 cups)
240ml single cream (1 cup)
240 ml whole milk (1 cup)
1 TBS grated onion
salt and black pepper to taste
225g strong cheddar cheese, cut into chunks (8 ounces)
110g orange process cheese, cut into chunks (4 ounces)
2 cups chopped leftover baked ham
4 TBS coarse cracker crumbs
butter to dot 


Preheat the oven to 180*C/350*F/ gas mark 4.  Butter a 2 litre shallow casserole dish (2 quart).

Cook the macaroni according to package directions.  Drain well, rinse, and drain again.

Warm the milk, cream and onion together in the same saucepan you cooked the macaroni in.  Stir in the cooked macaroni and chunks of cheese, along with the bits of  ham.  Pour into the baking dish and spread out. Cover tightly and bake for abuot 30  minutes.  Uncover and  scatter the cracker crumbs over top.  Dot with some butter and return to the oven for about 15 minutes until the crumbs are golden brown.  Let stand for five minutes and then serve to some very lucky people. 


You could leave the ham out altogether and if you used a vegetarian cheese it would work well for vegetarians.  But really the ham went so well in this.  

I served a nice salad and some peas and carrots on the side.  Crusty rolls were also present!  I hope you will try this. I think you will find that not only is it the easiest mac and cheese you have ever made, but also one of the tastiest!  Bon Appetit!


Sunday 26 November 2017

Chocolate Gingers


Chocolate and ginger have a wonderful affinity for each other.  The flavours go together just like peas and carrots!  There are some lovely hard ginger biscuits you can buy in the shops over here that are dipped in dark or milk chocolate and they are G-O-R-G-E-O-U-S! I like the dark chocolate ones.


Todd really struggles with them however.  He loves the flavour but his older gnashers just can't cope with the hardness of them. I totally understand and don't really mind  . . .  more for me.  👍


Today I baked him some chocolate gingers that he could eat though, and he is in ginger biscuit heaven!


These are crisp edged with chewy middles.  He has already scarfed down about half a dozen, which is so not like him.  He usually doesn't indulge to that degree.


They are a lot spicier than my normal molasses crinkles that I bake, having two full teaspoons of ginger in them, along with a hefty amount of cinnamon, cloves and cardamom.  So lovely flavours!


You do have to chill the dough for a couple of hours before you shape and bake.  Shaping and baking is really simple though . . .


You just roll into balls and then roll the balls in granulated sugar to coat and then bake.  If your kitchen is somewhat warm however, chill them on the baking sheets for about ten minutes before baking.


The end result is totally moreishly addictively scrumptious!  Seriously.  Even without the chocolate.


But do try them with the chocolate.  Its easy.  I just melted semi sweet chocolate chips and generously drizzled it over top of the cooled cookies.  I think it's fair to say I am not a "decorator" in any sense of the word.  I am much too impatient.  I  just slop it on.  These taste really good no matter your skill at presentation!


*Chocolate Gingers*
Makes about 30

Crisp edges, chewy sweet middles and lotsa spice, with a hint of semi sweet chocolate drizzle. Very moreish. 

280g plain flour (2 cups)
2 tsp bicarbonate of soda (baking soda)
1/2 tsp salt
2 tsp ground ginger
1 1/2 tsp ground cinnamon
1/2 tsp ground cloves
1/4 tsp ground cardamom
180g unsalted butter, melted and cooled (3/4 cup)
190g sugar (1 cup)
60ml molasses (1/4 cup)
1 large free range egg
sugar for rolling


For the chocolate glaze:
180g semi sweet chocolate chips (1 cup) 


Sift together the flour, soda, slt, ginger, cinnamon, cloves and cardamom.  Whisk together the butter, sugar, molasses and egg.  Combine together the dry and the wet ingredients to give you a uniform, soft dough.  Cover and chill for 2 hours.
Preheat the oven to 180*C/350*F/gas mark 4.  Line several baking sheets with baking paper.  Put some granulated sugar into a small bowl.

Roll the dough into walnut sized balls and roll the balls in sugar.  Place 2 inches apart on the baking sheets. Bake in the heated oven for 10 to 12 minutes until the cookies have spread and are light golden brown. Any cracks should appear slightly moist.  Let sit on the baking sheets for a few minutes before scooping off onto wire racks to finish cooling.

 For the choclate glaze, melt the choclate chips in a bowl set over simmering water, taking care not to let the bottom of the bowl touch the water.  Drizzle the melted chocolate over top of the cookies and allow to set before storing in an airtight container.

Store in an airtight container for up to 4 days, or freeze in an airtight container for longer.


Yes, the Christmas Cookie fest has begun.  I can't think of any neighbours that would not be appreciative of a container of these!  Happy Holidays and Bon Appetit!