Friday 30 November 2018

Christmas Coleslaw


We had company for dinner the other night.  I did a Roasted Ham with a honey/mustard glaze, some Potatoes Dauphinoise and a variety of vegetables.  I also made this delicious coleslaw.  I love coleslaw and in my opinion, you gotta have coleslaw when you have ham!


Coleslaw is one of those salads that comes in very handy during the holiday season when we are doing a lot of entertaining.  It is easy to make ahead and goes perfectly on any buffet table! 


Perfect for Tree Trimming Parties and Pot Lucks!


My mother always made great coleslaw!  I can remember watching her stand at the counter making it.  She always shredded her cabbage by hand with a knife, and that is the way I like to do my cabbage also, with a knife.  I do grate the other vegetables, with the exception of the onion. That I chop by hand as well. 


This version is prettied up a bit for the holidays with the addition of chopped dried cranberries.  Dried Cranberries are sweet without being overly so and add an almost jewel-like quality!


I've also added chopped toasted walnuts.  I always toast my nuts before using.  It really enhances their natural flavours and helps them to shine.  I never add nuts to any salad until just prior to serving.


The dressing is a simple one with sour cream, mayo and Greek yogurt.  I have never used the lower fat version in this, but I can't see why they wouldn't work. 


There is also dry mustard powder for a bit of a punch, some lemon juice, white wine vinegar, seasoning and a bit of honey for some sweet.  The vegetables used are white cabbage, carrots, celeriac and spring onions.


Its just a really, really nice salad! 


Yield: Serves 4 to 5
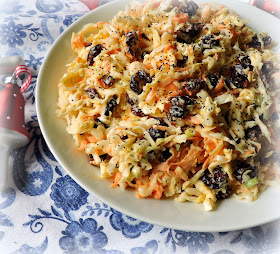
Christmas Coleslaw

Delicious and colourful.  A great addition to the holiday buffet table.

ingredients:

1/4 pound celeriac (celery root) peeled and coarsely grated
1/4 pound carrots, peeled and coarsely grated
1/4 pound white cabbage, finely shredded by hand
3 spring onions, finely chopped
75g dried cranberries, coarsely chopped (1/2 cup
60g toasted chopped walnuts (1/2 cup)
poppy seeds to garnish
For the dressing:
40g sour cream (1/3 cup)
2 heaped TBS mayonnaise
2  heaped TBS plain Greek yogurt
1/2 tsp dried mustard powder
1 TBS white wine vinegar
1 TBS lemon juice
2 tsp liquid honey
salt and black pepper to taste

instructions:

Prepare all of your vegetables.  Put them into a bowl along with
the cranberries and walnuts.  Whisk together all of the dressing
ingredients until smooth and well combined.  Pour over the vegetables
and toss well together to coat evenly.  Cover and chill.  Stir in the
toasted nuts and sprinkle with the poppy seeds just prior to serving.

Note - Best made on the day. You can easily  and successfully double this to serve  more people.
Created using The Recipes Generator


You can store any leftovers in the refrigerator, covered, but I don't recommend keeping it for any longer than a day! 


Have you seen these? They are called Fruit Savers and I got them from MyKtchn.  They are the most fabulous fruit saver/covers.  Easy to use and fabulous for all sorts! 


Handy Fruit Savers is a 4 piece set  of these flexible rubber lids that serve to help to prevent your favourite foods from spoiling. They are reusable covers and will work with almost any round fruit or vegetable, helping to keep them fresh for use the next day.


 They can also be used for containers which don't have a cap or are otherwise in the open.  How many times have you lost the cap for a jar, or have an open tin of something that you need to cover???  I do it all the time.   Problem no more!! These solve that problem perfectly!


 You can store sensitive foods safe from oxygen, reducing the risk of discolouration, which in turn helps me to reduce food waste and save me money. I just love them!  I don't think I would be without them now.  You can find out more about them here. 


Thursday 29 November 2018

Berry French Toast in a Mug (Diabetic Friendly)


Food like can be difficult for a Diabetic.  I am a Type 2 Diabetic and my husband is not.  He can eat whatever he wants and never gain an ounce.  In fact he has a difficult time keeping weight on.   So in this house it is a fine dance between making sure he gets what he needs to eat and keeping me in line with what I should or shouldn't eat. 


As you know, I do bake him lots of treats and try not to overly deprive him without overly tempting myself.  It is very difficult at times and I admit, I do taste far more than I should sometimes, but thankfully my blood sugars stay within the guidlines most of the time. I can tell when I have gone overboard because my vision gets blurry and that's when I start drinking lots of water. Thankfully it doesn't happen very often. 


I saw this recipe on the Mr Food Recipe Kitchen site the other day, in the Everyday Diabetic Recipes Section and it looked really good and like something I could indulge in every now and then.  French toast. I love French Toast, but it is very rare that I can have it.


There are some very good sugar and syrup substitutes out there  that are sugar free and not too bad tasting.  Sukrin make some very good sugars (brown and white and icing) and I found a company here in the UK that makes wonderful calorie free and sugar free syrups. 


Of course whole wheat bread is very diabetic friendly because it is low GI and so long as you keep your amounts down, you can enjoy that as well on occasion. (Eating foods that have a low score on the glycaemic index can keep blood sugar levels steady and can even help your body metabolise fat more efficiently


I ordered a few different syrups from the Skinny Food Co a few weeks back. Some Ketchup, some Maple Syrup, and Vanilla Syrup.  Unfortunately sugar subs like this tend to be very expensive and never really come up to the satisfaction level of the real thing.    But at least they make it possible for you to be able to enjoy a treat every now and then. which is a heck of a lot better than not at all!


With the addition of fresh berries this was really good and made for a lovely quick breakfast that I totally enjoyed.  You simply mix everything together, pour it into a mug and then quick cook in the microwave, stirring it halfway through the cook time.


It wasn't even rubbery like some of these microwave goodies can be.  (Most microwave cakes are kind of rubbery, I find . . . but maybe I am just too picky.)


The original recipe called for egg substitute instead of an egg, but I don't think an egg every now and then will hurt.  We don't have egg substitute over here in the UK, at least not that I have ever seen.

Yield: 1

Berry French Toast in a Mug

prep time: 1 minscook time: 2 minstotal time: 3 mins
Quick, easy, delicious and Diabetic friendly. You can also easily adapt this for non-diabetics by using regular maple syrup and ordinay white bread.  I cut the crusts off, but I expect you don't really need to.

ingredients:

1 large free range egg, beaten
2 TBS skim milk
2 tsp sugar free syrup
1/4 tsp vanilla extract
1/8 tsp ground cinnamon
2 slices whole wheat bread, cut into 1/2 inch cubes
2 fresh strawberries, chopped
1 TBS fresh blueberries

To serve (Optional)
sugar free syrup
fresh berries

instructions:

Spray a large mug with some non-stick low fat cooking spray. 
Combine the egg, milk, syrup, vanilla and cinnamon together in a bowl.
Add the bread cubes and the fruit.  Toss to coat evenly. Pour into the
prepped mug.

Microwave on highfor 45 seconds. 
Stir gently and microwave for about 30 seconds longer, or until the
bread is set in the centre.  Top with some extra berries if desired and a
 bit of extra syrup.
Created using The Recipes Generator


Craving indulged, I can feel good that I am sticking to my Diabetic guidelines, which is really important this time of year when we are surrounded by tons of goodies that we can't have!  I got some pancake mix from the company also, which I hope to enjoy one day.  You would just die if you saw how much I got and how much it cost.  I was not impressed, and actually a bit disappointed when I saw it,  to be honest, so I am saving it for a really special occasion!  

In any case this is quick, easy and delicious! Bon Appetit!

Wednesday 28 November 2018

Sheet Pan Pumpkin Pie


I had wanted to share this recipe prior to Thanksgiving, but time got away from me.  I can't not show it to you however as it was really a lovely pie and we both really enjoyed it very much.


I confess when I was growing up I didn't really like pumpkin pie very much.  It wasn't until I became an adult that I found myself able to fully appreciate its virtues.


I think of all the pumpkin pies I have made through the years I enjoyed this one most of all.  It was a bit different than the usual pumpkin pie.  I found the recipe on the Land O Lakes website and adapted it from there to British measurements, etc. 


I'm afraid I also took the liberties of cutting the recipe in half as there are only two of us in our home and we were not expecting any company.


I cooked the half recipe in an 8 inch square baking tin, which worked perfectly. 


It cooked in the same amount of time as the full one would have done, probably because it was a bit deeper.


It had a beautiful velvety texture and the flavour was rich and full.  Making it with cream probably added to the richness and creaminess of the end result.


The pastry cut outs on top were a really nice touch.  The pie looked really pretty wit them! 


Do make the caramel cream to serve with it.  Its really lovely.


Of course it will be lovely even with plain whipped cream. 


Funny thing, since moving over here I no longer feel the need to sweeten my whipped cream.  The British never do and let the cream speak for itself.  I think that's because the milk and cream is so beautiful over here.


Yield: 24

Sheet Pan Pumpkin Pie

prep time: 20 minscook time: 1 hourtotal time: 1 hours and 20 mins
Pie enough for all your guests, plus seconds, served with a luscious caramel whipped cream.

ingredients:

Pastry:
560g plain flour (4 cups)
1/2 tsp salt
305g cold butter, cut into chunks (1 1/3 cup)
300ml cold water, plus extra if needed (1 1/4 cups)

For the filling:
4 large free range eggs
400g soft light brown sugar (2 cups, packed)
240 ml heavy cream (1 cup, heavy whipping cream)
2 tsp pumpkin pie spice
2 (425g) tins of pumpkin puree (not pie filling) (29 ounces)

For the whipped cream:
310ml heavy cream (1 1/2 cups heavy whipping cream)
60ml caramel topping (1/4 cup)
2 TBS icing sugar

instructions:

Preheat the oven to 220*C/425*F/ gas mark 7.  Line a (9 by 15 inch) baking sheet (with sides) with parchment paper. Set aside.

Whisk
 together the flour and salt for the pastry together in a bowl.  Drop in
 the butter and then cut in with a pastry blender or fork until the
mixture resembles coarse crumbs.  Stir in the cold  water gradually with
 a fork, just until the flour is moistened.  Divide the dough into two
portions, one 3/4 of the dough, and the other 1/4 of the dough.  Shape
each into a ball and flatten. Wrap the larger disc in cling film and
refrigerate

Roll out the smaller part of the
dough to 1/4 inch thickness on a lightly floured surface.  Using shaped
 cookie cutters, cut into about 40 pieces.  Place 12 to 18 on a baking
tray and refrigerate the remaining ones.  Sprinkle with a bit of sugar
if you wish.  Bake for 5 to 7 minutes, or until golden brown. Set aside
to cool completely.

Roll the remaining disc of
dough out to a rectangle large enough to line the prepared baking sheet,
 1/4 inch thick. Fold into quarters and place into the baking pan.
Unfold and press firmly against the bottom and sides.  Flute or crimp
the edges.

Whisk together all of the
ingredients for the filling together.  Pour into the crust.  Decorate
the top with the remaining unbaked pastry shapes.  Bake in the oven for
10 minutes, then reduce the oven temperature to 180*C/350*F/ gas mark
4..  Bake for 50 to 60 minutes, or until a knife inserted in the centre
of the pie comes out clean.  Set aside to cool completely.

To
 make the cream beat the whipping cream, caramel sauce and sugar in a
chilled bowl, at low speed, until the caramel sauce has dissolved. 
Increase speed to high and beat until soft peaks form. 

Serve pie with dollops of whipped cream on top and a crust cut out garnish if desired.
Created using The Recipes Generator


I know Thanksgiving is over and everyone is probably pumpkin-pied out, but do bookmark this lovely pie for next year, or why not give your family an additional treat of another pie during the holidays. I am sure they will love it.  If you do it in a sheet pan it is perfect for taking to any buffets or pot lucks you might be invited to during the holidays!  Bon Appetit!


Tuesday 27 November 2018

New York Pizza


I confess that I am a Pizza lover.  Aficionado.  Pizza hog. Treasurer . . . . maybe even obsessed.  If its Pizza, I am there.  

I have been carrying on a great love affair with it for most of my early teen years and adult life.  I can't help myself.  I just adore the stuff. 


My first run in with pizza was when I was a teenager. My boyfriend at the time brought over a pizza mix and we made one together. It was simple. It was delicious. I fell in love.

Since then I have been enjoying pizzas from one coast to another and across the sea.  RJ's pizza in Winnipeg was really good, but then again, I have never really met a pizza I didn't like.


I could eat pizza for breakfast, lunch and dinner.  And all on the same day.  Yep, I love, LOVE pizza. 

Crisp crust. Thin crust. Thick crust. Crust you can fold.  Any way. Any how.


Yesterday I tried out making a New York Pizza.  With foldable crisp slices, a delicious sauce and lotsa lotsa cheese.  

I've never been to New York, never tried the pizza, but I have read about it. Dreamt about it. wished for it.


Have I ever told you my cousin owns/runs a Pizza place back home?  Yep, he does.  

The Pizza Factory on Main Street in Middleton, Nova Scotia . . . and it produces some of the best pizza in the Valley.


It is not a chain run conglomerate, but a small individual mom and pop style of business.  There is only one of them and they make great pizza.  

The crust is a family secret recipe that only he and his sister know, and it is an amazing crust.  One of the best ever.


It is one of the first things I need to treat myself to every time I go home.  If you are ever in the area, be sure to check it out.  You won't be sorry.  

He started working there when he was a teenager and when the owner decided to retire, he offered Hal the opportunity to buy the business.  Hal did and has never looked back  We are all immensely proud of him and his pizza! 


And how back to my pizza.  Its not Hal's crust, but its a pretty darn good crust.  

Lovely flavour and texture and just sturdy enough to stand up to the toppings, and yet at the same time light and airy.


What characterises a New York Pizza?  I have never been to New York or tasted one in person, but I have drooled over many a slice on the telly.  

Latest one being on an episode of Somebody Feed Phil.  I reckon New York City must have some of the tastiest food in the world. 


According to The Spruce Eats:  

New York style pizza has slices that are large and wide with a thin crust that is foldable yet crispy. It is traditionally topped with tomato sauce and mozzarella cheese, with any extra toppings placed on top of the cheese. Pizza without additional toppings is called “plain,” “regular,” or “cheese.  


This fits the bill on all of those counts.  It has a thin, airy crust that is crisp and yet foldable . . .


It is covered with a delicious tomato sauce  . . .  my own recipe, honed after many years of eating pizza, knowing what tastes good and what I like and adaptation until I perfected it.  

I am mighty proud of my sauce. 


And of course plenty of mozzarella cheese, plus some Parmesan . . .  because to me a Pizza needs Parmesan cheese too. 


 New York  Pizza 

I am not a pizza expert by any stretch, but I have eaten plenty of pizza in my life, from the make at home mixes to pizza in Calgary, best ever coming from a Greek restaurant no less. 

Winnipeg, Halifax, etc.  I think I know good pizza.


The best in my opinion is Hal's but this one runs a good second.  Ok, I am a bit biased. I admit it.  But it is my blog after all. You will just have to try it and make up your own mind.

Yield: makes 2 pizzas

New York  Pizza

prep time: 20 minscook time: 2 hourtotal time: 2 hours and 20 mins
Light and airy with lots of cheese. If you don't want to make two pizzas, you can divide the dough in half and freeze one portion, well wrapped and you can also free half the sauce for another time. Plan ahead as this can take some time.

ingredients:

For the crusts:
945g strong bread flour (3 3/4 cups)
1 1/4 tsp sugar
1 envelope of active dry yeast
1 tsp fine sea salt
2 TBS +2 tsp olive oil
360ml warm water (1 1/2 cups)

For the sauce:
2 cups of tomato passata (seived tomatoes)
1/4 cup tomato paste (sundried tomato paste is nice sometimes for a change)
2 cloves of garlic, peeled and minced
1 tsp sugar
1 tsp onion powder
1 1/2 tsp dried basil leaves
1 tsp dried oregano leaves
1/4 tsp chinese five spice powder
seasalt and freshly ground black pepper to taste
You will also need:
230g fresh mozzarella, grated and then frozen (2 cups)
4 TBS coarsely grated Parmesan cheese

Optional:
Toppings as desired
(chopped onion, olives, bacon, peppers, pepperoni, etc.)

instructions:

Combine the bread flour, sugar, yeast and salt in the
bowl of your stand mixer. Combine to mix. Add the water and 2 TBS of the
 oil.  Beat using the dough hook until the dough forms a ball around the
 hook.  If you think the dough is too sticky, you can add additional
flour 1 TBS at a time. If you think the dough is too dry, you can add
water, 1 TBS at a time. Tip out onto a lightly floured surface and
gently knead until you have a smooth, firm ball.  Oil a large bowl with
the remaining olive oil.  Add the ball of dough, turning to coat it in
oil. Cover with plastic cling film and set in a warm area to rise until
it doubles in size, about an hour and a half.

While the dough is rising, make the sauce and let it cool.

To make the sauce, put
 all the ingredients in a small saucepan and bring to a simmer. Cover
with a lid, slightly ajar and simmer on very low for about 15 minutes. Remove from the heat and let cool.

Turn
 the dough onto a lightly floured surface. Divide in 2 equal pieces. If
you are not using both, wrap one tightly in cling film and place into a
zip lock bag.  Flatten and place in the freezer for another time.

Let the dough you are using rest for 10 minutes, then press and roll out to a 12 inch circle on a sheet of baking paper.

Preheat
 the oven to 230*C/425*F/ gas mark 7.  Put a pizza stone if you have one
 in the oven to heat. If not, place a pizza pan in the oven.

Cover
 your crust with as much sauce as you require, and then freeze the rest
in individual portions for later use.  Add your desired toppings and
cheese. Slide the pizza onto the heated pizza stone or pan and return to
 the oven to bake for 10 to 13 minutes, until the crust is golden and
crisp and your cheese has melted and bubbling.  Cut into slices to
serve.
Created using The Recipes Generator


What are you favourite toppings on a pizza?  Sometimes I like pepperoni and sausage, but most of the time I go simple and like just onions and olives, and yes  . . .  bacon every now and then.  Bon Appetit! 

New York  Pizza

This content (written and photography) is the sole property of The English Kitchen. Any reposting or misuse is not permitted. If you are reading this elsewhere, please know that it is stolen content and you may report it to me at mariealicejoan at aol dot com. 

Follow my blog with Bloglovin