I am enjoying a quiet Saturday as I sit and write this. Usually at the weekends, I like to bake a cake or some such.
Sometimes it will be a fancy cake, especially if we are celebrating something. More often than not it is a Victoria Sandwich Cake. This is quite simply, the best.
In all truth our favourite cake is the simple Victoria Sandwich Cake. That is the one we enjoy eating most of all, and the one I enjoy baking most of all.
I know I have shared it with you before, but can you ever share something that you love too many times? I think not . . .you can never have too much of a good thing!
My mother always filled our cakes with jam. With jam in the middle a cake needs no other adornment. Especially if you use really good jam. And I always do.
My father always loved cake with jam in the middle and it was something we all enjoyed. My jam of choice has always been Bonne Maman. It just has the nicest consistency and the right amount of fruitiness!
Jam is a very versatile ingredient. You can change the flavour of a plain cake such as this just by varying the type of jam you choose to use.
But it must always be a good jam. Homemade is good of course, but if you are buying your jam, make sure you get a quality one.
More often than not I will use strawberry jam. That is my favourite, along with raspberry which follows a close second.
These are what are the most traditional for this purpose. Any red jam looks great actually.
Here are some suggestions to shake it up a bit. Add a bit of lemon zest to the batter before baking and fill it with some wild blueberry jam.
You have yourself another tasty combination. The flavour of lemon and blueberries together is unmatchless.
If you add some freshly grated nutmeg and a bit of vanilla. Fill it with peach or apricot jam and your cake is lifted to an entirely different level.
Or you could fold raspberries into the cake and fill it with peach jam. Voila, a sort of a peach melba cake!
And don't get me started on lemon curd. Lemon curd in the middle is another favourite of mine. I completely adore Lemon Curd.
I could eat it with a spoon. Shhh . . . don't tell, but whenever I use it I always eat a cheeky spoonful. That's yours and my little secret now.
In the summer filling this cake with a layer of whipped or clotted cream and sliced strawberries turns this cake a beautiful indulgence . . .
You cannot get much better than a cake filled with softly whipped cream and berries. You do have to eat the whole thing on the day, but that is so not a problem!
This is a cake that can be as simple as you wish. It can also be as elaborate as you wish. It suits all occasions.
It is the Birthday cake of choice in this house and so quick and easy to whip up. You can seriously have one of these on the table in less than an hour, tops and that allows for cooling.
It is perfect for cold and dismal, rainy autumn afternoons near the end of September. A day when all you want to do is hunker in with a good book and a hot cuppa.
A day when you can pull a blanket over your knees and just hunker down. A day when you are wanting comfort of the utmost kind.
If ever there was a cake that you could consider to be a comfort cake, this is it. Comfort, pure and simple and most delicious.
Yield: Makes 1 7-inch cake
Author: Marie Rayner
Victoria Sandwich Cake
Popular during the reign of Queen Victoria, this cake remains popular to this day, which is a huge testament to it's taste and ease of baking!
ingredients:
170g of butter (12 TBS,)
170g caster sugar (3/4 cup)
3 large free range eggs, beaten
1 1/2 tsp baking powder
170g self raising flour (a scant 1 1/4 cups)
To finish:
strawberry or raspberry jam
caster sugar or powdered sugar to dust on top
instructions:
How to cook Victoria Sandwich Cake
Butter and base line two 7 inch sandwich tins. Set aside. Preheat the oven to 180*C/350*F/ gas mark 4.
Sift the flour together with the baking powder.
Cream the butter and sugar together until light in colour and fluffy. Gradually beat in the eggs, a little at a time, beating well after each addition. If the mixture begins to curdle, add a spoonful of the flour.
Fold in the flour with a metal spoon, taking care to use a cutting motion so as not to knock out too much of the air that you have beaten into the batter. Divide the batter evenly between the two cake tins, levelling off the surface. Make a slight dip in the centre of each.
Bake on a centre rack of the oven for about 25 minutes, or until the sponges have risen well, are golden brown, and spring back when lightly touched. Allow to cool in the pan for five minutes before running a knife carefully around the edges and turning out onto a wire rack to cool completely.
Once cooled, place one layer on a cake plate. Spread with raspberry jam. Place the other cake on top, pressing down lightly. Dust with icing or caster sugar and cut into wedges to serve.
If I am lucky this will last us several days, but since it is a favourite of both of us, I don't expect that it will be around much longer that. Quick, easy and delicious. Qualities that are pretty hard to beat!
Up Tomorrow: Fried Egg Sandwiches (brought forward from the other day)
I received some lovely Sea Trout Supremes from Seafresh the other day and couldn't wait to try them. So here I am with a delicious fish dish for Friday that I think you are really going to fall in love with! If you aren't already aware of it, Seafresh is an on line fish monger, which sells quality fish, seafood,
poultry and meat. I was incredibly impressed with both
their product and their delivery service! There was absolutely nothing
that I could fault with any of it. Feel free to read about my experience here.
These beautiful trout supremes are sourced from the ice cold waters of Scotland and the Faroe Isles in the North of Scotland. Skinned and boned, and frozen individually, this beautiful fish is a part of the salmon family and contains health benefits similar to Salmon, being rich in Omega 3 fish oils. Scotland is famous for its trout and salmon, so I was really excited to be able to try this today. (Let it be noted that I thawed the fish completely prior to cooking so the cook times relate to thawed fish.)
Because it is a lovely piece of fish, I wanted to give it a really simple treatment so that the flavour of the fish would shine through. I thought about pan frying it, but then decided to steam it instead.
I placed the fillets on an oiled sheet of aluminium foil and brushed them with oil, and then I seasoned them lightly with salt and white pepper.
Further to that I julienned some basil leaves and scattered them over top and squeezed over the juice of a fresh lemon.
I sealed up the packet and lay it aside so I could start my sauce.
I decided on a Ginger and Tomato Sauce, which might sound a bit unconventional, but let me assure you the flavours work beautifully with an oily fish such as Salmon or Trout.
I peeled and de-seeded two large tomatoes and popped them into the jug of my immersion blender and added a quantity of sliced peeled fresh ginger root. I blitzed the two together until they were quite smooth and then I passed them through a sieve into a non-reactive saucepan.
I then set it aside until I had cooked the sea trout.
I steamed the trout, in the packet, in a basket over boiling water for about 8 minutes, at which time it was cooked perfectly.
To finish the sauce I heated it gently over moderate heat just to the boiling point, whereupon began to whisk the butter into it a small bit at a time resulting in a silky glossy and rich sauce.
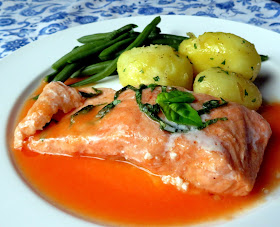
To serve I spooned a portion of this beautifully flavoured sauce onto each heated dinner plate and laid a fillet of the steamed sea trout on top. We enjoyed this beautiful fish dish along with some boiled new potatoes and steamed green beans. It was a dinner made in heaven. Elegant and yet quite simple. Delicious!
Yield: 4
Author: Marie Rayner
Steamed Sea Trout with a Ginger & Tomato Sauce
Perfectly cooked fish is steamed and served with a snappy and lush sauce flavoured with ginger and tomato. Delicious! You will need a steaming basket/rack to cook the fish.
ingredients:
4 Sea Trout fillets, skinned
1 TBS light olive oil
8 basil leaves, rolled and julienned
the juice of one lemon
fine sea salt and freshly ground white pepper to taste
For the Ginger & Tomato Sauce:
2 large beef steak tomatoes, peeled and seeded
55g fresh ginger, peeled and sliced (2 ounces)
45g salted butter (3 TBS)
instructions:
How to cook Steamed Sea Trout with a Ginger & Tomato Sauce
Tear a sheet of aluminium foil large enough to enclose the fish fillets in a single layer. Oil it lightly. Place the fish fillets onto it and brush each with some oil. Season with salt and pepper and sprinkle with the basil leaves. Squeeze the juice of the lemon over top. Pull the foil over top to enclose completely, leaving some air space. Seal tightly and set aside.
Put the tomatoes and ginger into the cup of an immersion blender or liquidiser. Blitz until smooth and then pass through a fine sieve. Discard any solids.
Put the packet of fish in the basket of a steamer, over boiling water. Cover the steamer. Steam over the boiling water for 7 to 8 minutes until cooked through. Remove and set aside while you finish the sauce.
Place the sauce in a saucepan and bring just to the simmer. Don't allow it to boil. Break the butter into bits and whisk in a bit at a time until you have a lovely glossy sauce. Taste and adjust seasoning.
Place a pool of sauce on each of four heated dinner plates. Place a cook fillet of Sea Trout on top of each and serve with your favourite vegetables.
NOTES:
Regular trout and salmon can also be cooked in this manner.
If you can't get Sea Trout Supremes you can also use ordinary trout fillets or salmon fillets and cook them in the same manner with excellent results. The cook time will vary.
A few things about Seafresh:
Same Day dispatch on orders received before 1 PM.
All packages are carefully hand packed.
Free delivery on orders above £50, £8 on orders below that amount.
Responsibly and sustainably sourced.
Air Blast Frozen at source within 4 hours of being caught.
Note - Although I was gifted with product free of charge for the
purposes of review, I was not required to write a positive review in
exchange, nor would my integrity allow me to recommend anything if I did
not truly like it. Any and all my opinions are my own entirely.
Cooking for only two people can be somewhat of a challenge for people. It took me years to hone the skill.
After having cooked for a large family (7 of us) for quite a number of years, it was a struggle for me to teach myself to scale back to only two.
It can be done however and I think I have it down to an art now. Sure there are times when certainly I want to cook for more, but more often than not, that just isn't the case.
If you are only cooking a casserole, that's okay. You can always divide it into two casseroles and freeze one for later on. But when it comes to cooking a joint, it gets a little bit harder.
I am here to dispell all of the mystery. Its not as hard as you think!
I have always found that when cooking a large roast for two people
alone, you can't get rid of the leftovers quick enough. Also cooked beef never
quite tastes the same after having been frozen, but perhaps that is just me.
I am the Queen of leftovers, but even I have my limits. Eating leftover roast for four days in a row is not my favourite thing to do.
There is nothing much more satisfying than a fall-apart tender meaty pot roast to feed the soul and tummy on a cool autumnal day. This scaled down version of an old family favourite delivers on all levels!
Its comfort food pure and simple. Tender and delicious and provided just enough leftovers for two people in an amount that you won't get tired of!
Rolled Beef Brisket is the cut I prefer to use for pot roasts. Its not as fatty as other cuts and it cooks to a beautiful tenderness that we quite enjoy.
It also cuts beautifully into nice slices when its done without falling apart. This is especially nice when cutting for sandwiches.
The original recipe for this lovely pot roast is one that I got off the back of a packet of dry onion soup mix many moons ago.
I have gradually adapted it through the years to suit my family's taste and I believe that it is the best pot roast that you could ever want to make.
Potatoes, carrots and swede (rutabaga) cook along side of the roast in a delicious mix of broth and apple juice. This is so that when all is said and done, you have your meat and your vegetables done and finished at the same time.
A full meal cooked in one pot, and the oven does all of the cooking.
You could also add a peeled and quartered onion along with the other vegetables if you wanted to. I like to cook a green vegetable on the side to add some colour to the plate.
Either frozen peas or string beans. Whatever vegetable meets you fancy.
On this day I also did half a recipe of my late father-in-law's Yorkshire Pudding Recipe. This is the perfect Yorkshire Pudding Recipe as far as I am concerned.
I cooked half the recipe in a 9 by 12 inch glass baking dish.
I call it Genius Yorkshire Pudding because it cooks up perfectly every single time so long as you follow the directions.
You can have it ready to go into the oven when you bring the meat out to rest and it can cook while you cook the gravy. The recipe is here.
Actually you could cook the full recipe if you wanted to because these will freeze quite successfully and then you will have some for another time.
The gravy is also easy to make. You simply shake some flour and water together and whisk it into the pan juices, then cook until it thickens, whisking the whole while. Perfect gravy. I like to add some creamed horseradish because we quite enjoy that flavour, but you don't have to do that if you don't want to.
Yield: Serves 2 (with some leftovers)
Author: Marie Rayner
Classic Pot Roast for Two
Deliciously tender meat with some veg and a fabulously tasty gravy. Perfectly sized for just two people, with some leftover for a tasty hash, sandwiches or casserole the day after. This is so easy it practically cooks itself.
ingredients:
1 (1 1/2 pound) rolled beef brisket
2 medium carrots, peeled and cut into chunks
2 medium potatoes, peeled and quartered
1/2 small swede (rutabaga) peeled and cut into chunks
240ml beef broth (1 cup)
240ml apple juice (1 cup)
1 tsp balsamic vinegar
1 tsp brown sugar
1 bay leaf
1/2 tsp dry thyme leaves
1/4 tsp garlic powder
pinch of paprika
1/2 package dry onion soup mix
salt and black pepper to taste
For the gravy:
3 TBS flour, shaken in 120ml/1/2 cup cold water
1/2 TBS creamed horseradish
instructions:
How to cook Classic Pot Roast for Two
Preheat the oven to 160*C/300*F/ gas mark 3. Have a medium sized flame proof roaster with a tight fitting lid ready.
Whisk together the beef broth, apple juice, balsamic vinegar and brown sugar. Set aside.
Season the roast all over with salt and black pepper. Place into the centre of the roaster. Place the cut up vegetables around the meat in the roaster. in the roaster. Sprinkle the onion soup mix over top of the roast, along with the thyme leaves, garlic powder and paprika. Push the bay leave down the side amidst the vegetables. Pour the apple juice/broth mixture around the roast, covering the vegetables.
Cover the roasting pan with a sheet of foil, sealing it in tightly. Place the lid on top of the foil. Pop the roaster into the preheated oven and roast for 3 1/2 to 4 hours, at which time the roast should meltingly tender and the vegetables done. (I would check it halfway through the cook time to make sure there is still enough liquid in the dish. If not, top up with some boiling water.) Remove from the oven. Remove the roast and vegetables to a platter and tent lightly while you make the gravy. Discard the bay leaf.
To make the gravy, place the roasting dish on top of the stove over medium heat. You should have approximately 2 cups of liquid. If you don't, top it up with some more beef broth. Shake together your flour and water and whisk it into the juices along with the creamed horseradish. Cook, whisking constantly, over medium heat, until the mixture bubbles and begins to thicken. Cook for a further 2 to 3 minutes to cook out any flour taste.
Slice the meat to serve along with a portion of the vegetables and some of the gravy spooned over top. I like to serve with English baby peas on the side. Delicious!
I made a delicious hash with the leftovers yesterday. I just chopped up a small peeled onion, added some chopped cooked potato, the diced leftover beef, a splash Worcestershire sauce and some naughty chopped up Yorkshire pudding.
I melted a TBS of butter along with 1 TBS oil in a skillet and added the whole lot and cooked it until we had lots of crispy bits and the whole lot was heated through. (I used a small tin of cooked new potatoes, drained and chopped) Two delicious meals without a lot of effort. I like that!
This content (written and photography) is the sole property of The
English Kitchen. Any reposting or misuse is not permitted. If you are
reading this elsewhere, please know that it is stolen content and you
may report it to me at: mariealicejoan at aol dot com Thanks so much for
visiting. Do come again!
I have always been a huge fan of salty and sweet combinations. Chocolate covered potato chips? Yes I do! Chocolate dipped Pretzels? Count me in! Sweet and salty anything and I am all over it. That combination is truly is a weakness of mine
I saw this recipe the other day on Pinterest. The recipe comes from Tastemade UK. I have adapted it to North American Ingredients so my North American friends and family can enjoy it as well.
It might well be one of the ugliest pies you have ever seen . . . if not THE ugliest!
Even a coat of icing sugar doesn't pretty it up . . .
There are not too many cakes and sweet bakes that don't look better with a dusting of icing sugar. This is the exception. It is still downright ugly.
But boy oh boy, what it lacks in looks it more than makes up for in taste!
The crust is a mix of crushed ritz crackers, dessicated coconut, melted butter and demerara sugar. I believe that is the same as Turbinado sugar in the US. Its like a granulated brown sugar, or granulated coffee sugar.
You press that into the bottom of a spring form pan . . . and then make the filling.
The filling is a rich caramel custard . . . you create it by melting butter together with heavy cream, two kinds of sugar, eggs and some dry milk powder. I am not sure what the purpose of the dry milk powder is . . .
You melt the butter, cream and sugars together and then temper the beaten eggs with some of that. That helps to prevent you from ending up with scrambled eggs.
By tempering I mean you whisk some of the hot mixture into the beaten egg, slowly, a bit at a time, which slowly brings up the temperature of the eggs without cooking them. That way you can add them into the whole mixture with no problems.
You still should strain the mixture as there are bound to be a few eggy bits that escape no matter what, and straining makes sure they don't end up in your pie.
You lay out another quantity of crackers in your pie. I overlapped them, but in hindsight I wouldn't do that again. I would lay them out in a single layer, even if it meant not using all of them.
The whole crackers are very difficult to cut through when you go to serve the pie and you know what? This is a pretty ugly pie anyways, so why not just crumble them into coarse crumbles. That would solve the whole cutting problem.
Todd enjoyed a slice of this still slightly warm with a dollop of clotted cream on top. He said it was very nice . . . but you know, I had to taste it myself just to be sure. And I would say it is more than very nice. Its dangerous.
Yield: makes 1 (9-inch) pie
Author: Marie Rayner
Ritz Cracker Pie
If you are a fan of salty and sweet, you will quite simply love this pie. Its not very pretty but it more than makes up for that in taste!
ingredients:
For the crust:
125g ritz crackers (4 1/2 ounces)
75g melted butter (1/3 cup)
75g demerara sugar (6 1/2 TBS, turbinado)
50g dessicated coconut (2/3 cup)
For the filling:
150g butter (2/3 cup)
150ml double cream (2/3 cup)
150g soft light brown sugar (3/4 cup)
150g demerara sugar (3/4 cup turbinado)
2 TBS dry milk powder
pinch of salt
3 large free range eggs
You will also need:
a further 125g of ritz crackers, approximately (4 1/2 ounces)
instructions:
How to cook Ritz Cracker Pie
Preheat the oven to 165*C/325*F/ gas mark 3. Butter and then baseline a 9 inch spring form pan. Butter the sides really well also. Set aside.
Place the crackers for the crust in a food processor and blitz until fine. Add the melted butter, sugar and coconut. Blitz again to combine. Press into the bottom of the spring form pan.
Place the butter, cream, sugars and milk powder into a saucepan. Cook, stirring, over moderate heat until the mixture comes to a boil and everything is well mixed together. Let cool slightly. Beat the eggs together and then temper them with a bit of the caramel mixture. Whisk this mixture back into the caramel, then pour the whole thing through a sieve, discarding any solids and set aside.
Arrange the remaining crackers in the crust in a decorative manner. Pour the caramel custard over top and place the pan on a baking sheet. Bake in the preheated oven for 45 minutes until golden brown. Remove from the oven and allow to cool completely before cutting. Yummo!
This is not for anyone who is on a diet, or trying to avoid sugar or fat. Its loaded with all of that and salt too from the crackers. That makes this a once in a blue moon, if not lifetime, treat!