Thursday 30 September 2021

A Simple Pain Perdu

 
A Simple Pain Perdu 
Sometimes you want a dessert that feels special but that won't take up a lot of time or ingredients.  I confess, I can be rather lazy like that at times, in fact I would say most of the time.

My time is precious and I am so busy that it can sometimes be a struggle to get in all the things I need to get done!  That's when desserts like Pain Perdu come in really handy.

 
A Simple Pain Perdu

 In France, French Toast is actually called Pain Perdu, which loosely translated means lost bread. It was designed to use up every scrap of bread, especially stale bread. 

With its sinfully crisp and buttery crust and exquisitely sweet custardy interior, it turns something which might be thrown away into something quite magical. 

A Simple Pain Perdu

It makes a fabulous brunch or breakfast at the weekend, but let me tell you this.  Something mystical happens when you make it with leftover cake or sweet loaves.

This isn't breakfast or brunch any longer. This is a fabulously  quick, easy and delicious dessert! A dessert I would even serve to company!

A Simple Pain Perdu 
If you are regular readers of mine, you will recall that the other day I baked Mary Berry's Swiss Roll cake.  Oh my but it was some good.   

But, like any cake, it was best eaten on the day. Its still good the second day, but by the third day it was needing some help.  I was going to make French Toast for breakfast this morning and I did. 

French Toast

Using some stale Brioche that I had.  And it looked really good.  But then I spied the leftover swiss roll sitting on the counter and my wheels started to spin.

What if I used the same method to cook that?  What if indeed!

A Simple Pain Perdu 

You know me when I get an idea in my head. I won't rest until I execute it!  The French toast could wait for another day.

I wanted Pain Perdu . . .  made with cake . . .  with some fruit and ice cream . . .  dessert for breakfast and why not!  Yes, I can be very naughty at times.

A Simple Pain Perdu 
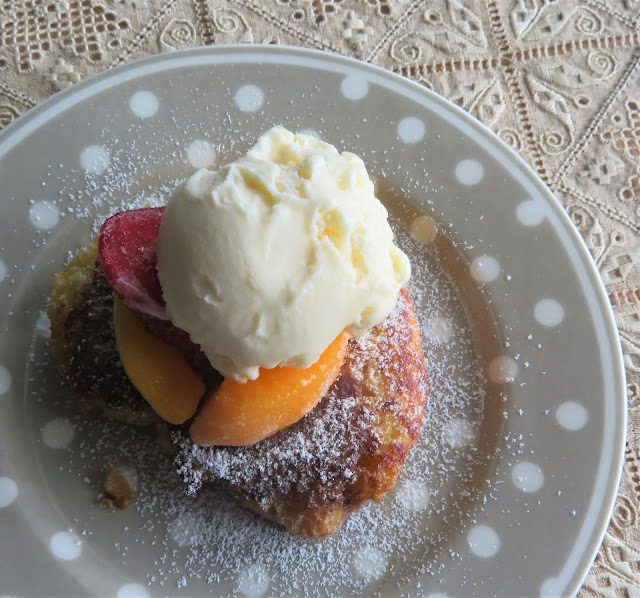
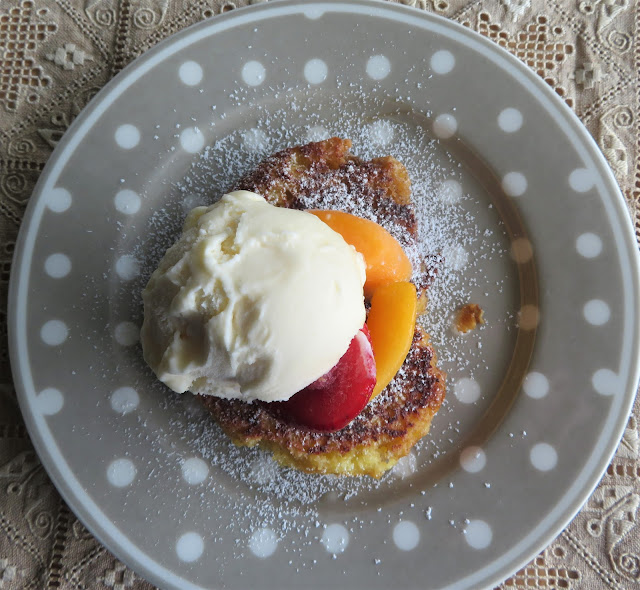
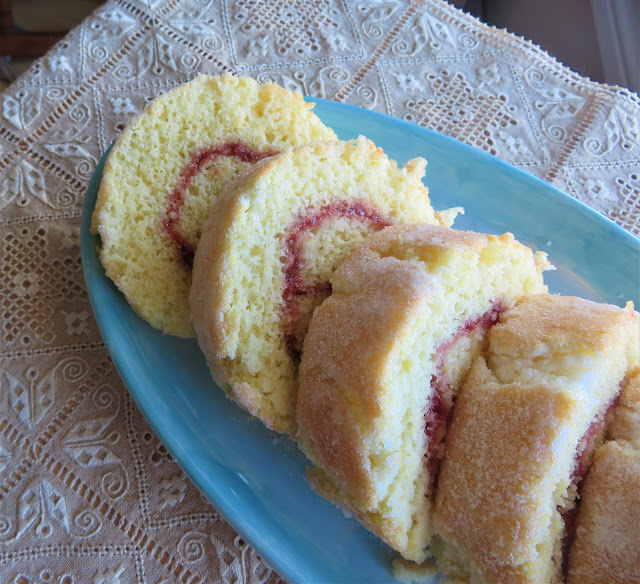
And so that is what I did and it was fabulous.  I cut the leftover swiss roll into 1 inch thick slices and then I dipped it into the cream and egg mixture I had for the French toast and I fried it in butter.

I felt like that was okay because, the cake itself was fat free.  Half a dozen of one, six of another.

A Simple Pain Perdu 
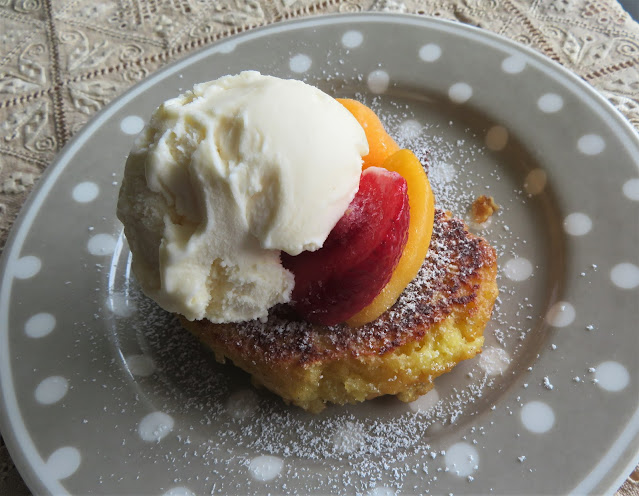
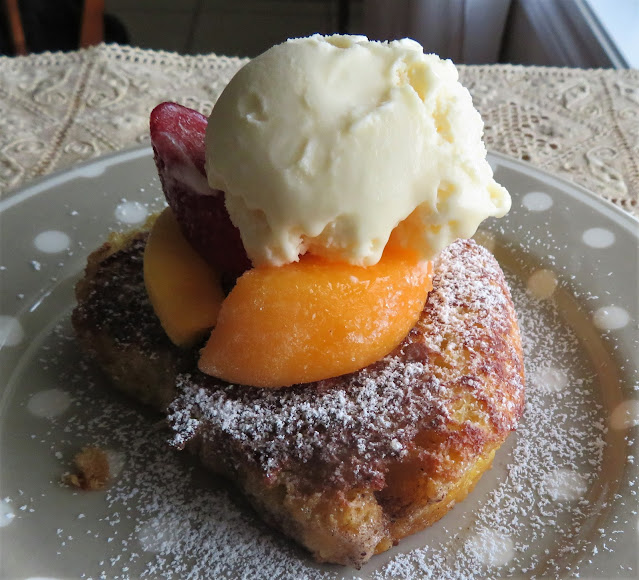
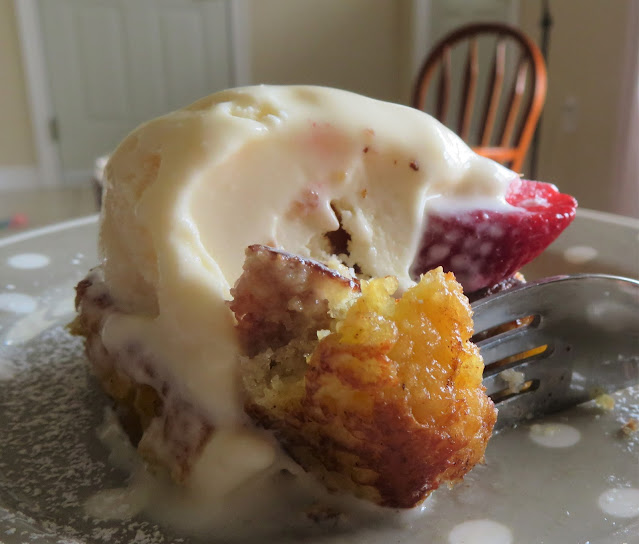
I toasted it in a skillet in foaming butter until it was olden brown on both sides.  The edges all crisp and caramelized.

The interior staying soft, fluffy and soufflé-like.  Almost like a bread pudding.  Rich from the cream and eggs.

A Simple Pain Perdu 

Not overly sweet. It doesn't need to be.  There was that sweet swirl from the jam already and then served with fruit and ice cream, you didn't need any more sweet.

This was quite simply fabulous and so quick to make.

A Simple Pain Perdu 
I was only going to eat a tiny taste of it (I had only done one slice because I had already done two slices of French toast.)

But before I knew it, it was half gone.  Oh my, but it was some good. I abandoned the idea of having French Toast for breakfast and just had this in its place.

A Simple Pain Perdu 
I used a frozen mix of fruit on top.  Mango, peaches, strawberries. I had bought some raspberries, but they went moldy overnight.  I hate it when that happens.

I hate wasting money like that. It makes me not want to buy fresh fruit at all. I think sometimes because we live here, low in the valley we are at the bottom of the food chain or something.  I have been very disappointed in the quality of fresh fruit and vegetables available, unless you get it at the Farm market.  

Most of the stuff in the grocery shops is sub-standard.  People told me before I went to the UK that their food was rubbish. I have news for them. It was a bazillion times better than what I am finding here.  But I digress.

A Simple Pain Perdu

Before I knew it, frozen fruit or not,  my plate was clean and my breakfast had been replaced with a delicious, quick, easy and fabulous dessert.

Some days are just like that n'est ce pas? 

You don't have to use swiss roll cake for this tasty pudding. You can use any kind of cake you fancy that is going a bit stale. Gingerbread, pumpkin loaf, pound cake, etc. All would be exceptional.

A quick and easy dessert from what would normally be thrown to the birds.  What more could you ask for!

Yield: 4
Author: Marie Rayner
A Simple Pain Perdu

A Simple Pain Perdu

Prep time: 10 MinCook time: 15 MinTotal time: 25 Min
A homey comforting dessert that is a cross somewhere between a bread pudding and French toast. A very simple make, this makes the ideal dessert served warm with a scoop of vanilla ice cream and some fresh fruit.

Ingredients

  • 2/3 cup (160ml) heavy cream (whipping cream)
  • 2 large free range eggs, plus 1 egg yolk
  • 2 TBS sugar
  • 4 (1 inch thick) slices of your favorite plain cake (I used swiss roll, but you can use pumpkin loaf, pound cake, angel food cake,etc.)
  • 1/4 cup (60g) butter for cooking
To serve:
  • Icing sugar to dust
  • a good vanilla ice cream
  • fruit of your choice

Instructions

  1. Whisk the cream, eggs and sugar together in a large shallow bowl or container. Dip the first two slices of cake into the egg mixture and leave to soak up for 5 minutes.
  2. Melt half of the butter in a skillet over medium heat. Once the butter begins to foam, add the cake slices. While they are cooking soak the remaining slices of cake.
  3. Brown the slices of cake over medium heat, until golden brown on both sides.  Drain on paper towel and keep warm in the oven while you cook the remaining slices of cake in the remaining butter as above.
  4. Place one slice on each of four dessert plates.  Dust with icing sugar.  Top with some fruit an a scoop of ice cream and serve immediately.  Deliciously simple!
Did you make this recipe?
Tag @marierayner5530 on instagram and hashtag it #TheEnglishKitchen
This content (written and photography) is the sole property of The English Kitchen. Any reposting or misuse is not permitted. If you are reading this elsewhere, please know that it is stolen content and you may report it to me at: mariealicejoan at aol dot com 

Wednesday 29 September 2021

One Pan Cheesy Sausage Pasta

One Pan Cheesy Sausage Pasta

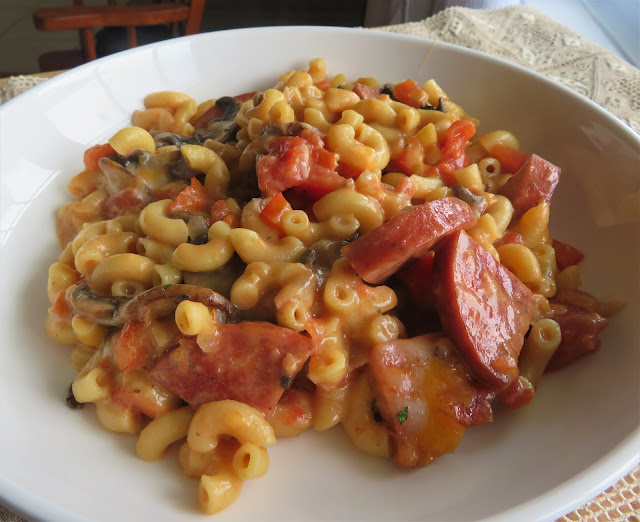
 Cheesy, creamy, spicy and savory this one pan midweek supper has it all going for it! Prepare yourself to fall in love because this quick and simple recipe is destined to become a favorite!
Not only that, but it is sized for two to three eaters (two if they are hearty eaters),or one with leftovers to heat up the next day.


One Pan Cheesy Sausage Pasta 
I am a huge fan of one pan cooking. If I can cook an entire meal on one sheet pan or in a skillet, then I am all for it!

No fuss, no muss, that's my favorite way to cook these days!  I had enough of fussy cooking when I cooked at the manor, and now that there is just me in my house to feed, I am cutting all of my tried and true recipes back to feed just one or two.

One Pan Cheesy Sausage Pasta 
No worries however because all of them can be doubled or even tripled to serve more people than just two.  

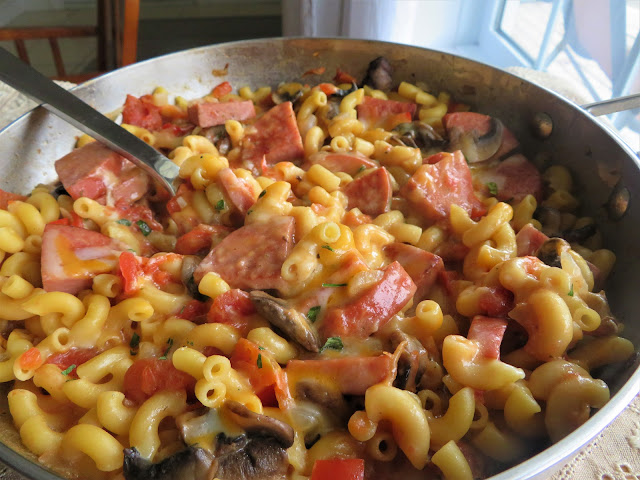
With its savory smoked sausage and creamy cheesy sauce, garlic, mushrooms, tomatoes, peppers and onions, this one pan pleaser is destined to become a meal that you will want to put on repeat in your kitchen.

One Pan Cheesy Sausage Pasta 
Not only is it delicious, but it is also very simple, quick and easy to make, using simple every day ingredients. There is nothing too out of the ordinary here.  

Today I have used Polish Kielbasa sausage because that is what I had in my refrigerator, but you can use any smoked sausage that you enjoy.


One Pan Cheesy Sausage Pasta 
HOW TO MAKE ONE PAN CHEESY SAUSAGE PASTA 
 
This is so quick and easy to make. A real doddle.

You need to begin by heating a bit of light olive oil in a skillet over medium heat. I use the light olive oil, which just means that it is lighter in color than regular extra virgin olive oil. This is what I used for all of my cooking. Save the EVO for dishes that don't require cooking like salads and salad dressings.

One Pan Cheesy Sausage Pasta 
Add your onions, mushrooms, peppers and smoked sausage to the hot oil.  Its not a lot of oil really, basically it is just enough to coat the bottom of your pan and keep things from sticking.

You don't want to brown these things, just soften them without coloring them. If  you want your smoked sausage browned, then add it first and brown it before adding the vegetables.

One Pan Cheesy Sausage Pasta 
You don't have to use smoked sausage with this if you don't want to. Crumbled normal sausage meat works just fine. Just slip it out of the skins and crumble it into the pan. You can even use minced steak or turkey if that is what you would rather have.

All work very well.  You could even leave meat out altogether and add extra vegetables making this a great vegetarian option. Or you can use flaked tuna or salmon.

One Pan Cheesy Sausage Pasta 
Once your vegetables have softened you add some garlic. Two cloves, but that is certainly not set in stone. If you are not a huge fan of garlic, cut the amount in half.

This is cooked just long enough to soften it and make everything really fragrant and then you add in everything else but the cheese.

One Pan Cheesy Sausage Pasta 
I know that there is no such thing as a can of chopped tomatoes that is only one cup in size, but don't worry about that. You can freeze the rest of the can to use another time. They freeze really well, and you can actually make a wonderful tomato soup for one using the other half of the can of tomatoes.

I use stock powder for things like this where I am only going to need a little bit. Its just more efficient and cost conscious, because I can spoon out only as much as I need.  I am sure you can use other pastas if you wanted to, but I have only ever used elbow macaroni.

One Pan Cheesy Sausage Pasta 
Once you bring the mixture to the boil then you can just reduce it to a slow simmer and walk away. No need to cover it. The macaroni cooks right in the liquid.  I do like to stir it a few times to make sure it isn't sticking to the pan.

Once your pasta is tender, then stir in half of the cheese, let it melt, scatter the remaining cheese over top, cover and let it sit for five minutes, covered.   That way the cheese melts nicely over top and you have something ooey and gooey to bring to the table.

One Pan Cheesy Sausage Pasta

I'll be honest I never add any salt to this. I find it just salty enough.  Cheese itself is quite a salty ingredient, and then the smoked sausage is a bit salty as well.  If I add anything at all it is pepper, because I do love lots of pepper.

This goes excellently with some crusty bread and a tossed green salad on the side. Nothing could be easier.  A delicious one pan meal, which is hearty and filling and that goes together in a flash.  What more could a person ask for! 

One Pan Cheesy Sausage Pasta

One Pan Cheesy Sausage Pasta

Yield: 3
Author: Marie Rayner
Prep time: 10 MinCook time: 25 MinTotal time: 35 Min
This quick and easy supper dish is made all in one pan for a no fuss no muss mid-week meal! Its delicious and one of my favorite things to make!

Ingredients

  • 1/2 TBS light olive oil
  • 1/2 pound smoked sausage, sliced (I used light kielbasa)
  • 1 small onion, peeled and diced
  • 6 medium fresh mushrooms, washed and sliced
  • 1/3 of a red pepper, trimmed and chopped (optional)
  • 2 cloves fresh garlic, peeled and minced
  • 1 cup (240ml) chicken stock
  • 1 cup (160g) canned diced tomatoes in juice
  • 1/4 cup (60ml) whole milk
  • 1 cup (115g) dry macaroni
  • 1/2 tsp salt
  • 1 cup (120g) grated cheddar cheese

Instructions

  1. Heat the oil in a medium sized deep skillet.  Add the onions, mushrooms, peppers and sausage.  Cook, stirring occasionally until the vegetables begin to soften.
  2. Add the garlic and cook for one minute.
  3. Stir in the tomatoes, stock, milk, pasta and seasoning.  Bring to the boil, then reduce to a simmer.
  4. Cook over low for 10 to 15 minutes, or until the pasta is tender, stirring occasionally. Remove from the heat.  Stir in 1/2 of the cheese until it melts.  Scatter the remaining cheese over top. 
  5. Cover and let stand for 5 minutes to melt the cheese. Serve immediately.
Did you make this recipe?
Tag @marierayner5530 on instagram and hashtag it #TheEnglishKitchen
One Pan Cheesy Sausage Pasta
All of the content you see here on this page, both photography and written, are the sole property of The English Kitchen, Marie Rayner. Any reposting or misuse is not permitted. If you are reading this elsewhere, please know that it is stolen content and you may report it to me at mariealicejoan at aol dot com.  

Tuesday 28 September 2021

Mary Berry's Swiss Roll (A Tutorial)


Mary Berry's Swiss Roll  

I have shared a Swiss Roll recipe on here before. You can access my original post here.  Swiss Rolls or Jelly Roll as it is also known is probably one of the favorite cakes of many people. 

My mom didn't bake very often when I was a child. She worked full time, but when she did make a Jelly/Swiss roll, my siblings and I got very excited.  To be honest we were even excited to get a store bought one.  
Mary Berry's Swiss Roll 
Jam and cake, cake and jam, if its jam and cake everyone in my family is in seventh heaven. Simply put they are one of our favorite things, right up there with fish and chips! 

Swiss rolls are the perfect cakes to bake for a weeknight  or afterschool treat.  Completely fat free, they are very easy to make and are one of what I consider to be no fuss, no muss cakes!

Mary Berry's Swiss Roll 
And yet, many people are intimidated by the idea of making a Swiss Roll cake. Today I want to demystify that notion and I wanted to try out Mary Berry's recipe for this beautiful fatless sponge.

She is the doyenne of the Great British Bake Off. I know she is no longer a part of that show, but to be honest in my opinion, she WAS that show and when she left, it lost a lot of its appeal for me.

Mary Berry's Swiss Roll

She was always kind to the contestants on the show, even if she was being critical. Its called taking your medicine with a spoonful of sugar.  Anyways, I like her.

Every recipe of hers that I have ever made has been impeccable.  There have been no duds. I thought it would be fun today to share a tutorial with you on how to make a proper Swiss Roll a la Mary Berry! Her recipe is the best swiss roll recipe and I would expect nothing less!


Mary Berry's Swiss Roll

 
HOW TO MAKE A PROPER SWISS ROLL CAKE  

I took photographs of every step of my baking today's cake so I could show you every step of the way.  One thing I always do when baking is to start with room temperature ingredients. My flour and sugar are always room temperature, but you might want to bring your eggs to room temperature. This is easily done by resting them in a bowl of quite warm (not boiling) tap water for a few minutes. 

Measure your eggs and sugar into a clean, grease free bowl. Using an electric hand mixer (you can also use a stand mixer with the whisk attachment) you want to whisk these together for about five minutes. At that point you should have a light  and frothy mixture which is thickish.  Your beater/whisk should leave a trail or a ribbon when you lift it up out of the mixture. This is essential and there is no quick way to get around it.

Once you have achieved the proper consistency, you can start folding in the flour.  You need self rising flour. (I tell you how to make your own in the recipe notes.) Fold this into the egg/sugar mixture using a rubber spatula as you are sifting the flour in. You want it to be thoroughly combined without any dry streaks but you also don't want to knock any air out of your batter that you have just gone to all that trouble of beating it in.

Mary Berry's Swiss Roll

You want to be preheating your oven to 400*F/200*C.  You also want to have a swiss roll pan buttered and lined with baking parchment. A Swiss roll pan is 9 X 13 inches in size.

You can also use a baking sheet of the same size so long as it has a lip around the edge. Your cake will rise approximately 3/4 to one inch.

Mary Berry's Swiss Roll

Spread your batter evenly into the prepared pan, smoothing it out and making sure it gets into all of the edges.  It is a cake that bakes really quickly so don't forget to put on your timer. It should be done in 10 minutes.

While it is baking prepared your paper that you are going to use to roll it up.  Spread a sheet of baking parchment that is slightly larger than your cake tin on the counter and dust it all over evenly with finely granulated sugar. 

The cake is done when it is golden brown and the sides have started to shrink away from the sides of the pan slightly.

Mary Berry's Swiss Roll

You will need to invert the cake onto this sheet of paper as soon as you take it out of the oven.  It should come out very easily if you have buttered your pan properly and lined it. But just in case, I do like to run a sharp knife down the long edge of both sides of the pan.

Once you have tipped the cake out onto the sugar dusted paper, you will need to remove the baking paper that is stuck to the bottom of it from where you baked it in the pan. Carefully loosen and slowly peel it off, discarding it when you are done.

Using a sharp serrated knife, trim the baked edges from all around the cake.  Just cut a tiny sliver. If you have any kids in the house they will love eating these.  Or you can throw them out to the birds. 

While the cake is still warm and once you have trimmed the edges, you will need to make a score mark about 1 inch from one of the short edges of the cake, taking care not to cut all the way down to the bottom.  Let your cake cool slightly and while it is still a bit warm, spread the jam in a thin layer all over the surface.

Using your paper to help you push the cake along, roll the cake up tightly beginning at the scored edge.

Mary Berry's Swiss Roll 
When you are done it will look like this. Don't worry if the jam has not come out evenly at all the edges. Just trim those away, again the kids will be more than happy to help you get rid of them! 

And that's it. Your cake is done and it was reasonably painless I am sure!  

Mary Berry's Swiss Roll 
I think Mary would approve of my cake. I got a nice tight roll on it and there is not too much or too little jam.

The texture is nice as well. Light and fluffy. Not rubbery.

Mary Berry's Swiss Roll 
The last thing you want is a cake that has the texture of an omelet.  This cake is quite simply beautiful.

You can also easily vary the recipe and fillings if you want. Its just as lovely filled with lemon curd. You can also make a buttercream icing to fill it with, varying the flavor of that.  Coffee buttercream is quite popular.


Mary Berry's Swiss Roll 
For a simply coffee flavored buttercream icing simply beat together 3 ounces (75g) of butter, with 1 3/4 cup (225g) of sifted icing sugar, 2 tsp milk and 2 tsp of coffee flavoring. (Camp is good for this)

You can make any kind of buttercream icing you enjoy. Strawberry. Lemon. Orange. Or even use a combination of vanilla butter cream and your favorite jam.

Mary Berry's Swiss Roll 
People also like to fill them with whipped cream and fruit. Strawberries or raspberries (or both) are very nice!

In this case I don't sweetened the cream, as the cake itself is pretty sweet. I do fold a bit of sugar into the sliced berries. 1 cup or 1/2 pint of cream whipped is generally sufficient.

Mary Berry's Swiss Roll

For the holidays you can fill it with a thin layer of spiced buttercream and fruity mincemeat.  Always nice, or you can fold some chestnut cream into some whipped cream and fill it with that. Yummilicious!

Its beautiful just as is however, for an every day teatime/afterschool/ treat.  Swiss Roll. Its a good thing, and Mary Berry's recipe for it is excellent and fail-proof!

Mary Berry's Swiss Roll

Mary Berry's Swiss Roll

Yield: 8
Author: Marie Rayner
Prep time: 15 MinCook time: 10 MinTotal time: 25 Min
This delicious fat-free sponge cake with its jam filling makes a delicious tea-time treat!

Ingredients

  • 4 large free range eggs
  • 1/2 cup (100g)fine granulated sugar (caster sugar)
  • 3/4 cup (100g) self raising flour ( see note)
For the finishing and filling:
  • 4 TBS finely granulated sugar
  • 4 heaped TBS strawberry or raspberry jam

Instructions

  1. Preheat the oven to 400*F/200*C/ gas mark 6.  Butter a 9 by 13 inch cake tin or rimmed baking sheet/jelly roll pan and line the bottom with baking parchment.  Set aside.
  2. Beat the eggs and the sugar together in a large bowl with an electric mixer until the mixture is light and leaves a trail/ribbon in the bowl when you lift out the beaters. This will take a good five minutes.
  3. Sift the flour over the mixture, folding it in with a spatula as you do so. Take care not to knock the air out of the batter.
  4. Spread the batter in the prepared tin, making sure you get it in all of the corners.
  5. Bake in the preheated oven for 10 minutes, or until golden brown and the edges the cake are beginning to shrink from the edges of the pan. Do not over bake.
  6. While the cake is baking place a sheet of  baking parchment slightly larger than the cake tin on a counter top. Sprinkle the 4 TBS of sugar over top evenly. 
  7. When the cake is one invert the cake onto the sugared baking parchment. Carefully peel the baking paper from the bottom of the cake and discard.
  8. Using a sharp serrated knife, trim the edges from the cake, and then make a score mark 1 inch away from one short edge, taking care not to cut all the way through.
  9. Let the cake cool for a few minutes to lukewarm.  Spread the jam over the surface of the cake evenly. (Don't do this when the cake it too hot or it will absorb the jam which you don't want.)
  10. Working from the short edge that you made the score mark in  roll the cake up firmly. Using the paper to push it along really helps.
  11. Cut into thick slices to serve.

Notes:

You can easily make your own self-rising flour by adding 1 1/2 tsp of baking powder and 1/2 tsp of salt to every cup of flour. I make mine up by 4 cups and it always gets used.

Did you make this recipe?
Tag @marierayner5530 on instagram and hashtag it #TheEnglishKitchen
Mary Berry's Swiss Roll
All of the content you see here on this page, both photography and written, are the sole property of The English Kitchen, Marie Rayner. Any reposting or misuse is not permitted. If you are reading this elsewhere, please know that it is stolen content and you may report it to me at mariealicejoan at aol dot com. 

Monday 27 September 2021

Easy Roasted Winter Squash with Garlic & Thyme


Roasted Winter Squash with Garlic & Thyme 
One thing I am really loving about being back in Canada is the huge variety of Winter squashes which are available for cooking.  

In the UK, we basically had one. Butternut Squash. Don't get me wrong, I adore Butternut Squash, but I also love other types of Winter squash, and its nice to have a variety to choose from!

Roasted Winter Squash with Garlic & Thyme 
Squash was not something which I really enjoyed when I was growing up. My mother only had one way of cooking it, boiling.  

And, as they did in them there days, she boiled it to death.  I think most vegetables had the life boiled out of them!   

In any case, mom boiled the squash and I could take it or leave it. It was always too squishy and lacking in flavor. Blah. Blah. Blah.

Roasted Winter Squash with Garlic & Thyme 

Winter squash is one of those vegetables, however, whose flavor is greatly enhanced when you use other method to cook it. Like roasting for instance.

Roasting Winter squash really heightens the sweetness of them as well as the natural nuttiness.  Well, most Winter squashes anyways. 

Roasted Winter Squash with Garlic & Thyme 
Long about this time of year I start looking at contenders to serve as side dishes for my Thanksgiving feast.  In Canada we celebrate Thanksgiving in October, which is a month earlier than they do in the United States.

I have my favorites, dishes that I do every year and always do the same, such as the swede, potatoes, carrots and stuffing.  But sometimes I like to switch out the others a bit if I can. 

Roasted Winter Squash with Garlic & Thyme 
My favorite way of roasting my turkey will always be my Herb Roasted Turkey, and that applies whether it is a breast/crown or the whole beast. 

For me, turkey doesn't get much better than that, and the gravy that you end up with at the end is magnificent.

Roasted Winter Squash with Garlic & Thyme 

My favorite stuffing is Mary Berry's Sage & Onion Stuffing.   Stuffing just could not be any more delicious than this one.

Its a beautiful mix of butter, herbs and bread, stuffing perfection.  For me the best part of the meal is always the stuffing, and this one does not let you down. not ever!

Roasted Winter Squash with Garlic & Thyme 
All the other sides I like to play with a bit and love trying out new ways of preparing them. This recipe for Roasted Winter Squash with Garlic & Thyme comes from a cookery book by Diana Henry, entitled "Pure Simple Cooking."

It is filled with lots of lovely simple recipes for cooking everything from soup to nuts.  This was one of the sides in the book and the photograph for it had me drooling. 

Roasted Winter Squash with Garlic & Thyme 
I love dishes like this that use simple ingredients and very few of them.  Things that most people have in their homes most of the time.

And this recipe does just that. Its simple and almost pure in what it requires and how it is cooked.


Roasted Winter Squash with Garlic & Thyme  
WHAT YOU NEED TO COOK ROASTED WINTER SQUASH WITH GARLIC & THYME

Other than the squash which you may have to go out and buy, you will probably have most everything else already in your kitchen.

  • Winter Squash
  • Olive oil
  • Butter
  • Thyme
  • Garlic
  • Seasoning

Roasted Winter Squash with Garlic & Thyme 
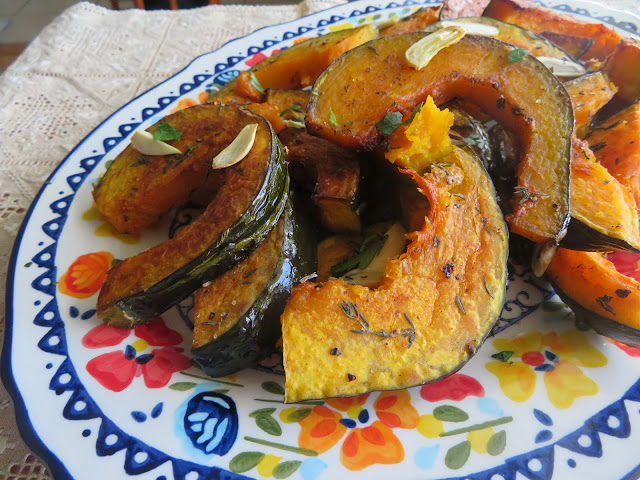
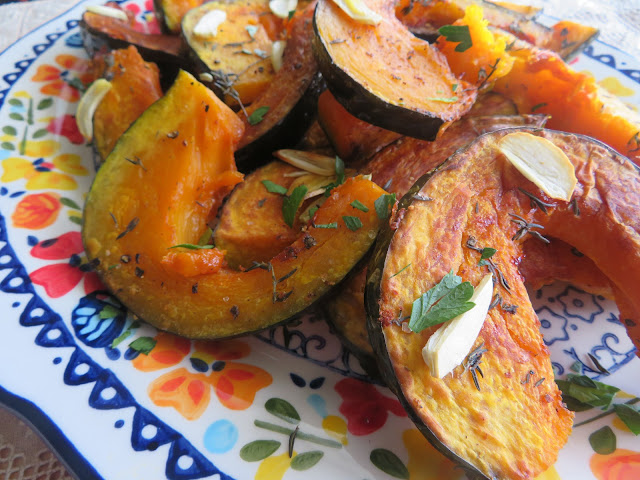
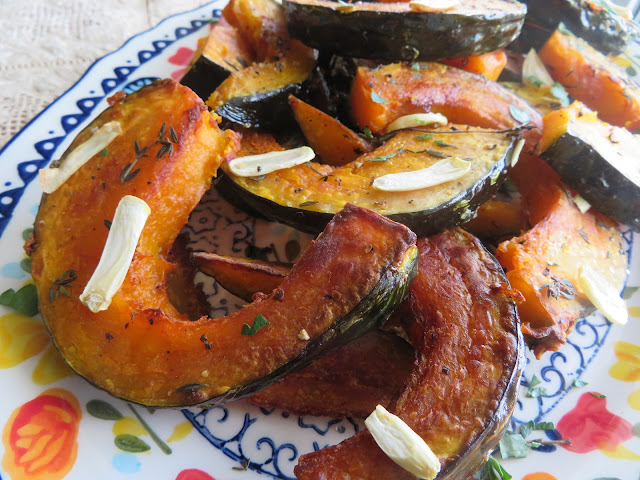
What I love most about roasting things like this is that you get all of that beautiful caramelization on the edges of the vegetables. Nutty and brown and slightly sticky.  


Herby from the liberal use of fresh thyme, and then the savory sweetness of the garlic.  You can totally leave the garlic out if you want to, but I found that it added  a lovely additional layer of flavor.

Roasted Winter Squash with Garlic & Thyme 
HOW TO HANDLE WINTER SQUASH

The hardest part of this recipe is probably cutting the squash in half and scooping out the seeds. Some winter squashes can be extremely hard and difficult to cut in half.   Here are some of my tips which will make that process a bit easier.

1. Use a large, sharp, heavy duty knife. This is no time to break out the paring knives. You want to bring out the big guns for this, and do make sure it is really sharp.  A dull knife is a dangerous tool in the kitchen. 

2. Trim off both ends of the squash first, the stem end and the root/blossom end.  You are not going to be eating those parts, and trimming these off will give you a bit of stabilization. In other words, your squash should stay better in place while you are cutting with no rolling around.

Roasted Winter Squash with Garlic & Thyme  
3. Cut vertically through the squash.  This just makes sense and allows for better shapes when it comes to portioning it than if you were to cut it horizontally.  If your knife gets a bit stuck, use something to lightly hammer the back handle of the knife, like a mallet.

4.  Peel with a knife and not a vegetable peeler.  Using a paring knife gives you much better control.  Squashes come in all kinds of shapes and sizes.  For this recipe she left the skin on the squash for roasting, but I will tell you that when I make it again, I am definitely peeling it. Its a lot easier to eat with the peel already removed.

Roasted Winter Squash with Garlic & Thyme 

5.  The easiest way to scoop out the stringy bits and seeds is with a melon baller. You could also use a grapefruit spoon. They just make a messy job a whole lot easier.

That is just a few tips to help make cutting your squash a tiny bit easier.  Above all use caution!  We don't want anyone slicing off their fingers!

Roasted Winter Squash with Garlic & Thyme 

You will need to cut your squash into 3/4 inch wide slices for this recipe. Diana did not peel her squash  and neither did I, but if I made it again, it is important to note that I would peel it. 

I found it quite difficult to remove the peels when eating it.  At least they were with this particular squash.

Roasted Winter Squash with Garlic & Thyme 
Diana also thinly sliced peeled garlic and scattered it over the roasted squash wedges for the last 15 minutes of roasting.  Personally, if I do this again, I am going to leave the garlic cloves whole and unpeeled.

I will give them a slight bashing to crack them, but I plan on putting them in with the squash right from the get go.  That way you will end up with lovely roasted cloves of garlic, in which case you may even want to use more than six cloves.

Roasted Winter Squash with Garlic & Thyme  

Roasted garlic is beautifully mellow and not at all harsh.  I could find nothing totally redeeming about thinly slicing it.  

It was cooked, but there was none of that beautiful sticky mellowness that you get from roasting whole cloves. And if I am going to use that many cloves of garlic I would prefer it to be a bit more than a garnish that isn't even all that attractive.

Just a suggestion on my part. 

Roasted Winter Squash with Garlic & Thyme

In any case, with my suggested changes, this could very well be a contender for a side dish for my Thanksgiving feast.  I will probably only have my daughter and son in law here,  so not a huge crowd.

My first Thanksgiving on Canadian soil in over 20 years. If that isn't a cause for a celebration, and a great excuse to pull out all the stops,  I don't know what is!

Roasted Squash with Garlic & Thyme

Roasted Squash with Garlic & Thyme

Yield: 6 as a side
Author: Marie Rayner
Prep time: 10 MinCook time: 45 MinTotal time: 55 Min
You want to use the sweeter varieties of squash for this recipe. Butternut, Buttercup, Kabucha. All work really well.

Ingredients

  • 2 pounds of winter squash (wash well)
  • ¼ cup (60ml) olive oil
  • 2 TBS butter
  • 4 sprigs of fresh thyme
  • 6 cloves of garlic, peeled and thinly sliced

Instructions

  1. Preheat the oven to 375*F/190*C/ gas mark 5.
  2. Halve the squash and scoop out the fibers and seeds in the middle. (you can save these, wash them off, dry and use them to plant more squash next year!)
  3. Cut the squash into ¾ inch slices (at the thickest part of each wedge).
  4. Place the butter and olive oil on a rimmed baking sheet. Pop into the oven and heat gently until the butter begins to foam. (about 5 minutes) Remove from the oven. Carefully add the squash slices, turning them to coat them in the butter/oil mixture. Pull the leaves from the thyme and scatter them over top, along with a goodly seasoning of salt and pepper.
  5. Return the squash to the oven and roast for a further 20 to 25 minutes, turning them every so often.
  6. Scatter the garlic slices over top and roast for a further 15 minutes until the squash pieces are soft and slightly caramelized.
Did you make this recipe?
Tag @marierayner5530 on instagram and hashtag it #TheEnglishKitchen
 

Roasted Winter Squash with Garlic & Thyme

All of the content you see here on this page, both photography and written, are the sole property of The English Kitchen, Marie Rayner. Any reposting or misuse is not permitted. If you are reading this elsewhere, please know that it is stolen content and you may report it to me at mariealicejoan at aol dot com.