Tuesday 31 January 2023

Copycat Kozy Shack Rice Pudding


Copycat Kozy Shack Rice Pudding 


My father was coming to my place for supper last night and so I wanted to make him something special for his dessert. My father has a sweet tooth and dessert is something he really looks forward to. He is 89 years old now and we do like to indulge him from time to time with something really special.


He usually eats supper at my sister's every day, so it was a real treat for me to have him here.  I wanted to make him something that we would both really enjoy, but that wouldn't be too awfully bad for him.


Copycat Kozy Shack Rice Pudding 


I had pinned this recipe for Copycat Kozy Shack Rice Pudding from a blog called Bunny's Warm Oven quite a while back.  She in turn had adapted it from Epicurious


They called it Rice Pudding "Gonzo," named after a firefighter who lost his life in the World Trade Center on 9/11.


Copycat Kozy Shack Rice Pudding


My father and I both love rice pudding. In fact, I think my whole family does. It wasn't something that my mother ever made us at home, but I have made it loads as an adult. It has to be one of the most comforting and delicious desserts out there and it is incredibly simple to make.


I decided to adapt the recipe by cutting it in half. Neither my father nor I needed a full batch, as much as we love rice pudding.  We need to restrain ourselves as we are both in a constant battle with our weight! Half a batch was plenty!


Copycat Kozy Shack Rice Pudding 


WHAT YOU NEED TO MAKE COPYCAT KOZY SHACK RICE PUDDING

Very simple ingredients.  The original recipe on Epicurious used long grain rice, whereas for a rice pudding short grain rice is more traditional. You can use either one.


  • 4 cups (960ml) of full fat milk
  • 1/2 cup (105g) arborio rice, uncooked (do not rinse)
  • 1/2 cup (100g) sugar
  • 1 TBS butter
  • 1/2 tsp pure vanilla extract
  • 1/8 tsp salt
  • 1 large free-range egg, lightly beaten
  • 1/2 cup (120ml) heavy cream
  • 1/4 tsp ground cinnamon


Copycat Kozy Shack Rice Pudding


Don't be tempted to use semi-skimmed or skimmed milk. You will not get the same results. You can use undiluted evaporated milk instead of cream if you are really wanting to cut back on the fat.


I always use free-range eggs. You have to pick your battles, and this is one I choose to fight. You can use regular eggs if it doesn't bother you to use eggs from caged hens.


I always use pure vanilla extract. There is no comparison when it comes to flavor. You could substitute vanilla paste for the extract if you have it.


Copycat Kozy Shack Rice Pudding 


I do not differentiate between salted and unsalted butter. I use salted butter most of the time, choosing to cut back on the salt in my recipes to compensate for it.  Unless it is going to make a heck of a difference, salted butter works fine.


I just can't justify having both kinds of butter in my home and, to be honest, I think it a bit pretentious for people to specify using unsalted butter for things like this. No offense intended. It's just my opinion. In most cases you will find that there is very little difference.

Do NOT rinse your rice. This recipe relies on the starch from the rice to help thicken it.


Copycat Kozy Shack Rice Pudding 


HOW TO MAKE COPYCAT KOZY SHACK RICE PUDDING


It's a very easy pudding to make when it comes to making puddings. If you follow the instructions carefully, you can't go wrong.


Place the rice, milk, sugar, butter, vanilla and salt into a heavy bottomed medium-large saucepan. Bring to the boil over medium high heat and then immediately reduce to a simmer. (Don't walk away. Milk expands tremendously when it boils.)


Cook on a low simmer, uncovered, stirring frequently for about an hour, until the rice is very tender.


Copycat Kozy Shack Rice Pudding 


Take the pan off the heat. Beat your egg in a bowl. Add about 1 cup of the rice mixture to the beaten egg, whisking constantly. (This tempers the egg.) Stir the egg mixture back into the saucepan of pudding and then stir in the heavy cream.


Pour the rice pudding into a 5 by 9-inch (deep) baking dish. (Should be able to hold about 1 1/2 quarts/liters.) Sprinkle with the cinnamon.


Cover and refrigerate for 3 hours before serving. This will keep in the refrigerator (covered) for up to three days.

Copycat Kozy Shack Rice Pudding


True confession here, I have never eaten Kozy Shack Rice Pudding, although I have seen it at the shops. My sister says it is really delicious, and I will take her word for it.


Never having eaten it, I cannot say for sure whether this pudding tastes the same, but I can tell you that it is mighty  MIGHTY delicious!  It went down a real treat. It's a good thing that I didn't make the full recipe or we would have made real pigs of ourselves!


Copycat Kozy Shack Rice Pudding


Loving rice pudding as I do, I have more than a few rice pudding recipes here in The English Kitchen. All are delicious:


STICKY TOFFEE RICE PUDDING - A delicious combination of two favorite desserts. There is no sugar in the rice pudding itself. Instead it relies on the sweetness of dates to sweeten it. (Delicious.)  A  fabulously tasty pecan sticky toffee sauce is drizzled over top for serving.


FLAP JACK TOPPED RICE PUDDING -A delicious, simple and comforting, baked rice pudding with a fabulous sweet and crunchy flapjack topping. By flapjack here I don't mean North American pancakes, I mean the British Flapjack which is a sweet, buttery, oaty treacle slice.  Incredibly moreish to say the least.

Yield: 3 - 4
Author: Marie Rayner
Copycat Kozy Shack Rice Pudding

Copycat Kozy Shack Rice Pudding

Prep time: 15 MinCook time: 1 HourInactive time: 3 HourTotal time: 4 H & 15 M
If you are a fan of rice pudding, then you best prepare yourself to fall in love with this copycat recipe of a very popular name brand rice pudding! Its fabulously tasty and incredibly easy to make as well!

Ingredients

  • 4 cups (960ml) of full fat milk
  • 1/2 cup (105g) arborio rice, uncooked (do not rinse)
  • 1/2 cup (100g) sugar
  • 1 TBS butter
  • 1/2 tsp pure vanilla extract
  • 1/8 tsp salt
  • 1 large free-range egg, lightly beaten
  • 1/2 cup (120ml) heavy cream
  • 1/4 tsp ground cinnamon

Instructions

  1. Place the rice, milk, sugar, butter, vanilla and salt into a heavy bottomed medium-large saucepan. Bring to the boil over medium high heat and then immediately reduce to a simmer. (Don't walk away. Milk expands tremendously when it boils.)
  2. Cook on a low simmer, uncovered, stirring frequently for about an hour, until the rice is very tender.
  3. Take the pan off the heat. Beat your egg in a bowl. Add about 1 cup of the rice mixture to the beaten egg, whisking constantly. (This tempers the egg.) Stir the egg mixture back into the saucepan of pudding and then stir in the heavy cream.
  4. Pour the rice pudding into a 5 by 9-inch (deep) baking dish. (Should be able to hold about 1 1/2 quarts/liters.) Sprinkle with the cinnamon.
  5. Cover and refrigerate for 3 hours before serving. This will keep in the refrigerator for up to three days.
Did you make this recipe?
Tag @marierayner5530 on instagram and hashtag it # marierayner5530
copycat Kozy Shack Rice Pudding 

This content (written and photography) is the sole property of The English Kitchen. Any reposting or misuse is not permitted. If you are reading this elsewhere, please know that it is stolen content and you may report it to me at mariealicejoan at aol dot com. 


 Thanks so much for visiting! Do come again!! 


Monday 30 January 2023

Hello Fresh, a fair and impartial review

Hello Fresh


When I was living in the UK, as a food blogger, I was often being sent products for review.  This was a very common practice for companies. I was always more than happy to receive something free of charge and write about it.


I always tried to be as fair and impartial as I could be when reviewing these things. I will be honest here however, when someone is giving you something for free with the expectation of review, it is only natural to be a bit slanted towards the positive and minimize the negative.  Its only human.


Also, if someone is sending you something for the purpose of review, they are only going to send you the very best. It would be a very poor business practice indeed to send anyone anything substandard if you are expecting something positive from the outcome.


I have had the opportunity through the years to review a great many things.


Here in Canada, it's not been my experience that companies send me anything to try out. In fact, since my return to Canada, I have not been offered anything for review purposes. I am not sure if that is a legal thing in Canada or not. 


I recently decided to try out Hello Fresh, totally independently and for the purposes of a fair review. I had reviewed them in the past in the UK, but I thought it would be interesting to review my experience as a consumer who had to go through the process of using this service from the very beginning, and in another country.


Hello Fresh is a Berlin Based company that has their services available throughout the world, with meal plans that are touted for being family friendly, as well as catering to a variety of diets. I believe their largest customer base is in America.


Hello Fresh


For those who are not aware of them, Hello Fresh is a meal KIT delivery service, that offers weekly shipments of recipes and groceries that are delivered right to your front door.  It enables you to make fresh, easy and appealing meals from the comfort of your own home, without the hassle of having to plan and shop for ingredients on your own.


I decided to sign up for and try the service out for a few weeks. I like to cook, but I have found, as a single person, it is difficult to purchase quantities of ingredients in the exact amounts that I need. I often find myself wasting things which really bothers me, especially fresh ingredients such as salad or vegetables.  It's not so difficult with other things like meat as I can simply freeze the excess for later use.


One thing which I did not like is that I had to sign up for the service before I was actually able to see what they were offering in terms of meal kits available.   I was also limited to the meals available and unable to design or devise a meal myself. 


On the plus side, there were plenty of meal options to choose from.  They also cater to certain diets such as vegetarian or low carb.  You can also choose plans which cater to smaller sized families and larger groups, with the smallest size being 2 people. 


Boxes are delivered once a week.


Hello Fresh


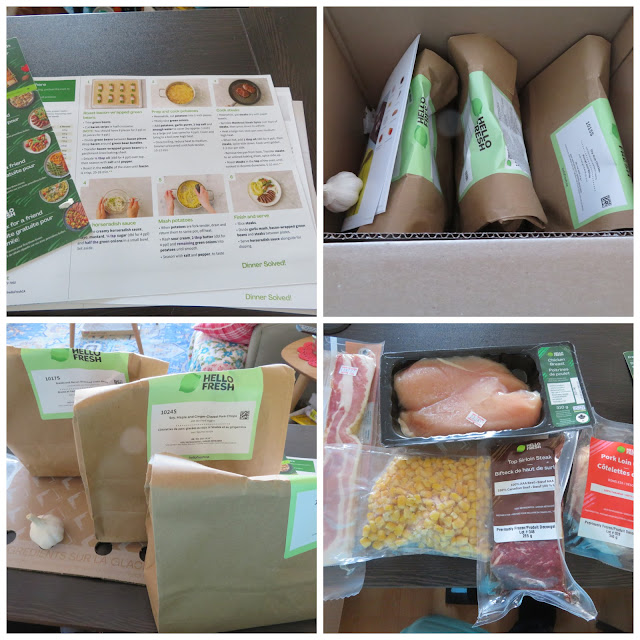
Included in the box are all of the main ingredients for however many meals you have chosen.  All of the meat, produce and most condiments/sauces/etc.  What they do not include are things such as cooking oil, sugar, salt, pepper, butter, etc.


Seen here are the contents of my first box. It was beautifully packed, everything arriving cold and ready to put into my refrigerator or freezer.


The meat/proteins are packaged separately and stored with frozen ice packs at the bottom of the box.


front of card


The remaining ingredients for each meal are separated into their own individual paper bags.  Included are detailed recipe cards which show you a photograph of what the finished meal should look like on one side, and detailed cooking instructions with photographs of each step on the reverse side.


recipe instructions


I found the instructions to be very simple and easy to follow.  Included also on the cards are information on anything you need to do before you begin and any equipment or tools you might need in order to prepare or cook the recipe, with any special instructions being outlined in red.


I have a daughter who is developmentally challenged, and I believe that she would very easily be able to follow the cards and cook the meals I received.


Turkey Burger


One of the meals that I ordered was for a Turkey, Lettuce and Tomato Burger with Ranch and Roasted Sweet Potatoes. You can see their photo on the card shown above and my results in the photo just above here.  It was delicious.


Ingredients for Pork Meal


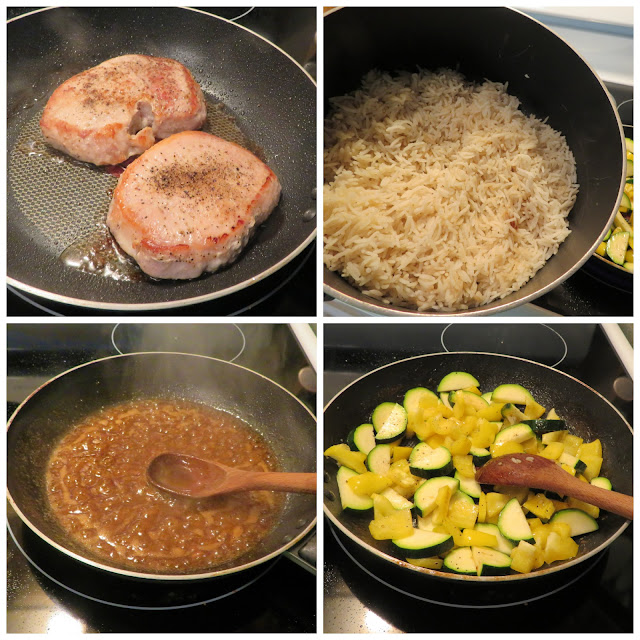
Another meal which I had chosen was Soy, Maple and Ginger-Glazed Pork Chops with Stir Fried Veggies.  It too was very quick and easy to execute  . . . 


Ginger Glazed Chops


This was the end result.  Perfectly cooked pork, with a delicious glaze, crispy tender stir fried vegetables and perfectly cooked rice.


When making my decision to try out this meal plan, I decided at the outset that I would try it for more than just one week, to make sure that the experience of my first box received would also be the experience of consecutive boxes, so I tried it for three weeks running in order to check on the consistency of the meals and service provided.


Chicken Parmesan


Here is another one of the meals I chose.  Baked Chicken Parmesan with Crispy Potatoes and Garlicky Green Beans. It was also delicious.


I discovered though, as a keen cook, I found myself diverting somewhat from the recipe cards and doing my own thing on the actual day. What I had thought I wanted to cook when I placed my order, was not always what I felt like cooking when it came to the day.


Through all three weeks I tried the boxes however, everything I received was received in good order, fresh and of excellent quality.


PROS -

You can sign up for as many weeks as you wish and quit at any time. You can also pause your subscription if need be. There is also a rather attractive bonus and discount on your first box.


All of the ingredients are delivered to your doorstep, saving on wear and tear on the car and petrol, not to mention putting up with the hassle of traffic, not to mention saving on the time needed to go shopping and pick up the ingredients.


 Their insulated boxes are well packaged, double lined and containing ice packs which help to keep the food fresh.  Everything has a shelf life of at least a week.


The recipes were simple and quick to execute with detailed instructions. Their meal cooking time ranges between 30 and 40 minutes. 


 Their fresh produce and condiments are packaged in color-coded bags so that you can easily sort them out, with all of their packaging being recyclable, and everything was very fresh.


CONS

The biggest one for me is that you have to sign up before you can see what meal choices are actually on offer. I did not like that at all.


They decide the meal plan choices which are available for you to choose from. As a subscriber, you are not given the freedom to choose from anything other than what is on their menu. 


They don’t deliver sugar, salt, pepper, butter, and cooking oil.  I appreciate that, as a keen cook, I always have these things in my home, but other people might not.


The smallest size of the meals in their plans was for two servings. It would be nice if they had single serving offerings. I did not like having to eat the same thing two days in a row.


 Without the incentives offered for your first few meals, their meals can be rather costly compared to if you walked to a grocery store and brought the ingredients yourself. The cost will vary according to the type of meal chosen and for the size of the meals chosen. There is also a delivery fee.


There is quite a lot of packaging, ie. cardboard, plastic, etc. to get rid of each week.


Making Meal


FINAL REMARKS

Overall, I quite liked the boxes I received. I think they are great for a single person who is living on their own, or for a young couple who both have jobs and not a lot of time for planning and shopping for their meals.


If you are an elderly person who likes to cook, they give you the freedom to do just that.  I know a lot of seniors end up purchasing frozen prepared meal deliveries.  Those meals are often filled with sodium and fat.  You can control the sodium and fat in these meals yourself, which is a real plus, as well as having the pleasure of being able to cook for yourself.


There was no waste. Everything in the boxes was specifically designed to be used up, with nothing being leftover, which is actually quite cost effective over time. 


All of the packaging is recyclable. The paper bags included can also be repurposed to collect food scraps for composting.


Each meal I received was fairly complete, as well as being quick and easy to do.  I didn't have to plan for sides, etc. Everything was there, and I was able to sit down to a full, nutritious and delicious meal in about half an hours' time total.


They were somewhat costly, so if you are on a very limited income this could be a bit of a drawback, but when you figure in the fact that there is no waste, I believe this balances out in the long run.


I hope that you have enjoyed my fair and impartial review of the Hello Fresh Boxes.  I was not asked by them to do this review, nor was I compensated for doing so.  What you see here is the truth of my own experience in trying out this meal plan box system here in Canada.


This content (written and photography) is the sole property of The English Kitchen. Any reposting or misuse is not permitted. If you are reading this elsewhere, please know that it is stolen content and you may report it to me at mariealicejoan at aol dot com. 


 Thanks so much for visiting! Do come again!! 


Sunday 29 January 2023

Beef Steak Hot Pot


Beef Steak Hot Pot


I have been craving Beef Stew all week.  It's a winter thing I guess, and having just come through having had a bad cold I was really craving some sort of comfort food.


In the UK they make things called Hot Pots in the winter months.  This is usually with lamb, but I have also seen them made with other meats such as pork or chicken.  This is the ultimate in comfort food.


Beef Steak Hot Pot


Meat and vegetables layered in an oven proof casserole dish with some stock, and then baked until everything is meltingly tender.  Usually there is a thatch of sliced potatoes on top, but not always.


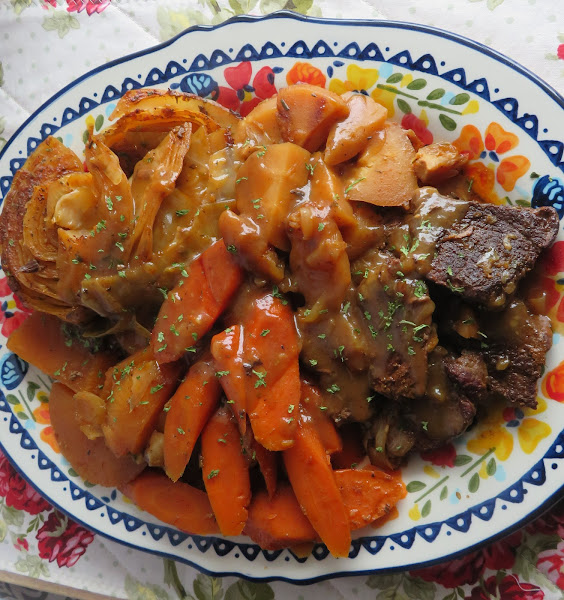
Today I decided to make myself a hot pot of sorts using some steak I found in my freezer, and why not! I was really pleased with how it turned out as well. This is sized for two to three people, but could certainly be made large enough to feed many more than that.


Beef Steak Hot Pot 


Its not a recipe as much as it is a technique.  Meat it browned and then layered up with a variety of vegetables. A flavor filled stock is poured over top and then the whole thing is baked long and slow until everything melts in your mouth.


You can thicken the juices to make a delicious gravy if you wish. 


Beef Steak Hot Pot


Its all a matter of using what you have.  I have even seen hot pots made with canned corned beef and baked beans.  Using steak would be at the higher end of the scale!

Delicious, hearty and thrifty, that is the epitome of a classic hot pot, and in these days of having to pinch our pennies, thrifty counts more than ever!


Beef Steak Hot Pot 


WHAT YOU NEED TO MAKE BEEF STEAK HOT POT


I simply used what meat and vegetables I had in my freezer and refrigerator. Using up what you already have is the name of the game! This is by no means a stringent list of ingredients!


  • 1 tsp butter
  • 1 tsp oil
  • 10 ounces (285g) top round or stewing steak cut into pieces
  • 1/2 tsp each garlic powder, salt, black pepper and summer savory (or thyme)
  • 1/2 small white cabbage cut into wedges
  • 1 large parsnip, peeled and thickly sliced
  • 1/3 of a small turnip (rutabaga/swede) peeled and cut into thick half moons
  • 2 medium carrots, peeled and thickly sliced
  • 2 small onions quartered
  • 2 cups beef stock
  • 1 TBS tomato ketchup
  • 1 TBS sweet pickle juice or Worcestershire sauce
  • 1 TBS HP or other steak sauce
  • 1 heaped TBS to thicken the gravy


Beef Steak Hot Pot 


I am not sure what kind of steak I had as I had not marked the package but bear in mind you don't want to use your most expensive cut.  I would suggest a rump or round steak. Any kind of steak which is well suited to braising.

Likewise, your vegetables. Root vegetables braise very well, and I think they taste even better if braised until they melt in your mouth. But I could be alone in that way of thinking. I like to mash them up on my plate and dot them with butter. 


Beef Steak Hot Pot 


Cabbage is especially lovely when braised long and slow for a lengthy period of time. It becomes almost buttery, and it does indeed melt in the mouth.


I love rutabaga, carrots and parsnips.  They work very well in a dish like this.


Beef Steak Hot Pot 


I chose to flavor the stock with a few aromatics, tomato ketchup, HP sauce and some sweet pickle juice. If you don't have sweet pickle juice then you can use Worcestershire sauce, or even leave it out altogether. I happen to like it in any dish like this one.


You will also note that there is not a lot of seasoning in this dish. With aromatics such as the above you don't really need a lot of seasoning. Just make sure you sprinkle some of it on each layer. 


Beef Steak Hot Pot


HOW TO MAKE BEEF STEAK HOT POT

Nothing could really be easier. Brown your meat and then layer up your veg and bake. You can thicken the juices at the end for a delicious gravy if you wish.


Preheat the oven to 350*F/180*C/gas mark 4.


Heat the butter and oil in a heavy based oven proof casserole until the butter begins to foam. Add the pieces of steak and brown them well on both sides.


Mix together the herbs and seasonings in a small bowl.


Place the onion quarters around the browned steak in the bottom of the casserole. Sprinkle with a bit of the seasoning.


Layer in the vegetables one at a time on top of the steak, sprinkling each layer with the seasoning mixture, and ending with the wedges of cabbage.


Whisk together the beef stock, ketchup, pickle juice, and HP sauce. Pour over the meat and vegetables. Cover the casserole tightly.


Place into the preheated oven. Roast for about 1 1/2 to 2 hours until the meat and vegetables are tender.


Remove from the oven. Using a slotted spoon remove the meat and vegetables from the juices to a platter. Set aside and keep warm.  Whisk the flour into the remaining juices and cook, whisking constantly over medium high heat until the gravy thickens.


Serve portions of the meat along with the vegetables with some of that delicious gravy spooned over top.


Beef Steak Hot Pot 


This really was delicious.  I always love something like boiled potatoes or mash with this type of a meal.  Today it was boiled potatoes. 
 

 I boiled them in their skins just like my mother always did. Just pick some small to medium sized potatoes and wash them very well. Cover with lightly salted water, bring to the boil and then simmer for 20 to 25 minutes until fork tender.


Spear with a fork and peel.  As I was peeling mine, I was thinking of my mother and watching her peel boiled potatoes for our supper. What a sweet memory for me that was.


Beef Steak Hot Pot


If you are a fan of long and slow cooking, you might also enjoy the following:


POT ROASTED PORK WITH CABBAGE AND CARROTS -   This Pot Roasted Pork with Cabbage and carrots is one of my favorite meals to cook when the temperatures start dropping and the nights begin to draw in. A long slow braise results in succulent moist pork, tender roasted carrots, butter tender cabbage and a rich gravy that is to die for.


LANCASHIRE HOT POT - If you are a fan of Coronation Street you will be familiar with the pleasure of the Lancashire Hot Pot.  This is as traditional as they get, with layers of lamb, onions and carrots, and a lovely thatch of buttery sliced potato on top. 

Yield: 2-3
Author: Marie Rayner
Beef Steak Hot Pot

Beef Steak Hot Pot

Prep time: 20 MinCook time: 2 HourTotal time: 2 H & 20 M
Tender pieces of beef with plenty of vegetables cooked long and slow. You can make a delicious gravy with the pan juices. I like to serve this with boiled or mashed potatoes!

Ingredients

  • 1 tsp butter
  • 1 tsp oil
  • 10 ounces (285g) top round or stewing steak cut into pieces
  • 1/2 tsp each garlic powder, salt, black pepper and summer savory (or thyme)
  • 1/2 small white cabbage cut into wedges
  • 1 large parsnip, peeled and thickly sliced
  • 1/3 of a small turnip (rutabaga/swede) peeled and cut into thick half moons
  • 2 medium carrots, peeled and thickly sliced
  • 2 small onions quartered
  • 2 cups beef stock
  • 1 TBS tomato ketchup
  • 1 TBS sweet pickle juice or Worcestershire sauce
  • 1 TBS HP or other steak sauce
  • 1 heaped TBS to thicken the gravy

Instructions

  1. Preheat the oven to 350*F/180*C/gas mark 4.
  2. Heat the butter and oil in a heavy based oven proof casserole until the butter begins to foam. Add the pieces of steak and brown them well on both sides.
  3. Mix together the herbs and seasonings.
  4. Place the onion quarters around the steak in the bottom of the casserole. Sprinkle with a bit of the seasoning.
  5. Layer in the vegetables one at a time on top of the steak, sprinkling each layer with the seasoning mixture, and ending with the wedges of cabbage.
  6. Whisk together the beef stock, ketchup, pickle juice, and HP sauce. Pour over the meat and vegetables. Cover the casserole tightly.
  7. Place into the preheated oven. Roast for about 1 1/2 to 2 hours until the meat and vegetables are tender.
  8. Remove from the oven. Using a slotted spoon remove the meat and vegetables from the juices to a platter. Set aside and keep warm.
  9. Whisk the flour into the remaining juices and cook, whisking constantly over medium high heat until the gravy thickens.
  10. Serve portions of the meat along with the vegetables with some of the gravy spooned over top.
Did you make this recipe?
Tag @marierayner5530 on instagram and hashtag it # marierayner5530
Beef Steak Hot Pot


This content (written and photography) is the sole property of The English Kitchen. Any reposting or misuse is not permitted. If you are reading this elsewhere, please know that it is stolen content and you may report it to me at: mariealicejoan at aol dot com 


Thank you so much for visiting! Do come again!