


I had in mind the other day to make some Fish Finger Tacos. I got everything ready to go and realised I didn't have any flour tortillas, and so I did what every capable cook does, I improvised. I had some finger buns in the house and so I turned them into sandwiches instead, with most excellent results!! We both really enjoyed these and they made a change from our regular fish finger sandwiches, The World's Best Fish Finger Buttie!

We liked them every bit as much which is saying a lot, as my other ones are plenty delicious, let me tell you!

I like to use Cod fish fingers, made from sustainable cod. I also like to use the larger ones versus the smaller ones as you get more cod per finger and less breading/coating. You also don't get as many in a pack, but that's okay with us. If you would rather use the smaller ones, then by all means do so!

I popped them onto a baking sheet and sprinkled them with taco seasoning to give them a bit of a spark. This works great for anything like that which you want to add extra flavour to. Just sprinkle on your favourite seasoning mix . . . for tacos, (and these sandwiches) I used taco seasoning. You can make your own, or use a purchased mix.

I had made a spicy coleslaw for use in the tacos, so I thought, why not use it in a sandwich? I use coleslaw in my Crispy Chicken Sandwiches, and my BBQ Chicken Sandwiches, so why not here! Coleslaw on a sandwich is a very good thing!

This coleslaw is flavoured with a spicy mayo . . . this is where some of that taco seasoning comes in handy again. I also added lime juice and zest for a bit of a punch/tartness. YUM!

I also added some spicy guacamole. You could use already made, but its very easy to make a simple one yourself by mashing together some garlic, avocado pear, chopped tomato and some more of that lime juice.

Once the fish fingers are done, I sprinkled them with some grated cheese and popped them back into the oven briefly to melt the cheese while I toasted the buns on the cut edges.

I piled the coleslaw and guacamole onto the toasted buns and then topped them with the cheese coated spicy fish fingers.

These were fabulous!! We both really enjoyed them a lot. I was really happy that didn't let myself become daunted by not having any tortillas to fly with my original idea, and Todd was happy that I didn't make him go to the store to get some. (In all truth, I have pretty much given up on sending him to the store for anything but simple things like milk and bread. He always comes back with the wrong thing. No lie.)

We couldn't wait to tuck in and we were not disappointed in the least. Each mouthful was more delicious than the last. I found myself wishing I had made a few more. (I only made two. I do that a lot because there are only two of us.)

I think we both could very easily have enjoyed a second helping of one of these tasty sandwiches!

You could of course serve some potato chips or tortilla chips on the side with dips, and you could spoon salsa on top of these sandwiches if you were so inclined. We were happy with them just as they were, and I think you will be too!

*Spicy Fish Finger Sandwiches*
Serves 4
Quick,
easy and delicious. You won't use the whole envelope of taco seasoning,
but don't worry about it. You can clip it shut and use it again another
time.
8 thick cod fish fingers
1 envelope of taco seasoning mix
4 TBS mayonnaise
the zest and juice of one lime, divided
1/2 small cabbage, trimmed, cored and hand shredded
1 large carrot, peeled and grated
1/2 red onion, peeled and very thinly sliced
1 avocado, peeled, and pitted
1 clove garlic, peeled and crushed
2 tomatoes, de-seeded and diced
4 large bread rolls
8 TBS grated strong cheddar cheese

Preheat your oven according to the package
directions for the fish fingers. Sprinkle each fish finger with a small
amount of taco seasoning and place onto a baking sheet. Pop into the
preheated oven and bake according to the package directions.
While
the fish fingers are baking make the coleslaw and guacamole. To make
the coleslaw, mix together the mayonnaise with 2 TBS of the taco
seasoning mix and half of the juice and lime zest. To make the
guacamole, mash the avocado roughly, adding a pinch of salt and the
crushed garlic. Stir in the tomatoes and remaining lime zest and juice.
(you can also add some chopped fresh coriander if you have it, about 1
TBS of it.)
Split the bread rolls and toast
lightly under a hot grill or broiler. When the fish fingers are done
sprinkle some cheese on top of each and then pop the tray back in the
oven for a few minutes to melt the cheese.

Fish fingers are one of those things I always have in my freezer. They come in really handy for things like this, for last minute impromptu meals when you just can't be asked to cook, and children really love them. We happen to love them too. (Don't judge me, lol) Something new for Fish Friday??? Why not! Bon Appetit!


We've been having a lot of fun with our Space Grill over these last few weeks. The Weather has been just gorgeous, warm, sunny and dry. I think this is the warmest driest summer on record in quite a long while.
Here in Chester we have had a few showers, which has been good, and in fact the other morning when I got up it was raining and there was a rainbow to greet me. In any case this has been the perfect weather for BBQ'ing and Grilling and we have been using our grill almost every single day!
The other day I decided to try foil pack grilling on it and did a variety of chicken packs. These are individual chicken dinners all put together in one foil packet, including the chicken and a side/sauce, etc.
Very easy to do and very easy to cook! I did a Sweet and Sour Chicken pack, a Hunters Chicken and Potato pack, and a Honey Mustard Chicken & Sweet Potato pack, each one being very delicious in their own right.

You simply put all of the ingredients needed onto a square of heavy duty foil and seal them in, then pop them onto the grill for an easy entree with literally no fuss, no muss and very little clean up!
You just gotta love cooking like this! Delicious and perfect for a lazy day of relaxing in the summer sunshine!

The Honey Mustard and Sweet Potato Chicken one is delicious. A mix of cubed sweet potato and red bell peppers is placed on the foil first. You top this with a chicken breast (I like free range) and then a mix of honey, mustard and a special homemade Montreal Chicken Seasoning is poured over top.
Seal it up and pop it onto the grill. 20 to 25 minutes later, dinner is served! Peel back the foil, sprinkle on some spring onion and you are set to go! I would just prepare a side salad to go with this and have some crusty bread. Easy peasy!

*Honey Mustard Chicken Foil Packs*
Makes 4 servings
Quite simple to make and delicious. No fuss, no muss, a meal in each packet.
4 TBS butter, melted
2 TBS liquid honey
2 TBS Dijon mustard
1 TBS Montreal Chicken Seasoning (see below)
4 boneless, skinless chicken breasts, trimmed
2 large sweet potatoes, peeled and cut into 3/4 inch cubes
1/2 large sweet red bell pepper, trimmed and cut into 1 inch pieces
2 spring onions, trimmed and sliced

Cut 4 large pieces of heavy duty aluminium foil. Put the sweet
potatoes into a microwavable bowl and then cook on high for 5 to 7
minutes, stirring every 2 minutes, until they tender tender when you
pierce them with a fork. Carefully divide the potatoes between the four
pieces of foil.
Top with the bell pepper chunks and the chicken
breasts. Whisk together the butter, honey, mustard and chicken
seasoning. Spoon an equal portion over each piece of chicken. Bring up
two opposite sides of the foil to meet and cover the chicken and
vegetables. Pleat tightly, allowing room for expansion. Seal the ends.
Place
on a grill you have heated to medium. Cover with a metal lid. (make
sure it has a heat resistant handle) Grill for 18 to 20 minutes,
rotating the chicken every ten minutes by half a turn. It will be done
when the juices run clear. Peel back the foil and top each with some of
the spring onions and serve.
Note - this can be done in a 200*C/400*F/ gas mark 6 oven. Place on a tray and roast for 25 to 30 minutes.

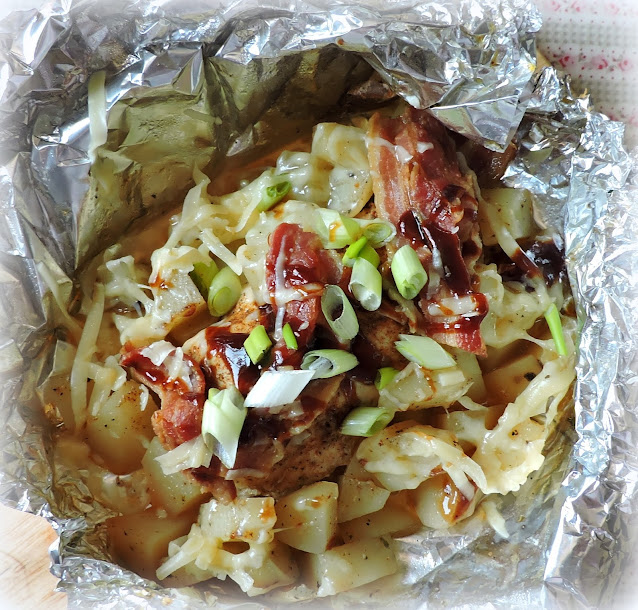
Toss cubed potato together with some Italian herb/garlic seasoning a bit of oil and scatter it around the chicken. Top the chicken with some cooked bacon and seal as before.
Cook for about 20 to 25 minutes, tear open the foil, top with BBQ sauce, grated cheese and some spring onion before serving to your drooling family! Again, easy peasy lemon squeasy! Some coleslaw and crusty bread would be fab with this!

Mix all of the ingredients well together and store in a glass jar away from the heat and light. Store or up to 6 months.

*Hunter's Chicken Foil Packs*
Serves 4
Once again, simple, easy and delicious with little or no clean up involved.
500g baking potatoes, peeled and cut into 3/4 inch cubes (1 1/4 pounds)
1 TBS Italian herb and garlic seasoning
salt and black pepper to taste
2 tsp oil
4 boneless, skinless, chicken breasts, trimmed
1 1/2 tsp BBQ seasoning (see below)
4 slices streaky bacon, cooked and halved
120g cheddar cheese, grated (1 cup)
60g BBQ sauce (1/4 cup)
2 spring onions, chopped

Tear off 4 large pieces of heavy duty aluminium foil.
Toss
the potatoes together in a bowl with the oil, Italian herb and garlic
seasoning, and salt and black pepper to taste. Season the chicken with
the BBQ seasoning and place 1 piece in the centre of each piece of
foil.
Divide the potatoes evenly, placing them around the chicken on
the foil. Lay bacon slices over top of the chicken. Bring up two side
of the foil to meet together over the chicken. Seal edges making a 1/2
inch pleat to allow for expansion. Fold in the other edges to seal.
Place
onto a grill over medium heat. Cover with a metal lid. Cook for 18 to
20 minutes, rotating the packages 1/2 turn every 10 minutes. The
juices will run clear when the chicken is done.
Tear open on the tops.
Sprinkle a portion of the cheese over the potatoes of each packet.
Spread 1/4 of the BBQ sauce over each piece of chicken, garnish with the
spring onions and serve.
Note - this can be done in a 200*C/400*F/ gas mark 6 oven. Place on a tray and roast for 25 to 30 minutes.
BBQ Seasoning Mix
Makes 1/2 cup
1/2 TBS dried thyme
1 TBS garlic powder
1 TBS dried parsley flakes
1/2 tsp celery salt
2 tsp mild chili powder
1/2 TBS garlic salt
1/2 TBS black pepper
60g fine sea salt (1/4 cup)
1/2 TBS ground cumin
1 TBS onion powder (not salt)
2 TBS dried mustard powder
1 tsp cayenne pepper (or to taste)
75g soft light brown sugar (1/3 cup, packed)

Finally we have Sweet & Sour Chicken. This is soooooooooooooo delicious and so simple! Take a sheet of heavy duty foil for each. Pop a chicken breast in the centre.
Season it with some all purpose seasoning salt, and then top with a mix of sliced peppers and pineapple chunks. Finally spoon the sweet and sour sauce mix over top, which is a special mix of fine shred marmalade, sweet chili sauce and rice wine vinegar.
Seal and grill, again for 20 to 25 minutes. Sprinkle with spring onions and serve. I like to have steamed rice with this and if you wanted to you could steam some snow peas to go along as well. Yummy Scrummy!!!

*Sweet & Sour Chicken Foil Packs*
Serves 4
Sweet, sour with a bit of heat. These are lovely. Serve with steamed rice.
4 boneless, skinless chicken breasts, trimmed of any fat
seasoning salt
8 TBS fine shred orange marmalade
3 TBS sweet chili sauce
3 TBS rice wine vinegar
1 each, small red and green bell pepper, cut into strips
1 (425g) tin pineapple chunks, drained (1 8-oz tin)
heavy duty aluminium foil

Cut four large rectangular pieces of foil. Whisk together the
marmalade, sweet chili sauce and rice wine vinegar. Set aside. Prepare
your vegetables.Season the chicken all over with seasoning salt and
place one piece in the centre of each square of foil.
Top each with 1
TBS of the marmalade mixture and 1/4 of the pineapple and pepper
slices. Divide the remainder of the sauce between them all.
Fold
the foil over the chicken and vegetables so that the edges meet in the
centre. Seal tightly, making a 1/2 inch fold. Seal the ends, leaving
room for expansion.
Heat the BBQ grill. Place
the packets onto the grill, over medium heat. Cover with a metal lid.
(Make sure you have a heat resistant knob on it.) Cook for 20 to 30
minutes, rotating the packages every 10 minutes or so. When done the
chicken juices will run clear. Cut an X across the top of each packet
and serve with some steamed rice.
Note - this can be done in a 200*C/400*F/ gas mark 6 oven. Place on a tray and roast for 25 to 30 minutes.

Montreal Chicken Seasoning
Makes 1/2 cup
I can not find this over here so I just make my own. It comes in handy or all sorts and is also good on fish.
4 TBS fine sea salt
1 TBS black pepper
1 TBS onion powder (not salt)
1/2 TBS garlic powder (not salt)
1/2 TBS crushed red chili flakes (or to taste)
1/2 TBS dried thyme
1/2 TBS dried rosemary
1/2 TBS coriander seed, bruised

We just love this fabulous Space Grill BBQ. This revolutionary, Australian designed, Chef Grade Stainless Steel grill folds out in about 10 seconds.
There
is no need for super human strength. Even I have found it quite easy. A
simple pivot system changes space into a grill. It is really that
easy!

Its sleek
and attractive, folds away conveniently after use and comes with a
fabulous cover to keep it safe from the elements. I can also attest to
the fact that it cleans up like a dream!
The parts come off very easily
for wiping clean, and that patented drip tray also removes very easily
for wiping out and cleaning. No fuss, no muss! (And you know how much I
like that concept!) We are ever so pleased with it! If you would like
to know more about it, or perhaps even to purchase one for your own use,
do check out the Space Grill Site.
Easy to use, space saving, easy to clean and you can also purchase a separate stand that you can bolt it to which means you can move it around rather than having it bolted to your home or garden wall. We have a stand for ours because we don't own our own home. If we ever have to move, this beautiful baby is coming with us! Bon Appetit!!


I hope you can take another chicken recipe! Yes we do eat a lot of chicken in this house. No surprise there, it is quite economical and very adaptable.
You could probably eat chicken every day of the week and have it prepared in a different and delicious way each and every time. You can never have too many chicken recipes to my way of thinking!

I dare say I could write a book filled with chicken recipes alone!
I am always pushing the boundaries with this wonderfully versatile protein and adapting it to new flavours!

Because there are only two of us, I do like to buy free-range organic corn-fed chicken. I think it tastes better.
Especially if you are going to use it on its own, where the taste of the chicken really matters. Today I just used free-range as the chicken was going to be taking on a lot of other flavours.

I don't remember ever really having chicken very often when I was a child. We mostly ate red meat. I think chicken was much more expensive than other meats.
We might have a roast chicken once in a blue moon and every now and than my mother would treat us to chicken breasts that she would cook in the "Maryland" style. Dipped in egg and cracker crumbs and fried until golden brown. We loved them!

Of course they were "bone in". I don't think I ever recall seeing boneless chicken, or at least it was not as readily available as it is to us in these modern times!
We are a lucky people.

In this recipes, I have pounded boneless skinless breasts to an even thickness and then coated them with a panko breaded coating before frying them until golden brown and crisp.

Its important to try to get your chicken breasts to as much of an even thickness as you can so that they cook pretty evenly.
You don't really want parts of it cooking through much faster than others. It is done when the juices run clear.

I always start by cooking it "Presentation" side down first. This is the side that you will want facing up when you go to serve it. It is just what I was taught to do when I was at culinary school.
While it doesn't make much of a difference flavour wise, the side that gets cooked first usually ends up looking much better.
This is because when you put it into the pan the meat/fish/poultry will still be raw and malleable. For this reason more of its surface area will be touching the pan.

As it cooks the meat/fish/poultry will shrink up a bit and draw into itself, so that when you flip it over it won't lay as flat in the pan.
Also it will pick up some of the brown bits left in the pan from cooking the top side, so it can appear somewhat spotty. Just a little trick of the trade here!

You will love the sauce for this. It gets drizzled over the hot crisp chicken when you go to serve it. Its a bit spicy, but not overwhelmingly so.
It is also a bit sweet from the use of ketjap manis (Indonesian sweet soy sauce) and liquid/runny honey. I could eat this sauce with a spoon!

*Crispy Chicken Katsu Curry*
Serves 4
Printable Recipe
Crisp chicken with a finger-lickingly tasty nicely spiced sweet sauce. Serve with steamed rice.
For the Chicken:
4 boneless, skinless chicken breast halves, pounded to an even thickness
salt and freshly ground black pepper
45g plain flour (1/4 cup)
2 medium free range eggs
125g of Japanese Panko, or other fine dried bread crumbs (1 1/3 cups)
60ml of vegetable oil for frying (1/4 cup)
For the sauce:
1 TBS medium hot curry powder
1 1/2 TBS plain flour
1 TBS oil
480ml water (2 cups)
2 TBS Kejap Manis (see my recipe)
1 TBS liquid honey
To serve:
Fresh steamed white rice
4 spring onions, light green and white parts, thinly sliced

To make the sauce. Whisk together the curry powder, flour and oil
in a saucepan until you have a paste. Slowly whisk in the water. Heat,
whisking constantly, until the sauce bubbles and begins to thicken.
whisk in the Kejap Manis and the honey. Taste and adjust as required, to
your desired heat or sweetness. Set aside and keep warm.
Season the pounded chicken breasts with some salt and pepper.
Place the flour on a plate. Beat the eggs in a shallow bowl. Place
the Panko into another shallow bowl. One at a time, dredge the chicken
breasts into first the flour, then the eggs, and finally the Panko,
coating them evenly and pressing the crumbs on to adhere. Set aside on a
lined baking sheet while you heat the oil.
Heat
the oil in a large frying pan until very hot, but not smoking. Add
the chicken breasts and reduce the heat to medium. Cook, turning once,
until the crumbs are golden brown and the chicken feels firm when
pressed in the centres, about four minutes per side. Adjust the heat
as needed so that the crumbs don't burn. Transfer to a cutting board.

I always cook extra chicken when I am doing the chicken part of recipes like this. I then freeze them individually and then wrap them up individually and pop them into a freezer container, ready to bring out whenever I want to make a quick supper.
I find that they come in they come in very handy! Bon Appetit!


About 20 years ago now, I met a lovely lady named Jacquie. It was when I was being taught by the Missionaries of the church I belong to. She and her husband Tom used to come with them on occasion when they were teaching me, and actually we became pretty good friends through the process. I love Jacquie and her husband. They are pretty wonderful people. I don't know what I would have done without their love and support during my first year in the church. They really took me under their wings when my life fell apart and did everything they could to help me. I will always appreciate the love and the care that they gave to me.
Jacquie was an Iridologist, Herbalist and Reflexoligist. Her house always smelled so wonderful, all herby and delicious. She gave the best foot massages and she could tell what was ailing you just from looking into your eyes. She also made the most amazing Tofu Burgers. I used to love being invited over to hers when she was making them for dinner. At first I didn't know what to think when she said she was having Tofu Burgers, but with one taste I was hooked. Ab fab, as they say!!

I was recently asked by the people at Tofuture if I would like to try out their Tofu Press. I immediately thought of Jacquie and her Tofu Burgers. How could I say no!

Tofu is one of the most versatile, healthy and delicious foods around, but to get the most out of it, you really need to press it. The unique and stylish Tofuture Tofu Press removes the water from unpressed tofu simply and effectively. The gradual nature of pressing will give your unpressed tofu the perfect texture and consistency enabling it to absorb gorgeous marinades or the beautiful flavours of the dish you are preparing.

It consists of three pieces. A white base. A green inner tub with a perforated bottom which allows for the water to drain out, and a lid which acts as a press. It has really strong elastic bands which clip down beneath those little white bits you see sticking out on the base, to hold it on and press down on the tofu, with three different levels of pressure.

Its very easy to use and comes with very clear instructions on how to use it.

Here you see my package of Tofu and the Tofu Press.

Remove the tofu from the packaging, draining off and disposing of any liquid. Place the block into the inner tub with the perforations and place that tub into the base.

Clip on the lid, by pulling the elastic bands down around the hooks and push the handles down to impart a continuous pressure on the tofu.

Now leave the press in the fridge for the desired amount of time, you don’t need to return to the press to increase the pressure half-way through the pressing time. The longer you leave the tofu, the better it will be pressed.
We recommend the following guideline pressing times depending on what you are making.
Short press, 15-30 mins – for ‘cheese’ sauce, ‘chocolate’ mousse or ‘cheese’cake
Medium press, 1-2 hours – for pasties, quiches and pies
Long press, 4 hours to overnight – for stir-fries, kebabs and baked tofu
I used a medium press for these burgers.

*Jacquie's Tofu Burgers*
Makes 10 servings
This delicious recipe comes from my longstanding friend Jacquie. I have enjoyed many of these in her home. They are fabulous!
1 pound tofu (firm)
160g quick oats (2 cups)
4 spring onions chopped
1 TBS each tomato ketchup, mustard, and Bragg's All Purpose Seasoning (can use Soy Sauce)
1/2 tsp garlic granules
1 tsp oregano flakes
salt and black pepper to taste
Oil for frying

Crumble
the tofu into a bowl, along with some of the water from the pressing
(only as needed to give you the right consistency). Add the oats and
stir well together. Mix together the onions, garlic granules, oregano,
seasoning and the ketchup, mustard and Braggs. Mix this into the
tofu/oat mixture until well combined. Have ready a large sheet of plastic
cling film. Dump onto the cling film and form a log. Roll the cling
film around the log, twisting at either ends like a Christmas cracker.
Tuck the ends underneath. Place in the refrigerator and let chill
overnight.
When you are ready to cook, slice off as many burgers as you are wanting, about 1/2 to 3/4 inch thick.

The press is compact and easy to store. The outer tub can also be used as a bowl for marinating your pressed tofu. To find out more about this nifty piece of kit, or purchase one, do check out the Tofuture website. There are recipes and tips and everything you need to know about the Tofu Press. You can also buy this press via Amazon in the UK, the US, Canada, Germany, France, the Netherlands, Belgium, Spain and Italy.
Follow their feed on Instagram
Follow them on Twitter
Check them out on Facebook
Many thanks to Tofuture for sending me this Tofu press for the purpose of review. Very much appreciated. I was very impressed with the results and I am looking forward to using it in the future for all sorts!
Note - although I did receive a press free of charge, I was not required to write a positive review in exchange.
Subscribe to:
Posts (Atom)





Social Icons