


One of the things I really enjoyed in the over 20 years that I lived in the U.K. was going to National Trust properties. Usually (but not always) they consisted of a beautiful historical house and gardens. In most cases there was always a gifts shop, and a tea-room or restaurant attached. A place to relax and enjoy a hot drink and a cake or some other delicious bite after the exhaustion of walking through and exploring everything.
Their tea rooms are exemplary and are well known for their baked goods and sandwiches, soups, etc. Having a treat in the tearoom was always something that I looked forward to on these excursions, and the goods on offer usually had an historical context attached to whichever property we were visiting.
I really miss being able to visit places like this. There is nothing like that where I live now.


- 3 1/2 cups (350g) sifted plain, all-purpose flour
- 1 1/2 tsp ground cinnamon
- 1 cup + 1 1/2 TBS (250g) butter, softened
- 3/4 cup +2 tsp (175g) soft light brown sugar, packed and put through a sieve
- 1 1/4 cups (175g) stoned dates, chopped small


- Preheat the oven to 350*F/180*C/gas mark 4. Butter a 7 X 11-inch Swiss roll tin and line with baking paper, leaving some overhang for lifting out. (See note below about pan sizes.)
- Whisk the flour and cinnamon together in a large bowl. Drop in the butter and rub it into the flour mixture using your fingertips until the mixture resembles sand. (Just put some of your favorite music on to listen to and rub away. It will go quickly.)
- Whisk in the brown sugar and the dates, mixing everything together very well. (Make sure your dates are chopped fairly small. A sharp knife makes short work of this.)
- Tip the mixture into the prepared pan and press down firmly and evenly. You can use the bottom of a metal measuring cup or a palate knife to do this.
- Bake in the preheated oven for 30 minutes, until golden brown.
- Leave to cool completely in the tin.
- Lift out and cut into evenly sized fingers with a sharp knife.
- Store in an airtight container. (I used an empty chocolate tin, lined with baking parchment, with more parchment between the layers.)


Date & Cinnamon Shortbread
Everything a good shortbread biscuit/cookie should be. Not too sweet they are quite rich, with a short, buttery, crumbly texture. The sweetness comes from the dates which pepper these bars in abundance. Perfect to enjoy with a hot cup of tea.
Ingredients
- 3 1/2 cups (350g) sifted plain, all-purpose flour
- 1 1/2 tsp ground cinnamon
- 1 cup + 1 1/2 TBS (250g) butter, softened
- 3/4 cup +2 tsp (175g) soft light brown sugar, packed and put through a sieve
- 1 1/4 cups (175g) stoned dates, chopped small
Instructions
- Preheat the oven to 350*F/180*C/gas mark 4. Butter a 7 X 11-inch Swiss roll tin and line with baking paper, leaving some overhang for lifting out. (See note below about pan sizes.)
- Whisk the flour and cinnamon together in a large bowl. Drop in the butter and rub it into the flour mixture using your fingertips until the mixture resembles sand.
- Whisk in the brown sugar and the dates, mixing everything together very well.
- Tip the mixture into the prepared pan and press down firmly and evenly. You can use the bottom of a metal measuring cup or a palate knife to do this.
- Bake in the preheated oven for 30 minutes, until golden brown.
- Leave to cool completely in the tin.
- Lift out and cut into evenly sized fingers with a sharp knife.
- Store in an airtight container.
Notes
The equivalent of a 7 x 11-inch pan can be achieved by using:
- One 9-inch round pan
- One 9 x 9-inch square pan

This content, written and photography, is the sole property of The English Kitchen. Any reposting or misuse is not permitted. If you are reading this elsewhere, please know that it is stolen content and you may report it to me at mariealicejoan at aol dot com.


- 1 chicken leg quarter (a piece of chicken that is the thigh and leg joined together)
- 1/2 tsp aluminum-free baking powder
- 1/4 tsp salt
- 1/4 tsp black pepper
- 1/4 tsp ground paprika

- Preheat your air fryer to 400*F/200*C. (Only if your air fryer requires you to do so.)
- Remove your chicken leg quarter from the packaging and pat dry with some paper kitchen toweling. (Don't skip this step as it is integral to the crispiness of your chicken skin.)
- Whisk together the baking powder, salt, pepper and paprika. Sprinkle this all over the chicken coating it on both sides as best as you can. (Alternately you can shake the seasonings and the chicken together in a zip lock baggie.)
- Place into the air fryer basket.
- Cook for 35 to 40 minutes. Give the basket a shake every ten minutes. (Mine did not stick at all. No need to spray the basket first with any non-stick spray.)
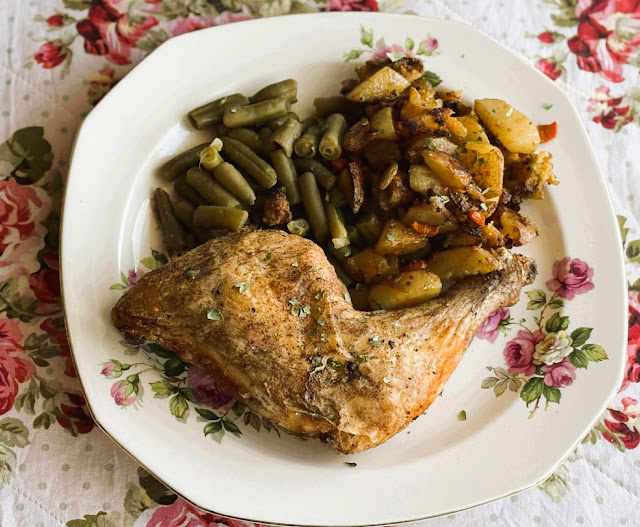
- When done the chicken should be golden brown and the internal temperature at its thickest point should register 165*F/75*C.

- I enjoyed the fact that it went together quick and easily and didn't use a lot of complicated or hard to find ingredients.
- I enjoyed the fact that I didn't have to turn on my oven and my kitchen stayed nice and cool.
- I liked the crispy skin on the chicken. I was quite surprised that you could not taste the baking powder at all. For that reason, it is important that you use an aluminum free one.
- I love that you could easily tailor the seasonings used to things which you and your family really enjoy.
- The chicken was perfectly cooked without being dried out in the time it took to cook.
- You can easily multiply the ingredients to make as many chicken leg quarters as you wish, or even a combination of smaller cuts, ie. legs, thighs.
- Simple, simple, simple.


Air Fryer Crispy Chicken Leg Quarters
These come out nice and crispy without being dried out. A good basic chicken leg quarter. Quantities are given for one. You can multiply to cook as many as you wish.
Ingredients
- 1 chicken leg quarter (a piece of chicken that is the thigh and leg joined together)
- 1/2 tsp aluminum-free baking powder
- 1/4 tsp salt
- 1/4 tsp black pepper
- 1/4 tsp ground paprika
Instructions
- Preheat your air fryer to 400*F/200*C.
- Remove your chicken leg quarter from the packaging and pat dry with some paper kitchen toweling.
- Whisk together the baking powder, salt, pepper and paprika. Sprinkle this all over the chicken coating it on both sides as best as you can.
- Place into the air fryer basket.
- Cook for 35 to 40 minutes. Give the basket a shake every ten minutes.
- When done the chicken should be golden brown and the internal temperature at it's thickest point should register 165*F/75*C.

This content, written and photography, is the sole property of The English Kitchen. Any reposting or misuse is not permitted. If you are reading this elsewhere, please know that it is stolen content and you may report it to me at mariealicejoan at aol dot com.


I wanted something quick and easy for my lunch today. There is another heat warning in effect for today. Typical summer weather. I am not wanting to put on my oven and so am making great use of my air fryer. I am also not wanting to eat anything particularly heavy. My father is coming for supper, so I am saving my big meal for later in the day when he is here.
Crispy Chicken Wraps are a quick, easy and delicious option to make for a day like today. Not only do they go together very quickly, but you can cook the chicken pieces in the air fryer while you are prepping any vegetables, keeping the kitchen nice and cool.


INGREDIENTS NEEDED
TO MAKE CRISPY CHICKEN WRAPS
There is nothing really complicated about these delicious wraps. You could of course make your chicken tenders from scratch. I have a low-fat, guilt-free recipe here.
- 4 breaded chicken tenders, cooked according to package directions
- two medium flour tortilla wraps
- 1 medium tomato, cored and sliced
- 1 cup of chopped iceberg lettuce
- 1 spring onion, trimmed and chopped (scallions, green onions), optional
- 2 TBS prepared ranch dressing, or to taste

As you can see, I use the Schneiders brand Original Crispy Chicken Tenders. I like these, they are whole pieces of chicken, not ground up chicken. The coating is also very nice, crisp and not greasy. I cooked mine in the air fryer. (20 minutes at 400*F/200*C. flipping them halfway through the cook time.)
I used a good brand of flour tortillas. I didn't have medium, only 12-inch ones and 6-inch ones. I deemed the 6-inch ones to be too small and so went with the 12. They turned out to be the perfect size, with plenty of room to tuck in the ends for a much neater eating experience.
The field tomatoes didn't look so good at the farm marker when I went to pick my tomatoes and so I just bought greenhouse tomatoes. If you grow your own tomatoes they would be ideal. Just cut the tomatoes in half, core and then slice thinly into half-moons.
You could use whole lettuce leaves if you wish and if you are lucky enough to have some nice crisp outer leaves available. I had only the center of a head of iceberg lettuce and so I chopped mine. A bit messier to eat, but just as tasty.
The spring onions are totally optional. I thought they would add a lovely touch of sharpness and some more color. Leave them out by all means if you are not a fan.
I used a good, bottled ranch dressing and, I confess, I was a bit heavy-handed with it. You do you!

HOW TO PREPARE
CRISPY CHICKEN WRAPS
As you can see, there is nothing really complicated about these! Easy peasy lemon squeezy.
- Cook your chicken tenders according to the instructions on the package. I used my air fryer. (400*F/200*C for 20 minutes, flipping halfway through the cook time.)
- Chop your lettuce, slice your tomatoes and chop your spring onions. (The onions are optional and if you wish you can leave the lettuce leaves whole.)
- Lay two tortillas out flat. Place two chicken tenders, slightly off center on each, head to tail. (You should not need to overlap them according to the size of the tortilla and the chicken pieces. If they are overly large, you may need to overlap.)
- Sprinkle the lettuce, sliced tomatoes and spring onions over top of the chicken tenders. Drizzle with the ranch dressing. (Admittedly I did use a fair bit, but you can use as little or as much as you need or want.)
- Wrap up tightly, folding in the sides, and wrapping everything up snugly.
- Cut in halves or thirds on the diagonal and serve either hot or at room temperature.

- You could add a few strips of cooked streaky bacon. This would make for a Crispy Chicken BLT Wrap.
- You can vary the type of tortilla wrap used. Spinach or tomato ones are nice as are whole grain.
- Not a fan of tomatoes? You can use thinly sliced bell peppers in their place.
- Sprinkle the chicken tenders with your favorite seasoning before cooking them to vary the flavor. Cajun seasoning is nice, as is lemon pepper. I like the Kinder's seasonings. The butter/garlic one is a real favorite.
- You can add any fresh ingredients that you enjoy. Chopped olives, pickles, hot peppers, etc. Your wrap, your way!
- Vary the dressing used. Catalina French is a delicious option.


HOT ITALIAN HOAGIES - I wish I could tell you how many times I have made these delicious hot sandwiches. They were something I used to make for the missionaries when they would come for supper in the U.K. A little taste of home. They are quick and very simple to make. As easy as layering simple ingredients into split fresh buns and baking in the oven. The sub buns are spread with a parmesan garlic butter before laying with a selection of Italian Cold Cuts, spicy pickles and some cheese. Baked in the oven until everything is heated through and the cheese all melty, nothing goes down better! These are quite simply fabulous!

Crispy Chicken Wraps
Although this recipe makes only two delicious servings, it can easily be multiplied to serve more. This makes a quick and delicious lunch or light supper. No fuss, no muss, summer food!
Ingredients
- 4 breaded chicken tenders, cooked according to package directions
- two medium flour tortilla wraps
- 1 medium tomato, cored and sliced
- 1 cup of chopped iceberg lettuce
- 1 spring onion, trimmed and chopped (scallions, green onions), optional
- 2 TBS prepared ranch dressing, or to taste
Instructions
- Cook your chicken tenders according to the instructions on the package. I used my air fryer. (400*F/200*C for 20 minutes, flipping halfway through the cook time.)
- Chop your lettuce, slice your tomatoes and chop your spring onions.
- Lay two tortillas out flat. Place two chicken tenders, slightly off center on each, head to tail.
- Sprinkle the lettuce, sliced tomatoes and spring onions over top of the chicken tenders. Drizzle with the ranch dressing.
- Wrap up tightly, folding in the sides, and wrapping everything up snugly.
- Cut in halves or thirds on the diagonal and serve either hot or at room temperature.

This content, written and photography, is the sole property of The English Kitchen. Any reposting or misuse is not permitted. If you are reading this elsewhere, please know that it is stolen content and you may report it to me at mariealicejoan at aol dot com.


Social Icons