


One thing I have been longing to master for quite a while now is to make a working Sour Dough Starter that I can use to make my own bread with. We are experiencing a shortage of yeast at the moment (and flour and sugar for that matter) so creating something like a sour dough starter is a skill we can all use. I had tried once before with NO success. I thought I would try again and I watched quite a few videos on You Tube and finally felt secure enough that I thought I could master it. (Fingers crossed) What I am sharing with you today is the result of about two weeks trial and error and finally SUCCESS!

I think the real key to my success this time was using filtered water. The time before I had used tap water. I had no idea that the chlorine etc. in tap water would have a hug impact on the success of your starter. This was something that I learned this time and it was a real boon to my success. I just used bottled filtered water that you can buy in the shops. Apparently you can leave tap water out on the counter top for a couple of days also. I decided not to take a chance and just used filtered water from our water storage. What good is a Pandemic if you don't use the time in quarantine to learn a new skill! It is my greatest hope that eventually I will be turning out really great loaves of bread with the skill of one who has been doing it all of their lives. But for now, here's my tutorial on how to get a really great starter going as well as a few ideas of what you can do with it!

WHAT DO YOU NEED TO MAKE A SOUR DOUGH STARTER
1. a mix of equal parts of strong whole wheat and white flours
2. filtered water
3. a glass jar with a loose lid (I use a Weck jar,which comes with a glass lid.)
4. a rubber spatula for stirring and scraping

DAY 1
Measure 50g (6 1/2 TBS) of your flour mixture into the glass jar. Add 100g ( 3.5 fluid ounces) of the filtered water.

Stir
together until the mixture is completely smooth and amalgamated,
scraping down the sides of the jar using your spatula frequently.

Just keep smoothing, stirring and scraping until you have a completely homogenous mixture, then carefully wipe down the insides of the glass with a clean damp cloth. (use filtered water to dampen the cloth.)

Place the lid on top and set the jar aside for 24 hours.
DAY 2

As you can see there are a few bubbles forming on the top of the flour.

Give the mixture a good stir, replace the lid and leave it for a further 24 hours.
DAY 3

This is what my starter looked like on the morning of day 3. As you can see there is a lot of activity going on. I AM EXCITED ABOUT THIS!! Progress! I might actually have some success this time around!

You will need a clean jar. What you are going to do now is to decant 3 TBS of the live mixture into a clean jar. Once you have done that you will need a further 70g (1/2 cup) of the whole wheat/white bread flour mix and a additional 80ml (1/3 cup) of filtered water.

Add this to the decanted 3 TBS of live mixture in the clean jar and give it a good stir together. This is called "feeding" it.

Scraping down the sides with your spatula and making sure it is all mixed together well so that there are no dry lumps or streaks. Clean the insides of the jar with a clean piece of paper towel, moistened with filtered water . . . so that there are no streaks up the insides of the jar . . .

Put the lid back on the jar and then mark the level with a rubber band on the outside of the jar. (Look, you can see it already bubbling.) Set it aside to work for 11 hours now.

Some suggested that you give your Sour Dough Starter a name. I thought long and hard on this and decided that I am going to call mine HOPE. Why Hope? Because one, I really HOPE that it works for me this time, and two, we have never needed HOPE more than we do at this time during this disheartenig World Wide Pandemic.

I have the perfect Jar Labels to use as well. Innoveem Jam & Chutney Jar Labels. These premium quality jar labels have a strong adhesive which means the labels won't fall off my jar. You can write on them with any pen or biro! They are also easy to remove, leaving no sticky mess or residue after use (HUGE plus), and the set contains some really classy Vintage shaped designs. Perfect for this!
I can also offer my readers a discount of 20% off if they follow this link
to purchase and add the discount code JLABEL20 at checkout! Offer is good until the end of June. They really are fantastic labels. I have been using the same one on my jar of sour dough starter removing it and reapplying it every day for almost two weeks now without any problem. Looks brand new and sticks as well as it did on the first day!

I am really filled with HOPE this time. I am so excited about this. Can you tell??? This appears to be working well for me! (Fingers crossed, I don't want to jinx myself!)
DAY 4, 5, 6, 7
On these next four days you will need to do the following:
Decant 50g (about 3 TBS) to a clean jar. Add 100g plain flour (3/4 cup) and 100g filtered water (3 1/2 fluid ounces). Stir it vigorously. Clean any residue from the inside of the jar using filtered water on some clean paper towels. Cover loosely, mark the starter level with an elastic band. Let rest for 24 hours. (You can discard the rest of the starter in the first jar, left from the decant, or save it to make pancakes, etc.)

This is Day 4 I am impressed. Look at the action!

This is Day 5 There's a fair bit of bubbling going on. Not quite as much as yesterday.

This is Day 6. As you can see it had risen a good inch above the red band and then fell back down again. It has a really fermented smell to it. Not unpleasant. Almost but not quite like an alcohol. Almost like a beer.
The starter will be ready to bake with when it rises and falls consistently for a few days in a row.

This is Day 7.
As you can see there is a ton of action going on! Its also getting lighter in colour because my feed has been plain strong flour rather than a mix of whole wheat and white. I think I am now ready to bake some bread with it, but first a few pictures to show you what I have been doing with the discard. I have a jar in the refrigerator I am keeping the discard in. Flour is so precious at the moment, I really can't bring myself to throw it away.

You can do quite a lot with it. King Arthur Flour has a large number of recipes and suggestion on their page.
I have made us Sour Dough Pancakes several times.

They are the best pancakes I have ever eaten. As you can see they are incredibly light and fluffy and the flavour is fantastic. Todd enjoys his with syrup, but I am perfectly happy with them just on their own, they are that good!

Sour Dough Pancakes
Yield: Makes a dozen pancakes
These are so light and fluffy. Best pancakes ever!
Ingredients:
Overnight batter:
- 200g of sour dough sarter discard, stirred down (3/4 cup)
- 240ml buttermilk or milk (I used milk) (1 cup)
- 2 large free range eggs, lightly beaten
- 3 TBS white sugar
- 1 tsp vanilla extract
- 60g butter melted (4 TBS)
- 280g plain flour (2 cups)
Add prior to cooking:
- 1 tsp bicarbonate of soda
- 1 tsp baking powder
- 1 tsp fine sea salt
To cook and serve:
- softened butter to grease the pan
- your favourite syrup
Instructions:
How to cook Sour Dough Pancakes
- The night before you want to make the pancakes, whisk together all of the overnight batter ingredients in a large bowl until well combined. Cover and leave to rest on the countertop overnight at room temperature, or for up to 12 hours.
- Just before cooking whisk in the remaining ingredients. Cover and let rest for about 10 minutes.
- Heat a griddle pan or large non-stick skillet. Rub lightly with butter. Pour in large dessertspoon's full into the pan (abou 1/4 cup measures). I can get 3 onto my griddle pan. Cook until golden brown on the bottom and the tops are covered with small bubbles. Flip over and brown the other side.
- Serve warm with your favourite syrup. We like Maple.
Notes:
You can scatter a few of your favourite berries over top before flipping them over. We like blueberries.

I have also made Sour Dough Brownies. These are incredible!

They are dense and fudgy like a good brownie should be. Moist, and yet you can hold them in your hand.

I had thought about stirring some chocolate chips or nuts into them, but didn't this time.

The flavour is really nice, with just a hint of tang.

Sour Dough Brownies
Yield: 9
Use your sour dough discard to make perfect moist and fudgy brownies!
Ingredients:
- 115g of semi sweet chocolate (4 ounces)
- 115g unsalted butter (1/2 cup)
- 190g caster sugar (1 cup)
- 1 tsp vanilla extract
- 2 large free range eggs, at room temperature
- pinch of salt
- 190g sour dough starter discard (3/4 cup)
Instructions:
- Preheat the oven to 180*C/350*F/ gas mark 4. Butter a 9 inch square baking tin and line it with some baking paper, leaving an overhang to ease in lifting the cooled brownies out of the pan.
- Chop the chocolate and place it into a bowl along with the butter, also cut into bits. Heat in the microwave on high for about 1 minute. Stir to melt the chocolate and butter. If it is not quite finished, pop it in for another 30 seconds or so. Stir until all are melted and amalgamated thoroughly. Stir in the sugar. Add the eggs, vanilla and salt, mixing well together. Finally stir in the sourdough starter, combining everything thoroughly. Pour into the prepared pan.
- Bake in the preheated oven for 25 to 28 minutes, or until a toothpick inserted in the centre comes out clean with no wet batter attached. Do not over bake.
- Allow to cool in the tin for 10 to 15 minutes before lifting out to a wire rack to cool completely. Cut into squares or rectangles to serve. I dusted the tops with a bit of icing sugar. Store in an airtight container. Will keep for a few days.

Having mastered the starter I figured I was ready to bake a loaf of bread.

I decided to start off simply with my first try at baking a loaf and I found the perfect recipe on Little Spoon Farm.

Baking Sour Dough bread can be a bit convulated, requiring many steps. I thought I would do simple for the first time, and this was the perfect recipe to begin with.

It turned out really nice. Not bad for a loaf of bread that was 8 days in the making (counting the number of days it took for me to get the starter going!)

As you can see it has a really nice texture. The crust is really nice as well.

Lots of lovely holes . . . the crust is a bit chewy for Todd. He has a difficult time with anything chewy or hard.

I will need to find a recipe for a loaf that makes a less chewy crust for him. MY sister found this for me on True Sour Dough.
- Wrap your sourdough bread neatly in a thick damp tea towel.
- Place loaf in a large sealed container for about an hour.
- Take it out of the container and place on a cooling rack still wrapped in the damp cloth for the remaining cooling time.
- Once it has cooled, you can remove the damp tea towel and you’ll find a lovely soft crust!
I will try that the next time. I do need want to get a few more things if I am going to bake sour dough regularly. A proper razor for cutting slashes in the top and some proper proofing baskets, but we will see how it goes. I don't want to spend too much money until I figure out if this is just a flash in the pan for me. I really hope to keep it up!
HOW TO STORE A SOUR DOUGH STARTER

(source)
I am going to try each of his methods. Watch this space!


Here in Chester we are lucky enough to have an indoor market right in the mid-town by the town hall. It is filled with some cafe's and a variety of small businesses, butchers, cheese monger, fish monger, greengrocers, etc.
They have been a God-send during this time of quarantine and lock-down. Each one are offering packages of their goods for home deliver, which has been a real blessing to me.

The other day I got a meat pack from the butcher. Geoff Hughes Family Butchers. I got the healthy eating pack which was filled with lean meats, sausage and chicken, and I added a medium roasting chicken to the order.
I have always been really happy with any meat that I have gotten from them. Contactless pay, and free contactless delivery. Safe. Safe. Safe.

Just look at that beautiful roasting chicken. Free-range and organic. Lovely and plump. I decided to spatch cock it for roasting.
Quite often I will spatchcock a chicken when roasting it. There are two great benefits to spatchcocking a whole chicken.

The first is that a spatchcocked chicken cooks faster and more evenly
than a chicken left in its naturally state.
This is fantastic for
when you want to cook a whole chicken on a barbecue, but its a method that is as equally
good when you’re wanting to roast the chicken in the oven.

The second advantage is that, with a spatchcocked chicken, all of the
skin gets lovely and crispy, not just the bits facing upwards in the
oven.
Even in a convection oven, roasting an unflattened chicken won’t
give you the same uniform browning as roasting a butterflied chicken. Salty, crunchy, golden skin is one of the best
things about a roast chicken. (Tell me I am not alone in this)
So you get a nice crisp skin, whilst maintaining the moist delectability of the roast chicken meat itself. Win/win! (Complete instructions are in the recipe on how to do this.) Today I inserted a mix of butter, herbs and lemon zest beneath the skin and rubbed a bit on top as well.

On this occasion I chose to roast my chicken on a bed of chopped root vegetables, aromatics and herbs. Carrots, parsnips, onion, celery, garlic, a quartered lemon and fresh thyme.
I softened them in a bit of olive oil first and then laid the spatchcocked chicken on top. Finally I squeezed a lemon over it all.

Oh boy but this smells pretty amazing when it is roasting . . . .

I start it at a high temperature and then turn the temperature down for the remainder of the roasting, basting the chicken partway through the roasting time.

The high temperature at the beginning really helps to create a nice crisp and golden skin . . . just look at that perfectly cooked wing . . .
my favourite bit . . . that and those little scallops on the underside near the thigh . . .

The aromatics roasting beneath the chicken serve as a trivet and also help to infuse flavour all the way through that meat . . .

And then of course the butter herb mixture beneath the skin helps to insure that the meat is really well flavoured and succulent.

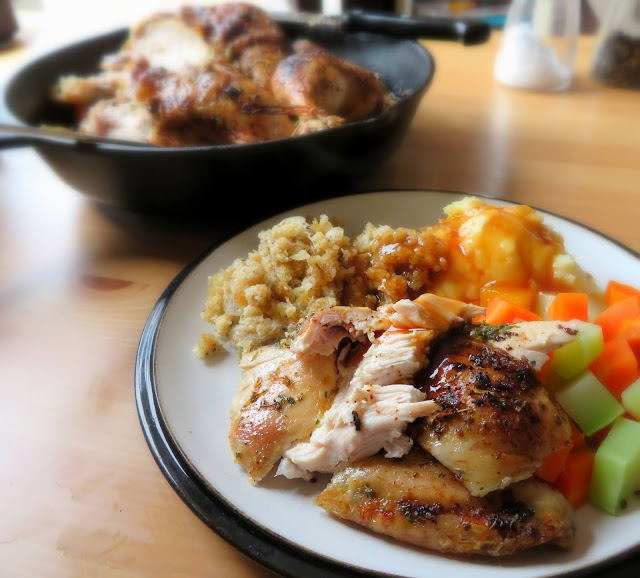
I served it with some of my homemade Sage and Onion Stuffing. (I made a double batch so I could freeze some for another time.) This is so good. I could eat it wih a spoon, even before I cook it.

I cooked some cubed swede (rutabaga), carrots and broccoli stems for a vegetable. Broccoli stems are nice. Just peel and cube. No waste here!


The pan juices are really lush spooned over top. This was a fabulouslsy tasty dinner!
Yield: 4 with leftovers

Roasted Spatchcock Chicken
Tender moist and flavourfull chicken with a lovely crisp skin. Cooks to perfection in half the time.
Ingredients:
- 1 medium sized whole chicken, at room temperature
- 1 stalk of celery, trimmed and sliced
- 1 carrot, trimmed and sliced
- 1 parsnip, trimmed and sliced
- 1 onion, peeled and sliced
- 6 cloves garlic, peeled and bashed
- a few sprigs fresh thyme
- a splash of olive oil
- salt and pepper to taste
- 2 lemons, divided
- 1 tsp dried sage
- 1 tsp dried parsley
- 1 tsp dried rosemary
- 1 tsp dried thyme
- 4 TBS softened butter
Instructions:
- You will need a good pair of kitchen scissors for this recipe. Pat your chicken dry with some paper towelling and ten place it onto a large cutting board, bottom side up, neck facing you. Holding the neck in one hand, and using the kitchen scissors, cut down along the spine on one side, working as close to the spine as you can so that you don't waste any good meat. Repeat on the other side. Wrap the spine (chicken back) up tightly and freeze to make some chicken stock another time.
- Flip the chicken over on the cuttong board, breast side up. Using the heel of your hand press down firmly, flattening the breastbone (you will need to break it) so that the chicken and legs are all one thickness. I like to tie the legs together and tuck the wing tips under the skin of the thigh. (see photograph)
- Mix together the softened butter along with the dried herbs, and the zest of one lemon. Loosen the skin on both the breasts and the thigh and push some of this mixure under the skin. Rub any remaining mixture on top and dust generously with salt and black pepper.
- Preheat the oven to 225*C/425*F/ gas mark 7.
- Place all of the cut vegetables in an oven proof skillet (I use my cast iron one) with a splash of oil, and cook for about 10 minutes, tossing and stirring. Add one of the lemons quartered and then the sprigs of thyme. Place the spatch-cocked chicken on top of these in the skillet. Squeeze the juice from the zested lemon over top.
- Place the skillet in the preheated oven and roast for about 25 minutes. Lower the temperature to 190*C/375*F/ gas mark 5. Baste the chicken and roast for a further 35 to 45 minutes until the chicken juices run clear and the skin is a lovely golden brown.
- Remove from the oven and let rest for about 10 minutes before slicing to serve. If you wish you can use the pan juices to make a gravy, or you can just spoon a few of them over the sliced chicken to serve. Delicious!

We had plenty for dinner on the day. Leftovers for sandwiches, some for a casserole and the bones for a soup. Roast chicken really is the meal which keeps on giving!
This content (written and photography) is the sole property of The English Kitchen. Any reposting or misuse is not permitted. If you are reading this elsewhere, please know that it is stolen content and you may report it to me at: mariealicejoan@aol.com
Subscribe to:
Posts (Atom)





Social Icons