


I can only guess some really brave housewife happened upon the idea of using tomato soup to help cut back on butter and eggs which were really scarce at the time, along with wages. There is some, but not a lot.
What a wonderful way to think outside of the box! How very innovative. Whoever it was, I thank them very much!


You can leave it plain if you wish, or just make a vanilla butter cream. Plain it is lovely toasted lightly and spread with butter.
Yes, I do know how to add extra calories to just about everything. What can I say? Guilty as charged.I guess I just know how to put the good in taste. And my hips don't lie. They are the proof of the pudding.

This spicy moist cake is studded with sweet sticky raisins. You can leave them out if you want, but if you are a raisin lover, I highly recommend you leave them in. You could use chopped dates in their place if you wanted to, or even both.
Same with the walnuts. Leave them in and do toast them first if you can. It does make a difference. You could probably use pecans in their place, but I have just always used walnuts. Where I come from if a recipe calls for nuts, its usually walnuts.

Tomato Soup Cake
Ingredients
- 1/4 cup (60g) butter
- 1 cup (195g) sugar
- 1 large free range egg
- 1 (10 3/4 oz)(295g) tin of condensed tomato soup, undiluted
- 1 tsp bicarbonate of soda
- 1 1/2 cups (210 g) sifted all purpose (plain)flour
- 1 tsp ground cinnamon
- 1/2 tsp ground cloves
- 1/2 tsp ground nutmeg
- 1/4 tsp salt
- 1/4 tsp baking powder
- 1/3 cup (50g) raisins
- 1/3 cup (40g) toasted walnuts (coarsely broken)
- 2 1/2 TBS butter, at room temperature
- 4 TBS cream cheese, at room temperature
- few drops of vanilla extract
- 1 cup (130g) icing sugar sifted (or enough to give you the consistency needed) (In the UK it may take considerably more)
Instructions
- Preheat the oven to 180*C/350*F/ gas mark 4. Butter an 8 by 4 inch loaf tin and line with baking paper. Set aside.
- Cream the butter and sugar together until light and fluffy. Beat in the egg. Beat in the tomato soup.
- Sift together the flour, soda, baking powder and spices. Add to the creamed mixture and mix together just to combine. Fold in the raisins and nuts.
- Spread in the loaf tin and bake for 40 to 45 minutes until well risen and a toothpick inserted in the centre comes out clean. (Here in the UK, mine took an additional 10 minutes.)
- Let cool in the tin for 10 minutes, then tip out onto a wire rack to cool completely.
- When the cake has cooled make the frosting. Beat everything together until smooth, adding enough icing sugar to give you a smooth, thickish yet spreadable frosting. Spread over the top of the cake.
- Cut into thick slices to serve.
 How are you coping with all of the changes in Blogger? I am having a heck of a time myself. I have never been one much for writing code etc. Like a car, I just want to get behind the wheel and turn the key. This sure is different! I suppose in time it will become old hat! Things are not quite looking the same on my home page, but I am hopeful that they will sort themselves out in due time.


What intrigued me about this recipe was that it was mixed and baked in the tin. I have made a cake like that since I was a teen, called Wacky Cake. It was a recipe given to me by my best friend Linda's mother. I have been baking that one for nigh on 50 years now.
This, too was a chocolate cake, very similar to Wacky Cake, but at the same time quite different. This one was in the cookies and bars section of the book, amongst the brownies and other squares.

It also used an egg, which the Wacky Cake did not. In the Wacky cake recipe you made three hollows in the dry ingredients mixed in the pan. Into one went oil. Into the other went vinegar, into the last went water. This recipe has no vinegar either.
It also used melted chocolate instead of cocoa powder. I was intrigued. You lay a layer of walnut halves and chocolate chips on top of it prior to baking. Again, intrigued.

Not intrigued enough however to actually mix the cake in the pan. I wanted to be able to cut it into squares and so I mixed it in a bowl and the poured it into a baking tin I had buttered and lined with baking paper so I could lift it out.
I didn't want to take any chances on it sticking to the pan. I also wanted to be able to cut it into perfect squares. Yes, I can be a bit pedantic when it comes to things like that.

The end result is a lovely and moist chocolate bar/cake. Not too sweet, but with just the right amount of chocolate flavour.
It is more like a cake than a bar. I don't think you could call it a brownie, unless you are wanting a very cake-like brownie.

This is the kind of cake/bar my grandmother would have baked. I would love to know the history of it and how it came to have the name of Flash in a Pan.
I suspect it has something to do with it being mixed all together in the pan. Not to mention the ease at which it goes together and the short time it takes to bake. Indeed it is baked in a flash!

There are a few things in life which make me incredibly happy. One of those things is trying out a new recipe. Another is chocolate cake. I also love walnuts and chocolate chips.
Combine all of those things and I am very happy. In fact I am truly ecstatic if you want to get right down to it!


I don't know about you, but just reading that made my heart happy. Those are my values. Home. Family. Traditions and good food.
The message is repeated again in French just beneath. Did you know that New Brunswick is the ONLY truly officially bilingual province in Canada? Its true. Both Engish and French are its official languages. As are all of the street/traffic/highway signs, etc.

You can correct me if I'm wrong, but I do believe it is the law. I also think most children are able to be educated in both languages. My grandsons are being educated in both French and English. Its a good thing.
Half of this cookbook is in English and half of it is in French. Different recipes in each half. A great impetus to learn the language. Thankfully my highschool French is good enough that I can easily sort it out.

I was really pleased with how this "Flash in a Pan" turned out! It is nice and moist and quite chocolaty considering it only has two ounces of melted chocolate in it. Make sure you use a good dark chocolate.
I love the walnuts on the top. I did not bother to toast them this time as I knew they would be baking in the oven on top of the batter and would get nice and toasty anyways. I didn't want to risk them burning.

Flash in a Pan

Ingredients:
- 1/2 cup (120ml) canola oil
- 2 ounces melted unsweetened chocolate
- 1 large free range egg
- 1 1/4 cups (175g) plain flour
- 1 cup (190g) granulated sugar
- 1/2 tsp bicarbonate of soda
- 1/2 tsp salt
- 1/2 tsp vanilla extract
- 3/4 cup (180ml) water
- 12 to 16 walnuts halved
- 1/2 package of chocolate chips (I used 1 cup/180g)
Instructions:
- Preheat the oven to 180*C/350*F/ gas mark 4. You will need a 9-inch square cake tin.
- Mix the first 9 ingredients in the cake tin. Beat with a fork until light and creamy, for about 2 minutes. Scrape the bottom and sides of the tin with a spatula and then spread the batter out evenly in the tin.
- Arrange walnut halves evenly over top and scatter with the chocolate chips. Do not mix them in.
- Bake for about 30 minutes until the cake springs back when lightly touched and a toothpick inserted in the centre comes out clean.
- Cut into squares to serve.
notes:
 Clearly I do not have a heck of a lot of willpower when it comes to either chocolate or cake, or walnuts for that matter. Life is far too short not to be happy. A little treat now and then does a body and a mind good.
 Thanks so much for visiting. Do come again!


But I so wanted to get it, to enjoy it too. I was not ready to give up on it just yet. I couldn't understand why so many people waxed poetic about it. I wanted to be able to do the same.
And so I kept with it, persistently. Periodically trying a new recipe to see if I might not come up with something that I enjoyed. I so wanted to be able to taste what it was that other people were tasting.

A few weeks back I saw a video on Tasty for what looked like a really pretty ratatouille. It was composed of a sauce that was cooked first on top of the stove and then layered in a dish.
Next they added layers of thinly sliced rounds of vegetables to the top. They were arranged so prettily. It looked like a picture.
They drizzled a basil oil over top and then covered it tightly and baked it, until the vegetables were meltingly tender. It looked quite promising.

This week I added all of the vegetables to my grocery order so that I could make it. I bought myself some fresh yellow and green courgettes (zucchini) and ripe roma tomatoes. I also bought some baby aubergine (eggplant).
I did not want to make a full recipe, as I knew it would be far too much for us to conceivably eat. We do not have the appetites these days that we used to have in the old days.

Instead of their suggested topping for the vegetables I created one of my own using basil pesto, olive oil and a splash of Balsamic vinegar. I cannot think of anything that doesn't taste much better when having added a bit of Balsamic vinegar to it.
It looked as pretty as a picture before it went into the oven. I was so pleased with how it looked. I was almost dancing around the room. If this tasted even half as good when done as it looked before baking, we were in for a real treat!

I envisioned this beautiful pie dish of ratatouille coming from the oven. We eat first with our eyes after all, and it did smell quite lovely when it was baking.
Hmmm . . . it came out looking a bit like a dog's dinner I am sad to say. LOL I had to laugh when I saw it. Where was the visual appeal?

Anyways, I dutifully scattered some fresh basil over top and took some photos. If I am honest, and I always am, I wasn't feeling very hopeful.
To say I was more than a tad bit disappointed in how it looked is a bit of an understatement. The proof of the pudding is in the eating however, so I was reserving my judgement for that.

Even though there was a huge part of me that was thinking that if this looked this nasty, then it was going to taste nasty also. Admittedly it looked quite a bit better once I broke through and spooned some of it onto a plate.
But how would it taste . . . I held my breath. I had some lovely fresh French Bread that I had been saving to dip into it when it was done.

Admittedly, I hate to waste food. Fresh vegetables are somewhat expensive, even at this time of year when they are plentiful. If you don't have a garden, you are at the mercy of the shops.
I have to say the fresh veg I have been getting from Ocado have been really nice. They cost a bit more than Asda, but quality speaks for itself, and I have been more than happy with everything. They have now partnered with M&S and M&S is quality.

I spooned some out onto the plate. It didn't look half bad. It smelled gorgeous if I don't say so myself. I was feeling rather hopeful.
I had my crusty bread at the ready. Was I going to be happy? Was I finally going to see why people wax lyrical about Ratatouille?

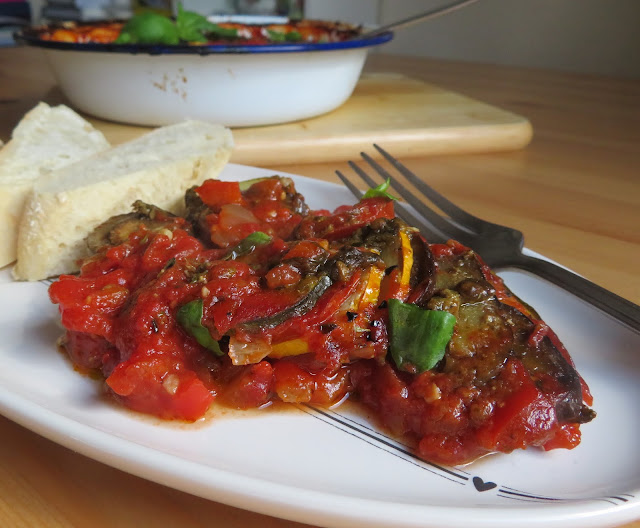
I was pleasantly surprised just by what it looked like spooned onto my plate. It actually looked so good that my tastebuds started to tingle . . .
It was filled with colour and texture. It smelled amazing. I was beginning to be hopeful.

I spooned some onto my bread. I did not butter the bread. I did not want my palate for the ratatouille spoiled by my love of butter. I wanted to try it completely unadulterated . . .
I did toy with the idea of toasting my bread, but in the end, I left it in its natural crusty state. I am happy that I did.

This was amazingly delicious! I was really pleased. The zucchini and the eggplant were properly tender. The tomatoes melted in the mouth . . .
There was none of the bitterness that you can sometimes get from both zucchini and eggplant. Both were somewhat buttery, almost sweet and somewhat indulgent.

The flavour of the sauce that was on the bottom perfectly enhanced and had flavoured everything. The pesto/balsamic mixture I had sprinkled on top had done its job perfectly.
The crusty bread was perfect without butter. It did a beautiful job of mopping everything up. I did what I had not done in a very long time. I went in for seconds.

Baked Ratatouille for Two
Ingredients:
- 1 14-oz (400g) tin of chopped tomatoes in tomato juice
- 1/2 small red bell pepper, trimmed and chopped
- 1 small onion, peeled and chopped
- 2 cloves garlic, peeled and minced
- salt and black pepper to taste
- 6 basil leaves chopped
- 1 medium green zucchini (courgette) thinly sliced, 1/8 inch thick
- 1 medium yellow zucchini (courgette) thinly sliced, 1/8 inch thick
- 1 very small egg plant (aubergine), trimmed and thinly sliced, 1/8 inch thick
- 2 roma tomatoes, cored and thinly sliced, 1/8 inch thick
- fine sea salt and black pepper to taste
- 1 TBS basil pesto
- 1 TBS olive oil
- 1 tsp balsamic vinegar
- torn basil leaves to garnish
- crusty French bread to serve
Instructions:
- Begin by making the sauce. Add the oil to a saucepan. Add the peppers, onions and garlic. Sweat over medium heat, stirring frequently for 4 to 5 minutes until tender. Add the tomatoes and seasonings. Simmer for about 15 minutes until nicely thickened. (This is important as the vegetables will give out more liquid in the oven and you don't want them to dilute the sauce too much.) Pour into an 8 inch pie dish, smoothing over the top. Place on a baking tray.
- Preheat the oven to 190*C/375*F/ gas mark 5.
- Arrrange the sliced vegetables decoratively over top of the tomato sauce, pushing them down into it a bit.
- Whisk together the pesto, olive oil and balsamic vinegar. Drizzle this over top of the vegetables in the baking dish. Cover tightly with aluminium foil.
- Bake in the preheated oven for 40 minutes. Uncover and bake for a further 10 to 15 minutes, until the vegetables are meltingly tender.
- Serve warm or at room temperature, garnish with fresh basil and with some fresh French bread to help mop all of it up. Delicious!
notes:
 I am really pleased that I decided not to give up on ratatouille. If you have never tried it before, I really hope that you will. Especially now when we have an abundance of fresh zucchini and tomatoes to work with!
 Thanks so much for visiting. Do come


One of the things I love to make when we have leftover roasted or rotisserie chicken is Nachos. They are easy to make, and very easily adapted to your individual tastes.
They also make for a very quick week night supper, or if you are feeling particularly indulgent, something to munch on whilst watching a game or a film on the telly at the weekend! Teenagers also love them, so they are great for teen get-togethers and parties.
Not that any of us are doing a lot of partying at the moment with the virus, but one can always live in hope!

Nachos was not something I had ever made until my sister introduced me to them back in the 1990's. We did eat a lot of Tex Mex food in my home. Enchiladas and Tacos were a real favourite.
But I had just not heard of or tried Nachos. We went en masse to visit my sister with my mother one weekend when my sister was living in London, Ontario and I was living in Meaford, Ontario. When I think back on it now, that was really a lot of Nachos to make in order to feed all of us!

But that is one of the great things about nachos! You can amp them up or down according to how many people you have at the table! There would have been 14 of us including my mother.
Another good thing is that they are really quick and easy to make! Cheesy, crisp tortilla chips, layered with flavourful chicken, black beans and a variety of toppings!
You just can't go wrong! They are real people pleasers!


Actually, I will usually make ours separately. I will use Tortilla chips for mine and frozen french fries for his. Everybody's a happy camper!!!
I used leftover chicken for mine this time, from our roast dinner the other day. You can also use shredded rotisserie chicken, which works perfectly well.

I like to toss the chicken together with some seasonings to give it extra flavour. I use mild chili powder that I bring over here from North America. I find the British Chili powder far too spicy and hot.
Funny story. I had not lived here very long and Todd's Aunt Doris was up from Devon visiting us. She was the age then that Todd is now. I wanted to make my special chili potatoes for us as a side dish for our supper.

I added a full tablespoon of what I though was regular chili powder. One biteful and our heads almost blew off! Kapow! I had never tasted anything so hot in my life. Totally inedible.
The chili powder here in the UK is completely unadulterated by anything else. It is pure ground dried red chilis and it is hot, hot, hot! In North America what we buy as chili powder has been mixed with other things such as ground oregano, cumin, coriander, garlic, salt and cloves!

I was totally surprised at the heat of the chili powder here! A mistake I never made ever again! If you are worried about your chicken being too dry, you can also add a quantity of prepared tomato salsa.
You don't need a lot, just a couple of dollops will do it. You don't want it to be soggy so that it makes your chips soggy. Unless you particularly like soggy chips! We I don't!


I like to use lots of different toppings when it comes to my nachos. Sliced olives (both black and green), diced bell peppers (red, yellow and green), chopped green chilies and chopped red onions. I also used some black beans.
Feel free to adapt those toppings to whatever your family loves and enjoys. You can add pickled jalapenos, or roasted green chilies. Some people even like sliced raw green chilies. I am afraid I can't stand the additional heat!

If you don't like chicken, or have a vegetarian in the house, you can use shredded jack fruit in much the same way. It has a texture very similar to that of meat.
If you don't want to use chicken, you can use browned ground beef, or even browned ground turkey. Just add the spices as I have suggested as per the recipe and amounts. For two people I would never go larger than 2 cups, and to be honest 2 cups is very generous.
These are double layered. You get a first layer of chips and chicken and cheese and then a second layer of the same, finally topping them with your preferred toppings.

I served these hot with our favourite cold tomato salsa and some sour cream. I also splashed some green Tabasco over the top of mine.
Green Tabasco doesn't have quite as much heat as the red Tabsco sauce has. I quite like it actually. Its really good on eggs of any kind.
Sheet Pan Chicken Nachos make for a lush and deliciously perfect mid-week supper! Quick and easy to make an economical, they always go down a real treat!
Easy Sheet Pan Chicken Nachos for Two

Ingredients:
- 1/2 cup (45g) of well drained black beans
- 1/4 cup (45g) of sliced olives (I use a mix of green and black)
- 1/2 small jalapeno pepper, trimmed and finely chopped
- 1/2 small red onion, trimmed and finely chopped
- 4 TBS finely chopped coloured bell peppers (use a mix)
- 1 1/2 cups (6 ounces) grated Monterery Jack cheese
- 2 cups chopped or shredded leftover roast, or rotisserie chicken
- 2 tsp mild chili powder
- 1/2 tsp garlic powder
- 1/2 tsp onion powder
- 1/2 bag of restaurant style tortilla chips (8 ounces or 225g)
- Tomato salsa
- Dairy sour cream
- guacamole
- Chopped green onions and tomatoes
Instructions:
- Preheat the oven to 225*C/425*F/ gas mark 7. Line a rimmed baking sheet with aluminium foil. Spray lightly with some low fat cooking spray.
- Prepare your chicken by either cubing or shredding. Toss in together in a bowl along with the chili powder, garlic powder and onion powder. (You can also add some tomato salsa if you wish.)
- Build your nachos by layering the ingredients on the baking sheet as follows: Half of the tortilla chips (spread out in an even layer), 1/2 of the chicken, 1/2 of the cheese, the black beans, the remaining tortilla chips, the remaining chicken, the remaining cheese, then the olives, jalapeno, peppers and chopped onions.
- Bake in the preheated oven for 8 to 10 minutes until the cheese has melted and everything is heated through. The edges should just be starting to brown.
- Divide between two plates and serve hot with your desired garnishes.





Social Icons