


Today I am sharing a recipe which has been a family favorite in my home for over 40 years. Graham Cracker Pie. I actually have two versions of this recipe.
One was given to me by my good friend Leona in 1982 and the other is one which I found in a cookery book entitled Woman's Day Old-Fashioned Desserts by Barbara Myers. Both are excellent recipes.
Today I have used the recipe found in the book.
.JPG "Graham Cracker Pie")
There is a very similar version of it out there called Flapper Pie. That version probably dates this pie back to the 1920's era of the Flapper! This version varies slightly from that one.
This is just not any pie, but a beautiful creamy vanilla custard pie, nestled into a sweet graham cracker crumb crust, topped with sweet meringue and more graham cracker crumbs. This then baked until the crumbs get all nice and crisp.
.JPG "Graham Cracker Pie")
I used to make this a lot when my children were growing up. It was a real favorite with them, and I loved it too as it was fairly simple to make.
There was no rolling out of pie crust. You just made the cracker crumb crust, a simple vanilla pudding filling, a meringue to top and then baked it to brown and crisp everything up.
It also used things which I normally always had in my larder and refrigerator. Simple and yet incredibly delicious.
.JPG "Graham Cracker Pie")
WHAT YOU NEED TO MAKE GRAHAM CRACKER PIE
Simple basic everyday ingredients. It's not rocket science.
For the crust:
- 1/2 cup (120g) butter, melted
- 1 1/2 cups (135g) graham cracker crumbs (can use Digestive crumbs)
- 1/4 cup (50g) sugar
For the filling:
- 1/2 cup (100g) granulated sugar
- pinch salt
- 1 TBS cornstarch (corn flour)
- 1 TBS plain all-purpose flour
- 2 cups (480ml) whole milk
- 2 large free-range egg yolks
- 2 tsp butter
- 1 tsp vanilla
For the meringue topping:
- 2 large free-range egg whites
- 1/2 tsp salt
- 1/4 tsp cream of tartar
- 1/2 tsp vanilla
- 4 TBS icing sugar, sifted
.JPG "Graham Cracker Pie")
As stated above you can use digestive biscuit crumbs in place of the graham cracker crumbs if you live in the UK. The important thing is to make sure that the crumbs are quite fine. I use my food processor to ensure this.
You don't want big lumps of crackers or Digestives in the crust.
Here in North America, you can buy graham cracker crumbs, which is graham crackers already pulverized into crumbs. They are a very handy ingredient to have in your store cupboard.
.JPG "Graham Cracker Pie")
You don't have to use whole milk to make the filling. I do think it makes for a richer tastier filling, however. By all means use semi-skimmed or 2% if that is what you have.
I always use pure vanilla extract in my baking. It is well worth the extra expense. Its flavor is exceptional.
You can also use ordinary large eggs. I made a conscious choice a number of years ago to use only free-range eggs because I abhor the practice of using caged hens to produce eggs.
.JPG "Graham Cracker Pie")
HOW TO MAKE GRAHAM CRACKER PIE
There are three basic elements to this pie. Crust, filling and topping. It may seem complicated, but I can promise you that it is really very simple.
For the crust, mix the sugar, melted butter and crumbs together until well combined. Reserve a scant half cup for the topping. Press the remainder into the bottom and up the sides of a buttered 9-inch oven-proof pie tin. Set aside.
.JPG "Graham Cracker Pie")
For the filling, whisk the sugar, salt, corn flour, and all-purpose flour together in the top of a double boiler. Slowly whisk in the milk. Set over simmering water and cook, stirring constantly, until the mixture thickens. (About 10 minutes)
Beat the egg yolks in a small bowl. Gradually whisk in half of the cooked mixture. Return the egg and custard mixture back into the top of the double boiler. Cook, stirring constantly, until the mixture bubbles and thickens, about 3 to 4 minutes longer. The mixture should barely hold its shape when a spoon is drawn through it.
Whisk in the butter and vanilla. Leave to cool for about 5 minutes and then carefully pour into the crumb crust. Leave to cool slightly.
.JPG "Graham Cracker Pie")
Preheat the oven to 350*F/180*C/gas mark 4.
Whisk the egg whites together with the vanilla, salt and cream of tartar just until the mixture starts to mound. Continue to beat whilst slowly adding the sugar, beating until stiff peaks form and the mixture is glossy.
Spread the meringue on top of the pie filling, spreading it right to the edges. Sprinkle the reserved crumb evenly over top.
Bake in the preheated oven for 20 to 25 minutes, or until the crumbs are crisp and the meringue feels firm.
Leave to cool completely and serve at room temperature.
.JPG "Graham Cracker Pie")
I do apologize for the sloppy look of the pie in the photos. It's just me. I wasn't patient enough to let it sit long enough before cutting into it.
Ideally you should let it sit for 2 to 3 hours before cutting into it. Your slices will be much neater.
This was still slightly warm and so it didn't stand up as it should. I was chasing the light. I like to take my photos in natural light and the day was getting on and the light was fast fading.
.JPG "Graham Cracker Pie")
In any case I hope it doesn't put you off from making this delicious pie. I can promise you that everyone will love it. It's been pleasing my family for a very long time.
No bells, no whistles. Just plain old-fashioned goodness. You can't beat it!
.JPG "Graham Cracker Pie")
Some other family favorite pies you might be interested in are:
BEST BUTTERSCOTCH PIE - My MIL's pie for a delicious creamy butterscotch filled pie, topped with meringue. All from scratch. It was always my ex-husband's choice for his birthday rather than a cake. Yes, it IS that good! Rich filling, sweetly topped in a buttery flaky crust. You can't beat it.
OLD FASHIONED LEMON ICEBOX PIE - Fluffy, creamy and tangy, this old-fashioned Lemon Icebox Pie recipe is an old family favourite that goes way back. This recipe has sat in my Big Blue Binder for probably over 40 years. It is a fabulously delicious lemon icebox pie recipe that is no bake. Quick, easy and yes, delicious. It also uses no eggs, unlike many of the lemon icebox pie recipes I have seen out there and there is no cooking at all involved.
Yield: 6-8
Graham Cracker Pie
Prep time: 5 MinCook time: 40 MinTotal time: 45 Min
A delicious cream filling in a crumb crust, topped with meringue and more crumbs! A fabulous family pie!
Ingredients
For the crust:
- 1/2 cup (120g) butter, melted
- 1 1/2 cups (135g) graham cracker crumbs (can use Digestive crumbs)
- 1/4 cup (50g) sugar
For the filling:
- 1/2 cup (100g) granulated sugar
- pinch salt
- 1 TBS cornstarch (corn flour)
- 1 TBS plain all-purpose flour
- 2 cups (480ml) whole milk
- 2 large free-range egg yolks
- 2 tsp butter
- 1 tsp vanilla
For the meringue topping:
- 2 large free-range egg whites
- 1/2 tsp salt
- 1/4 tsp cream of tartar
- 1/2 tsp vanilla
- 4 TBS icing sugar, sifted
Instructions
- For the crust, mix the sugar, melted butter and crumbs together until well combined. Reserve a scant half cup for the topping. Press the remainder into the bottom and up the sides of a buttered 9-inch oven-proof pie tin. Set aside.
- Whisk the sugar, salt, corn flour, and all-purpose flour together in the top of a double boiler. Slowly whisk in the milk. Set over simmering water and cook, stirring constantly, until the mixture thickens. (About 10 minutes)
- Beat the egg yolks in a small bowl. Gradually whisk in half of the cooked mixture. Return the egg and custard mixture back into the top of the double boiler. Cook, stirring constantly, until the mixture bubbles and thickens, about 3 to 4 minutes longer. The mixture should barely hold its shape when a spoon is drawn through it.
- Whisk in the butter and vanilla. Leave to cool for about 5 minutes and then carefully pour into the crumb crust. Leave to cool slightly.
- Preheat the oven to 350*F/180*C/gas mark 4.
- Whisk the egg whites together with the vanilla, salt and cream of tartar just until the mixture starts to mound. Continue to beat whilst slowly adding the sugar, beating until stiff peaks form and the mixture is glossy.
- Spread the meringue on top of the pie filling, spreading it right to the edges. Sprinkle the reserved crumb evenly over top.
- Bake in the preheated oven for 20 to 25 minutes, or until the crumbs are crisp and the meringue feels firm.
- Leave to cool completely and serve at room temperature.


Sometimes you just crave a Cinnamon roll, but you have neither the inclination nor the time to take the traditional yeast bread route. That's when a recipe such as this one for these delicious melt-in-the-mouth Bisquick Cinnamon Rolls comes in very handy!
These delicious rolls leave everyone wanting more, and you won't mind a bit because they are so quick and easy to make!

This is the perfect recipe to whip up at the weekend, especially a holiday weekend when you have loads of people about and nipping at your heels for something tasty to enjoy with their morning cup of java!
These fit the bill perfectly because not only are they quick and easy to make, but they are delicious! They literally do melt in the mouth!
%20-%20Copy.JPG "Bisquick Cinnamon Rolls")
When we were growing up, we never had any such thing as a yeasted Cinnamon roll in our house. My mother always made them with biscuit dough. That is what I grew up with and what my children grew up with.
I never knew there was any other kind. Truth be told I enjoy this type of Cinnamon roll much more than the traditional ones. I suppose it is all in what you are used to!
%20-%20Copy.JPG "Bisquick Cinnamon Rolls")
This particular version is loaded with plenty of rich buttery cinnamon flavor with a filling made from ground cinnamon, butter, brown sugar and vanilla.
The dough itself is merely Bisquick baking mix, sugar and milk. Where these differ from other cinnamon rolls of the same ilk however is that some warm milk gets poured over them just prior to baking.
This makes for a really rich and fluffy/moist cinnamon roll!
%20-%20Copy.JPG "Bisquick Cinnamon Rolls")
If you are in the UK you may not be familiar with Bisquick baking mix. This is a type of biscuit/scone mix that you can buy in the shops and use to make quick and easy biscuits/scones/pancakes.
It may not be readily available in the UK, but never fear, I had a fabulous recipe to make your own baking mix here. You will find it comes in handy for all sorts!
.JPG "Bisquick Cinnamon Rolls")
It comes in very handy for all sorts of quick and easy dishes, both savory and sweet. I enjoy using it to make my Raspberry Peek-a-Boos. (A delicious raspberry muffin cup type of dessert.)
It is also an integral ingredient in my (4-ingredient) Easy 7-Up biscuits/scones.
It also makes a great topping for meat pies and casserole, etc. and of course these fabulously delicious melt-in-the-mouth Cinnamon Rolls.
.JPG "Bisquick Cinnamon Rolls")
WHAT DO YOU NEED TO MAKE BISQUICK CINNAMON ROLLS
Other than the baking mix everything is pretty straight forward.
For the cinnamon filling:
- 1/3 cup (80g) butter at room temperature
- 1/3 cup (75g) soft light brown sugar
- 2 tsp ground cinnamon
- 1 tsp vanilla extract
For the rolls:
- 3 cups (360g) Bisquick baking mix (see note)
- 1/2 cup (120ml) milk
- 1/4 cup (50g) granulated sugar
soaking liquid:
- 1/3 cup (80ml) warm milk
To glaze:
- 1 cup (130g) icing sugar
- 2 TBS milk
.JPG "Bisquick Cinnamon Rolls")
I use regular salted butter in these and full fat milk. For the cinnamon sugar filling you want your butter to be at room temperature so that you can mix it together easily with the other ingredients.
I always use pure Vanilla Extract. There is just no comparison between the artificial one and the real thing. The real thing is always better.
.JPG "Bisquick Cinnamon Rolls")
HOW TO MAKE BISQUICK CINNAMON ROLLS
These are so easy to make, almost instant in comparison to the yeast variety.
Preheat the oven to 375*F/190*C/ gas mark 5. Butter an 8-inch square baking tin very well. Set aside.
Beat all of the ingredients for the cinnamon filling together until light and well combined. Set aside.
Measure the baking mix into the bowl. Whisk in the sugar. Add the milk and mix together to a soft dough.
.JPG "Bisquick Cinnamon Rolls")
Roll the dough out to an 8" by 18" rectangle on a lightly floured surface using a lightly floured rolling pin. Spread the Cinnamon Filling evenly over top. Roll up tightly from short end to short end. Cut into 9 (2-inch) slices.
Place the slices into the prepared baking tin, leaving space in between each roll.
Warm the milk in the microwave for 15 seconds and then pout over top of the cinnamon rolls in the pan.
.JPG "Bisquick Cinnamon Rolls")
Bake in the preheated oven for 25 minutes until the rolls are golden brown and each roll is cooked through, including the center roll.
While the rolls are baking whisk together the sugar and milk to make the glaze.
Remove the cooked rolls from the oven and leave to rest for 5 minutes. Spread the glaze over the hot rolls to cover. Serve warm.
.JPG "Bisquick Cinnamon Rolls")
I think you will find that these are really delicious. They almost melt in the mouth, with that beautifully textured roll, to the rich and buttery filling and that sweet glaze is just the perfect finishing touch.
These would be great any time but might come in especially handy during the holidays when you are wanting to have something quick and easy up your sleeve!
.JPG "Bisquick Cinnamon Rolls")
If you are wanting to go the more traditional route you may like my Small Batch Yeasted Cinnamon Rolls. The recipe makes exactly six beautiful, puffy, soft and incredibly tasty rolls.
I also have a great recipe on here for Air Fryer Cinnamon Rolls made using the Refrigerated Cinnamon Rolls you can buy at the shops! That one is also quick, easy and delicious.
Yield: 9
Bisquick Cinnamon Rolls
Prep time: 15 MinCook time: 25 MinInactive time: 5 MinTotal time: 45 Min
These delicious cinnamon rolls are a lot faster to make than the traditional ones and they melt in the mouth with a beautiful texture and plenty of cinnamon flavor!
Ingredients
For the cinnamon filling:
- 1/3 cup (80g) butter at room temperature
- 1/3 cup (75g) soft light brown sugar
- 2 tsp ground cinnamon
- 1 tsp vanilla extract
For the rolls:
- 3 cups (360g) Bisquick baking mix (see note)
- 1/2 cup (120ml) milk
- 1/4 cup (50g) granulated sugar
soaking liquid:
- 1/3 cup (80ml) warm milk
To glaze:
- 1 cup (130g) icing sugar
- 2 TBS milk
Instructions
- Preheat the oven to 375*F/190*C/ gas mark 5. Butter an 8-inch square baking tin very well. Set aside.
- Beat all of the ingredients for the cinnamon filling together until light and well combined. Set aside.
- Measure the baking mix into the bowl. Whisk in the sugar. Add the milk and mix together to a soft dough.
- Roll the dough out to an 8" by 18" rectangle on a lightly floured surface using a lightly floured rolling pin. Spread the Cinnamon Filling evenly over top. Roll up tightly from short end to short end. Cut into 9 (2-inch) slices.
- Place the slices into the prepared baking tin, leaving space in between each roll.
- Warm the milk in the microwave for 15 seconds and then pout over top of the cinnamon rolls in the pan.
- Bake in the preheated oven for 25 minutes until the rolls are golden brown and each roll is cooked through, including the center roll.
- While the rolls are baking whisk together the sugar and milk to make the glaze.
- Remove the cooked rolls from the oven and leave to rest for 5 minutes. Spread the glaze over the hot rolls to cover. Serve warm.
Notes
You can easily make your own baking mix. Find my Homemade Baking Mix Recipe here.

Thanks so much for visiting! Do come again!

When my family was growing up, I spent many weeks prior to Christmas baking and preparing for the holiday season. I used to freeze everything in airtight containers, ready to be enjoyed on the day, and throughout the holidays.

We didn't have a lot of money to go around back then, and so it only made sense to prepare things a little bit at a time. It also made sense time wise. Who wants to be caught having to bake your brains out at the last minute!
I also liked to give baking trays filled with a variety of cookies and bakes to family and friends for the holidays. Nobody ever turned such a gift down!
.JPG "Raspberry Crumble Cookies")
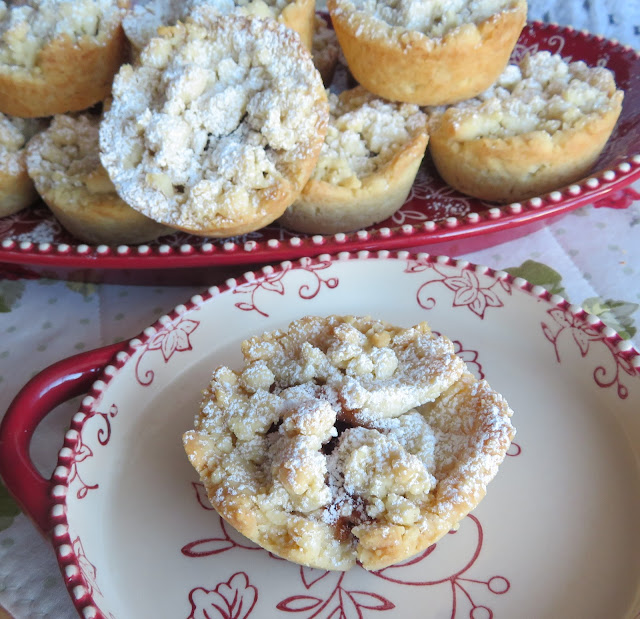
These melt-in-the-mouth crumble cookies are amazingly delicious with a shortbread-like texture, a sweet jam filling and a moreish buttery crumble topping.
One buttery batter is created to form both the base and the topping. Are they a tart? Are they a cookie? I say they are both!
.JPG "Raspberry Crumble Cookies")
The moreish crumble batter mixture is very easy to make. Pressed into muffin tins it forms a beautiful buttery base, ready to cup sweet raspberry jam.
Some more of that buttery batter is crumbled over top for the perfect crumbly finish.
.JPG "Raspberry Crumble Cookies")
WHAT YOU NEED TO MAKE RASPBERRY CRUMBLE COOKIES
A few pantry staples put together in a most delicious way. There is nothing out of the ordinary here!
- 1 cup (225g) butter, softened
- 1/3 cup (45g) icing sugar
- 1/4 cup (50g) granulated sugar
- 1 tsp vanilla extract
- 1 tsp almond extract
- 2 1/4 cups (315g) all-purpose plain flour
- pinch of salt
- seedless raspberry jam
.JPG "Raspberry Crumble Cookies")
I take my butter out of the refrigerator early in the morning when I get up. That way it is at room temperature, which is the perfect temperature to begin making these.
I use organic granulated sugar which we get from Costco. My icing sugar or confectioner's sugar as it is also called just comes from the store.
.JPG "Raspberry Crumble Cookies")
If you are not fond of almond extract, you can leave it out altogether. I use half the amount the recipe calls for.
You can use any kind of jam you like in these cookies, but I think the red jams make the prettiest show. I also happen to love raspberry or strawberry jam. I use seedless jam as well, for a better presentation.
You could also use mincemeat for a really simple mincemeat tart.
.JPG "Raspberry Crumble Cookies")
HOW TO MAKE RASPBERRY CRUMBLE COOKIES
These really are some of the easiest cookies to make.
Preheat the oven to 350*F/180*C/ gas mark 4. Butter a 12-cup muffin cup tin. Set aside.
Cream the butter and both sugars together using an electric whisk for two to three minutes until light and creamy. Beat in both extracts.
Add the flour and mix until just mostly combined. The mixture should be a bit crumbly, but it should also hold together if you squeeze the mixture in your hands. If it is too sticky add a bit more flour.
Measure out about 1/3 of the mixture and reserve for the topping.
.JPG "Raspberry Crumble Cookies")
Divide the remaining mixture between the muffin cups and press into the cups, making sure you go up the sides a bit in order to create a space for the jam to go. This is the muffin tin I use. I highly recommend it.
Spoon about a TBS of jam into the center of each. Sprinkle some of the reserved crumble mixture over the top of each cookie.
Bake in the preheated oven for about 20 minutes or until the tops are starting to turn golden brown.
Leave in the pan to cool completely before removing carefully from the pan.
Store in an airtight container for up to 5 days at room temperature. These can be frozen in an airtight container for up to 3 months.
I dusted mine with a bit of confectioner's sugar for a prettier presentation.
.JPG "Raspberry Crumble Cookies")
Try not to overdo the jam you put into each cookie. Jam really expands when heated, so less really is more. Also, you risk your cookies sticking to your pan and being difficult to remove.
Do make sure you leave them in the pan to cool completely before trying to remove them so as to prevent breakage. They tend to be a bit crumbly while still warm.
.JPG "Raspberry Crumble Cookies")
These really do melt in the mouth. They are like a shortbread cookie, only better, because of the jam. My family has always been nuts about jam in cookies, so these tasty bakes are right up our alley!
You can make them smaller if you wish and get more cookies out of them, but I find that they are just the right size for us!
.JPG "Raspberry Crumble Cookies")
Some other Christmas cookies that you might enjoy are:
MACADAMIA SHORTBREAD COOKIES - Shortbread cookies? Macadamia nuts? You can't lose. These are very simple to make and bake as well. Incredibly moreish. You have been warned.
SPECULAAS - These are my favourite of all the Christmas Cookies. Dutch Speculaas cookies, or what I grew up calling windmill cookies. They are a type of spiced shortcrust biscuit, traditionally baked for consumption on or just before the St Nicholas' feast in the Netherlands.
Yield: 12
Raspberry Crumble Cookies
Prep time: 10 MinCook time: 20 MinTotal time: 30 Min
Melt in your mouth jammy buttery crumble cookies. Half cookie, half tart, 100% delicious.
Ingredients
- 1 cup (225g) butter, softened
- 1/3 cup (45g) icing sugar
- 1/4 cup (50g) granulated sugar
- 1 tsp vanilla extract
- 1 tsp almond extract
- 2 1/4 cups (315g) all-purpose plain flour
- pinch of salt
- seedless raspberry jam
Instructions
- Preheat the oven to 350*F/180*C/ gas mark 4. Butter a 12-cup muffin cup tin. Set aside.
- Cream the butter and both sugars together using an electric whisk for two to three minutes until light and creamy. Beat in both extracts.
- Add the flour and mix until just mostly combined. The mixture should be a bit crumbly, but it should also hold together if you squeeze the mixture in your hands. If it is too sticky add a bit more flour.
- Measure out about 1/3 of the mixture and reserve for the topping.
- Divide the remaining mixture between the muffin cups and press into the cups, making sure you go up the sides a bit in order to create a space for the jam to go.
- Spoon about a TBS of jam into the center of each. Sprinkle some of the reserved crumble mixture over the top of each cookie.
- Bake in the preheated oven for about 20 minutes or until the tops are starting to turn golden brown.
- Leave in the pan to cool completely before removing carefully from the pan.
- Store in an airtight container for up to 5 days at room temperature. These can be frozen in an airtight container for up to 3 months.

Thanks so much for visiting! Do come again!
Subscribe to:
Posts (Atom)





Social Icons