Pages

  • Contact Me
  • MAKE YOUR OWN (a list of make your own mixes)
  • Recipe Index
  • Privacy Policy
  • Advertising and Disclosure
  • Post Index

Search This Blog

Powered by Blogger.

Social Icons

The English Kitchen

Pages

  • Home
  • About Me
  • Cook Booklets
  • Categories
  • _Kitchen Wisdom
  • _In The Larger and Pantry
  • _Couldn't Live Without
  • _Kitchen Wish List
  • Additional Recipes
  • _Vegetarian
  • _Salads
  • _Breads
  • _Sandwiches

Baked Broccoli Alfredo Rigatoni

Wednesday, 28 May 2025


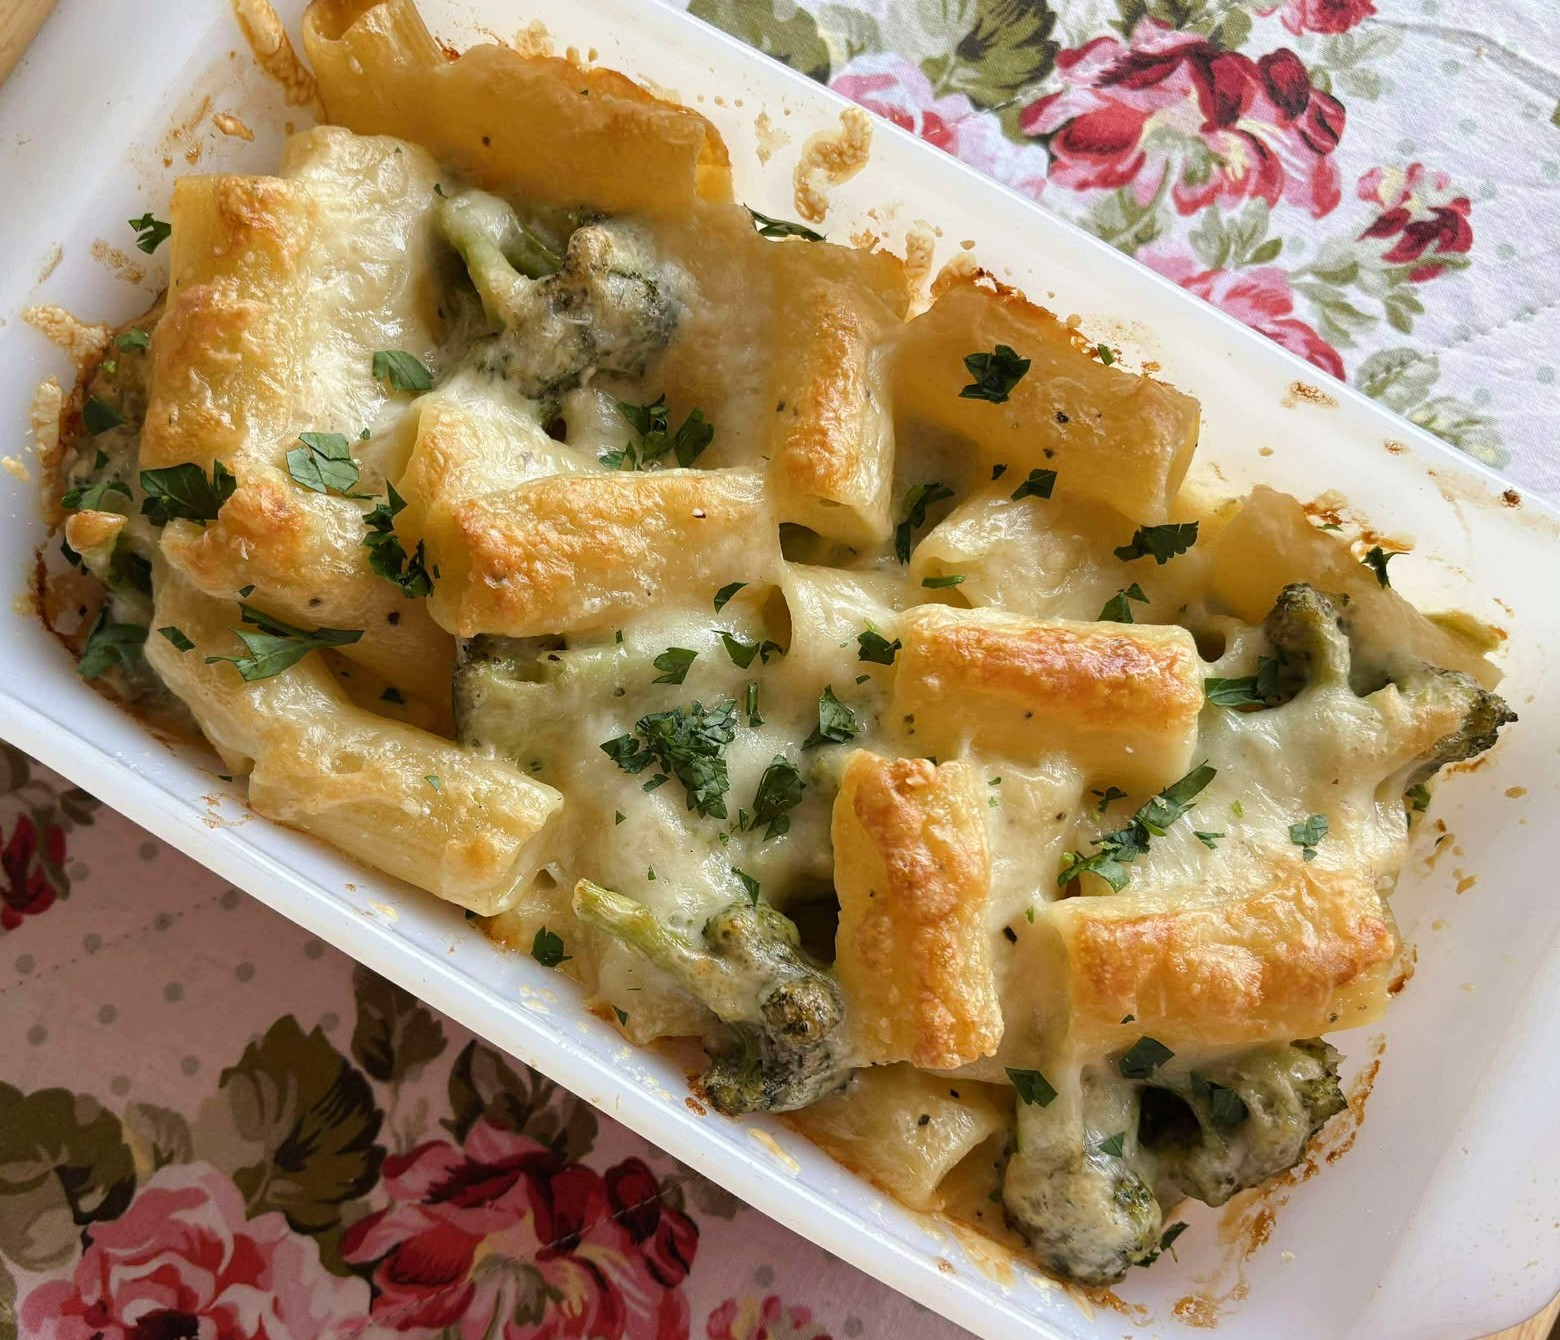
Broccoli Alfredo Rigatoni 


I think pasta has to be one of my favorite things and yet it was not something we had very often when I was growing up. My mom never made macaroni and cheese or anything like that. She made hamburger macaroni every now and then (not my favorite) and when we got into our teens, she discovered what he called Italian spaghetti!!


She was really proud of that. It was a pound of ground beef browned in a saucepan with a can of Catelli pasta sauce added.  Again, I was not a fan.  The sauce was lackluster and to be honest I was not fond of the meat in the "sauce." It was fatty and just blech.  It was a texture thing.


Broccoli Alfredo Rigatoni 


It got so she would save me a couple TBS of the sauce before she added the meat, and I would eat my spaghetti plain with that sauce and a bit of cheese on top. I was quite happy with that.


I have always been quite happy to eat my pasta without meat.  This recipe I am sharing with you today is for a simple pasta dish which is creamy and comforting. No meat in it, but plenty of crispy tender broccoli. All folded together with a velvety Alfredo sauce and baked beneath a blanket of cheese. What's not to like about this one!!


This is a small batch recipe that makes two delicious servings! You can easily double it to feed more and make it ahead of time ready to pop into the oven at supper time if you wish!


Broccoli Alfredo Rigatoni 


WHAT YOU NEED TO MAKE BAKED BROCCOLI ALFREDO RIGATONI


Just a few simple ingredients.  There is nothing overly complicated about this dish.


  • 1 1/3 cups (6 ounces/150g) rigatoni pasta, uncooked
  • 1/2 broccoli crown, broken into florets (about 1 cup)
  • 1 cup (257g) Alfredo sauce (see below how to make your own)
  • 1/2 cup (56g) grated Mozzarella cheese
  • 1/4 cup (45g) grated Parmesan cheese
  • 1 clove garlic, peeled and bruised
  • salt and black pepper to taste

Broccoli Alfredo Rigatoni 


You can use any tubular shaped pasta for this recipe.  You could even use Fusilli if that is all you have.


You could use frozen broccoli if you wanted to. Thaw it first, but do not blanche it with the pasta when you cook that.  Just add it thawed to the casserole and it will finish cooking in the oven without overcooking.

By bruising the garlic, I mean to bash it lightly with the bottom of a glass, cup or bottle.  You don't want it smashed to smithereens as you will want to fish it out before putting the dish together so nobody gets a whole clove of garlic in the mouth.

Broccoli Alfredo Rigatoni 


HOW TO MAKE BAKED BROCCOLI ALFREDO RIGATONI


This is really not hard to make at all. The broccoli cooks in with the pasta during the last few minutes of cooking the pasta.


Bring a large pot of salted water to the boil and then add the rigatoni pasta along with the bruised clove of garlic. Cook according to the package directions adding the broccoli florets during the last 2 minutes of cook time.


Drain well and rinse. Drain well again. Remove the garlic and discard. Return the pasta and broccoli to the saucepan. Fold in the alfredo sauce, coating everything well with it.


Preheat the oven to 350*F/180*C/ gas mark 4. Butter a 4-cup/1/2-liter baking dish. Pour the pasta and broccoli mixture into the baking dish.


Mix the mozzarella and Parmesan cheeses together. Sprinkle evenly over top of the pasta/broccoli. Bake in the preheated oven for 20 to 25 minutes until heated through and the cheese is golden brown.


Broccoli Alfredo Rigatoni 


Easy Alfredo Sauce (will printout with the recipe)


1 1/2 TBS butter
1/2 cup (120ml) half and half or cream
2 cloves garlic minced
3/4 cup (135g) freshly grated Parmesan cheese
salt and cracked black pepper to taste
freshly grated nutmeg (optional)


Melt the butter in a saucepan over medium heat. Add the cream and garlic and bring to a simmer. (don't allow to boil) Cook, whisking for about 5 minutes. Add the cheese slowly, whisking constantly until melted. Season to taste with salt and black pepper and nutmeg if desired.


If you think your sauce is too thick, you can thin it out with a bit of milk or pasta water.


Broccoli Alfredo Rigatoni 


HINTS AND TIPS


1. You can add any variety of vegetables to the dish to increase the nutritional value of the dish and add color and interest. Mushrooms, peppers, carrots, cauliflower, peas, etc. Just blanch them before adding them.  Fry the mushrooms and peppers.


2. This can be made ahead of time up to the point of oven baking it. Simply cover and pop into the refrigerator. Remove about half an hour before you want to cook it and proceed as per the recipe.


3. Feel free to add protein to the dish in the way of cooked and crumbled sausage, cubed cooked chicken or turkey, drained tinned salmon or tuna, etc.


4. Cook your pasta just to al dente.  Over cooking it will make it mushy.


5. Taste and adjust seasoning along the way.


6. If possible, grate your own cheeses. They usually add something to pre-grated cheese to keep it from clumping together and to make it flow better. You don't really want that in your sauce or casserole. 


Broccoli Alfredo Rigatoni 


This was exceptionally delicious and very easy to put together. I loved that it used only simple ingredients. I made my own Alfredo sauce and have added the recipe for that to the printable recipe in case you wish to do the same thing!


If you really wanted to you could add some tuna, salmon or cooked chicken to the dish. I enjoyed this with some crusty bread and a mixed salad on the side. It was super tasty!


Broccoli Alfredo Rigatoni   


You don't always need meat to make a fulfilling and hearty pasta supper.  I often treat myself to indulgent vegetarian pasta options that are not only delicious, but I can promise you, the meat is never missed.  Here are a few tasty vegetarian options that you might also enjoy!


Easy Mushroom Bolognese


EASY MUSHROOM BOLOGNESE - This is really delicious and not at all hard to make.  If you have a food processor and use it, the work and time required is cut down considerably. Simple affordable everyday ingredients and deliciously on the table in about half an hour.


One Pan Oven Spaghetti


ONE PAN OVEN SPAGHETTI - A family classic with perfectly cooked spaghetti bathed in a rich, savory tomato sauce.  Minimal effort required as it all cooks in the oven, including the spaghetti. Delicious and easy to make, this always goes down a real treat!


Yield: 2 servings
Author: Marie Rayner
Baked Broccoli Alfredo Rigatoni

Baked Broccoli Alfredo Rigatoni

Prep time: 15 MinCook time: 25 MinTotal time: 40 Min

A creamy and delicious baked pasta dish filled with crispy tender broccoli and a rich alfredo sauce.

Ingredients

  • 1 1/3 cups (6 ounces/150g) rigatoni pasta, uncooked
  • 1/2 broccoli crown, broken into florets (about 1 cup)
  • 1 cup (257g) Alfredo sauce (see below how to make your own)
  • 1/2 cup (56g) grated Mozzarella cheese
  • 1/4 cup (45g) grated Parmesan cheese
  • 1 clove garlic, peeled and bruised
  • salt and black pepper to taste

Instructions

  1. Bring a large pot of salted water to the boil and then add the rigatoni pasta along with the bruised clove of garlic. Cook according to the package directions adding the broccoli florets during the last 2 minutes of cook time.
  2. Drain well and rinse. Drain well again. Fish out and discard the garlic clove. Return the pasta and broccoli to the saucepan. Fold in the alfredo sauce, coating everything well with it.
  3. Preheat the oven to 350*F/180*C/ gas mark 4. Butter a 4-cup/1/2 liter baking dish.
  4. Pour the pasta and broccoli mixture into the baking dish.
  5. Mix the mozzarella and Parmesan cheeses together. Sprinkle evenly over top of the pasta/broccoli.
  6. Bake in the preheated oven for 20 to 25 minutes until heated through and the cheese is golden brown.

Notes

Easy Alfredo Sauce

1 1/2 TBS butter

1/2 cup (120ml) half and half or cream

2 cloves garlic minced

3/4 cup (135g) freshly grated Parmesan cheese

salt and cracked black pepper to taste

freshly grated nutmeg (optional)


Melt the butter in a saucepan over medium heat. Add the cream and garlic and bring to a simmer. (don't allow to boil) Cook, whisking for about 5 minutes. Add the cheese slowly, whisking constantly until melted. Season to taste with salt and black pepper, and nutmeg if desired.


If you think your sauce is too thick, you can thin it out with a bit of milk or pasta water.

Did you make this recipe?
Tag @marierayner5530 on instagram and hashtag it #EnglishKitchen

Broccoli Alfredo Rigatoni


This content, written and photography, is the sole property of The English Kitchen. Any reposting or misuse is not permitted. If you are reading this elsewhere, please know that it is stolen content and you may report it to me at mariealicejoan at aol dot com.  


Thanks for visiting! Do come again!! 


 If you like what you see here, why not consider signing up for my newsletter and/or subscribing/following me on Grow. You can also bookmark my recipes via the Grow platform. Check out the heart on the right hand side of the screen.
read article

Ploughman's Salad

Tuesday, 27 May 2025

Ploughman's Salad 


I made myself a really delicious salad for my lunch the other day. I was always really fond of the Ploughman's Pub Lunch when I lived in the U.K.   A delicious collation of ham, apple, cheese, bread, pickled onions and some salad leaves (at it's very basic). Usually, the bread is a lovely crusty or seeded bread.  Sometimes you might see grapes or a type of chutney on the plate as well.


There is nothing so delicious in the world as this. Enjoyed in a pub on a hot day after a long hike and quaffed down with a cold drink.  The older the pub the better. Very atmospheric!


Oh, how I miss England and the culture.  I was told before I went to live over there that the food was awful and it rained all the time. That was not my experience.  Yes, it did rain a fair bit, but the food was anything but awful.  Some of the freshest and quality produce, meats, cheeses, etc. ever. I am afraid that I took it quite for granted when I was there!


Ploughman's Salad 


This delicious salad is a bit of a riff on a Ploughman's Lunch. I adapted it from a book I have entitled A Salad for All Seasons by Harry Eastwood.  Its a great book.  Some of the ingredients for the salads can be a bit difficult to acquire here in North America, but, thankfully, having lived over there I am knowledgeable enough to be able to make more than suitable substitutions when required to do so!


The dressing is the star of this salad! It goes very well with all of the other ingredients. Crunchy sweet apple, salty ham, rich cheddar cheese, toasty bread, pickled onions and those crisp salad leaves. 


The original salad made four servings. I cut it in half to make only two.  This was really delicious! I highly recommend!  


Ploughman's Salad 


WHAT YOU NEED TO MAKE PLOUGHMAN'S SALAD


I have had to adapt some of the ingredients to what was available to me here in Canada.  Read notes to see what I did.


For the Dressing:
  • 1 TBS apple cider vinegar
  • 1 tsp soft light brown sugar, packed
  • 1 tsp English mustard (hot)
  • 1 tsp Worcestershire sauce
  • 1 TBS light olive oil
  • salt to taste
For the Salad:
  • 1/4 cup (25g) pickled onions, cut into halves
  • 1 stalk celery, trimmed and thinly sliced on the diagonal
  • 1/2 cup (75g) diced ham
  • 1/2 pink lady apple, cored and cut into thin slices
  • 2 1/2 ounces (60g) sharp mature cheddar, broken into rough chunks
  • 1 slice of thick granary bread
  • 1 TBS olive oil
  • salt
  • 3 cups roughly torn salad leaves (about 135g)
  • a small handful of whole walnuts, toasted (about 6)


Ploughman's Salad 


English mustard is very hot. You only need it in small quantities. If you cannot find it you can use Dijon mustard. It won't be quite as spicy, but it will still taste good.


The original recipe called for walnut oil. If you have it by all means use it. I used a light olive oil in it's place.


I could not get British pickled onions, so I used North American sour pickled onions. You could use the sweet, pickled onions instead if you wished.


Pickled walnuts are not available here as were called for in the original recipe. I imagine they are difficult to find everywhere in North America, so I just used toasted walnut halves.


I also could not find ham hock or ham on the bone and so I used a ham steak which I cut into cubes. In the original recipe they used torn ham hock or ham on the bone.


I used an Irish Cheddar Cheese that I bought at the shops. It was really yummy. Derry Cheddar.  What a nice flavor it had!


Ploughman's Salad 


HOW TO MAKE PLOUGHMAN'S SALAD


This goes together very quickly and easily and makes for a darn good lunch!


To make the dressing, combine all of the ingredients in a glass jar and give them a good shake together. The sugar should be dissolved before you finish shaking it. If not, keep shaking.


Brush the bread on both sides with the olive oil and lightly salt. Pop into the toaster and toast until golden brown.


Ploughman's Salad 


Toss the lettuce leaves with half of the salad dressing. Divide between two chilled plates.


Top each with half of the celery, half of the ham, half of the cheese, half the sliced apples and half of the pickled onions. (Lay out as decoratively as you can.)


Tear up the toasted bread and scatter over top.


Drizzle with the remaining dressing. Scatter the toasted walnut halves over top and serve immediately.


Ploughman's Salad 


HOW TO TOAST WALNUTS


Walnuts can be toasted either on the stove top or in the oven.  I usually do mine a whole bagful at a time and keep them in an airtight container in the freezer. Toasting walnuts really helps to minimize their bitterness and highlights their beautiful nutty flavor!


OVEN - Preheat the oven to 375*F/190*C/ gas mark 5.  Spread your nuts out onto a baking sheet in a single layer leaving space between the nuts.  Toast in the heated oven for 5 to 10 minutes, just until they start to turn golden and you can smell their nuttiness.


STOVETOP - Heat a large skillet over medium-high heat. Add the nuts to the dry pan in a single layer and toast, stirring frequently until they start to brown and smell nutty.  This will take about 5 minutes.


Ploughman's Salad 


This was super delicious. I have always loved a Ploughman's Lunch and have often ordered it in a restaurant. Having it in salad form was a delicious alternative!


Living in Canada now I was not able to get the British style picked onions or ham hock called for in the original recipe, but my substitutions were every bit as delicious!


The dressing really makes this salad! (Can't you say that about just about any salad?)


Ploughman's Salad 


There is nothing as tasty for lunch or dinner in the warmer months than a main dish salad. Here are a few more of my favorites!


Salade Composé.


SALAD COMPOSE - These are my favorite kinds of salads because they are so easy to put together with a little bit of this and a little bit of that.  Hard-boiled egg, crisp streaky bacon, sweet garden cherry tomatoes, fresh salad leaves (also from the garden if you are lucky), toasted garlic croutons and a tangy Sherry Dijon Vinaigrette Dressing complete the delicious picture!  Throw on some French music and pretend you are in a Bistro!


Grilled Chicken and Wheatberry Salad


GRILLED CHICKEN AND WHEATBERRY SALAD - A colorful plate of salad greens is topped with a delicious wheatberry salad, chock full of crunch and sweetness. Crunchy toasted walnuts and chopped celery . . . sweet dried cranberries . . . sharp tasting spring onions, and a tangy lemon and olive oil dressing. This is topped again with a breast of chicken that has been rubbed with a delicious mixture of spices and grilled until perfectly cooked, and still juicy and tender. Nobody can complain about this!


Yield: 2
Author: Marie Rayner
Ploughman's Salad

Ploughman's Salad

Prep time: 20 MinTotal time: 20 Min

Like the plate but in salad form. This is a fabulous salad! Simple, easy to make and delicious! The simple dressing is phenomenal.

Ingredients

For the Dressing:
  • 1 TBS apple cider vinegar
  • 1 tsp soft light brown sugar, packed
  • 1 tsp English mustard (hot)
  • 1 tsp Worcestershire sauce
  • 1 TBS light olive oil
  • salt to taste
For the Salad:
  • 1/4 cup (25g) pickled onions, cut into halves
  • 1 stalk celery, trimmed and thinly sliced on the diagonal
  • 1/2 cup (75g) diced ham
  • 1/2 pink lady apple, cored and cut into thin slices
  • 2 1/2 ounces (60g) sharp mature cheddar, broken into rough chunks
  • 1 slice of thick granary bread
  • 1 TBS olive oil
  • salt
  • 3 cups roughly torn salad leaves (about 135g)
  • a small handful of whole walnuts, toasted (about 6)

Instructions

  1. To make the dressing, combine all of the ingredients in a glass jar and give them a good shake together. The sugar should be dissolved before you finish shaking it. If not, keep shaking.
  2. Brush the bread on both sides with the olive oil and lightly salt. Pop into the toaster and toast until golden brown.
  3. Toss the lettuce leaves with half of the salad dressing. Divide between two chilled plates.
  4. Top each with half of the celery, half of the ham, half of the cheese, half the sliced apples and half of the pickled onions. (Lay out as decoratively as you can.)
  5. Tear up the toasted bread and scatter over top.
  6. Drizzle with the remaining dressing. Scatter the toasted walnut halves over top and serve immediately.
Did you make this recipe?
Tag @marierayner5530 on instagram and hashtag it #EnglishKitchen

Ploughman's Salad 


This content, written and photography, is the sole property of The English Kitchen. Any reposting or misuse is not permitted. If you are reading this elsewhere, please know that it is stolen content and you may report it to me at mariealicejoan at aol dot com.  


Thanks for visiting! Do come again!! 


 If you like what you see here, why not consider signing up for my newsletter and/or subscribing/following me on Grow. You can also bookmark my recipes via the Grow platform. Check out the heart on the right hand side of the screen.


read article

Italian Pasta Salad

Monday, 26 May 2025


Italian Pasta Salad 


We are coming into Salad season here now with warmer temperatures.  Many people are having cookouts at the weekend or going on picnics and there is nothing nicer to serve on one of those occasions than a pasta salad.


This Italian Pasta Salad recipe is one of my favorite pasta salad recipes to use. Not only is it loaded with color and crunch, but it has bags of texture and flavor as well!   Add to that the fact that it is really quick and easy to make and you have a real winner of a side dish to serve in the summer months!


Italian Pasta Salad  


This salad is really a meal in and of itself, with loads of crisp veggies, sweet cherry tomatoes, sharp red onions, meaty kalamata olives, hard salami, peppers, milky mozzarella balls, salty Parmesan, fresh herbs and a lovely spicy Italian dressing!


It can also be made well ahead of time which makes for a very convenient dish to have on hand in the summertime. It makes a great portable lunch as well if you are having to take your lunch with you to work or school.

I can promise you that every bite is loaded with taste and texture.  Prepare to fall in love!


Italian Pasta Salad  


WHAT YOU NEED TO MAKE ITALIAN PASTA SALAD


It looks like quite a lengthy list of ingredients but trust me when I tell you that most of them are really quite ordinary things.


  • 115g dry pasta (1 cup), cooked until al dente according to package directions
  • 12 cherry tomatoes, halved
  • 8 Bocchini, halved (mini mozzarella balls)
  • 1/2 each red and orange bell peppers, trimmed and chopped
  • 1/2 medium red onion, peeled and chopped
  • 12 kalamata olives, halved
  • 6 large leaves of basil, rolled and slivered
  • a small handful of fresh flat leaf parsley, chopped
  • 2 ounces hard dry Italian salami, diced
  • 6 marinated artichokes, quartered
  • 120ml of Italian Salad Dressing (1/2 cup) (or try out my homemade dressing below)
  • 3 TBS coarsely grated Parmesan Cheese


Italian Pasta Salad  


You can use any kind of pasta you like for this, but I like to use a variety of pasta that really hugs the dressing. Spirals, bow ties, elbows, etc.  What you don't want is a totally flat pasta.  You also will want shorter shapes, not long pieces like spaghetti. 


If you want to be healthy use whole wheat or high fiber pasta.


I like to use the Italian cherry tomatoes. Italian tomatoes have the best flavor.


Not able to get the Bocchini?  Then just cube regular mozzarella into 1/2-inch cubes. It will work fine.


I love Kalamata olives. If you can't get then you can just use black olives, but really Kalamata olives will give you the best flavor!


If you don't have marinated artichokes, you can use canned.  But do use the marinated, well drained, if you have them for the optimum flavor!


Please use freshly grated Parmesan cheese for the best flavor!


Italian Pasta Salad  


This delicious homemade Dry Italian Salad Dressing Mix works really well in this salad. Alternately you can just use bottled Italian Dressing!


Make Your Own Dry Italian Salad Dressing Mix:  Mix together 1 1/2 tsp. garlic salt, 1 1/2 tsp. onion powder, 1 1/2 tsp. granulated sugar, 1 Tbsp. dried oregano, 1/2 tsp. black pepper, 1/8 tsp. dried thyme, 1/2 tsp. dried basil, 1 1/2 tsp. dried parsley, 1/8 tsp. celery salt, and 1/2 tsp. salt in a container. Thoroughly combine and store in an airtight container.  This makes 3 TBS. To make salad dressing, combine the 1 TBS of the dressing mix with 1/2 cup (120ml) canola oil, 2 TBS white vinegar and 1 TBS of water. Shake well together and leave to sit for about 10 minutes before using.  Shake again when you go to use it.


Italian Pasta Salad  


HOW TO MAKE ITALIAN PASTA SALAD


You know a recipe is really simple to make when all you have to do is to prepare the ingredients, chop the veggies, etc. and then toss them together with a simple dressing. That's it in a nutshell!  Easy peasy lemon squeezy!


Italian Pasta Salad  


FIVE RULES TO FOLLOW WHEN MAKING PASTA SALADS

1. Always make sure to use the right type of pasta shape for your particular salad. This depends on the dressing you are using. A vinaigrette dressing is suited to almost any shape, but if you are using a creamy dressing you will want to use a pasta which will hug onto and hold the dressing. 

2. Take care not to over cook the pasta, or under cook the pasta.  Remember your pasta will absorb some of the dressing and soften a bit upon standing, so you want your pasta to be cooked just to al dente.  Crunchy under-cooked pasta is never good any time.  Follow the  directions included on your package of pasta to get it right! 

3. Make sure you season your pasta right, which means cooking it in salted boiling water, and then tasting it when its done. If you think it needs a bit more salt or pepper then add it. Just be careful not to add too much. You cannot remove what is already done.


Italian Pasta Salad  


4. Unless otherwise directed do not dress your pasta salads while the pasta is still warm.  Warm pasta will soak up all of your dressing and leave you with a dry pasta salad. You can add half of the dressing while it is still warm, but hold off on adding the remainder until the salad is completely cold.

5.  Take care not to make your salad too far in advance or you will end up with a bowl of soggy pasta. Making it on the day you are actually going to serve it is a great rule of thumb to follow.


If you follow these five rules there is no reason why your pasta salads cannot all be delicious and popular at any gathering!

One final rule, less is more!  Don't be tempted to go overboard with either the dressing or the add ins!


Italian Pasta Salad 


This really is a beautiful summer salad. Perfect for lunch or as a side for a BBQ supper.  Perfect also to take to picnics. If you are taking it on a picnic, pack it in an airtight container and bring along a bit of extra dressing to toss it with when you get there!


I really think you are going to enjoy this tasty salad!  I know I sure do! I love Italian flavors!


Italian Pasta Salad 


We are right on the cusp of salad season here in Canada.  Here are a few other pasta salads that I really enjoy! I can promise you that they are really delicious!


Tex Mex Pasta Salad


TEX MEX PASTA SALAD - with red and yellow cherry tomatoes, red onions, peppers, sweet corn, avocado, coriander and black beans! Add a zippy Tex Mex dressing and Bob's your Uncle!  This salad goes well with all of your BBQ favorites!  I love to use Farfalle for this one, but you can use any pasta shape that you enjoy. Add some cubed cooked meat or cheese and you can easily turn this fabulous salad into a delicious main dish salad!


Turkey, Sour Cherry & Almond Salad


TURKEY, SOUR CHERRY & ALMOND SALAD - This is a lovely main dish salad. I like to use farfalle (bowtie)pasta for this, whole wheat if I can get. It has the perfect shape to use in a pasta salad. Nice and open, but with a few little pleats to hold in the dressing. The dressing for this salad is delicious.  A homemade poppy seed dressing that is lovely and tangy from fresh lemon juice, with a bit of punch from Dijon mustard and sweetness from creamy honey. The salad itself boasts the inclusion of cubed cooked turkey breast.  You could also use chicken if you don't have any turkey.  Also in the mix are dried sour cherries for a bit of sweet tartness, sharp red onions, crunchy celery and salted almonds . . .  and creamy tangy Gorgonzola cheese.


Italian Pasta Salad

Print
Italian Pasta Salad
Yield: 2
Author: Marie Rayner
A deliciously simple Pasta Salad, perfectly sized down for the smaller family.

Ingredients:

  • 115g dry pasta (1 cup), cooked until al dente according to package directions
  • 12 cherry tomatoes, halved
  • 8 Bocchini, halved (mini mozzarella balls)
  • 1/2 each red and orange bell peppers, trimmed and chopped
  • 1/2 medium red onion, peeled and chopped
  • 12 kalamata olives, halved
  • 6 large leaves of basil, rolled and slivered
  • a small handful of fresh flat leaf parsley, chopped
  • 2 ounces hard dry Italian salami, diced
  • 6 marinated artichokes, quartered
  • 120ml of Italian Salad Dressing (1/2 cup)
  • 3 TBS coarsely grated Parmesan Cheese

Instructions:

  1. Combine all of the ingredients in a bowl and toss together to combine.  Cover and chill for half an hour to allow for the flavors to meld.  Divide between two serving dishes and enjoy!
Did you make this recipe?
Tag @marierayner5530 on instagram and hashtag it #EnglishKitchen
Created using The Recipes Generator


Italian Pasta Salad 
This content (written and photography) is the sole property of The English Kitchen. Any reposting or misuse is not permitted. If you are reading this elsewhere, please know that it is stolen content and you may report it to me at: mariealicejoan at aol dot com 


Thanks for visiting! Do come again!! 


 If you like what you see here, why not consider signing up for my newsletter and/or subscribing/following me on Grow. You can also bookmark my recipes via the Grow platform. Check out the heart on the right hand side of the screen.

read article
new entries old entries
View mobile version
Subscribe to: Posts (Atom)

If You Like What You See

If you like what you see and wish to donate to help pay for butter, sugar, eggs and whatnot, every little bit is appreciated. Thanks!
PRIVACY POLICY

Buy the Book!

If you are a Baking Enthusiast and a fan of British Baking you are going to love this new book I wrote. From fluffy Victoria sponges to sausage rolls, the flavors of British baking are some of the most famous in the world. Learn how to create classic British treats at home with the fresh, from-scratch, delicious recipes in The Best of British Baking. Its all here in this delicious book! To find out more just click on the photo of the book above!

Translate


This is a book I wrote several years ago, published by Passageway Press. I am incredibly proud of this accomplishment. It is now out of print as my publisher went out of business after Covid, but you can still find used copies for sale here and there. If you have a copy of it, hang onto it because they are very rare. This was a real labor of love for me and a dream come true as I had always wanted to write a book since I was a child. Hopefully I will be able to republish it one day. If you know of a publisher who is looking for something let me know!

Welcome, I'm Marie

Welcome, I'm Marie
Canadian lover of all things British. I cook every day and like to share it with you!
A third of my life was spent living in the UK. I learned to love the people, the country and the cuisine. I have always been an Anglophile. You will find plenty of traditional British recipes here in my English Kitchen. There are lots of North American recipes also, but then again, I am a Canadian by birth. I like to think of my page as a happy mix of both. If you are looking for something and cannot find it, don't be afraid to ask! I am always happy to help and point you in the right direction, even if it exists on another page, or in my extensive collection of cookbooks. I moved back to Canada in the year 2020 and have been busy building a new life for myself back in my homeland. I am largely retired now, except for this little space on the internet that I call home. I hope you will stay a while and have a good boo around. There's lots of deliciousness here to explore!

Search This Blog

Featured

Classic British Sausage Casserole (Easy One-Pan Comfort Food)
    There's something wonderfully comforting about a good sausage casserole - the kind that fills the kitchen with cozy aromas and bring...

Popular Posts

  • Fried Cabbage with Bacon & Onions
      I have always loved fried cabbage.  I first had it when I was in high school.  We cooked it in our Home Economics Class. It was just ...
  • Sticky Lemon Chicken
    I am always on the look out for a good chicken breast recipe.  We eat a lot of chicken in this house, and it mostly comes in the form of...
  • Lemon Friands
    Anyone who knows me, knows that I am a nut for anything lemon flavoured. It's always been one of my absolute favourite taste thril...
  • Quick and Easy Bacon and Egg Tarts
       You might not think that you have time to do a bacon and egg breakfast on a weekday, but this recipe here today proves that just isn...
  • Mary Berry's Cheese Scones
    I wanted to make some scones to enjoy the other day.  I have made quite a few scones here on the blog and I love them all. I do like to try ...

My Favourite Places

  • Welcome Home Kitchen Blog
  • Cookbooklets
  • Categories
  • _Kitchen Wisdom
  • _In the Larder and Pantry
  • _Couldn't Live Without
  • _Kitchen Wish List

Archive

  • ▼  2026 (270)
    • ▼  October (1)
      • Classic British Sausage Casserole (Easy One-Pan Co...
    • ►  September (30)
    • ►  August (31)
    • ►  July (30)
    • ►  June (30)
    • ►  May (31)
    • ►  April (28)
    • ►  March (31)
    • ►  February (27)
    • ►  January (31)
  • ►  2025 (358)
    • ►  December (28)
    • ►  November (30)
    • ►  October (32)
    • ►  September (29)
    • ►  August (29)
    • ►  July (29)
    • ►  June (30)
    • ►  May (31)
    • ►  April (30)
    • ►  March (31)
    • ►  February (28)
    • ►  January (31)
  • ►  2024 (349)
    • ►  December (29)
    • ►  November (30)
    • ►  October (29)
    • ►  September (29)
    • ►  August (26)
    • ►  July (26)
    • ►  June (30)
    • ►  May (31)
    • ►  April (30)
    • ►  March (30)
    • ►  February (29)
    • ►  January (30)
  • ►  2023 (341)
    • ►  December (27)
    • ►  November (28)
    • ►  October (27)
    • ►  September (28)
    • ►  August (25)
    • ►  July (31)
    • ►  June (30)
    • ►  May (31)
    • ►  April (28)
    • ►  March (31)
    • ►  February (28)
    • ►  January (27)
  • ►  2022 (366)
    • ►  December (26)
    • ►  November (29)
    • ►  October (30)
    • ►  September (29)
    • ►  August (32)
    • ►  July (33)
    • ►  June (29)
    • ►  May (33)
    • ►  April (30)
    • ►  March (29)
    • ►  February (31)
    • ►  January (35)
  • ►  2021 (370)
    • ►  December (36)
    • ►  November (31)
    • ►  October (31)
    • ►  September (31)
    • ►  August (30)
    • ►  July (32)
    • ►  June (35)
    • ►  May (27)
    • ►  April (29)
    • ►  March (31)
    • ►  February (27)
    • ►  January (30)
  • ►  2020 (314)
    • ►  December (30)
    • ►  November (23)
    • ►  October (31)
    • ►  September (29)
    • ►  August (27)
    • ►  July (29)
    • ►  June (26)
    • ►  May (26)
    • ►  April (26)
    • ►  March (25)
    • ►  February (23)
    • ►  January (19)
  • ►  2019 (310)
    • ►  December (20)
    • ►  November (22)
    • ►  October (21)
    • ►  September (29)
    • ►  August (31)
    • ►  July (25)
    • ►  June (30)
    • ►  May (32)
    • ►  April (25)
    • ►  March (26)
    • ►  February (24)
    • ►  January (25)
  • ►  2018 (322)
    • ►  December (29)
    • ►  November (28)
    • ►  October (31)
    • ►  September (25)
    • ►  August (29)
    • ►  July (32)
    • ►  June (27)
    • ►  May (19)
    • ►  April (26)
    • ►  March (31)
    • ►  February (25)
    • ►  January (20)
  • ►  2017 (345)
    • ►  December (29)
    • ►  November (30)
    • ►  October (29)
    • ►  September (33)
    • ►  August (23)
    • ►  July (30)
    • ►  June (29)
    • ►  May (31)
    • ►  April (29)
    • ►  March (28)
    • ►  February (28)
    • ►  January (26)
  • ►  2016 (384)
    • ►  December (33)
    • ►  November (31)
    • ►  October (30)
    • ►  September (31)
    • ►  August (34)
    • ►  July (35)
    • ►  June (28)
    • ►  May (33)
    • ►  April (30)
    • ►  March (34)
    • ►  February (33)
    • ►  January (32)
  • ►  2015 (388)
    • ►  December (34)
    • ►  November (32)
    • ►  October (34)
    • ►  September (35)
    • ►  August (43)
    • ►  July (31)
    • ►  June (28)
    • ►  May (31)
    • ►  April (32)
    • ►  March (32)
    • ►  February (26)
    • ►  January (30)
  • ►  2014 (424)
    • ►  December (38)
    • ►  November (38)
    • ►  October (41)
    • ►  September (31)
    • ►  August (30)
    • ►  July (35)
    • ►  June (39)
    • ►  May (42)
    • ►  April (38)
    • ►  March (33)
    • ►  February (27)
    • ►  January (32)
  • ►  2013 (378)
    • ►  December (40)
    • ►  November (35)
    • ►  October (36)
    • ►  September (32)
    • ►  August (30)
    • ►  July (30)
    • ►  June (31)
    • ►  May (28)
    • ►  April (25)
    • ►  March (33)
    • ►  February (30)
    • ►  January (28)
  • ►  2012 (376)
    • ►  December (34)
    • ►  November (35)
    • ►  October (35)
    • ►  September (32)
    • ►  August (35)
    • ►  July (28)
    • ►  June (31)
    • ►  May (29)
    • ►  April (29)
    • ►  March (30)
    • ►  February (29)
    • ►  January (29)
  • ►  2011 (331)
    • ►  December (32)
    • ►  November (29)
    • ►  October (27)
    • ►  September (28)
    • ►  August (27)
    • ►  July (28)
    • ►  June (28)
    • ►  May (25)
    • ►  April (26)
    • ►  March (28)
    • ►  February (26)
    • ►  January (27)
  • ►  2010 (286)
    • ►  December (32)
    • ►  November (30)
    • ►  October (31)
    • ►  September (25)
    • ►  August (23)
    • ►  July (5)
    • ►  June (27)
    • ►  May (23)
    • ►  April (14)
    • ►  March (23)
    • ►  February (25)
    • ►  January (28)
  • ►  2009 (169)
    • ►  December (26)
    • ►  November (24)
    • ►  October (26)
    • ►  September (23)
    • ►  August (25)
    • ►  July (21)
    • ►  June (21)
    • ►  May (3)

PRIVACY POLICY
© The English Kitchen.
Customized by My Fairy Blog Mother.
