


One of the things I like best about this time of year is all the lovely berry fruits that are becoming available. This pudding is a real favourite in our household, probably because all these fresh fruits are only in the shops for a very short time each year.
Soft and tremblingly tasty, this pudding is full of lovely fresh flavours . . . tart currants, sweet raspberries, blueberries, tay berries . . . cherries . . . this is summer at it's finest in a bowl.
Do plan ahead as it needs to be put into the fridge the night before in order for it to set up properly and for the lovely fruit juices to soak meltingly into the bread. Also be sure to use a good loaf of white bread, not the ordinary sliced bread that is for every day use, and so soft and squidgy. Buy a good and sturdy loaf, and let it go stale. You want it to be a couple of days old so that it will soak in the juices better.

*Summer Pudding*
Serves 6
See printable recipe below.
This delicious pudding is one of my favourite things about summer. Tart . . . sweet . . . this pudding contains all the goodness of summer in every mouthful. Plan ahead as it needs to sit overnight to set up.
750g/1lb 14oz mixed summer fruit
(such as raspberries, red, white and blackcurrants, tayberries, loganberries, blackberries, cherries and blueberries)
185g/6½oz caster sugar
1 medium loaf good-quality white bread, slightly stale
2 tbsp cassis or blackcurrant cordial
creme fraiche for serving
You will need a 2 pint pudding basin.
Place all the fruit in a pan, removing any stalks as necessary. Add the sugar and then heat and cook them over medium heat for 3 to 5 minutes, only until the sugar has dissolved and the fruit begins to give up some of it's juices. Please be careful not to over cook them. Stir in the cassis or blackcurrant cordial. Set aside while you get the bread ready.
Trim off all the crusts from the bread and cut the bread into thin slices. Cut one round slice out of the bread to fit the bottom of the basin and place it into the basin.
Trim off all the crusts from the bread and cut the bread into thin slices. Cut one round slice out of the bread to fit the bottom of the basin and place it into the basin.
Line the pudding basin with the slices of bread, overlapping them and sealing well by pressing any edges together. Fill in any gaps with small pieces of bread, so that no juice can get through when you add the fruit. spoon all of the fruit and its juices into the pudding basin.
Trim the tips of bread from around the edge. Cover the top of the fruit with more wedges of bread. Place the pudding basin on a plate to collect any juices. Find a saucer that fits neatly inside the bowl, and place it on top to cover the upper layer of bread, then weigh the saucer down with weights - unopened tin cans come in very handy for this.. Let it cool, then place in the fridge overnight.
The next day, remove the weights and the saucer. Run a thin blade around the edges, then invert the basin onto a shallow serving plate. Serve, cut into slices or spooned out, and topped with a good dollop of Creme Fraiche.

The next day, remove the weights and the saucer. Run a thin blade around the edges, then invert the basin onto a shallow serving plate. Serve, cut into slices or spooned out, and topped with a good dollop of Creme Fraiche.

Yield: 6
Summer Pudding
Prep time: 30 MinCook time: 12 HourTotal time: 12 H & 30 M
This delicious pudding is one of my favourite things about summer. Tart . . . sweet . . . this pudding contains all the goodness of summer in every mouthful. Plan ahead as it needs to sit overnight to set up.
Ingredients
- 750g/1lb 14oz mixed summer fruit (such as raspberries, red, white and blackcurrants, tayberries, loganberries, blackberries, cherries and blueberries)
- 185g/6½oz caster sugar (a generous 3/4 cup)
- 1 medium loaf good-quality white bread, slightly stale
- 2 tbsp cassis or blackcurrant cordial
- creme fraiche for serving
- You will need a 2 pint pudding basin.
Instructions
- Place all the fruit in a pan, removing any stalks as necessary. Add the sugar and then heat and cook them over medium heat for 3 to 5 minutes, only until the sugar has dissolved and the fruit begins to give up some of it's juices. Please be careful not to over cook them. Stir in the cassis or blackcurrant cordial. Set aside while you get the bread ready.
- Trim off all the crusts from the bread and cut the bread into thin slices. Cut one round slice out of the bread to fit the bottom of the basin and place it into the basin.
- Line the pudding basin with the slices of bread, overlapping them and sealing well by pressing any edges together. Fill in any gaps with small pieces of bread, so that no juice can get through when you add the fruit. spoon all of the fruit and its juices into the pudding basin.
- Trim the tips of bread from around the edge. Cover the top of the fruit with more wedges of bread. Place the pudding basin on a plate to collect any juices.
- Find a saucer that fits neatly inside the bowl, and place it on top to cover the upper layer of bread, then weigh the saucer down with weights - unopened tin cans come in very handy for this.. Let it cool, then place in the fridge overnight.
- The next day, remove the weights and the saucer. Run a thin blade around the edges, then invert the basin onto a shallow serving plate. Serve, cut into slices or spooned out, and topped with a good dollop of Creme Fraiche.
All rights reserved The English Kitchen


I've been lucky enough at various times in my life to have had chickens. I love chickens. They're really quite fascinating and although they often look quite alike, they have their own unique personalities and can be a lot of fun to watch.
My first husband's family had battery hens. I used to help grade eggs in the hen house on Saturdays, which was a long metal building. I never saw the inside part where the chickens were kept. I only ever saw the grading room, where all the eggs used to pass through a machine which would then categorize them according to size and quality. They passed through it on a conveyor belt and at the end of this belt I would put them into the appropriate cartons. I had not idea what it meant to be a battery hen at that time. Good thing too, or my heart would have broken into a million pieces.

Thankfully these days we have all been made aware of the appalling conditions on battery farms and we have the option to buy free-range organic chicken . . . happy chicken just tastes better!

This is my favorite way to roast a chicken. It turns out moist and delicious each and every time.

*Perfect Roast Chicken*
Serves 4
Printable Recipe
I highly recommend free-range, organic chicken. All that running around in the farm yard is good for them and they taste better. A happy chicken is a tasty chicken!
1 X 1.75kg chicken
salt and freshly milled black pepper
30g of butter, softened
1 onion, roughly chopped
1 carrot, roughly chopped (no need to peel)
1 stick celery,roughly chopped
1 leek, white part only, chopped
olive oil
1 sprig sage
1 bay leaf

Pre-heat the oven to 190*C/375*F. Remove any giblets from your chicken and save for another day. Wipe your chicken dry and then rub it all over with the softened butter and season it liberally inside and out with some salt and pepper.
Place the chopped vegetables in the bottom of a thick roasting tin with some olive oil. Place on the hob over medium heat and cook and stir with a wooden spoon, cooking for about 5 minutes to slightly colour the vegetables. Remove from the heat. Add the spring of sage and the bayleaf. Place the chicken on top of the vegetables and roast for about an hour and 15 minutes, or until the chicken tests done. (The leg bone should move easily in it's socket and the juices should run clear) Remove from the oven, place on a cutting board, and let sit for 15 to 20 minutes (lightly cover with some foil) before carving.
If you like you can add some chicken broth to the vegetables in the pan and place it over the burner and bring it to a boil. Allow to boil for several minutes before straining into a large jug. Discard any solids in the strainer and then skim off any fat from the juices in the jug. Return them to the pan and cook and simmer for a good 10 to 15 minutes, to reduce somewhat. Spoon these juices over the sliced chicken when you serve it. You can also thicken them with a bit of flour and water to make a thick gravy.
mmm . . . I can't wait to do something with the leftovers. Tune in tommorrow to see what I came up with!


I had some apples in my fruit bowl the other day that were looking decidely tired. When I have old bananas I always make a banana loaf or muffins. That way they don't get wasted. When I saw that I needed to use up these apples the idea of applesauce immediately came to mind, and so I peeled them all and cut them up and into a pot they went with a bit of water. I didn't sweeten them, as I had already decided I was going to make an applesauce cake.

I love applesauce cake, with it's warm spices and moist texture. This particular version smells heavenly when it is baking. I always bake it in two layers and then ice one layer and then pop the other one into the freezer for a future date. You don't have to make the icing, but it really is a wonderful touch. You just can't beat a moist and tasty applesauce cake topped off with a tasty cream cheese icing. Why have it plain when you don't have to??

*Mom's Applesauce Cake*
Makes 2 - 8 inch layers
Printable Recipe
Moist and spicy, this is a real winner. Do make the icing! If anything this gets even better after sitting for a couple of days.
2 1/2 cups plain flour (310g)
1/4 tsp baking powder
1 1/2 tsp baking soda
1 tsp salt
1 tsp ground cinnamon
1/2 tsp ground cloves
1/2 tsp ground allspice
1/4 tsp freshly ground nutmeg
1/2 cup white vegetable shortening (trex or white flora) (110g)
1 cup caster sugar (190g)
1/2 cup water (120ml)
1 large egg
1/2 cup chopped walnuts (55g)
1 cup of chopped raisins (150g)
2 cups applesauce (510g)
Frosting:
1 large package of philadelphia cream cheese (250g or 8 ounces)
1 TBS milk
1 tsp vanilla
1 TBS orange juice
the finely grated zest of 1/2 orange
5 1/2 cups sifted icing sugar (715g)

Pre-heat the oven to 180*C/350*F. Grease and flour 2 8-inch round cake tins. Set aside.
Whisk together the flour, baking powder, baking soda, salt, cinnamon, cloves, allspice and nutmeg. Set aside.
Place the shortening and the sugar into a large bowl and beat with an electric whisk until light and fluffy. Beat in the egg and the water. Beat in the flour mixture, alternatively with the applesauce, mixing all in thoroughly. Fold in the raisins and nuts. Divide equally between both pans. Bake for 35 to 40 minutes, until the cake tests down when a toothpick inserted into the centre comes out clean. Remove from the oven and place on a wire rack to cool.
To make the frosting beat all the frosting ingredients together in a large bowl with an electric mixer until light and fluffy. You may or may not need all the liquid. I find the cream cheese over here is a lot more liquid than that found in North America so I never need all the liquid called for. It's a hit and miss kind of thing. If you find your frosting too runny, add more sifted icing sugar until it is spreadable.
Store in the refrigerator, but allow it to come to room temperature before serving. Scrummy yummy!!


I love fennel. It's one of my favourite vegetables. I am a real licorice lover and so I love it's mild licorice taste. It's wonderful braised and roasted, but my favourite way to eat it is raw.
There are two types of fennel. One is grown for it's seeds, which are delicious in sauces, and the other is grown for use as a vegetable, the most common type being Florence Fennel, which has a bulbous base, stalks which closely resemble celery and feathery fronds on top.

Crisp and slightly sweet, fennel is wonderful served raw in salads, and meltingly mellow and soft when braised, roasted or grilled. It goes wonderfully with other crisp vegetables and is most delicious with fish. A whole salmon stuffed with fennel and roasted is absolutely wonderful.

The bulbs should be heavy and white, firm and free of cracks, browning, or moist areas. The stalks should be crisp, with feathery, bright-green fronds.
You can keep fennel for a few days in the refrigerator wrapped in plastic, but try not to keep it more than a day or two because the flavor diminishes as it dries out.
I made a delicious slaw yesterday with some fennel that I picked up at the local green grocers at the weekend. I think I'll have the rest of it for my lunch today. This was really good.
This delicious slaw makes a light and refreshing change from regular coleslaw. I use my mandolin to slice the fennel and my box grater to do the carrots. But you could use the slicing and grating discs in a food processor as well, which would make really quick work of it. I love the mustard in the dressing. It adds a lovely bite to it. Adjust accordingly if you don't like things with a bite. Make the dressing first so that the flavours have time to really develop.
1 small to medium sized fennel bulb
3 cups peeled, shredded carrots (about 4 to 5 large carrots)
1/2 cup of minced red onion
1/2 cup chopped fresh coriander (cilantro)
DRESSING:
5 TBS fresh orange juice
1 TBS of White Balsamic Vinegar
2 tsp fresh lemon juice
1 to 1 1/2 tsp dry mustard powder
2 TBS really good quality extra virgin olive oil
1/2 tsp sea salt

Place all the dressing ingredients into a glass jar with a lid, and give it a good shake. Set aside.
Remove the top greens and stalks from the fennel bulb. Save the feathery greens for the slaw. Trim off any bruised or tough pieces. Quarter the bulb and then cut out the core. Shred half of it using a grater, mandolin or food processor. Reserve the other half for another use. You should have about 1 cup of grated vegetable.
Place it into a medium sized bowl, along with the carrot, onion, chopped fennel leaves and coriander. Toss together to mix. Just before serving, give the dressing a good shake and pour it over the slaw. Mix well and serve.


I had some pesto and puff pastry that needed using up at the weekend, and so I put together these lovely little tarts for our supper yesterday. They were really quick to make and quite delicious when they were done.

Prepared Puff Pastry is really quite a versatile ingredient. You can layer it with all sorts of things and be quite inventive. Try some roasted peppers and courgettes. (zucchini)
Add a little prosciutto, and some torn basil leaves. Even just with some sun dried tomato paste and cheese baked on top, and garnished with a salad of rocket leaves . . . use your imagination! I'm sure you can come up with some really tasty versions!

These are lovely little tarts that are just great for a light lunch or supper. Easy to make, your family or guests will think you slaved all day at them, they are that impressive. Using simple ingredients they go together very quickly. All that is needed is a salad of mixed leaves on the side.
1 package of ready rolled all butter puff pastry
4 medium sized ripe tomatoes
1 small packet of dry cured black olives
1 small packet of grated mixed Italian Cheeses (about 4 ounces of a mixture of provolone, Parmesan and mozarella)
4 TBS of good quality Pesto sauce
1 egg, beaten
Pre-heat the oven to 200*C/400*F. Line two baking sheets with parchment paper and set aside.
Unroll your pastry and cut it into 4, six inch rounds. Place the rounds onto the parchment paper lined baking sheets, leaving about 2 to 3 inches between them. Spread the pesto onto the rounds, leaving a 1/2 inch border all around.
Slice the tomatoes into wedges and lay them in a round on top of the pesto. Scatter the olives over top along with the cheese. Brush some beaten egg on the edges of each tart. Place into the heated oven and bake from 15 to 20 minutes, until they are nicely browned and crisp on the bottom. Serve warm or at room temperature.


It got rather chilly yesterday. I expect it was the rain. Funny how a little rain can do that. We had to have the fire on for a time to warm things up in here. Rainy days are soup days. Soup has always equated warmth and comfort to me.
Perhaps it's all those Campbell's Soup commercials I grew up with. There was always a child walking home from school in the rain, all cold and wet, only to be greeted by his mum at the door with a hot bowl of Campbell's Soup waiting on the table, usually chicken noodle. But . . . I digress . . .
I accidentally took a package of home baked beans out of the freezer the other day, thinking they were chicken in sauce. Yesterday with all the cold and rain I decided to turn them into a delicious soup. This really was wonderful and filling and oh-so-very-comforting.
The recipe is from my Fanny Farmer Cooking School cookbook. (I call it Old Reliable) That Fanny Farmer sure knew what she was doing.

This is a truly delicious soup, using simple ingredients. Quick to make, and very simple, you can have it on the table in about 35 minutes or so. I have never tried it with tinned baked beans but I expect they would taste pretty good done up this way as well.
4 cups baked beans
1 medium onion, peeled and chopped
3 stalks celery, chopped
1 1/2 cups tinned tomatoes
1 1/2 tsp mild chili powder
6 cups water
salt
freshly ground black pepper

Put 3 cups of the baked beans, the onion, celery, tomatoes, chili powder and water into a large pot. Bring to the boil, then reduce the heat and simmer, partially covered for about 30 minutes. Using a stick blender, puree until smooth.
You can also use a potato masher for a slightly coarser texture. Add the reserved baked beans. Reheat, seasoning to taste with salt and pepper. Serve ladled into hot soup bowls for a delicious lunch time treat.

One of the things I loved most about England are the tasty traditional cakes and bakes that you find over here. Cakes such as this Traditional Eccles Cakes recipe which I am sharing with you today.
I don't know why they are called cakes because really, they resemble a traditional cake in no way at all. These are more like little round puff pastry turnovers. But what is in a name really. Delicious is delicious no matter what you call it!

I confess that I fell in love with Eccles Cakes many, many years ago. Back in the early 1980's. I was a young mum living on a British Army base in Suffield, Alberta, in Canada.
There was a lovely girl named Sheena that used to bring them in every so often to the Ceramics Club I belonged to as a treat for us all. They were gorgeous. She invited me to her house one time so that I could watch her make them.

She was such a nice girl, and that was so kind of her. It meant that I could then make these delicious cakes for myself as I have done so on multiple occasions through the years.
So just what is an Eccles Cake? Not a cake, it is a small, round pie, quite similar to a turnover, which is filled with a buttery sweet dried fruit filling. Usually this filling will consist of butter, brown sugar, dried currants, raisins/sultanas, chopped candied peel and a few spices.

Generally speaking this lush sweet buttery filling will be encased in Flaky Pastry. But you will sometimes also see the filling surrounded by buttery puff pastry. Both options are quite acceptable and incredibly moreish!
They are named after the English town of Eccles, which is a town in the historic county of Lancashire and in the ceremonial county of Greater Manchester. They are a Lancashire food tradition and are actually traditionally enjoyed along with a wedge of Lancashire Cheese!

WHAT YOU NEED TO MAKE TRADITIONAL ECCLES CAKES
Simple store cupboard and baking ingredients. I always keep all butter puff pastry in the freeze so that I have some on hand for tasty bakes such as these cakes!
You will need:
- 1 sheet of ready rolled good quality bought or homemade "all butter" puff or flakey pastry (3/4 pound)
- 1 egg, beaten lightly with a fork
- 2 TBS demerara (turbinado) sugar to sprinkle
You will also need:
- 45g butter, melted (3 TBS)
- 45g dried currents (1/3 cup)
- 45g raisins (1/3 cup)
- 6 TBS soft light or dark brown sugar
- 5 TBS mixed peel, chopped
- the finely grated zest of one orange
- 1/2 tsp ground cinnamon
- 1/4 tsp freshly grated nutmeg

Dried currants are not always easy to find in North America. I usually buy mine on Amazon. Likewise mixed candied peel can also be somewhat difficult to procure. This is something I also buy on Amazon.
I use frozen already rolled all-butter puff pastry which I keep in the freezer. You can buy it in two roll packs. Just make sure you take the pastry out about 2 hours ahead of time and leave it the refrigerator to thaw out completely.

If you don't have any orange zest, you can substitute this with 1/2 tsp of pure Orange extract. That is what I had to do today.
You can make up the filling a few hours ahead of time if you wish, even the night before. It really isn't that hard to put together.

People often confuse Banbury Cakes with Eccles Cakes. They are very similar but Banbury Cakes are generally oval in shape instead of being round. They frequently contain rosewater or rum and were said to be a favorite of Queen Victoria.
Some other cakes in the UK which are very similar are Chorley Cakes and Coventry God Cakes.
Banbury Cakes come from Banbury, Chorley Cakes from Chorley and the God Cakes from Coventry, so they are all very regional in origin and whilst the fillings are similar, there are subtle differences between the three, in the main being the type of pastry used and the shape of the cakes.

Chorley Cakes are not quite as sweet as Eccles Cakes, and use short crust pastry instead of flaky or puff pastry. They are enjoyed in much the same way, however, with a light scraping of butter and some cheese.
God Cakes are triangular in shape which is said to represent the Holy Trinity. They are traditionally eaten at New Year and are gifted from God Parents to their God children.
All have a very similar, dried fruit and peel filling. Of course you can enjoy all of these cakes anywhere, any time.

HOW TO MAKE TRADITIONAL ECCLES CAKES
These are really not difficult to make at all. If you have all of your ingredients ready they go together in a flash. The hardest part is waiting for them to cool down long enough so that you can eat them without burning your mouth!
Pre-heat the oven to 200*C/400*F/gas mark 6. Line a baking tray with parchment paper and set aside.
Mix all the filling ingredients together in a small bowl. Set aside.
Thaw your pastry if frozen. Unroll on a lightly floured surface. Lightly roll to 1/8 of an inch in thickness. I usually pop mine into the refrigerator the night before I want to make them and then take it out of the fridge about 15 minutes before I start making them.)
Cut the pastry into 9 even squares with a pizza cutter or sharp knife. Brush all of the cut edges with some of the beaten egg.
Divide the filling evenly between each of the 9 squares. Bring the edges of the pastry together over the filling into the center. Press them firmly together, completely enclosing the filling.
Turn over and flatten the disc ever so slightly between the palms of your hand until it is about 2 inches in diameter. You should just barely be able to see the fruit through the pastry.

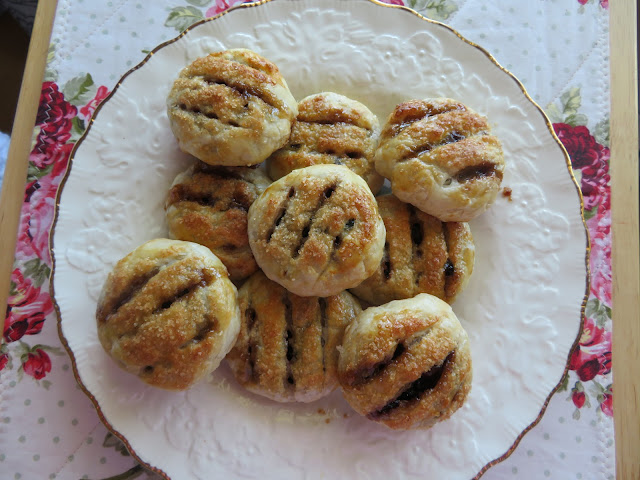
Place about 2 inches apart on the prepared baking sheet. Brush the top with some more of the beaten egg, and then sprinkle with the demerara sugar. Cut several small slits in the top of each with a sharp knife. (I used a pizza cutter.)
Bake in the pre-heated oven for 15 to 17 minutes until golden brown. The currants and sugar will caramelize through the holes and they will be scrumptiously delicious.
Remove to a wire rack to cool and try NOT to eat them all at once!! (I know it's quite difficult!)

What is not to love about something that is flakey and crumbly and stuffed full of currents, raisins and butter. For me it was love at first bite.
Not cakes but buttery, flaky, sweet little hand pies. A four bite piece of heaven on earth . . . with sugar on top . . . oozing little bits of juicy, sweet and sticky goodness. Most enjoyable with a hot cup of tea.

Some other deliciously moreish Teatime Treats here in the English Kitchen that you might want to also bake and enjoy are:
GINGER CRUNCHIES - Crisp shortbread based ginger biscuit/cookie/squares! They are crisp and buttery, very short textured. They are also topped with a lush ginger glaze and some sweet chunks of preserved ginger. Don't worry if you can't get the preserved ginger. You can make your own or you can use candied ginger in it's place. You can also leave it off altogether and still have a very delicious cookie!
LEMON SPLITS - Small griddle cakes, very similar to Welsh Cakes. Buttery, flaky, almost pastry-like, and sandwiched together with lush tart and sweet lemon curd. Incredibly moreish! Oh so tasty with a nice hot cuppa!
I don't know why they call them cakes. They're not a cake. They're like a little hand held piece of heaven on earth.
. . .
*
Eccles Cakes
Yield: 9
Prep time: 15 MinCook time: 17 MinTotal time: 32 Min
There is no doubt about it, these are a deliciously crumbly fruit stuffed mouthful of traditional British goodness. Buttery puff pastry, wrapped around a lush, buttery and sweet raisin, currant and peel filling. What's not to love?
Ingredients
You will need:
- 1 sheet of ready rolled good quality bought or homemade "all butter" puff or flakey pastry (3/4 pound)
- 1 egg, beaten lightly with a fork
- 2 TBS demerara (turbinado) sugar to sprinkle
You will also need:
- 45g butter, melted (3 TBS)
- 45g dried currents (1/3 cup)
- 45g raisins (1/3 cup)
- 6 TBS soft light or dark brown sugar
- 5 TBS mixed peel, chopped
- the finely grated zest of one orange
- 1/2 tsp ground cinnamon
- 1/4 tsp freshly grated nutmeg
Instructions
- Pre-heat the oven to 200*C/400*F/gas mark 6. Line a baking tray with parchment paper and set aside.
- Mix all the filling ingredients together in a small bowl. Set aside.
- Thaw your pastry if frozen. Unroll on a lightly floured surface. Lightly roll to 1/8 of an inch in thickness.
- Cut into 9 even squares with a pizza cutter. Brush all of the cut edges with some of the beaten egg.
- Divide the filling evenly between each of the 9 squares. Bring the edges of the pastry together over the filling into the center. Press them firmly together, completely enclosing the filling.
- Turn over and flatten the disc ever so slightly between the palms of your hand until it is about 2 inches in diameter. You should just barely be able to see the fruit through the pastry.
- Place about 2 inches apart on the prepared baking sheet. Brush the top with some more of the beaten egg, and then sprinkle with the demerara sugar. Cut several small slits in the top of each with a sharp knife. (I used a pizza cutter.)
- Bake in the pre-heated oven for 15 to 17 minutes until golden brown. The currants and sugar will caramelize through the holes and they will be scrumptiously delicious.
- Remove to a wire rack to cool and try NOT to eat them all at once!! (I know it's quite difficult!)

This content (written and photography) is the sole property of The English Kitchen. Any reposting or misuse is not permitted. If you are reading this elsewhere, please know that it is stolen content and you may report it to me at: theenglishkitchen@mail.com
Thanks so much for visiting. Do come again!
Subscribe to:
Posts (Atom)


Social Icons