

I was recently contacted and asked if I would like to try out some recipes which have been created by the acclaimed TV Chef Sophie Michell, to promote the new Blue Nun wines. (She is noted for Chanel 4's program, "Cook Yourself Thin.")
I was sent several recipes. There was one called Gold Leaf Sparkling Jellies with Iced Frozen Grapes and Creme Chantilly (using Blue Nun Sparkling Gold), as well as another one called, Cumin, Coriander and Ginger Marinated Lamb Cutlets with Saffron Rice and Pistachio Crumbs to be served with the Reisling. There wsa also a delicious looking Reisling Braised Chicken with Artichokes and Shallots and a Barbequed Sticky King Pao Chicken with Cashew, Carrot, Radish, Cucumber and Spring Onion Salad.
I chose the oriental recipe . . . the Barbequed Sticky Kung Pao Chicken. It looked tasty and we like a good Chinese dish. The recipe was missing the amount of radish to use, or how to use it, so I just sliced a few radishes into the mix.
This is a YouTube video that you can watch to see how she did it.
This is how mine turned out! Delicious!!

*Barbequed Sticky Kung Pao Chicken*
Serves 4
Printable Recipe
A beautiful chicken dish, spicy and finger lickin sticky good!
8 boneless & skinless chicken thighs, trimmed
For the Marinade:
2 TBS dark soy sauce
1 TBS Sherry, or for a lower sugar marinade use Blue Nun River Riesling
1 tsp honey
1 tsp hot chili flakes
For the Salad:
1/2 head of Chinese white cabbage
3 spring onions
1 carrot
1 red chili, depending on how much heat you like
50g of roasted cashew nuts, roughly chopped
For the Dressing:
4 tsp soy sauce
2 tsp Chinese rice vinegar
1 tsp sesame oil

Whisk together all of the marinade ingredients in a deep tray or dish. Add the chicken thighs. Open them up and turn them around to coat and cover them in the marinade. Cover and place in the refrigerator to chill for as long as possible. (Up to 24 hours and no less than 1 hour.)
To make the salad, peel and cut the carrot into very thin strips. Add to a large mixing bowl. Cut the spring onions thinly on a sharp diagonal. Add these to the bowl as well. Cut the Chinese Cabbage down the middle, core and then slice thinly. Add to the mix. Deseed the cucumber and thinly slice as well. Add this to the bowl and mix all of the ingredients together well.
Whisk together all the ingredients for the dressing and set aside.
When you are ready to eat, heat up a grill to very hot. Take the chicken out of the marinade. Discard any marinade left in the dish. Place the chicken onto the hot grill tray and cook for 8 minutes per side, until cooked throughout and nicely caramelized.
Add the dressing to the salad and toss all together. Divide the salad amongst 4 plates and top each with the grilled chicken, and a sprinkle of the chopped nuts. (She used peanuts in the video)
A glass of Rivaner Reisling (Fresh, Crisp and Fruity) is recommended as a good wine to serve with this dish.
Of course as a Mormon, I really can't give an opinion on how this wine is as a drink, but here is what Sophie had to say:
The Rivaner Riesling is really a super match for most types of Asian and oriental style dishes, which I find can be really hard to match a wine with and a glug of this fresh, fruity wine is great in the marinade too.
There is a big trend for lower alcohol drinks at the moment, but some that I've tried are rather watery. However, the Blue Nun Delicate drinks (5.5% alcohol) however are packed with flavour and taste. They're ideal for the lazy summer days, picnics and bbq's. Or to serve as an aperitif when you want something refreshing and light to serve to guests.
They are made with full bodied aromatic wine and delicious fruit flavours such as white peach, mango, raspberry and lychee which taste delicious.
*Gold Leaf Sparkling Jellies with Iced Frozen Red Grapes and Creme Chantilly*
Makes 6
Ingredients:
600ml of Blue Nun Sparkling Gold White Wine
50ml of Elderflower cordial
1 TBS sugar
6 sheets gelatine
200g of red or green seedless grapes
200ml of double cream
2 tsp icing sugar
Firstly take the grapes and cut into little branches with 3 grapes per set, then place on a tray and pop into the freezer.
Soak the gelatine sheets in a small bowl of cold water for about 5 minutes until softened. Meanwhile, put 100ml of the Blue Nun Sparkling Gold and sugar into a small saucepan and bring to the boil. Squeeze the gelatin sheets to remove any excess water and stir into the wine mixture until dissolved.
Then mix the heated wine mix in with the rest of the wine (500ml), pour into a large bowl and place into the fridge. Leave for at least an hour, then check and stir. Basically you keep doing this until the mix has thickened enough for the gold flakes to not sink to the bottom.
When ready pour into four individual metal pudding moulds, about 200ml/7 fl oz/ generous 3/4 cup capacity if you want to turn the panna cotta out onto dessert plates, or into four pretty serving bowls. Put into the fridge to set for at least 2 more hours, or overnight. Then pour the cream and icing sugar into a bowl and whip until soft peaks form.
If the Panna Cottas are in metal molds, pour boiling water into a bowl and quickly dip the moulds into the water before turning them upside down on to dessert plates. Then add a dollop of the cream and some of the frozen grapes.
Serve with a glass of sparkling gold.
Sophie says: The Gold Flecks were such a talking point for my girl friends and I. I just adore the way the bubbles rise the gold flakes to the surface. Very Glam!
You can check out her other videos on YouTube as well. The Lamb one looks delicious as well.
Many thanks to Megan for sending me this lovely wine to cook with and to Blue Nun Wines.
Make sure you check out their page online, there's a lot of information there on the wines and stockists, etc. Also be sure to check out their Facebook Page!

Blue Nun Rivaner Riesling is available to buy in most UK supermarkets including Asda, Co-op, Morrisons, Nisa and Tesco with an RRP of around £5.99 for a 750ml bottle.
Blue Nun Medium White is available in Tesco and J Sainsbury.
Blue Nun Medium Red, White and Rose are all available in Nisa.
Blue Nun Sparkling Gold edition is available to buy at £9.59 on-line from www.drinksdirect.co.uk
Blue Nun Delicate Stills have a recommended retail price of £3.99 and the Blue Nun Delicate Sparkling have a recommended price of £5.99, both for a 750ml bottle. All of the Blue Nun Delicates are currently available to buy from Home Bargain stores across the UK only www.homebargains.co.uk
Please do remember that if you are going to drink, you should so so responsibly.

Do you all remember a while back when I was sent a lovely hamper and asked to create a special recipe using the ingredients in the hamper?? You can read more about that experience here.
I had a lot of fun with those ingredients (it really was a lovely hamper) and I came up with this tasty recipe for a A Spring Salad of Mixed Greens & Goats Cheese Bakewell "Truffles", with a cherry balsamic dressing.

I really enjoyed the challenge, and in a lot of ways it reminded me of my days working at the Manor and cooking for the Mr and Mrs there. I do miss it sometimes, so this was a wonderful opportunity for me to stretch my wings again and go out on a limb! (I do love doing that!)
Capricorn Somerset Goats Cheese, quite happily has chosen me to be their first finalist in their Goat's Cheese Challenge! Yay me!! You can read all about that Here. My recipe is on their page and everything! To say that I am quite, QUITE thrilled is to say the least. I am simply over the moon, and honored to have been chosen!

Dear old Ethel has even blogged about it here! So I guess I can stop pinching myself now. It's actually true! I am in the running! It wasn't a dream!
Do pop on over and take a gander. It's a really cute site!
Many thanks to Ethel and the Capricorn Team for choosing lil' ol' me!! I can die happy now!

There is one thing that the British do very well . . . and that is the good old British Banger! (Sausage to you non-Brits! Of course, it is also something that they do really poorly too . . . but we won't talk about those!) You just can't beat a good old fashioned, meaty, top quality, Butcher's thick sausage banger . . . avoid the cheap ones at all costs. They are just plain nasty and filled with fillers and other ucky stuff that you don't want to be eating.

I picked up some really nice smoked ones at the shops the other day. I wasn't sure what to expect . . . as they did not look like the smoked sausage that I am used to from back home. These looked just like regular bangers . . . upon reading the ingredients though, I learned that they were composed of uncooked smoked and regular pork. I thought they would be worth trying. They looked quite good.

I decided yesterday that I was going to braise them . . . I had some open cider that I had used last week and I wanted to use it up and so I decided that it would be just the thing for braising these sausages in . . .

And then I decided to add some thyme and some honey . . . because thyme and honey go very well together and I thought those flavours would be fabulous with the pork and the cider!
Know what??? I was RIGHT!

These were fabulous. They had my meat and potatoes loving hubster salivating as soon as he saw his plate. He could not wait to tuck in.

I do love it when my man is happy. It makes me happy too.

*Cider and Honey Braised Bangers*
Serves 4
Printable Recipe
Easy and delicious. This is a meal that cooks itself.
8 good quality thick and meaty sausages
225ml of Apple Cider (1 cup)
2 TBS runny honey
1/2 tsp dried thyme
1 small cabbage, trimmed, cored and cut into wedges
a knob of butter
Melt the butter in a skillet large enough to hold your sausages and the cabbage. (You will need one with a lid.) Once the butter begins to foam, add the sausages. Brown over medium heat on first one side, and then the other. Once they are browned, tuck in the wedges of cabbages wherever they will fit. Sprinkle all with the thyme. Drizzle with the honey and pour over the cider. Cover tightly and turn to low. Braise for 15 to 20 minutes. Remove the lid and scoop out the cabbage wedges. Cover and keep warm. Turn up the heat under the skillet and continue to cook the sausages, as the liquid bubbles away, turning them occasionally, until they are nicely glazed and the pan has some nice thick juices in it. Divide the sausages and cabbage amongst 4 heated plates and drizzle with some of those scrummy pan drippings.
Potatoes go very well with this, either steamed new potatoes or mash. It's up to you!

My friend Eleanor from Shrewd PR sent me the neatest little packet the other day. Inside it was a packet of these new egg cookers called "Poachies!"
Poaching eggs can be a real hassle for some people, and even I don't get it right all of the time . . . it can be really difficult keeping them into a tidy little parcel . . . perfectly rounded and ready to set on a crisp piece of buttered toast! And there is no end to the hints and techniques bandied about on how to perfectly poach an egg. Let's face it . . . it's not as simple as just cracking an egg into a frying pan filled with sizzling butter and cooking it.
I've tried all sorts of methods . . . using vinegar, salt . . . and even soda . . . you name it. I've tried dropping the eggs into a little whirlpool of simmering water (said to keep it in a neat and tidy little parcel) and slipping it from a bowl into simmering water, without the whirlpool . . . you name it, I've tried it and it's always hit and miss. Sometimes you get it right . . . and sometimes you don't.
Well that doesn't have to be a problem any longer. These fabulous revolutionary little things have just taken all the guess work and hassle out of making perfectly poached eggs! I kid you not!
It's as easy as cracking an egg into a little paper sac and lowering the sac into simmering water. The paper keeps the egg intact and still allows the water to penetrate it, cooking them in the perfect little poached egg shape . . . kind of like a tea bag . . . for eggs, if that makes sense!

The package comes with fabulous instructions printed on the back. It's very hard to get it wrong if you follow them. I've tried them a few times now . . . and every time has resulted in perfectly poached eggs . . . with no hassle and no fuss!
Easy peasy, lemon squeasy and so much healthier for you too than fried eggs!
And they were soooooo easy to use! I found a neat really neat video of the process on You Tube!! (What can't you find on You Tube!) I thought it would be great for you to see them in action, so click away!
I think I have found a brand new favourite kitchen tool!
Proper water poached eggs, perfect every time. You can't beat that!

Poachies are available at Waitrose, Cook Shops Department Stores, retailing at the very affordable price of £2.99 for a packet of 20.
You can read more about them here, and there is even a buy now button on that page which offers free delivery!

Many thanks to Eleanor and Poachies! I just love them and highly recommend! They take all the guess work and hassle out of poaching eggs! I'm all for that!!

I've seen a few salads similar to this floating around. In fact I think my sister has one that's very similar to this on her blog, Flat Belly Files. She uses wheat berries though. Love her dearly . . . we are a bit like chalk and cheese food-wise. She's like the good angel and I'm like the devil, tempting you with decadance . . .

I think there's room for a bit of both . . . probably would be better if you ate more like she does . . . with the occasional treat. That's what I am aiming for anyways . . . most of the time.

Ok, ok . . . so, in all honesty . . . it only appears to be some of the time. I try, that's what counts!

This salad is loosely based on a waldorf chicken salad . . . with apples, nuts, celery . . . but with no thick mayo gunking it up . . . it has a lovely honey/lemon dressing, which is . . . juuuussssttt right! (as Goldilocks would say!)

It's a great way to use up leftover roast chicken and I think it looks rather pretty on a plate. I have mine here on a bed of watercress . . . but any greenery will do.

I think that looks rather healthy, don't you??

*A Salad of Chicken, Couscous and Fruit*
Serves 4
Printable Recipe
A wonderful marriage of flavours, colours and textures that comes together beautifully. I quite, quite like this . . . and it's kinda healthy too!!
For the dressing:
the juice of 1/2 lemon
2 TBS extra virgin olive oil
1 tsp runny honey
pinch of ground cinnamon
pinch ground cardamom
pinch salt
a good grinding of black pepper
2 TBS chopped flat leaf parsley
For the salad
100g uncooked Israeli Whole Wheat Coucous (1/2 cup)
1 vegetable stock pot
boiling water
1 eating apple, washed, cored and chopped
1 stick of celery, washed, trimmed and chopped
2 cooked skinless boneless chicken breasts, chopped (about 2 cups)
a handful of dried sweetened cranberries
a handful of toasted pecan nuts, chopped
Whisk together all of the ingredients for the dressing in a medium sized bowl. Set aside.
Drop the vegetable stock pot into the boiling water. Add the couscous and bring back to the boil. Cook for 6 to 8 minutes and then drain. Do not rinse if you can help it. Drop the drained couscous into the bowl with the dressing. Stir to coat and leave set to cool in the dressing.
Once the couscous is cold and most of the dressing has been absorbed add the chopped apple, celery, chicken and cranberries. Toss together. Taste and adjust seasoning as necessary. You may need a bit of salt, depending on the strength of your stock. Stir in the toasted pecans just before serving.
Serve on a bed of salad greens, rocket or watercress. Delicious!

There is something about the combination of chocolate and peanut butter that is quintessentially perfect don't you think?

It's that sweet/salty thing I am sure. The rich sweetness of the chocolate going so very well with the creamy saltiness of the peanut butter . . .

It doesn't seem to matter to me if it is dark chocolate or milk chocolate, or something in between. Chocolate and peanut butter are just plain good, no matter which way you work it together. Reeses has made a fortune on that premise . . .

A divine combination that is bliss, pure bliss, and never more so than when baked into a buttery cookie, chock full to the brim with smooth and tasty semi sweet chocolate chips and topped with a rich, crumbly, peanutty streusal topping.

Scrummy never tasted so good! (Not a favourite of Todd's of course, but that's his fault for not liking chocolate. It just ain't natural!)

*Chocolate Peanut Crumble Cookies*
Makes about 15
Printable Recipe
Deep, dark and delicious chocolate cookies, filled with chocolate chips, topped with a scrummy peanut topping and drizzled with white chocolate as a crowning touch.
9 TBS of butter, softened
115g of caster sugar (1/2 cup plus 1 TBS)
1 heaped TBS of creamy peanut butter
1/2 tsp vanilla
1 large free range egg, beaten
150g plain flour (1 slightly heaped cup)
30g of cocoa powder (8 TBS)
1/2 tsp bicarbonate of soda
100g of semi sweet chocolate chips (1 cup)
For the crumble topping:
30g salted butter (2 1/2 TBS)
40g plain flour (1/4 cup heaped)
30g of caster sugar (1/4 cup)
60g of unsalted peanuts (1/2 cup),
half of them coarsely chopped and half of them left whole
For the drizzle:
50g of white chocolate, chopped (1/2 cup)
Preheat the oven to 190*C/375*F/gas mark 5. Line several baking sheets with parchment paper. Set aside.
Make the crumble topping by whisking together the flour and sugar. Rub in the butter until crumbly and then stir in the nuts. Set aside.
Cream together the butter and sugar for the cookies, along with the peanut butter, until smooth and fluffy. Beat in the egg. Sift together the flour, cocoa powder and baking soda. Stir this into the creamed mixture, mixing it in completely. Stir in the chocolate chips.
Shape into 15 gold ball sized balls. Place well apart on the baking sheets. Press down lightly with a spoon, making a slight indentation in the middles. Sprinkle heaped TBS of the topping in the middles. (This will be messy, and some will fall off, but do the best you can do. You will not need all of the crumble topping, but it freezes well for another time and trust me, when you taste these little gems, there will be another time). Bake for 10 to 15 minutes, or until the cookies are well set and the topping is golden. Remove from the oven and allow to sit for 5 to 10 minutes before scooping off to finish cooling on a wire rack.
Melt the chocolate in a bowl in the microwave for about 60 seconds. Stir until smooth. Drizzle decoratively over the tops of the cookies, across the streusel. Allow to set before storing in an airtight container.

Any guesses on what my absolute favourite cookie of all time is??? No, it's not custard creams, oreos, chocolate chip or even shortbreads . . .

It's the humble, peanut butter filled, peanut butter flavoured oat cookie called . . . "Pirate Cookies!" I just love that wholesome crisp oatmeal cookie (slightly peanut butter flavoured) and that yummy peanut buttercream filling. Oh, nothing on earth tastes better with a glass of milk.

I like to pull them apart and lick up the frosting and then eat the biscuits.

I like to dip them in milk and let them get soft and then eat that scrummy milk soaked goodness . . .

I like to eat them just as they come . . . two crispy layers . . . soft filling . . . Nom Nom!
I love to eat them anyway I can get them . . . only problem being . . . there is no such thing as a Pirate Cookie here in the UK . . . there is not even any biscuit that it close to being a Pirate Cookie.

My waistline is completely ok with that fact . . . but oh boy . . . you never know just how much you are going to miss something until it's way beyond your reach. I have been missing Pirate Cookies for nigh onto 12 years now . . . that's a long time to miss something.

Ok . . . so I do have had the occasional fix when I happen to fly home for holidays, about once every three years . . . but it's not near enough, truly. I love them that much. I've tried bringing some home with me in my baggage . . . but they get all crushed . . . not near as satisfying as crunching down your own biccies!

This week I decided to try to make my own . . . I baked oatmeal cookies largely based on an old recipe . . . I substituted some of the butter with peanut butter. It worked. I had some lovely peanut butter flavoured oatmeal cookies.I created a peanut butter flavoured buttercream filling.
I sandwiched that yummo peanut butter flavoured buttercream filling betwixt two of those scrummy oat cookies.

I fell in love. Mr Christie . . . you DO make good cookies . . . but these are better.
The end.

*Homemade Pirate Cookies*
Makes 18
Printable Recipe
Something which I have always missed from home . . . now I don't have to miss them anymore.
For the cookies:
75g of plain flour (3/4 cup)
1/2 tsp bicarbonate of soda
1/2 tsp of baking powder
1/2 tsp salt
8 TBS unsalted butter, at room temperature
90g of creamy peanut butter (1/2 cup)
96g of caster sugar (1/2 cup)
100g of soft light brown sugar (1/2 cup packed)
1 large free range egg, at room temperature
1 tsp vanilla
81g of quick cooking oats (1 cup)
For the filling:
3 TBS unsalted butter
90g of creamy peanut butter (1/2 cup)
130g of icing sugar, sifted (1 cup)
3 TBS heavy cream

Preheat the oven to 180*C/350*F/ gas mark 4. Line two baking sheets with parchment paper.
Whisk togethet the flour, soda, baking powder and salt. Set aside.
Cream together the butter, peanut butter and both sugars, until light and fluffy. Beat in the egg and vanilla. Mix in the flour mixture and then stir in the oats, beating briefly to combine. Scoop out using a small cookie scoop (approximately 1 heaped TBS) and drop onto the prepared baking sheets, leaving 2 inches in between each for spreading. Bake for 10 to 12 minutes, until the cookies are golden brown and the edgese are set. Allow to cool on the baking sheets for five minutes before removing to a wire rack to finish cooling.
Make the filling by beating together the butter, peanut butter and icing sugar at medium speed until smooth. Add the cream and beat until fluffy. Put together the cookies into pairs with some of this filling in between. Press the filling to the edges. Store in an airtight container.

Oh yes . . . I will still be induging my fill when I am home in July . . . but it's nice to know that I can still create a fabulous substitute in between trips!


Strawberries. They are a true summer treat. It is not often that you see the wild ones these days, but in early July our local fields begin to fill with fresh summer berries. I wait all year for the to ripen.


- 3/4 cup (175g) of unsalted butter, plus extra for greasing
- 5 TBS heavy (double) cream
- 1 tsp vanilla extract
- 1 1/2 cup plus 2 TBS (225g) plain flour
- 1 cup plus 3 TBS (100g) of ground almonds
- 1 tsp baking powder
- 1 cup (200g) of sugar
- 5 large eggs
- 1 3/4 cups (400g) of fresh strawberries, washed, half of them roughly chopped and half sliced (about 1 pound)
- 4 meringue nests, roughly broken up
- icing sugar to dust

Meringue nests can be purchases in the baking section of any good grocery store. They are quite crisp. You can also buy them online.

- Preheat the oven to 160*C/ 325*F/ gas mark 3. Butter a deep 8 by 12-inch baking tin. Line the bottom with parchment paper. Set aside.
- Whisk together the flour, almonds and baking powder. Set aside.
- Melt the butter. Whisk in the double cream and vanilla. Set aside.
- Place the sugar and eggs into a large bowl. Beat together with an electric whisk for about 5 minutes, until very thick and foamy. Pour in the butter mixture. Mix lightly.
- Add the flour mixture and whisk briefly until evenly combined with no dry streaks.


Pin This Recipe To Your Dessert Boards and Remember to FOLLOW ME ON PINTEREST, FACEBOOK, or INSTAGRAM
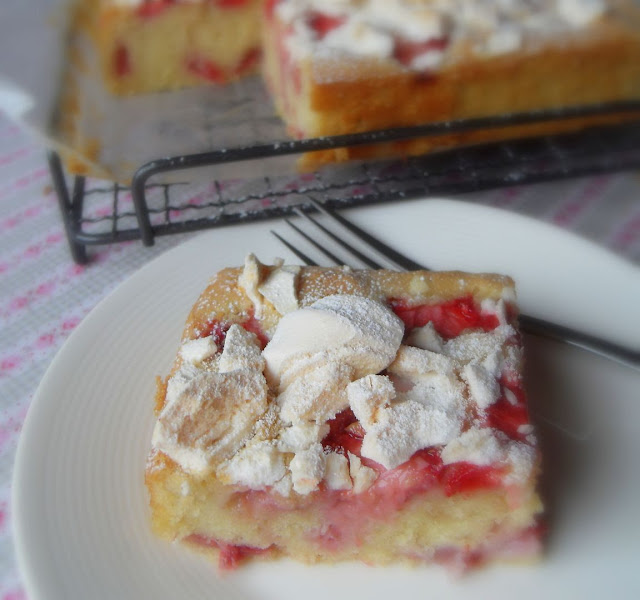
Eton Mess Cake
The perfect summer cake, loaded with fresh berries and sweet crumbled meringues. All you need to serve it with is perhaps a dollop of softly whipped cream.
Ingredients
- 3/4 cup (175g) of unsalted butter, plus extra for greasing
- 5 TBS heavy (double) cream
- 1 tsp vanilla extract
- 1 1/2 cup plus 2 TBS (225g) plain flour
- 1 cup plus 3 TBS (100g) of ground almonds
- 1 tsp baking powder
- 1 cup (200g) of sugar
- 5 large eggs
- 1 3/4 cups (400g) of fresh strawberries, washed, half of them roughly chopped and half sliced (about 1 pound)
- 4 meringue nests, roughly broken up
- icing sugar to dust
Instructions
- Preheat the oven to 160*C/ 325*F/ gas mark 3. Butter a deep 8 by 12-inch baking tin. Line the bottom with parchment paper. Set aside.
- Whisk together the flour, almonds and baking powder. Set aside.
- Melt the butter. Whisk in the double cream and vanilla. Set aside.
- Place the sugar and eggs into a large bowl. Beat together with an electric whisk for about 5 minutes, until very thick and foamy. Pour in the butter mixture. Mix lightly.
- Add the flour mixture and whisk briefly until evenly combined with no dry streaks.
- Stir in the chopped strawberries.
- Pour the batter into the prepared tin, smoothing over the top. Scatter the sliced berries over the top along with the meringue pieces.
- Bake in the preheated oven for 40 to 45 minutes until risen and golden brown. A skewer should come out clean.
- Allow to cool in the pan for about 20 minutes, then turn out onto a wire rack to finish cooling. Dust with icing sugar just before serving.
Notes
This cake is best eaten on the day. Sooooo NOT a problem! Left overnight, the meringues will soften, which still tastes quite good, but the crunch is not there.

This content, written and photography, is the sole property of The English Kitchen. Any reposting or misuse is not permitted. If you are reading this elsewhere, please know that it is stolen content and you may report it to me at mariealicejoan at aol dot com.





Social Icons