


I think you would have to be living under a rock in recent weeks not to see all of the highly decorated focaccia loaves on the internet. Very pretty to look at for sure. I have only just dipped my toes into the world of Sourdough. I recently mastered making the starter successfully along with a few bakes with the started and the discard. You can see my tutorial on how to make a Sourdough Starter here.

I am ever so pleased as I have finally mastered this skill! I have also managed to store it and bring it back to life again with great success, and if anything it is even better now than the original one! Apparently you can keep these things going for years and years. I watched a program on the television about San Francisco, the birthplace of sourdough and in the original factory they were still using the starter that they had been using since the 1800's!! Now to me, that's amazing!

All of those highly decorated focaccia are very pretty to look at for sure, but for my first one I wanted to really keep it simple. You begin by making a sponge . . . using some of your starter, some oil, honey and flour. Once that is bubbling away you add the remaining ingredients and knead it. Kneading is such a catharic exercise in mindfulness. I could do it forever . . . my mind just settled on nothing but what's going on beneath my hand. You can feel the dough changing as the gluten begins to develop and you end up with a lovely smooth ball, elastic in texture and slightly tacky.

You then pop it into an oiled bowl, cover with cling film and set it aside to rise for about 2 hours. I am always so surprised when I see the dough rising, with no yeast involved. Its like magic to me.

Once risen you punch it down and press it out onto a baking sheet with sides, then cover it lightly with a tea towel and let it rise again for a further hour.

A the end of that time you get to make little dimples all over the surface of the bread with your fingers, divots . . . . ready for you to brush with olive oil . . . the olive oil collects into the divots adding some scrumptiousness . . .

I kept it simple for this first time and just brushed it with a plain olive oil, albeit an excellent quality one and added a simple sprinkle of coarse sea salt.

If you wanted to you could brush it with an herby olive oil and sprinkle on extra herbs, or a pesto olive oil. I think I will do a rosemary one next time.

Its actually very similar to pizza dough except thicker, so I reckon there is no end to what you can top it with, or dress it up with. I am not really into all that fancy decoration stuff though. It might look pretty, but I prefer to keep things a bit simpler myself.

At any rate this is a beautiful focaccia, just nicely crusty on the outside and with a beautiful crumb . . . and just a slight sourdough tang . . .

We enjoyed some squares of it simply dipped into some more of that great olive oil. I may make sandwiches with the rest.
How to Make a Sourdough Focaccia

Yield: 1 (10 by 15-inch) Focaccia
I was pleased with how this turned out. Once you master this, you can experiment a bit with other flavours and additions.
Ingredients:
To Form the Sponge:
- 150g sour dough starter (3/4 cup)
- 120ml warm water (1/2 cup)
- 30ml olive oil (1/8 cup)
- 1/2 TBS honey
- 70g bread flour (1/2 cup)
To finish the bread:
- 60ml olive oil (1/4 cup)
- 280g bread flour (2 cups)
- 1 tsp fine sea salt
You will also need:
- A good extra Virgin Olive oil to brush
- coarse sea salt to sprinkle
Instructions:
- You will be doing this in three parts. First you will need to make the sponge. Combine all of the ingredients for the sponge in a bowl and leave to ferment, covered for an hour. You will know it is ready when the surface is covered with bubbles of a variety of sizes.
- Once your sponge is ready add the second amount of ingredients, mixing all together well. Tip out onto a lightly floured board and knead for 5 to 8 minutes until you have a dough which is smooth and soft and slightly moist.
- Tip the dough into an oiled bowl, turning it to coat lightly with oil. Cover with plastic cling film and set aside for 1 1/2 to 2 hours to rise. It should double in size.
- Punch down. Lightly oil your baking tray. (10 by 15 inch with sides.) Press the dough out onto the tray to fill it. If the dough pulls back, leave it for a few minutes and then press it out again.
- Cover lightly with a clean tea towel and leave to rise for another hour at which time it should double in size again.
- Preheat the oven to 230*C/450*F/ gas mark 7.
- Dock the dough in the pan by making little divets all over it with your finger tips. Brush with a good olive oil and sprinkle with coarse sea salt.
- Bake for 20 minutes in the preheated oven until golden brown. Place on a wire rack to cool in the pan. Cut into wedges or squares to serve.

Have you tried sourdough yet or been tempted to? If not, I can highly recommend. Once you get the hang of it, its really quite simple and there is no end to what you can do with the starter itself, and its discard!
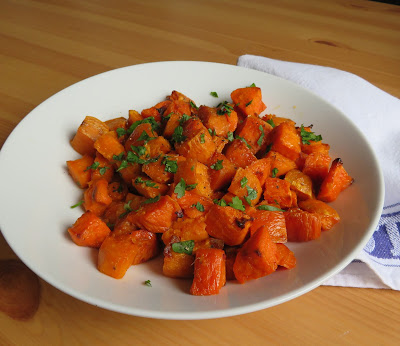

You are going to love the recipe I am sharing with you today. Roasted Sweet Potato Salad with Lime & Honey. Do you love sweet potatoes as much as I love sweet potatoes? If so, then this recipe is sure to become one you will turn to frequently in the summer months!


Did you have a job picking local strawberries when you were a teenager? I am pretty sure that if you lived in a fairly rural location you probably did.
Local strawberry growers depended on teens hungry for extra money back in the day! I did it for a few weeks every summer for a couple of years. It was a back breaking labour spending the day crouched low to the ground and in hot sun.
You picked long and hard for a few dollars a day, but we were grateful for the work. The farmers would actually send a truck to pick you up and take you to the strawberry fields.

I wonder if teens still pick berries for money? Or do our farmers have to rely on immigrants. I don't know. You would have thought all that picking would have soured my taste for berries, but nope.
I adore strawberries above all other berries. I don't think there is a way I could ever not like them, and here in the UK we grow some of the best.

One thing we all really loved during strawberry season every year was when my mom would make us Strawberry shortcakes for dessert.
Mom's strawberry shortcake was the highlight of strawberry season! You can find that recipe here.

I remember one year we happened to be travelling in the states and we visited my mother's Uncle Arnold in Connecticut.
They had chickens in their garden which we delighted in being able to feed and we had a lovely dinner with them, complete with Strawberry Shortcake for dessert!
Strawberry shortcake during berry season is a Maritime/New England tradition!

This Strawberry Shortcake Recipe I am sharing with you today differs a bit from the usual recipe in that rather than plain cream biscuits it uses a nut swirled biscuit!
I adapted this recipe from one I found on the Yankee Magazine site. The original recipe was for Pistachio Swirl Strawberry Shortcakes.

I didn't have pistachio nuts, but I did have plenty of pecans, so I used them in their place.
Just look at that lovely nut swirl in the biscuit! It adds a lovely touch and another level of flavour.

The biscuit dough itself is also a tad bit different. Cream biscuits but with some cornmeal (polenta) added for an extra bit of crispness!
They bake up nice and short and flaky!

Biscuits made with cream are simply lovely. Please be aware, I am not meaning biscuit in the British sense here! These are not cookies.
These are scone-like, North American Style Biscuits, and they are gorgeous!

We grow our own strawberries in our garden. They come in dribs and drabs, however, and I usually have to augment them with store bought berries if I am making something like this.
I am never able to pick enough at any one time.

Our berries are a lot smaller and sweeter than the store ones, but altogether they make for a pretty delicious combination!

The berries are only lightly sweetened.
When you have really good berries, you don't need to over sweeten them. The strawberry flavours shine through beautifully!

You can sweeten the whipped cream as well. I don't because I am a diabetic and I figure there is enough sweetness in the berries and those biscuits.
The British normally don't sweeten their cream anyways and I have gotten quite used to that.

At first I thought it was a bit strange, but I actually prefer it that way now!

Don't overwork your biscuit dough. The single greatest cause of tough biscuits is overworking the dough. Just stir everything together and then pat it out lightly to a rectangle.
The filling is very easy to make as well, but you will need a food processor or blender of some sort to blitz the nuts and sugar together to combine.

A bit of butter goes into the mix, and then you spread this filling onto the patted out biscuit dough. Roll it up, cut it into slices and bang!
You have nut swirls biscuits ready to bake into deliciousness!

Crisp, short and crumbly, perfect for this dessert . . .
cut in half once cold, and then layered with sliced berries and the whipped cream.

You owe it to yourself to try this version of shortcake at least once during this strawberry season. Trust me on this!
Pecan Swirl Strawberry Shortcakes

Yield: 8
A fresh spin on an old classic, with crisp cream biscuits swirled with a sweet pecan swirl, and filled with fresh ripe strawberries and whipped cream.
Ingredients:
For the biscuits:
- 140g plain flour (1 cup)
- 115g cornmeal (2/3 cup)
- 1 1/2 TBS granulated sugar
- 2 tsp baking powder
- 1/2 tsp salt
- 240ml double cream (1 cup heavy cream)
For the pecan swirl:
- 90g raw shelled and toasted pecan nuts (90g)
- 1 1/2 TBS granulated sugar
- 2 TBS butter, at room temperature
You will also need:
- 50g granulated sugar
- 2 pounds strawberries, washed, hulled and sliced
- 300ml double cream (1 1/4 cups)
- 2 TBS icing sugar
- icing sugar to dust
Instructions:
- First make the biscuits. Preheat the oven to 190*C/376*F/ gas mark 5. Line a large baking tray with baking parchment. Set aside.
- Measure the flour, corn meal, sugar. baking powder, and salt and give it a good whisk to combine. Add the cream and stir it togehr with a spatula until you get a soft dough. Set aside.
- To make the filling, put the nuts into a small food processor with the sugar and pulse until finely ground combindwith some larger pieces. Add the butter and pulse again to combine.
- Pat the dough out on a lightly floured surface to a 12 by 9 -inch rectangle with the long edge facing you. Spread the pecan filling over this to within 1 inch of the top edge, spreading it out evenly. Roll up tightly from the long edge like a jelly roll. Cut the roll into 8 equal slices. Place, evenly spaced and leaving plenty of room around them for expanding, on the prepared baking sheet. Press lightly to flatten just a tiny bit.
- Bake in the preheated oven for 20 to 25 minutes until golden brown. Scoop off onto a wire rack and allow to cool completely before proceeding.
- Mix your berries with the granulated sugar and let sit for about 10 minutes to macerate.
- Whip the cream together with the icing sugar until it forms soft peaks.
- To serve, carefully slice the biscuits in half through the centre. Place the bottoms onto serving plates. Top with a portion of berries, a dollop of whipped cream and the biscuit tops. Dust lightly with icing sugar and serve immediately.

What is your favourite way to enjoy Strawberries during the season?? I love a good strawberry pie and of course I could just sit and eat them out of hand.
I remember one time when we were visiting my in-laws when my children were growing up, they ate so many berries that my FIL told them that when we went to wake them in the morning there would be nothing but big fat strawberries laying in their beds! OH but that didn't half give them a thrill!


I really love skillet meals like this Cheesy Tuna Pasta. Meals/entrees that can be cooked all in one pan on top of the stove.
In the summer they are especially welcome as they don't heat up the kitchen like oven bakes do. But they are equally as delicious and desired in the winter months. To be honest I am up for a one pan supper any time!

This Cheesy Tuna Pasta is just like your favourite Tuna Casserole, except it is cooked in a skillet. Amazingly there is no need to cook the pasta first.
The pasta cooks right in the pan with everything else. This also helps to cut down on the washing up! I am all for that!

So what do you need to cook a fantastic meal like this? Nothing unusual. Its simple, economical, quick and easy to make.
- small pasta shapes (I used smaller size macaroni)
- Albacore white tuna (I only ever buy albacore)
- whole milk (homogenized, don't use a lower fat milk, the richness of the sauce comes from the use of whole milk)
- water
- butter
- dry mustard powder
- sweet paprika (the opposite of hot paprika)
- grated strong cheddar cheese (don't be tempted to use pre-grated cheese please, it simply doesn't work well in this recipe.)
- frozen petit pois (sure you can use full size peas, but I prefer petit pois)
- salt, pepper, hot sauce and chopped parsley to garnish

As you can see, nothing too out of the ordinary here. The most expensive bits will be your cheese and your tuna.
I buy my Albacore tuna in glass jars from Ocado. I end up with really great tuna, and an empty glass jar that I can use when I make jam in the summer and autumn time.

Do you save your glass jars? I always have done, and plastic bags, etc. When I lived in Canada we used to buy our milk in plastic bags, in the 4 liter pack we would get three bags.
After the milk was gone I would wash and dry them and store them for future use. They made great freezer bags! Nice and heavy duty!

This is a fabulously tasty skillet meal. It goes together really quickly and is done in about 15 minutes time maximum.
While it is cooking you can be putting together a nice salad to serve on the side. Easy peasy.

You do need to keep an eye on it while it is cooking. First when you bring everything to the boil. Milk has the magic quality of being able to just about double in size when it comes to the boil, so keep watch.
You don't want to be cleaning burnt on milk from off the stove.

You also want to keep a watch on it and stir it often while it is simmering away. This is so that all of the pasta cooks equally and none sticks to the bottom of the pan.
There is nothing worse than pasta that is stuck to the bottom of the pan. If it burns it can send that burnt flavor all the way through the whole dish.

Don't attempt to cut fat in this recipe by using skimmed milk. You want at least 1% or higher. I use whole milk. It gives a lovely rich sauce.
I have never used any other kinds of milk in this dish other than cow's milk so I cannot speak as to how well they would work. (Soy, oat, almond, etc.) I can't think that they would be very nice actually. But that is just me.

You can use fresh garden peas if you have them. I use frozen petit pois (baby peas). I am thinking that frozen chopped broccoli would also work in the same quantity as the peas, as would a mix of frozen peas and corn.
Or even a mix of frozen vegetables. Just pick what you enjoy most.

Always grate your own cheese when you are using it for cooking like this. They add things to pre-grated blends to help them flow smoother when pouring out of the bag and they can often give you a poor finish.
It doesn't really take too long to grate your own, and it is so much nicer tasting and texture wise! Also use a nice and flavorful cheese. I use strong cheddar. You can also add a TBS or two of grated Parmesan if you wish. This adds an extra special touch!

I only ever use Albacore Tuna. An old Italian woman told me to never use anything else once. I was in the grocery store and buying tuna. This was back in the 1980's.
She was right. There is really no comparison and, to me anyways, it has always been worth it to pay a bit more and get albacore. Its just nicer and tastes far superior.

Make sure you use a pasta in this recipe which says it can be cooked in 6 to 8 minutes as per the instructions on the box. I used small elbows which worked perfectly.
All in all I think this is one winner of a weeknight supper! My children have always loved it. As a busy mom raising five children this is a recipe which always came in handy!
Cheesy Tuna Skillet Pasta

Yield: 4
A simple all in one supper entrée that comes together in one pan lickety split!
Ingredients:
- 230g small size pasta shapes (2 cups, I use small macaroni)
- 280g Albacore white tuna (10 ounces), well drained
- 480ml whole milk (2 cups)
- 240ml water
- 4 TBS butter
- 1/2 tsp dry mustard powder
- 1/2 tsp sweet paprika
- 245g grated strong cheddar cheese (2 cups)
- 75g frozen peas (1/2 cup)
- fine sea salt and freshly ground black pepper
- Tabasco sauce to taste
- fresh parsley to garnish
Instructions:
- I use my largest non-stick skillet for this recipe. Add the macaroni, the tuna (broken up), the milk, water, butter, dry mustard powder and paprika to the skillet. Place over high heat and bring to the boil, stirring constantly. (Stay on it as milk really doubles in volume as it boils and you don't want it to boil over.) Turn down to a bare minimum heat and cover tightly.
- Simmer until the pasta is cooked al dente, about 10 minutes or so, and almost all of the liquid has been absorbed. Stir frequently to prevent the bottom from catching. Stir in the frozen peas and cheese. Allow the cheese to melt. Season with the tabasco sauce and salt and pepper to taste. Sprinkle with the parsley and serve immediately.
notes:
Do NOT use pre-grated cheese. It doesn't work well in this recipe. Please grate your own. Any small pasta shape will work. The cook time depends on your pasta. If its not cooked and most of the liquid has already been absorbed, add a bit more boiling water if need be.

What are your favourite things to do with Tuna? We love it in sandwiches, salads, pasta dishes, baked loaves and patties!
This content (written and photography) is the sole property of The
English Kitchen. Any reposting or misuse is not permitted. If you are
reading this elsewhere, please know that it is stolen content and you
may report it to me at: mariealicejoan at aol dot com Thanks so much for
visiting. Do come again!
Subscribe to:
Posts (Atom)


Social Icons