Pages

  • Contact Me
  • MAKE YOUR OWN (a list of make your own mixes)
  • Recipe Index
  • Privacy Policy
  • Advertising and Disclosure
  • Post Index

Search This Blog

Powered by Blogger.

Social Icons

The English Kitchen

Pages

  • Home
  • About Me
  • Cook Booklets
  • Categories
  • _Kitchen Wisdom
  • _In The Larger and Pantry
  • _Couldn't Live Without
  • _Kitchen Wish List
  • Additional Recipes
  • _Vegetarian
  • _Salads
  • _Breads
  • _Sandwiches

The Yorkshire Pudding Wrap

Thursday, 30 April 2020

The Yorkshire Pudding Wrap 

Right when this corona virus was just beginning and we were all just starting to be afraid that it would spread to the UK, I had my last Chiropracter visit in Chester city.  We always treated ourselves to a lunch afterward on our walk back to the bus station.  Usually at a different place each time. 


On that day we decided to treat ourselves to a Yorkshire Pudding Wrap at one of the hot sandwich shops in downtown Chester.  I remember feeling very paranoid about germs at the time. It wasn't a nice feeling.  That was the last time we went anywhere. It was the 5th of March.  The rest is history.  We did enjoy our sandwiches however. They were very good indeed.


The Yorkshire Pudding Wrap 

The ones we had on that day were turkey ones, with stuffing, cranberry sauce, etc.  I decided to recreate them in our home today using what I had in the house.  Leftover roast beef, leftover roasted vegetables, peas, leftover gravy, etc.

The Yorkshire Pudding Wrap 

I cut my regular recipe for yorkshire pudding down in size and baked it in a jelly roll tin.  Because it was spread out quite a bit, it didn't rise quite as high, which is what I wanted.  I rolled it up in a clean tea towel as soon as I took it from the oven for a few minutes to soften it and make it a bit more pliable for wrapping purposes. This worked very well.

The Yorkshire Pudding Wrap 

I then cut it half crosswise to make two smaller wraps.  I spread each half with a quantity of horseradish sauce and grainy mustard and then I started layering.

The Yorkshire Pudding Wrap  

First heated roast beef.  You want to cut it very thin for this purpose. You can season it a bit with some salt and pepper if you like.

The Yorkshire Pudding Wrap 

Onto that I layered on the leftover and heated cooked veg that I had.  Roasted potatoes, cut into smaller bits, roasted parsnips, carrots, cabbage . . . baby peas, roasted onions . . .


The Yorkshire Pudding Wrap  

Just use what vegetables you have.  You don't need a lot really, just a tiny bit of each scattered over your roast beef . . .


The Yorkshire Pudding Wrap 

A bit of gravy got drizzled on top and then I rolled them up tightly.  In town you can eat these in a parchmen wrapper and yes they are messy.

The Yorkshire Pudding Wrap 

Here at home, we ate them on plates, with knives and forks and some homemade coleslaw on the side, coz  . . . that's how we roll. 

The Yorkshire Pudding Wrap 

Of course there was extra gravy for drizzling over top.  You just have to have some gravy drizzled over top.  Just look at that tender roat beef, those crispy roasted potatoes, parsnips, peas  . . .  carrots . . . 

The Yorkshire Pudding Wrap 

It was nigh on impossible to eat these out of hand.  We didn't even try . . .instead we gobbled them up with knives and forks.

The Yorkshire Pudding Wrap  

There were little utterances of glee in between mouthfuls  . . .  and why not. These were delicious!

Yield: 2
Author: Marie Rayner

The Yorkshire Pudding Wrap

The Yorkshire Pudding Wrap

Leftovers from a roast dinner, heated and wrapped in a flattened yorkshire pudding.  Scrumptiously tasty!

Ingredients:

For the pudding wrap:
  • 110g plain flour (3/4 cup)
  • 1/4 tsp salt
  • 1 large free range egg
  • 250ml milk (1 cup plus 2 tsp)
  • oil to cook
You will also need:
  • 1/2 pound of cooked roast beef, sliced thin and heated
  • a quantity of leftover cooked vegetables, heated (carrots, swede, parsnips, onions, cabbage, peas, etc.)
  • 2 TBS horseradish sauce
  • 1 TBS grainy mustard
  • salt and pepper to taste
  • leftover beef gravy, warmed

Instructions:

  1. Whisk all of the ingredients for the pudding wrap together in a bowl until smooth.  Let stand at room temperature for 10 minutes while you preheat the oven to 220*C/ 425*F/ gas mark 7. 
  2. You will need a jelly roll tin, approximately 12 inchs by 17 inches.  Pour a quantity of oil into the pan, about 1 1/2 TBS.  Put the pan in the oven to heat.  Once the oil has heated pour in the yorkshire pudding batter and return the pan to the oven.  Cook for 20 to 25 minutes until risen and golden brown.
  3. Have ready a clean tea towel the size of the pan.
  4. Warm your roast beef, gravy and vegetables.
  5. When the pudding is done remove it from the tin, flipping it onto the tea towel. Roll it up tighly from the short end, and leave it for a few minutes.  Unroll and then cut it in half crosswise so that you have two pieces of pudding  12 inches by 8 1/2 inches in size.
  6. Spread each piece with 1/2 of the mustard and horseradish sauce., followed by the thinly sliced beef, warmed vegetables and a bit of gravy drizzled on top.  Roll up and serve. Pass some extra gravy on the side if desired.

Did you make this recipe?
Tag @marierayner5530 on instagram and hashtag it #EnglishKitchen
Created using The Recipes Generator


The Yorkshire Pudding Wrap 

I couldn't finish mine actually.  Mitzie didn't mind. My loss was her gain. She loves a good roast dinner, minus the onions and the potatoes!  Do yourself a favour the next time you have leftovers from a roast dinner and make yourselves some of these delicious wraps!  They are Mmm ... Mmm ... Good!


Follow my blog with Bloglovin


read article

Levain Bakery Oatmeal Raisin Cookies

Wednesday, 29 April 2020

Levain Oatmeal Raisin Cookies 

I keep seeing Levain Chocolate Chip Cookies all over InstaGram.  They look fabulous and one day I am going to try them.  

The recipe is on a blog called A Bountiful Kitchen, which is owned by Si Foster.  Si and her husband are doing Missions in Spain at the  moment for our church. (Just like my husband and I did a few years ago, except we didn't get to go to Spain.)

Levain Oatmeal Raisin Cookies 

Interestingly enough Si's son in law did his Mission here in the UK several years back.  He was one of my favourite Missionaries, Elder Eliason.  

I know I say that about them all!  You know how much we love feeding them.

Levain Oatmeal Raisin Cookies 

Cody and his wife Brook were here in Chester last summer for a couple of days with their son George.  What a cutie pie George is.  

Brook is the owner of the very popular blog, Female Foodie. I think eating and cooking good food runs in the family!

Levain Oatmeal Raisin Cookies 

So anyways, I kept seeing these Levain Chocolate Chip Cookies all over IG, all attributed to Si's page.  I took a gander and thought hmm . . .  dare I?  

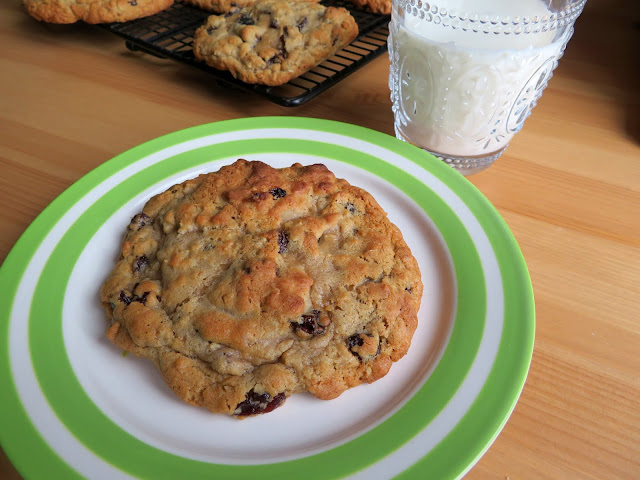
And then I spied her Levain Bakery Oatmeal Raisin Cookies, and that did it.  Resistance was futile.  I am a connoisseur of Oatmeal Cookies.

Levain Oatmeal Raisin Cookies  

I adore Oatmeal Cookies.  Besides they didn't take as much flour as the Chocolate Chip ones.  The Levain Baker is a NYC Bakery that is well known for its cookies.  

People line up around the block for one of their cookies.  And save it to say, they are EXPENSIVE!  

I have never had one, but now I feel like I have coz these Oatmeal Raisin Cookies of Si's are AMAZING!


Levain Oatmeal Raisin Cookies  

And a whole lot cheaper.  Mine were not as tall as Si's. They did flatten out a bit, but boy oh boy, are they yummy! 

Each cookie weight a whopping 6 ounces (175g).  That's pretty close to half a pound!

Levain Oatmeal Raisin Cookies 

If you want to learn more about these cookies and get the North American measurements, you will have to check out Si's page.  

I wouldn't want to step on any toes.   She also has a lot of hints and tips for making them the best cookies ever, so do check them out.


Levain Oatmeal Raisin Cookies  

I am only posting my British measurement adaptation here, which I am thinking is a.o.k.

Levain Oatmeal Raisin Cookies  

These cookies are as huge as a baby's head.  Seriously. The recipe only makes 9 big beautiful, delicious cookies.


Levain Oatmeal Raisin Cookies 

Mine didn't end up as tall as hers did.  I'm not sure why.  (Check hers out.)  But they are incredibly tasty!

Levain Oatmeal Raisin Cookies 

Crisp on the outsides . . .   chock full of oats . . .  chewy almost brownie-like in the middles . . .

Levain Oatmeal Raisin Cookies 

I send some to my next door neighbor. She is always getting us bread and  milk.  She can't do enough for us and she won't take anything in return, but I have found that she doesn't mind me baking things for her and her son, so . . .  yeh, I sent half over to them.

Levain Oatmeal Raisin Cookies  

She died and went to heaven.  Seriously. If you are looking for a wicked indulgence, this is the one you want to try.  Especially if you love Oatmeal Cookies!

Levain Oatmeal Raisin Cookies

Levain Oatmeal Raisin Cookies

Yield: makes 9 HUGE cookies
Author: Marie Rayner
A recipe from Bountiful Kitchen. These cookies are enormous and incredibly moreish. I am only putting the British Conversions here, you will need to visit A Bountiful Kitchen to get the North American equivalents in measurements.

Ingredients:

  • 240g unsalted butter, cut into bits (1 cup)
  • 250g soft light brown sugar (1 1/4 cup)
  • 95g granulated sugar (1/2 cup)
  • 2 large free range eggs
  • 385g of plain flour (2 3/4 cup)
  • 40g cornflour (1/4 cup)
  • 115g old fashioned oats (1 1/2 cups)
  • 1 tsp baking soda
  • 1/2 tsp fine sea salt
  • 1/2 tsp ground cinnamon
  • 265g raisins (1 3/4 cups)

Instructions:

  1. Preheat the oven to 220*C/425*F/ gas mark 7.  Line several baking trays with baking paper.
  2. Cream the butter and both sugars on low  with an electric whisk until very well blended. No butter bits should be visible.  Beat in the eggs, one at a time.  Whisk together the flour, cornflour, soda, oats, salt and cinnamon. Add to the creamed mixture and mix on low until the flour disappears. Mix in the raisins.
  3. Using a pair of kitchen scales measure out amounts of 170g and drop onto the prepared baking sheets leaving plenty of space in between. I did five on one baking sheet and four on the other. Try not to compact the dough, it should be high and quite rough looking.
  4. Bake for 6 to 7 minutes until the cookie is barely set and yet golden on top.
  5. Remove from the oven and leave on the baking sheets for an hour to set up.  Store in an airtight container

Did you make this recipe?
Tag @marierayner5530 on instagram and hashtag it #EnglishKitchen
Created using The Recipes Generator


Levain Oatmeal Raisin Cookies 

Another thing I liked about these is that they don't use any vanilla.  I am low on Vanilla and am not sure when I can get more, so I am rationing it!  Anyways, you need to bake these cookies if only once in your lifetime.  (Be warned however, when you taste one, you will want them more than once!)  Sorry about that! 

Levain Oatmeal Raisin Cookies

This content (written and photography) is the sole property of The English Kitchen. Any reposting or misuse is not permitted. If you are reading this elsewhere, please know that it is stolen content and you may report it to me at: mariealicejoan@aol.com 

Follow my blog with Bloglovin
read article

How to Make a Sour Dough Starter (Tutorial)

Tuesday, 28 April 2020


One thing I have been longing to master for quite a while now is to make a working Sour Dough Starter that I can use to make my own bread with.  We are experiencing a shortage of yeast at the moment (and flour and sugar for that matter) so creating something like a sour dough starter is a skill we can all use.  I had tried once before with NO success.  I thought I would try again and I watched quite a few videos on You Tube and finally felt secure enough that I thought I could master it. (Fingers crossed)  What I am sharing with you today is the result of about two weeks trial and error and finally SUCCESS! 


 I think the real key to my success this time was using filtered water. The time before I had used tap water. I had no idea that the chlorine etc. in tap water would have a hug impact on the success of your starter.  This was something that I learned this time and it was a real boon to my success.  I just used bottled filtered water that you can buy in the shops.  Apparently you can leave tap water out on the counter top for a couple of days also. I decided not to take a chance and just used filtered water from our water storage.  What good is a Pandemic if you don't use the time in quarantine to learn a new skill!  It is my greatest hope that eventually I will be turning out really great loaves of bread with the skill of one who has been doing it all of their lives. But for now, here's my tutorial on how to get a really great starter going as well as a few ideas of what you can do with it!


Sour Dough Starter  

WHAT DO YOU NEED TO MAKE A SOUR DOUGH STARTER 


1. a mix of equal parts of strong whole wheat and white flours
2. filtered water
3. a glass jar with a loose lid (I use a Weck jar,which comes with a glass lid.)
4. a rubber spatula for stirring and scraping

Sour Dough Starter  

DAY 1


Measure 50g (6 1/2 TBS) of your flour mixture into the glass jar.  Add 100g ( 3.5 fluid ounces) of the filtered water.  


Sour Dough Starter   


Stir together until the mixture is completely smooth and amalgamated, scraping down the sides of the jar using your spatula frequently. 
  
Sour Dough Starter


Just keep smoothing, stirring and scraping until you have a completely homogenous mixture, then carefully wipe down the insides of the glass with a clean damp cloth.  (use filtered water to dampen the cloth.) 


Sour Dough Starter  

Place the lid on top and set  the jar aside for 24 hours.

DAY 2 


Sour Dough Starter   

As you can see there are a few bubbles forming on the top of the flour. 

Sour Dough Starter

Give the mixture a good stir, replace the lid and leave it for a further 24 hours. 

DAY 3


Sour Dough Starter  

This is what my starter looked like on the morning of day 3.  As you can see there is a lot of activity going on.  I AM EXCITED ABOUT THIS!!  Progress!  I might actually have some success this time around!

Sour Dough Starter  

You will need a clean jar.  What you are going to do now is to decant 3 TBS of the live mixture into a clean jar.  Once you have done that you will need a further 70g (1/2 cup) of the whole wheat/white bread flour mix and a additional 80ml (1/3 cup) of filtered water.

Sour Dough Starter  

Add this to the decanted 3 TBS of live mixture in the clean jar and give it a good stir together. This is called "feeding" it.

Sour Dough Starter  

Scraping down the sides with your spatula and making sure it is all mixed together well so that there are no dry lumps or streaks.  Clean the insides of the jar with a clean piece of paper towel, moistened with filtered water . . .  so that there are no streaks up the insides of the jar . . .

Sour Dough Starter  

Put the lid back on the jar and then mark the level with a rubber band on the outside of the jar.  (Look, you can see it already bubbling.)  Set it aside to work for 11 hours now.

Sour Dough Starter  

Some suggested that you give your Sour Dough Starter a name.  I thought long and hard on this and decided that I am going to call mine HOPE.  Why Hope?  Because one, I really HOPE that it works for me this time, and two,  we have never needed HOPE more than we do at this time during this disheartenig World Wide Pandemic. 

jar labels

I have the perfect Jar Labels to use as well. Innoveem Jam & Chutney Jar Labels.  These premium quality jar labels have a strong adhesive which means the labels won't fall off my jar.  You can write on them with any pen or biro!  They are also easy to remove, leaving no sticky mess or residue after use (HUGE plus), and the set contains some really classy Vintage shaped designs.  Perfect for this!  

I can also offer my readers a discount of 20% off if they follow this link
 to purchase and add the discount code JLABEL20  at checkout! Offer is good until the end of June.  They really are fantastic labels.  I have been using the same one on my jar of sour dough starter removing it and reapplying it every day for almost two weeks now without any problem.  Looks brand new and sticks as well as it did on the first day!


Sour Dough Starter   

I am really filled with HOPE this time.  I am so excited about this.  Can you tell???  This appears to be working well for me! (Fingers crossed, I don't want to jinx myself!) 

DAY 4, 5, 6, 7  


On these next four days you will need to do the following:  

Decant 50g (about 3 TBS) to a clean jar.  Add 100g plain flour (3/4 cup) and 100g filtered water (3 1/2 fluid ounces).  Stir it vigorously.  Clean any residue from the inside of the jar using filtered water on some clean paper towels.  Cover loosely, mark the starter level with an elastic band.  Let rest for 24 hours.  (You can discard the rest of the starter in the first jar, left from the decant, or save it to make pancakes, etc.)

Sour Dough Starter  

This is Day 4   I am impressed.  Look at the action!


Sour Dough Starter

This is Day 5  There's a fair bit of bubbling going on.  Not quite as much as yesterday.


Sour Dough Starter

This is Day 6.  As you can see it had risen a good inch above the red band and then fell back down again.  It has a really fermented smell to it. Not unpleasant.  Almost but not quite like an alcohol. Almost like a beer.

The starter will be ready to bake with when it rises and falls consistently for a few days in a row.  

Sour Dough Starter


This is Day 7.   

As you can see there is a ton of action going on! Its also getting lighter in colour because my feed has been plain strong flour rather than a mix of whole wheat and white.  I think I am now ready to bake some bread with it, but first a few pictures to show you what I have been doing with the discard.  I have a jar in the refrigerator I am keeping the discard in. Flour is so precious at the moment, I really can't bring myself to throw it away.  

sour dough recipes

You can do quite a lot with it.  King Arthur Flour has a large number of recipes and suggestion on their page. 

I have made us Sour Dough Pancakes several times.

sour dough pancakes 

  They are the best pancakes I have ever eaten. As you can see they are incredibly light and fluffy and the flavour is fantastic.  Todd enjoys his with syrup, but I am perfectly happy with them just on their own, they are that good!

Sour Dough Pancakes

Sour Dough Pancakes

Yield: Makes a dozen pancakes
Author: Marie Rayner
These are so light and fluffy.  Best pancakes ever!

Ingredients:

Overnight batter:
  • 200g of sour dough sarter discard, stirred down (3/4 cup)
  • 240ml buttermilk or milk (I used milk) (1 cup)
  • 2 large free range eggs, lightly beaten
  • 3 TBS white sugar
  • 1 tsp vanilla extract
  • 60g butter melted (4 TBS)
  • 280g plain flour (2 cups)
Add prior to cooking:
  • 1 tsp bicarbonate of soda
  • 1 tsp baking powder
  • 1 tsp fine sea salt
To cook and serve:
  • softened butter to grease the pan
  • your favourite syrup

Instructions:

How to cook Sour Dough Pancakes

  1. The night before you want to make the pancakes, whisk together all of the overnight batter ingredients in a large bowl until well combined.  Cover and leave to rest on the countertop overnight at room temperature, or for up to 12 hours.
  2. Just before cooking whisk in the remaining ingredients. Cover and let rest for about 10 minutes.
  3. Heat a griddle pan or large non-stick skillet. Rub lightly with butter.  Pour in large dessertspoon's full into the pan (abou 1/4 cup measures). I can get 3 onto my griddle pan.  Cook until golden brown on the bottom and the tops are covered with small bubbles.   Flip over and brown the other side.
  4. Serve warm with your favourite syrup. We like Maple.

Notes:

You can scatter a few of your favourite berries over top before flipping them over. We like blueberries.

Did you make this recipe?
Tag @marierayner5530 on instagram and hashtag it #EnglishKitchen
Created using The Recipes Generator


Sour Dough Brownies  

I have also made Sour Dough Brownies.  These are incredible!


sour dough brownies 

They are dense and fudgy like a good brownie should be.  Moist, and yet you can hold them in your hand.

sour dough brownies  

I had thought about stirring some chocolate chips or nuts into them, but didn't this time.


sour dough brownies 

The flavour is really nice, with just a hint of tang.


Sour Dough Brownies

Sour Dough Brownies

Yield: 9
Author: Marie Rayner
Use your sour dough discard to make perfect moist and fudgy brownies!

Ingredients:

  • 115g of semi sweet chocolate (4 ounces)
  • 115g unsalted butter (1/2 cup)
  • 190g caster sugar (1 cup)
  • 1 tsp vanilla extract
  • 2 large free range eggs, at room temperature
  • pinch of salt
  • 190g sour dough starter discard (3/4 cup)

Instructions:

  1. Preheat the oven to 180*C/350*F/ gas mark 4.  Butter a 9 inch square baking tin and line it with some baking paper, leaving an overhang to ease in lifting the cooled brownies out of the pan.
  2. Chop the chocolate and place it into a bowl along with the butter, also cut into bits.  Heat in the microwave on high for about 1 minute.  Stir to melt the chocolate and butter. If it is not quite finished, pop it in for another 30 seconds or so. Stir until all are melted and amalgamated thoroughly.  Stir in the sugar.  Add the eggs, vanilla and salt, mixing well together. Finally stir in the sourdough starter, combining everything thoroughly.  Pour into the prepared pan.
  3. Bake in the preheated oven for 25 to 28 minutes, or until a toothpick inserted in the centre comes out clean with no wet batter attached.  Do not over bake.
  4. Allow to cool in the tin for 10 to 15 minutes before lifting out to a wire rack to cool completely.  Cut into squares or rectangles to serve.  I dusted  the tops with a bit of icing sugar.  Store in an airtight container.  Will keep for a few days.

Did you make this recipe?
Tag @marierayner5530 on instagram and hashtag it #EnglishKitchen
Created using The Recipes Generator


sour dough brownies 

Having mastered the starter I figured I was ready to bake a loaf of bread.

easy sour dough bread 

I decided to start off simply with my first try at baking a loaf and I found the perfect recipe on Little Spoon Farm.

easy sour dough bread 

Baking Sour Dough bread can be a bit convulated, requiring many steps.  I thought I would do simple for the first time, and this was the perfect recipe to begin with.

easy sour dough bread 

It turned out really nice. Not bad for a loaf of bread that was 8 days in the making (counting the number of days it took for me to get the starter going!)

easy sour dough bread 

As you can see it has a really nice texture.  The crust is really nice as well.

easy sour dough bread 

Lots of lovely holes . . .  the crust is a bit chewy for Todd. He has a difficult time with anything chewy or hard.


easy sour dough bread 

I will need to find a recipe for a loaf that makes a less chewy crust  for him.   MY sister found this for me on True Sour Dough. 

  1. Wrap your sourdough bread neatly in a thick damp tea towel.
  2.  Place loaf in a large sealed container for about an hour. 
  3. Take it out of the container and place on a cooling rack still wrapped in the damp cloth for the remaining cooling time. 
  4. Once it has cooled, you can remove the damp tea towel and you’ll find a lovely soft crust!
I will try that the next time.  I do need want to get a few more things if I am going to bake sour dough regularly.  A proper razor for cutting slashes in the top and some proper proofing baskets, but we will see how it goes.  I don't want to spend too much money until I figure out if this is just a flash in the pan for me.  I really hope to keep it up!  

HOW TO STORE A SOUR DOUGH STARTER


(source)


Once you have managed to create a workable starter you won't want to be baking bread every day. Maybe you will ony want to be baking it once a week.  Maybe you will be away on holidays at some point and won't be able to feed and keep it going every day. There are viable ways of storing your starter for anywhere from a week to longer.  I found a valuable source of information here on The Perfect Loaf.

I am going to try each of his methods.  Watch this space!


Follow my blog with Bloglovin
read article
new entries old entries
Subscribe to: Posts (Atom)

Buy the Book!

If you are a Baking Enthusiast and a fan of British Baking you are going to love this new book I wrote. From fluffy Victoria sponges to sausage rolls, the flavors of British baking are some of the most famous in the world. Learn how to create classic British treats at home with the fresh, from-scratch, delicious recipes in The Best of British Baking. Its all here in this delicious book! To find out more just click on the photo of the book above!

SUBSCRIBE TO MY NEWSLETTER

If You Like What You See

If you like what you see and wish to donate to help pay for butter, sugar, eggs and whatnot, every little bit is appreciated. Thanks!
PRIVACY POLICY

Translate


Welcome, I'm Marie

Welcome, I'm Marie
Canadian lover of all things British. I cook every day and like to share it with you!

Search This Blog

Featured

Hello Fresh, a fair and impartial review
  When I was living in the UK, as a food blogger, I was often being sent products for review.  This was a very common practice for companies...

Popular Posts

  • Fried Cabbage with Bacon & Onions
      I have always loved fried cabbage.  I first had it when I was in high school.  We cooked it in our Home Economics Class. It was just ...
  • Sticky Lemon Chicken
    I am always on the look out for a good chicken breast recipe.  We eat a lot of chicken in this house, and it mostly comes in the form of...
  • Lemon Friands
    Anyone who knows me, knows that I am a nut for anything lemon flavoured. It's always been one of my absolute favourite taste thril...
  • Quick and Easy Bacon and Egg Tarts
       You might not think that you have time to do a bacon and egg breakfast on a weekday, but this recipe here today proves that just isn&...
  • Mary Berry's Cheese Scones
    I wanted to make some scones to enjoy the other day.  I have made quite a few scones here on the blog and I love them all. I do like to try ...

Foodies 100

Foodies 100

My Favourite Places

  • Welcome Home Kitchen Blog
  • Cookbooklets
  • Categories
  • _Kitchen Wisdom
  • _In the Larder and Pantry
  • _Couldn't Live Without
  • _Kitchen Wish List

Follow This Blog With Bloglovin

Follow This Blog With Bloglovin

Archive

  • ►  2023 (27)
    • ►  January (27)
  • ►  2022 (368)
    • ►  December (26)
    • ►  November (29)
    • ►  October (30)
    • ►  September (29)
    • ►  August (32)
    • ►  July (33)
    • ►  June (29)
    • ►  May (33)
    • ►  April (31)
    • ►  March (29)
    • ►  February (31)
    • ►  January (36)
  • ►  2021 (373)
    • ►  December (36)
    • ►  November (31)
    • ►  October (31)
    • ►  September (31)
    • ►  August (30)
    • ►  July (32)
    • ►  June (35)
    • ►  May (28)
    • ►  April (29)
    • ►  March (32)
    • ►  February (28)
    • ►  January (30)
  • ▼  2020 (329)
    • ►  December (30)
    • ►  November (23)
    • ►  October (31)
    • ►  September (29)
    • ►  August (30)
    • ►  July (31)
    • ►  June (28)
    • ►  May (27)
    • ▼  April (27)
      • The Yorkshire Pudding Wrap
      • Levain Bakery Oatmeal Raisin Cookies
      • How to Make a Sour Dough Starter (Tutorial)
      • Roasted Spatchcock Chicken
      • Mile High Greek Yogurt Biscuits
      • Creamy Lemon Chicken
      • Tex Mex Smashed Potatoes
      • Italian Lemon Cream Cake
      • Butter Roasted Tomato Sauce
      • Peanut Butter Chocolate Chunk Cookie Sundae Pie
      • Earl Grey Tea Loaf
      • Asian Glazed Salmon
      • Deviled Ham Spread
      • Quick and Easy No Yeast Dinner Rolls
      • Proper Ham & Eggs
      • Oaty Apple Crumble
      • Saucy Pasta Hoops
      • School Dinner Curried Sausages
      • Wholesome Seeded Cranberry Muffins
      • Tijuana Tacos
      • ION8 Leakproof Steel Vacuum Flask
      • Almost Fried Chicken Chopped Salad
      • World's Best Chocolate Chip Cookies
      • Cinnamon Roll Waffles (Easy & from scratch)
      • Crushed Macaroni & Vegetables
      • Short Ribs a La Sauerbraten
      • Roasted Pears with Honey, Cinnamon & Cardamom
    • ►  March (26)
    • ►  February (24)
    • ►  January (23)
  • ►  2019 (352)
    • ►  December (22)
    • ►  November (25)
    • ►  October (27)
    • ►  September (32)
    • ►  August (33)
    • ►  July (27)
    • ►  June (33)
    • ►  May (34)
    • ►  April (32)
    • ►  March (32)
    • ►  February (28)
    • ►  January (27)
  • ►  2018 (383)
    • ►  December (31)
    • ►  November (32)
    • ►  October (32)
    • ►  September (32)
    • ►  August (35)
    • ►  July (35)
    • ►  June (31)
    • ►  May (32)
    • ►  April (30)
    • ►  March (35)
    • ►  February (28)
    • ►  January (30)
  • ►  2017 (387)
    • ►  December (32)
    • ►  November (34)
    • ►  October (36)
    • ►  September (37)
    • ►  August (29)
    • ►  July (32)
    • ►  June (30)
    • ►  May (33)
    • ►  April (33)
    • ►  March (30)
    • ►  February (30)
    • ►  January (31)
  • ►  2016 (432)
    • ►  December (36)
    • ►  November (34)
    • ►  October (35)
    • ►  September (37)
    • ►  August (38)
    • ►  July (39)
    • ►  June (33)
    • ►  May (36)
    • ►  April (34)
    • ►  March (37)
    • ►  February (36)
    • ►  January (37)
  • ►  2015 (420)
    • ►  December (41)
    • ►  November (34)
    • ►  October (36)
    • ►  September (38)
    • ►  August (44)
    • ►  July (34)
    • ►  June (32)
    • ►  May (33)
    • ►  April (35)
    • ►  March (33)
    • ►  February (28)
    • ►  January (32)
  • ►  2014 (450)
    • ►  December (39)
    • ►  November (41)
    • ►  October (43)
    • ►  September (34)
    • ►  August (33)
    • ►  July (36)
    • ►  June (42)
    • ►  May (43)
    • ►  April (42)
    • ►  March (35)
    • ►  February (29)
    • ►  January (33)
  • ►  2013 (393)
    • ►  December (42)
    • ►  November (38)
    • ►  October (37)
    • ►  September (35)
    • ►  August (30)
    • ►  July (32)
    • ►  June (31)
    • ►  May (30)
    • ►  April (25)
    • ►  March (33)
    • ►  February (30)
    • ►  January (30)
  • ►  2012 (395)
    • ►  December (35)
    • ►  November (39)
    • ►  October (36)
    • ►  September (33)
    • ►  August (35)
    • ►  July (29)
    • ►  June (34)
    • ►  May (30)
    • ►  April (32)
    • ►  March (31)
    • ►  February (30)
    • ►  January (31)
  • ►  2011 (353)
    • ►  December (32)
    • ►  November (30)
    • ►  October (29)
    • ►  September (28)
    • ►  August (31)
    • ►  July (31)
    • ►  June (29)
    • ►  May (28)
    • ►  April (27)
    • ►  March (31)
    • ►  February (29)
    • ►  January (28)
  • ►  2010 (291)
    • ►  December (32)
    • ►  November (31)
    • ►  October (32)
    • ►  September (26)
    • ►  August (25)
    • ►  July (5)
    • ►  June (27)
    • ►  May (23)
    • ►  April (14)
    • ►  March (23)
    • ►  February (25)
    • ►  January (28)
  • ►  2009 (173)
    • ►  December (27)
    • ►  November (24)
    • ►  October (26)
    • ►  September (23)
    • ►  August (26)
    • ►  July (21)
    • ►  June (23)
    • ►  May (3)

Thank you

Thank you

Contact Form


© The English Kitchen.
Customized by My Fairy Blog Mother.