


One thing I really love about muffins is that they are fairly quick and easy to prepare. You can mix up the dry ingredients and the wet ingredients (separately) the night before you want to bake them, leaving the dry ingredients lightly covered on the counter top and the wet in the refrigerator.
Just ready to quicky stir together and quickly bake when you get up in the morning. I speak with great authority on how much help the smell of baking muffins is when it comes to getting sleepy heads out of bed!
If my kids smelled something baking in the morning, they were always quick to rise and come down stairs. Muffins where like a magic wand for me in getting them up, at 'em and out the door on school mornings!!

- 2 cups (264g) all purpose plain flour
- 1/2 cup (100g) sugar
- 1 tsp baking soda (bicarbonate)
- 2 tsp baking powder
- 1/2 tsp ground nutmeg
- 1/2 tsp salt
- 1/3 cup (75.6g) of butter, melted
- 1/4 cup (85g) liquid honey
- 1 large free range egg, beaten lightly
- 1 cup (240ml) buttermilk
- 1 tsp pure vanilla extract


Some other delicious muffin recipes which I have baked in here that you might enjoy are:
SPECIAL K BREAKFAST MUFFINS -These are the PERFECT breakfast muffins. Quick and easy to make. Delicious. I highly recommend. Simple and filled with fiber. You can use ordinary Special K cereal, or you can be a bit more extravagant and use one of the varieties which contain fruit. This recipe makes half a dozen fabulous muffins.
ULTIMATE BUTTERMILK BRAN MUFFINS - I think one of my favorite types of muffin of all the types of muffins you can get today are plain old fashioned Bran Muffins. There is nothing pretentious about them. They are simple and they are delicious. This recipe for Buttermilk Bran Muffins is especially delicious, yielding a muffin that is super moist and delicious, with a well rounded top. You cannot go wrong with one of these!
Honey Buttermilk Muffins
Ingredients
- 2 cups (264g) all purpose plain flour
- 1/2 cup (100g) sugar
- 1 tsp baking soda (bicarbonate)
- 2 tsp baking powder
- 1/2 tsp ground nutmeg
- 1/2 tsp salt
- 1/3 cup (75.6g) of butter, melted
- 1/4 cup (85g) liquid honey
- 1 large free range egg, beaten lightly
- 1 cup (240ml) buttermilk
- 1 tsp pure vanilla extract
Instructions
- Preheat the oven to 375*F/190*C/gas mark 5. Butter a 12 cup medium muffin tin really well, or line with paper liners.
- Whisk the flour, soda, baking powder, salt, nutmeg, and sugar together in a large bowl.
- Whisk the melted butter, honey, egg, buttermilk and vanilla together in a large beaker.
- Make a well in the center of the dry ingredients and add the wet ingredients all at once. Stir together just to combine. Do not overmix. All of the dry ingredients should be moistened without any dry streaks. There will and should be lumps.
- Spoon the batter into the prepared pan, dividing it equally amongst the muffin cups. They should be about 3/4 filled.
- Bake in the preheated oven for 12 to 15 minutes. Do check them at 10 minutes to be sure. (Mine needed a bit longer. I would say about 18 minutes.) A toothpick inserted in the center should come out clean.


- 2 cups all purpose flour (280g)
- 3/4 teaspoon salt
- 1/3 cup butter (76g)
- 1/3 cup lard (or white vegetable shortening) (74g)
- 5 to 6 tablespoons of ice water
- 5 - 5 1/2 cups (625g - 680g) peeled, cored and sliced apples
- 2 cups (212g) of fresh or frozen cranberries
- 1/2 cup (57g) chopped walnuts (optional)
- 1/3 cup plus 2 TBS (79g) sugar
- 1/4 cup (60ml) maple syrup
- 1 1/2 TBS lemon juice
- the finely grated zest of one orange
- 1/2 tsp ground cinnamon
- 1/2 tsp ground cloves
- 2 TBS cornstarch (corn flour)
- milk and sugar to glaze (optional)


- To make the pastry, mix flour with salt, and cut in butter and lard, until you have pieces of fat in the flour about the size of peas. (Use a pastry blender or two round bladed knives.)
- Add ice water, one TBS at a time, tossing it in with a fork until pastry comes together. Shape into a ball and cut in two pieces. Form each piece into a round flat disc. Wrap in cling film and refrigerate for at least 1 hour. (Or overnight.)
- If you chill the pie crust overnight, take it out of the refrigerator about 1 hour prior to baking.

- Mix the apples, cranberries, walnuts (if using) and 1/3 cup (67g) of the sugar together in a large bowl. Leave to macerate for 10 minutes.
- Stir the maple syrup, lemon juice, grated zest, cinnamon and cloves into the apples. Mix the remaining sugar together with the cornstarch in a small bowl. Stir this into the fruit.
- Preheat the oven to 400*F/200*C/ gas mark 6. Line a large baking sheet with some baking paper.
- Roll half of the pastry out on a lightly floured countertop to a round that will fit into a 9 1/2 inch deep pie dish. (about 13 inches in diameter) Place the pastry carefully into a 9 1/2 inch deep pie dish, knocking gently with your knuckles so that it fits into the sides with a bit of an overhang. Place onto the baking sheet.
- Turn the fruit filling into the pie, and smooth it out a bit. Lightly moisten the rim of the bottom crust.
- Roll the remaining half of the pastry into a round large enough to cover the pie. Carefully place it on top of the filling to cover it completely, pressing around the edges to seal. Trim any over hang to 1/2 to 3/4 inch. Flute or crimp the edge as desired.
- Cut some vents in the top crust. Brush the top with milk and sprinkle with sugar.
- Bake in the preheated oven for 30 minutes. Reduce the oven temperature to 375*F/190*C/ gas mark 5. Rotate the pie 180 degrees. Bake for a further 30 to 40 minutes, until golden brown and the juices are bubbling up through the vents.
- Transfer to a wire rack and leave to cool for at least an hour prior to serving. Cut into wedges to serve. A scoop of vanilla ice cream goes very well on top of this!


Cranberry & Apple Pie
Ingredients
- 2 cups all purpose flour (280g)
- 3/4 teaspoon salt
- 1/3 cup butter (76g)
- 1/3 cup lard (or white vegetable shortening) (74g)
- 5 to 6 tablespoons of ice water
- 5 - 5 1/2 cups (625g - 680g) peeled, cored and sliced apples
- 2 cups (212g) of fresh or frozen cranberries
- 1/2 cup (57g) chopped walnuts (optional)
- 1/3 cup plus 2 TBS (79g) sugar
- 1/4 cup (60ml) maple syrup
- 1 1/2 TBS lemon juice
- the finely grated zest of one orange
- 1/2 tsp ground cinnamon
- 1/2 tsp ground cloves
- 2 TBS cornstarch (corn flour)
- milk and sugar to glaze (optional)
Instructions
- To make the pastry, mix flour with salt, and cut in butter and lard, until you have pieces of fat in the flour about the size of peas. (Use a pastry blender or two round bladed knives.)
- Add ice water, one TBS at a time, tossing it in with a fork until pastry comes together. Shape into a ball and cut in two pieces. Form each piece into a round flat disc. Wrap in cling film and refrigerate for at least 1 hour. (Or overnight.)
- If you chill the pie crust overnight, take it out of the refrigerator about 1 hour prior to baking.
- Mix the apples, cranberries, walnuts (if using) and 1/3 cup (67g) of the sugar together in a large bowl. Leave to macerate for 10 minutes.
- Stir the maple syrup, lemon juice, grated zest, cinnamon and cloves into the apples. Mix the remaining sugar together with the cornstarch in a small bowl. Stir this into the fruit.
- Preheat the oven to 400*F/200*C/ gas mark 6. Line a large baking sheet with some baking paper.
- Roll half of the pastry out on a lightly floured countertop to a round that will fit into a 9 1/2 inch deep pie dish. (about 13 inches in diameter) Place the pastry carefully into a 9 1/2 inch deep pie dish, knocking gently with your knuckles so that it fits into the sides with a bit of an overhang. Place onto the baking sheet.
- Turn the fruit filling into the pie, and smooth it out a bit. Lightly moisten the rim of the bottom crust.
- Roll the remaining half of the pastry into a round large enough to cover the pie. Carefully place it on top of the filling to cover it completely, pressing around the edges to seal. Trim any over hang to 1/2 to 3/4 inch. Flute or crimp the edge as desired.
- Cut some vents in the top crust. Brush the top with milk and sprinkle with sugar.
- Bake in the preheated oven for 30 minutes. Reduce the oven temperature to 375*F/190*C/ gas mark 5. Rotate the pie 180 degrees. Bake for a further 30 to 40 minutes, until golden brown and the juices are bubbling up through the vents.
- Transfer to a wire rack and leave to cool for at least an hour prior to serving. Cut into wedges to serve. A scoop of vanilla ice cream goes very well on top of this!

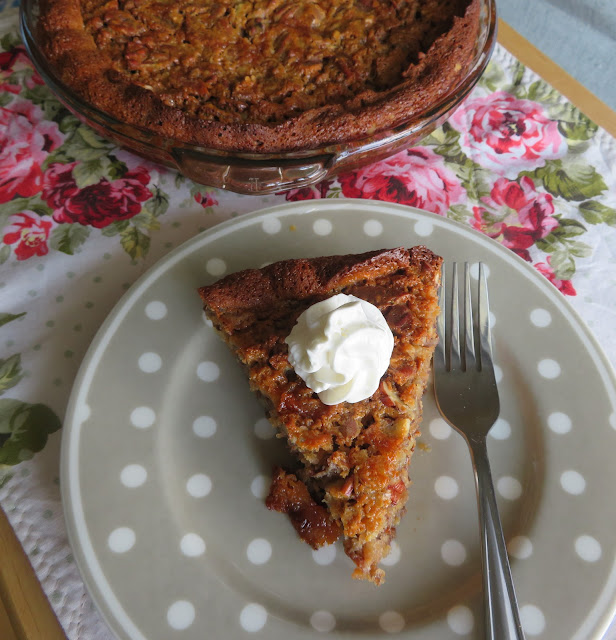


It is still not something I bake very often of course, and not just because of the calories and sweetness involved. Mostly because of the faffing about with making pastry, rolling it out, etc. This tasty recipe gets rid of every necessity for that!

- 1 1/2 cups (181g) chopped toasted pecans
- 3/4 cup (150g) soft light brown sugar, packed
- 1/2 cup (56g) baking mix (such as Bisquick or my homemade version)
- 1/4 cup (60g) butter, melted
- 3/4 cup (280ml) heavy or whipping cream
- 3/4 cup (263g) light or dark corn syrup (can use golden syrup)
- 1 1/2 tsp pure vanilla extract
- 4 large free range eggs
- sweetened whipped cream to serve


Impossibly Easy Pecan Pie
Ingredients
- 1 1/2 cups (181g) chopped toasted pecans
- 3/4 cup (150g) soft light brown sugar, packed
- 1/2 cup (56g) baking mix (such as Bisquick or my homemade version)
- 1/4 cup (60g) butter, melted
- 3/4 cup (280ml) heavy or whipping cream
- 3/4 cup (263g) light or dark corn syrup (can use golden syrup)
- 1 1/2 tsp pure vanilla extract
- 4 large free range eggs
- sweetened whipped cream to serve
Instructions
- Preheat the oven to 350*F/180*C/gas mark 4. Butter a 9 X 1 1/4 inch pie dish really well. Set aside.
- Toast and chop your nuts. Sprinkle them into the bottom of your buttered pie dish.
- Whisk the brown sugar, baking mix, melted butter, whipping cream, corn syrup, vanilla and eggs together until well combined in a large beaker. Pour over the pecans in the pie dish.
- Bake in the preheated oven for 50 to 55 minutes, or until a metal knife inserted near the center comes out clean.
- Leave to cool for five minutes before cutting into wedges to serve.
- Serve with sweetened whipped cream on top. Any leftovers should be stored in the refrigerator.


Social Icons