


Whisk the tomato ketchup, water, brown sugar, vinegar, all seasonings and hot sauce together in a pan. Bring to the boil, then reduce to a low simmer. Add the roast beef and heat through gently until heated thoroughly.

To serve spread the bottom of each bun with a portion of the horseradish mayo. Top with a portion of the BBQ Beef, and finally the cheese sauce. Place the top of the bun on top and serve immediately.


Makes one loaf
I think this is one of the easiest and tastiest cakes in the world to make! You just bang everything into the food processor and blitz it for two minutes and then pour it into your pan. 45 minutes you have a tasty cake to enjoy!
140g self raising flour (1 cup)
125g softened butter (1/2 cup)
115g white sugar (scant 2/3 cup)
2 heaping dessertspoons of salted caramel spread
2 large free range eggs

Put all the cake ingredients into the food processor and blitz for 2 minutes. Scrape the batter into your prepared loaf tin.
Bake for 30 minutes, or until well risen, nicely browned and a toothpick inserted in the centre comes out clean.
Remove from the oven. Leave in the tin and place on a wire rack to cool.Mix the drizzle topping ingredients together, stirring to blend well. Drizzle over top of the still very warm cake, and let set for a few minutes before removing from the pan to cool completely. (I make sure that I leave a bit of overhang with the parchment paper when I put it into the pan so that I can use it like handles and just lift the cake out when done!)


Crumble the almond paste into a bowl. Add the sugar, egg white, ground almonds and almond extract. Using a hand mixture beat until well combined. The mixture will be fairly sticky.


The English, especially English men, find a particular comfort in drawing closed the curtains on a leaden afternoon sky, lighting the fire and enjoying some little delicacy that they can toast and butter themselves.
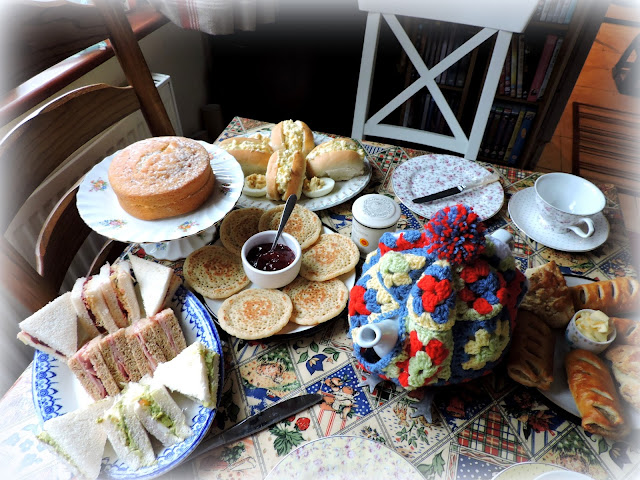
Afternoon Winter Teas have the capacity to chase away the Winter blues like nothing else can . . .


What would afternoon tea be without a plate of tasty sandwiches? (Choose 3 of the below fillings)
12 thin slices of white or wholemeal bread, crusts removed
room temperature butter, for spreading
sea salt and freshly ground black pepper as desired
For the egg and cress filling:
2 TBS good quality mayonnaise
1/2 tsp finely grated lemon zest from an unwaxed lemon
2 hard boiled eggs, peeled and chopped
a handful of mustard cress
For the Gentleman's Morsels:
1/4 pound shaved roasted ham
apricot jam, seived
Dijon mustard
For the Roast Beef:
1/4 pound thinly sliced rare roast beef
horseradish mayonnaise
a handful of rocket leaves
For the Parma Ham and Fig filling:
1/4 pound of parma ham
1 ripe fig
1/2 tsp balsamic vinegar
1/2 tsp olive oil
handful of rocket leaves
For the Stilton and Pear filling:
50g of Stilton cheese, thinly sliced (1/4 pound)
1 ripe firm pear
To cut sandwiches, lay your hand on top of the sandwich and lightly press down. Using a serrated knife and a gentle sawing motion, cut diagonally into quarters or lengthways into 3 fingers.
For the egg and cress sandwiches, thinly butter 4 slices of the bread. Combine the mayonnaise, lemon zest, egg and season with some black pepper, folding together well. Spread evenly on half the slices of bread. Sprinkle with the cress and top with the remaining 2 slices of bread. Cut as above.
To make the Gentlemen's Morsels., thinly butter 4 slices of the bread. Spread 2 slices with seived apricot jam. Spread the other 2 with Dijon mustard. Lay the ham evenly over top of 2 slices and top with the other 2. Cut as above.
For the Roast Beef, thinly butter 4 slices of the bread. Spread 2 slices with the horseradish mayonnaise. Top with the roast beef and season to taste. Sprinkle with the rocket and top with the other 2 slices of bread. Cut as above.
For the Parma Ham and Fig sandwiches, thinly butter 4 slices of bread and fold ham on top of two of them. Cut the fig into thin wedges, remove and discard the skin and then arrange the wedges on top of the ham. Whisk the vinegar and oil together. Season with a bit of salt and pepper. Drizzle over the figs. Top with rocket and the remaining slices of buttered bread and cut as above.
To make the Stilton and Pear sandwiches, thinly butter 4 slices of bread. Arrange the stilton over 2 slices of the bread. Slice the pear into thin wedges, removing and discarding the core, then arrange on top of the cheese. Season with black pepper, then top with the remaining slices of bread and cut as above.

Makes 12 servings

A drop scone or pancake by any other name. Yummy.
150g of self raising flour (1 cup + 2 TBS)
1 TBS caster sugar
pinch of salt
185ml of milk (3/4 cup)
1 large free range egg
butter to brush the grill
to serve:
softened butter
preserves
Sift the flour, sugar and salt into a bowl. Beat together the milk and egg. Add all at once to the dry ingredients and whisk together until smooth. Heat a large griddle pan, or nonstick frying pan. Brush with butter. Drop the batter by tablespoons onto the heated griddle. Cook until bubbles appear on the surface and the bottom is lightly browned. Flip over and cook on the other side until golden. Allow to cool completely and serve with some softened butter and jam for spreading.


I Knew then that I wouldn't have time to bake another cake from scratch, so I gave Todd a quick buzz on his mobile and asked him to bring us home a Victorian Sponge from M&S. It was actually quite good for a store bought cake. Here is my recipe for one you can bake yourself from scratch and I can tell you that it is very very good.

Makes one 7 inch cake
Popular during the reign of Qyeen Victoria, this cake remains popular to this day, which is a huge testament to it's taste and ease of baking! Don't be tempted to use all butter. This is one recipe that is better for the use of a mixture of butter and margarine.
85g butter, softened (6 TBS)
85g soft margarine (6 TBS)
but your cake won't be as light in texture)
170g caster sugar (1 cup)
1/4 tsp vanilla extract
3 large free range eggs, beaten
170g self raising flour (a scant 1 1/2 cups)
To finish:
3 TBS raspberry jam
buttercream to fill (optional)
icing sugar or caster sugar to dust the top
Butter and base line two 7 inch sandwich tins. Set aside. Preheat the oven to 180*C/350*F/ gas mark 4.
Cream the butter, margarine, sugar and vanilla together until light in colour and fluffy. Gradually beat in the eggs, a little at a time, beating well after each addition. If the mixture begins to curdle, add a spoonful of the flour.
Fold in the flour with a metal spoon, taking care to use a cutting motion so as not to knock out too much of the air that you have beaten into the batter. Divide the batter evenly between the two cake tins, leveling off the surface. Make a slight dip in the centre of each.
Bake on a centre rack of the oven for about 25 minutes, or until the sponges have risen well, are golden brown, and spring back when lightly touched. Allow to cool in the pan for five minutes before running a knife carefully around the edges and turning out onto a wire rack to cool completely.
Once cooled, place one layer on a cake plate. Spread with raspberry jam and buttercream (if using). Place the other cake on top, pressing down lightly. Dust with icing or caster sugar and serve.

- Use a good quality loose leaf or bagged tea
- This must be stored in an air-tight container at room temperature
- Always use freshly drawn boiling water
- In order to draw the best flavour out of the tea the water must contain oxygen, this is reduced if the water is boiled more than once.
- Measure the tea carefully
- Use 1 tea bag or 1 rounded teaspoon of loose tea for each cup to be served, plus one for the pot.
- Allow the tea to brew for the recommended time before pouring
- Brewing tea from a bag in a mug? Milk in last is best .

"Tea! Thou soft,thou sober, sage, and venerable liquid, thou female tongue-running, smile-smoothing, heart-opening, wink-tipping cordial, to whose glorious insipidity I owe the happiest moment of my life, let me fall prostrate!"
Colley Cibber, The Lady's Last Stake, 1708
And there you have it. A Winter's day mood brightener for two.
This content (written and photography) is the sole property of The English Kitchen. Any reposting or misuse is not permitted. If you are reading this elsewhere, please know that it is stolen content and you may report it to me at: mariealicejoan at aol dot com Thanks so much for visiting. Do come again!


Social Icons