Pages

  • Contact Me
  • MAKE YOUR OWN (a list of make your own mixes)
  • Recipe Index
  • Privacy Policy
  • Advertising and Disclosure
  • Post Index

Search This Blog

Powered by Blogger.

Social Icons

The English Kitchen

Pages

  • Home
  • About Me
  • Cook Booklets
  • Categories
  • _Kitchen Wisdom
  • _In The Larger and Pantry
  • _Couldn't Live Without
  • _Kitchen Wish List
  • Additional Recipes
  • _Vegetarian
  • _Salads
  • _Breads
  • _Sandwiches

Pierogi Stuffed Shells

Wednesday, 29 March 2023

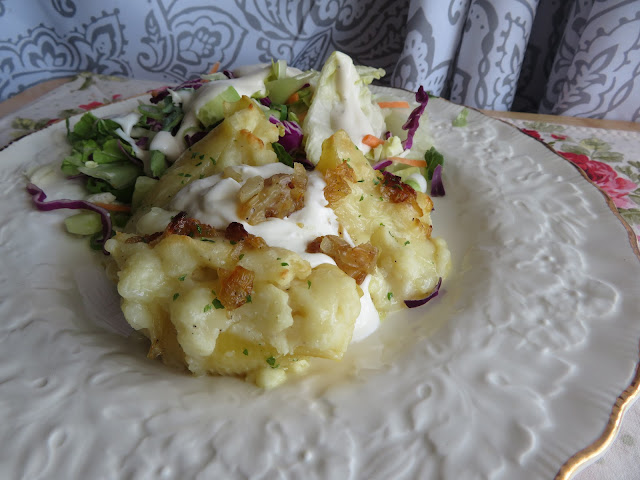
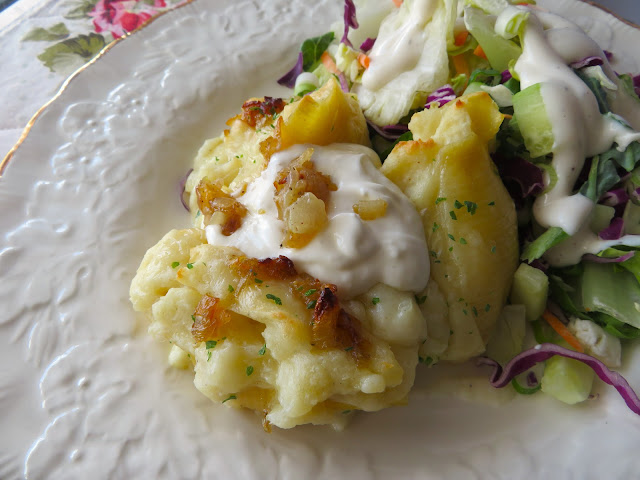
Pierogi Stuffed Shells


I love Pierogi.  They are one of my favorite foods of all time. They were not something I grew up with, but something which I discovered when I moved out to Winnipeg to get married in 1977.  


I remember being in a restaurant at Polo Park and my husband told me I should try Pierogi.  They were actually deep fried and came to the table all crisp and hot with a small bowl of sour cream and garnished with fried onions.  I fell in love.


Pierogi Stuffed Shells


We left Winnipeg a year later and moved to Calgary. I made friends with a lovely woman named Esther. Esther had had polio when she was a child and walked with the aid of crutches.  She was of Ukrainian descent.


She was such a dear friend to me. That first Christmas in Calgary she came over on Christmas Eve and showed me how to make Pierogi from scratch.  Apparently it was a Christmas tradition in her family.  


Pierogi Stuffed Shells 


We enjoyed them boiled and then dropped into melted butter and lightly sauteed along with onions until they were golden brown and the onions lightly caramelized.  We enjoyed them with sour cream of course.


I will always be indebted to Esther for showing me how to make a really delicious food from scratch.  Esther passed away a few years ago now.  I still miss her, but I never make pierogi without thinking about her and our friendship.


Pierogi Stuffed Shells 


I discovered this recipe I am sharing with you today on a blog called Real Life Dinner.  It sounded quick, delicious and easy. 

I did put my own twist on it and I cut the amount in half to serve only 3 people instead of 6.  It was very simple to make. You can make mashed potatoes from scratch or use leftover mashed potatoes, so its a great way to cut down on waste.

Its also very cheap and economical to make, especially if you buy your cheese when its on offer like I do!!

Pierogi Stuffed Shells 


WHAT YOU NEED TO MAKE PIEROGI STUFFED SHELLS

It may look like a lot of ingredients, but its really not much. You really need only four main ingredients.  Mashed potatoes, cheddar cheese, caramelized onions, and pasta shells. The rest is the icing on a very tasty cake.


For the potato filling:
  • 1 1/2 cups leftover or fresh mashed potatoes
  • 1/4 cup sour cream
  • 1 cup (120g) grated strong cheddar cheese
  • salt and black pepper to taste
  • 1/2 of your caramelized onions (see instructions)
For the caramelized onions:
  • 1 medium to large onion, peeled and finely chopped (amount depends on how much you like onions)
  • 1 TBS butter
  • salt and pepper to taste
  • 1/2 tsp sugar
You will also need:
  • 12 large pasta shells, cooked in lightly salted water
  • 1/2 cup (60g) grated strong cheddar cheese
  • the other half of the caramelized onions
  • 1/4 cup chicken stock
  • sour cream and additional fried onions to serve

Pierogi Stuffed Shells


I use strong cheddar cheese because you get loads more flavor for your money.  I always think anything less flavorful gets lost in a dish like this where it is combined with so many other things.

Adding a bit of sugar to the onions really helps them to caramelize nicely and enhances their natural sweetness.

I add a bit of stock to the bottom of the baking dish to help prevent the pasta shells from drying out. Where there is no sauce in this recipe, it is very easy for them to dry out.


Pierogi Stuffed Shells


Whisking a bit of sour cream into the mashed potatoes along with the cheese adds a nice rich flavor and loosens them up a tiny bit making the mixture easier to stuff into the shells.  I also like to add some of the caramelized onions to the potatoes.

I probably make twice as many onions as this recipe calls for because I love to serve the finished shells with additional fried onions as well.  But you can make as much or as little an amount of fried onions as you want.


Pierogi Stuffed Shells 


HOW TO MAKE PIEROGI STUFFED SHELLS

These are really a lot less complicated to make than regular pierogi.  There is no rolling out of the dough, crimping or boiling!  Easy peasy!!


Preheat the oven to 350*F/ 180*C/ gas mark 4. Have ready a shallow casserole dish large enough to hold all your shells. Butter the casserole dish with softened butter.


To caramelize the onions melt the butter in a medium sized non-stick pan. Add the onions, some seasoning and the sugar. Cook over medium low heat, stirring frequently until the onion has softened and begun to caramelize.


Pierogi Stuffed Shells 


Warm up the mashed potatoes for a minute or so in the microwave. Whisk the potatoes, cheese, sour cream, and salt and pepper to taste for the filling, using an electric whisk. If the mixture seems too thick you can beat in a small amount of milk. Stir in half of the caramelized onions.


Stuff the potato filling into the cooked pasta shells, about 2 to 3 TBS each. Place the stuffed shells into the buttered casserole dish.


Sprinkle the cheese evenly over top of the stuffed shells. Sprinkle with the remaining caramelized onions. Pour the chicken stock, carefully into the bottom of the pan.


Bake, uncovered, in the preheated oven until the cheese is bubbling and the shells are heated through, 20 to 30 minutes.


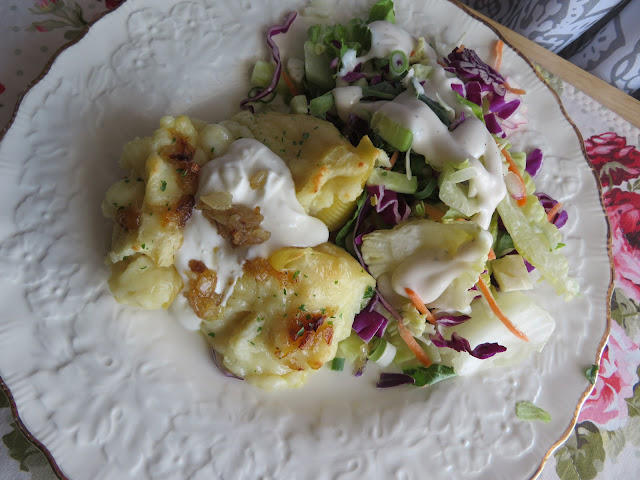
Serve hot with sour cream to spoon over top and additional fried onions if you wish.


Pierogi Stuffed Shells 


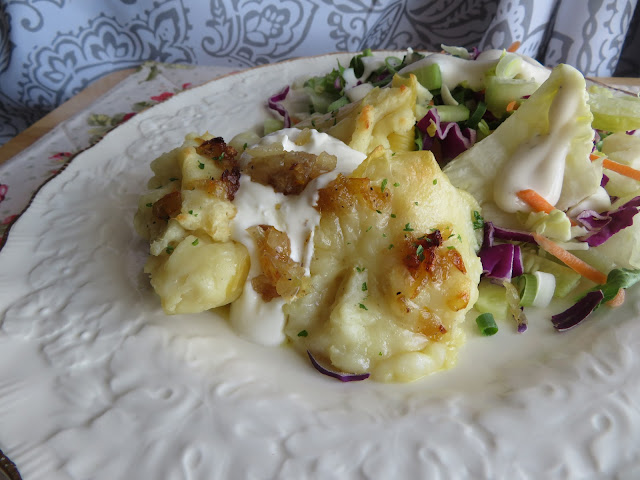
These were really surprisingly good. The shells were not quite as tender as the original pierogi dough is. If I made them again I would cook them for a bit longer, but they were quite delicious.


I found myself wondering what they would be like baked on a bed of a sour cream sauce, with a bit more drizzled on top.  I may try that sometime just to see.


In the meantime, although not quite as satisfying as the real deal, these were very good and this carboholic really enjoyed them with some additional sour cream, more onions and a tasty salad on the side.


Pierogi Stuffed Shells 


Here are a few other ways to enjoy stuffed shells.  You will want to use up the box won't you!


TACO STUFFED SHELLS -  This was something that my boys always enjoyed and that I used to make for the Missionaries sometimes when I had them over for supper.  Pasta shells stuffed with a tasty beef taco filling, topped with crumbled tortilla chips and cheese, then baked to perfection. Served hot with your favorite taco toppings they always go down a real treat!


CHEESY SHELL STUFFED SHELLS -  This is a personal favorite of mine. Shells are stuffed with a lush mac and cheese made using miniature shells.  Napped with a marinara and more cheese and baked until all gooey and rich. Can you ever have too much cheese? I think not!  This one spells W-I-N-N-E-R!!!


Yield: 3
Author: Marie Rayner
Pierogi Stuffed Shells

Pierogi Stuffed Shells

Prep time: 20 MinCook time: 30 MinTotal time: 50 Min
Quick and easier than regular pierogi, but with the same delicious flavors. You can use fresh mashed potatoes if you wish.

Ingredients

For the potato filling
  • 1 1/2 cups leftover or fresh mashed potatoes
  • 1/4 cup sour cream
  • 1 cup (120g) grated strong cheddar cheese
  • salt and black pepper to taste
  • 1/2 of your caramelized onions (see instructions)
For the caramelized onions:
  • 1 medium to large onion, peeled and finely chopped (amount depends on how much you like onions)
  • 1 TBS butter
  • salt and pepper to taste
  • 1/2 tsp sugar
You will also need:
  • 12 large pasta shells, cooked in lightly salted water
  • 1/2 cup (60g) grated strong cheddar cheese
  • the other half of the caramelized onions
  • 1/4 cup chicken stock
  • sour cream and additional fried onions to serve

Instructions

  1. Preheat the oven to 350*F/ 180*C/ gas mark 4. Have ready a shallow casserole dish large enough to hold all your shells. Butter the casserole dish with softened butter.
  2. To caramelize the onions melt the butter in a medium sized non-stick pan. Add the onions, some seasoning and the sugar. Cook over medium low heat, stirring frequently until the onion has softened and begun to caramelize.
  3. Warm up the mashed potatoes for a minute or so in the microwave. Whisk the potatoes, cheese, sour cream, and salt and pepper to taste for the filling, using an electric whisk. If the mixture seems too thick you can beat in a small amount of milk. Stir in half of the caramelized onions.
  4. Stuff the potato filling into the cooked pasta shells, about 2 to 3 TBS each. Place the stuffed shells into the buttered casserole dish.
  5. Sprinkle the cheese evenly over top of the stuffed shells. Sprinkle with the remaining caramelized onions. Pour the chicken stock, carefully into the bottom of the pan.
  6. Bake, uncovered, in the preheated oven until the cheese is bubbling and the shells are heated through, 20 to 30 minutes.
  7. Serve hot with sour cream to spoon over top and additional fried onions if you wish.
Did you make this recipe?
Tag @marierayner5530 on instagram and hashtag it # marierayner5530
Pierogi Stuffed Shells


This content (written and photography) is the sole property of The English Kitchen. Any reposting or misuse is not permitted. If you are reading this elsewhere, please know that it is stolen content and you may report it to me at: mariealicejoan@aol.com 


Thanks so much for visiting! Do come again!


 Follow my blog with Bloglovin
read article

Pineapple Glazed Ham Steak

Tuesday, 28 March 2023


Pineapple Glazed Ham Steak


Easter is just a few weeks away and I wanted to come up with a viable option for the smaller family to enjoy for Easter Dinner.


When I was growing up and for all of the years I was raising my family we always enjoyed Ham at Easter.  When mom cooked it, it was always cooked the day before and served cold and sliced, whereas in my own family we always enjoyed it hot.


Pineapple Glazed Ham Steak 


As a person living on my own now, I didn't want to have to be eating ham for days on end after the holiday meal.  I know many others are in the same situation and there are also many of us who are still not comfortable gathering together in large groups.


Some of us may be empty nesters as well, or living far away from family, so a smaller sized option is certainly welcome.
 

This delicious Pineapple Glazed Ham Steak is perfectly sized for two people.


Pineapple Glazed Ham Steak 


I adapted the recipe from one I found on Call me PMc.  It feeds four people and uses a full ham steak.  If you are looking for a meal to serve four, I suggest you check them out.


If you are like me, and looking to downsize, then stay right where you are because I have you covered. This is perfectly sized for two and is every bit as delicious as a full sized glazed ham!


Pineapple Glazed Ham Steak 


What you have here is juicy tender pieces of a full ham steak (you freeze half for another purpose) that are perfectly cooked and served with a brown sugar, mustard and pineapple glaze, that is a little bit sweet and fruity, a little bit tangy, a bit spicy and totally delicious!


I served it with scalloped potatoes and green beans for a lovely meal. I used a boxed scalloped potato mix (by Betty Crocker). I cut it in half, keeping the oven temperature and the bake time about 3/4 of the original bake time.  It turned out beautiful as you can see, and makes a great option for the smaller family. 


Pineapple Glazed Ham Steak 


WHAT YOU NEED TO MAKE PINEAPPLE GLAZED HAM STEAK

Very simple ingredients.  I usually have most of these things in my cupboard/larder at all times, but they are very easily picked up.


  • 1/2 half of a bone in full slice of ham (about 1/2 inch thick) (freeze the other half for another time.)
  • 1 tsp butter
  • 1/4 cup (50g) of soft light brown sugar
  • 1/4 cup (60ml) pineapple juice
  • 1/4 cup (52g) of chopped pineapple
  • 5 maraschino cherries, drained and patted dry
  • pinch ground cloves
  • 1 TBS Dijon mustard

Pineapple Glazed Ham Steak 


The ham slice/steak I am talking about is the one you can buy in the shops that is a full slice of a ham, usually with the small circular bone in the center. Just cut it in half, freeze one half and then cut the other half into two portions.

I used tinned crushed pineapple. I drained off some of the juice to use in the glaze and then some of the crushed pineapple to use as well. The remainder can be frozen for later or eaten in a fruit cup, put into coleslaw (delicious), etc. It will not and should not be wasted.


Pineapple Glazed Ham Steak 


I froze the remainder of my ham steak in two pieces. Very convenient for me to thaw out and use in a casserole, or even just as a protein option for some supper meal. 


Its very nice popped into the electric grill, cooked and then served as is, glazed or not! It always makes a lovely supper, served with some fried potatoes and corn on the cob.  Yummy yummy!


Pineapple Glazed Ham Steak 


HOW TO COOK PINEAPPLE GLAZED HAM STEAK

It may look complicated, but I can promise you that it isn't complicated at all and it really is delicious. 


Heat the butter in a medium sized skillet over medium high heat. Cut the ham in half yet again to make two servings. Brown them in the hot butter.


Whisk the sugar, pineapple, pineapple juice, mustard and cloves together. Spoon this sauce over top of the ham slices.


Turn the heat to low and simmer the ham steaks in the sauce for 20 to 25 minutes, until the ham is cooked through and glazed, turning them several times.


Add the maraschino cherries and heat through. Serve hot with some of the sauce spooned over top with a few cherries decorating each serving.


Pineapple Glazed Ham Steak 


Now doesn't that look special?  I think it makes for a really pretty dinner option. Quick and easy to make and oh so delicious. I think I have a new favorite way to cook my ham for special occasions!

I guarantee you are sure to fall in love with this simple and tasty entrée whether you are feeding one, or two, or many people.  Much quicker and easier than a full baked ham.  Deliciousness without having all those leftovers!


Pineapple Glazed Ham Steak 


Here are a few other recipes which make use of ham steaks that you might enjoy!

HAM STEAKS SHEET PAN DINNER - A complete dinner for four cooked on one large sheet pan. If you line the sheet with foil cleanup is at a  minimum.  With a delicious honey mustard glaze, roasted potatoes, butternut squash and green beans. A fabulous dinner to enjoy at any time.


PROPER HAM AND EGGS - This simple way of cooking ham and eggs makes for either a simple supper or a beautiful breakfast. You decide! One nice thick slice of ham/gammon.  Fried in butter until golden brown on both sides.  The fatty edge getting all stick and sweet from the marmalade glaze. OH so good, especially when you add two perfectly cooked farm fresh eggs!


Yield: 2 servings
Author: Marie Rayner
Pineapple Glazed Ham Steak

Pineapple Glazed Ham Steak

Prep time: 5 MinCook time: 30 MinTotal time: 35 Min
All the delicious flavors of a holiday ham without the leftovers. Perfectly sized for just two people

Ingredients

  • 1/2 half of a bone in full slice of ham (about 1/2 inch thick) (freeze the other half for another time.)
  • 1 tsp butter
  • 1/4 cup (50g) of soft light brown sugar
  • 1/4 cup (60ml) pineapple juice
  • 1/4 cup (52g) of chopped pineapple
  • 5 maraschino cherries, drained and patted dry
  • pinch ground cloves
  • 1 TBS Dijon mustard

Instructions

  1. Heat the butter in a medium sized skillet over medium high heat. Cut the ham in half yet again to make two servings. Brown them in the hot butter.
  2. Whisk the sugar, pineapple, pineapple juice, mustard and cloves together. Spoon this sauce over top of the ham slices.
  3. Turn the heat to low and simmer the ham steaks in the sauce for 20 to 25 minutes, until the ham is cooked through and glazed, turning them several times.
  4. Add the maraschino cherries and heat through.
  5. Serve hot with some of the sauce spooned over top and a few cherries on each serving.
Did you make this recipe?
Tag @marierayner5530 on instagram and hashtag it # marierayner5530
Pineapple Glazed Ham Steak


This content (written and photography) is the sole property of The English Kitchen. Any reposting or misuse is not permitted. If you are reading this elsewhere, please know that it is stolen content and you may report it to me at: mariealicejoan at aol dot com 


 Thanks so much for visiting! Do come again! 


 Follow me on Bloglovin
read article

Easy Tomato Pasta

Monday, 27 March 2023

Easy Tomato Pasta 


I have a pasta obsession.  Its true. I put my hand up.  I cannot resist a dish of fine pasta.  I collect pasta like little boys collect bubblegum cards as well.  I have a cupboard full of a whole variety of different pasta shapes and sizes.


Whenever I see pasta on offer at the shops, or if I see a different shape that I would like to try, I cannot resist buying it.  Dry pasta will keep for a very long time in the cupboard and in fact it will keep for two to three years past its sell by date in all actuality.


Easy Tomato Pasta 


That makes it an excellent store cupboard ingredient.  Pasta is really quite good for you.  It has gotten a bad rap in recent years, and quite undeservedly so. Recently published research indicates that pasta consumption does not contribute to obesity, and has actually been linked to a lower body mass index. 


When surveying the eating habits of over 23,000 Italians, researchers found that pasta did not correlate to waist size or BMI among those who had been studied. In all truth pasta is an important component of the Mediterranean diet and has a low glycemic index.  (Low GI)  Especially if you use a whole grain pasta, which I like to do if I can.


Easy Tomato Pasta 


Pasta makes the perfect foundation for a healthy, nutritious and satisfying meal. It is the ideal partner for many other foods, vegetables, beans, fish poultry, red meat, cheeses, eggs, etc.  It is also an excellent source of complex carbohydrates.


Low sodium, cholesterol free, and filled with important vitamins such as folic acid, iron and B-vitamins, pasta is and should be an important part of a well-balanced diet.  I try to make it a part of my diet several times a week.

Its also fairly inexpensive to buy, and is a great filler-upper!  Abundantly versatile, pasta is one ingredient that I would not be without in my store cupboard.

Easy Tomato Pasta 


This recipe for Easy Tomato Pasta was adapted from a recipe I found on the BBC Good Food site the other day.  Attributed to the chef Lesley Waters, it is not only quite an inexpensive meal to prepare but makes a great use of store cupboard ingredients as well.

Delicious, filling as well as budget and family friendly. Quantities are given for two servings, but it can easily be multiplied to serve more.


Easy Tomato Pasta


WHAT YOU NEED TO MAKE EASY TOMATO PASTA

Simple store cupboard ingredients. There is the option of adding sliced frankfurters to this dish, but you needn't do so if you want to keep it vegetarian friendly. Or you could add other bits of meat such as ham, spam, tinned corned beef, bacon, etc.


  • 1TBS light olive oil
  • 1 small onion, peeled and finely chopped
  • 1 clove garlic, peeled and finely minced
  • 14 oz (400g) tin of chopped tomatoes in juice, undrained
  • pinch sugar
  • few dashes Worcestershire sauce
  • 3 1/2 ounces (scant cup/100g) rigatoni or other tubular pasta shape
  • 1/2 cup (50g) cheddar or gruyere cheese, grated
  • a hunk of baguette or a slice of bread, coarsely grated
  • salt and pepper to taste
Optional:
  • 2 frankfurters/hotdogs, sliced
 
Easy Tomato Pasta 


I always have tinned tomatoes in my larder.  I like to keep a few larger cans of whole tomatoes for times when I am cooking something large, but for the most part I keep the smaller 400g tins, which are better suited to the smaller household. 


Having said that however, you can very easily freeze the tomatoes which don't get used from a larger tin in an airproof freezer container.  


Its a lot cheaper to grate your own cheese if you can. I do that most of the time.  This recipe also makes use of stale bread in the topping.  I used a thick slice of stale cheese bread that I had leftover from a loaf I had bought at the local farm market. It was delicious!


Easy Tomato Pasta


I accompanied my casserole with a nice salad on the side. That's all you really need. I made a small version of my favorite salad which is made with hand torn lettuce, chopped red onion, cubes of cheddar cheese and thawed frozen peas.  I had some snap peas which I also added, just trimmed and then julienned.  They added additional interest.


A very simple dressing to make uses 1/2 TBS of mayonnaise, 2 TBS oil, 1 TBS cider vinegar and 1 teaspoon of honey or sugar. I add seasoning and some dried dillweed to taste. I just shake this all together in a jar and toss the salad together with it. Its delicious! 


Easy Tomato Pasta 


HOW TO MAKE EASY TOMATO PASTA

Nothing could be simpler.  This is a real doddle.


Preheat the oil in a skillet over medium heat. Add the onions and sauté until softened, about 5 minutes. Stir in the garlic and cook until fragrant, about a minute longer.


Add the undrained tomatoes and the sugar. Bring to the boil and simmer for 20 minutes.


Cook the pasta until al dente according to the package directions. Drain well, rinse and drain again.


Add the Worcestershire sauce to the tomato sauce and season to taste. If you are using the frankfurters, add them to the sauce now. Pour this mixture into a heat-proof dish.


Mix the bread crumbs and cheese together. Scatter the cheesy crumbs over top of the pasta in the dish.


Preheat the grill/broiler to high.


Pop the cheese crumb coated dish under the grill and toast for 3 to 5 minutes, until bubbling hot and golden. Serve hot with a salad on the side.


Easy Tomato Pasta 


This was surprisingly delicious. Such a simple meal, with very little effort and so economical.  The sauce is simple and yet very tasty.


I did add hotdogs, and they also went surprisingly well with the remainder of the ingredients.  Don't leave out the Worcestershire sauce. It really adds a bit of tasty magic!  


Easy Tomato Pasta


Some other pasta dishes in The English Kitchen that you might also enjoy are:


PASTA WITH CHICKEN BROTH, BUTTER & CHEESE - This brilliant pasta dish is a beautiful example of simple and uncomplicated foods.  Food done well and put together in a most delicious way. Stock and pasta are the basis of this very simple and yet delicious dish in which pasta is quite simply cooked in a quantity of stock . . .  It doesn't get much easier than this. 


SAUCY PASTA HOOPS - Did you used to like Spaghetti hoops (Spaghetti-o's) when you were a child? It wasn't something we had very often but when we did it was a real favorite! A grown up version of a childhood favorite, all cooked in one pan. Rich and cheesy and oh so easy to make! NO fuss, NO muss, and delicious to boot.


Yield: 2 servings
Author: Marie Rayner
Easy Tomato Pasta

Easy Tomato Pasta

Prep time: 10 MinCook time: 30 MinTotal time: 40 Min
A quick, easy, economical and adaptably hearty pasta dish for two!

Ingredients

  • 1TBS light olive oil
  • 1 small onion, peeled and finely chopped
  • 1 clove garlic, peeled and finely minced
  • 14 oz (400g) tin of chopped tomatoes in juice, undrained
  • pinch sugar
  • few dashes Worcestershire sauce
  • 3 1/2 ounces (scant cup/100g) rigatoni or other tubular pasta shape
  • 1/2 cup (50g) cheddar or gruyere cheese, grated
  • a hunk of baguette or a slice of bread, coarsely grated
  • salt and pepper to taste
Optional:
  • 2 frankfurters/hotdogs, sliced

Instructions

  1. Preheat the oil in a skillet over medium heat. Add the onions and sauté until softened, about 5 minutes. Stir in the garlic and cook until fragrant, about a minute longer.
  2. Add the undrained tomatoes and the sugar. Bring to the boil and simmer for 20 minutes.
  3. Cook the pasta until al dente according to the package directions. Drain well, rinse and drain again.
  4. Add the Worcestershire sauce to the tomato sauce and season to taste. If you are using the frankfurters, add them to the sauce now. Pour this mixture into a heat-proof dish.
  5. Mix the bread crumbs and cheese together. Scatter the cheesy crumbs over top of the pasta in the dish.
  6. Preheat the grill/broiler to high.
  7. Pop the cheese crumb coated dish under the grill and toast for 3 to 5 minutes, until bubbling hot and golden. Serve hot with a salad on the side.
Did you make this recipe?
Tag @marierayner5530 on instagram and hashtag it # marierayner5530
Easy Tomato Pasta


This content (written and photography) is the sole property of The English Kitchen. Any reposting or misuse is not permitted. If you are reading this elsewhere, please know that it is stolen content and you may report it to me at: mariealicejoan at aol dot com 


 Thanks so much for visiting! Do come again! 


 Follow me on Bloglovin
read article
new entries old entries
Subscribe to: Posts (Atom)

Buy the Book!

If you are a Baking Enthusiast and a fan of British Baking you are going to love this new book I wrote. From fluffy Victoria sponges to sausage rolls, the flavors of British baking are some of the most famous in the world. Learn how to create classic British treats at home with the fresh, from-scratch, delicious recipes in The Best of British Baking. Its all here in this delicious book! To find out more just click on the photo of the book above!

SUBSCRIBE TO MY NEWSLETTER

If You Like What You See

If you like what you see and wish to donate to help pay for butter, sugar, eggs and whatnot, every little bit is appreciated. Thanks!
PRIVACY POLICY

Translate


Welcome, I'm Marie

Welcome, I'm Marie
Canadian lover of all things British. I cook every day and like to share it with you!

Search This Blog

Featured

Pierogi Stuffed Shells
  I love Pierogi.  They are one of my favorite foods of all time. They were not something I grew up with, but something which I discovered w...

Popular Posts

  • Fried Cabbage with Bacon & Onions
      I have always loved fried cabbage.  I first had it when I was in high school.  We cooked it in our Home Economics Class. It was just ...
  • Sticky Lemon Chicken
    I am always on the look out for a good chicken breast recipe.  We eat a lot of chicken in this house, and it mostly comes in the form of...
  • Lemon Friands
    Anyone who knows me, knows that I am a nut for anything lemon flavoured. It's always been one of my absolute favourite taste thril...
  • Quick and Easy Bacon and Egg Tarts
       You might not think that you have time to do a bacon and egg breakfast on a weekday, but this recipe here today proves that just isn&...
  • Mary Berry's Cheese Scones
    I wanted to make some scones to enjoy the other day.  I have made quite a few scones here on the blog and I love them all. I do like to try ...

Foodies 100

Foodies 100

My Favourite Places

  • Welcome Home Kitchen Blog
  • Cookbooklets
  • Categories
  • _Kitchen Wisdom
  • _In the Larder and Pantry
  • _Couldn't Live Without
  • _Kitchen Wish List

Follow This Blog With Bloglovin

Follow This Blog With Bloglovin

Archive

  • ▼  2023 (85)
    • ▼  March (29)
      • Pierogi Stuffed Shells
      • Pineapple Glazed Ham Steak
      • Easy Tomato Pasta
      • MEALS OF THE WEEK (March 19th - 25th)
      • Baked Funfetti Donuts
      • Herbed Cod with Crispy Garlic Potatoes
      • Hershey's Perfect One Bowl Chocolate Cake (small b...
      • Spaghetti & Meatballs (small batch)
      • Lamb Chops with Honey, Lemon & Thyme
      • Crunchy Tuna Salad Baguette
      • Oven Baked Chicken Breast for Two
      • Steamed Ginger Pudding
      • Smashed Brussels Sprouts
      • Traditional Irish Recipes for Saint Patrick's Day
      • Traditional Genoa Cake
      • Fried Bread
      • Mushroom Broccoli Pasta
      • Banana Chocolate Chip Muffins
      • Garlic Butter Sausages & Broccoli Skillet
      • Homemade Chicken Crunch Wraps
      • Traditional Irish Barmbrack
      • Early March Grocery Haul
      • Cube Steak & Onion Gravy
      • Lemon & Poppyseed Sour Cream Muffins (small batch)
      • Just a catch up . . .
      • Irish Soda Bread Muffins
      • Sheet Pan Macaroni and Cheese
      • Cindy's Peanut Butter Cookies (small batch)
      • Sheet Pan Pork Chop & Stuffing Dinner
    • ►  February (28)
    • ►  January (28)
  • ►  2022 (368)
    • ►  December (26)
    • ►  November (29)
    • ►  October (30)
    • ►  September (29)
    • ►  August (32)
    • ►  July (33)
    • ►  June (29)
    • ►  May (33)
    • ►  April (31)
    • ►  March (29)
    • ►  February (31)
    • ►  January (36)
  • ►  2021 (373)
    • ►  December (36)
    • ►  November (31)
    • ►  October (31)
    • ►  September (31)
    • ►  August (30)
    • ►  July (32)
    • ►  June (35)
    • ►  May (28)
    • ►  April (29)
    • ►  March (32)
    • ►  February (28)
    • ►  January (30)
  • ►  2020 (322)
    • ►  December (30)
    • ►  November (23)
    • ►  October (31)
    • ►  September (29)
    • ►  August (29)
    • ►  July (30)
    • ►  June (27)
    • ►  May (26)
    • ►  April (26)
    • ►  March (26)
    • ►  February (23)
    • ►  January (22)
  • ►  2019 (343)
    • ►  December (21)
    • ►  November (24)
    • ►  October (26)
    • ►  September (32)
    • ►  August (32)
    • ►  July (26)
    • ►  June (32)
    • ►  May (34)
    • ►  April (30)
    • ►  March (31)
    • ►  February (28)
    • ►  January (27)
  • ►  2018 (371)
    • ►  December (30)
    • ►  November (31)
    • ►  October (31)
    • ►  September (31)
    • ►  August (34)
    • ►  July (34)
    • ►  June (31)
    • ►  May (30)
    • ►  April (29)
    • ►  March (34)
    • ►  February (27)
    • ►  January (29)
  • ►  2017 (376)
    • ►  December (32)
    • ►  November (32)
    • ►  October (35)
    • ►  September (36)
    • ►  August (29)
    • ►  July (30)
    • ►  June (30)
    • ►  May (32)
    • ►  April (32)
    • ►  March (29)
    • ►  February (29)
    • ►  January (30)
  • ►  2016 (420)
    • ►  December (36)
    • ►  November (32)
    • ►  October (34)
    • ►  September (36)
    • ►  August (37)
    • ►  July (38)
    • ►  June (33)
    • ►  May (34)
    • ►  April (33)
    • ►  March (36)
    • ►  February (35)
    • ►  January (36)
  • ►  2015 (411)
    • ►  December (40)
    • ►  November (33)
    • ►  October (35)
    • ►  September (37)
    • ►  August (44)
    • ►  July (33)
    • ►  June (31)
    • ►  May (33)
    • ►  April (34)
    • ►  March (32)
    • ►  February (27)
    • ►  January (32)
  • ►  2014 (447)
    • ►  December (39)
    • ►  November (40)
    • ►  October (43)
    • ►  September (33)
    • ►  August (32)
    • ►  July (36)
    • ►  June (42)
    • ►  May (43)
    • ►  April (42)
    • ►  March (35)
    • ►  February (29)
    • ►  January (33)
  • ►  2013 (393)
    • ►  December (42)
    • ►  November (38)
    • ►  October (37)
    • ►  September (35)
    • ►  August (30)
    • ►  July (32)
    • ►  June (31)
    • ►  May (30)
    • ►  April (25)
    • ►  March (33)
    • ►  February (30)
    • ►  January (30)
  • ►  2012 (395)
    • ►  December (35)
    • ►  November (39)
    • ►  October (36)
    • ►  September (33)
    • ►  August (35)
    • ►  July (29)
    • ►  June (34)
    • ►  May (30)
    • ►  April (32)
    • ►  March (31)
    • ►  February (30)
    • ►  January (31)
  • ►  2011 (353)
    • ►  December (32)
    • ►  November (30)
    • ►  October (29)
    • ►  September (28)
    • ►  August (31)
    • ►  July (31)
    • ►  June (29)
    • ►  May (28)
    • ►  April (27)
    • ►  March (31)
    • ►  February (29)
    • ►  January (28)
  • ►  2010 (291)
    • ►  December (32)
    • ►  November (31)
    • ►  October (32)
    • ►  September (26)
    • ►  August (25)
    • ►  July (5)
    • ►  June (27)
    • ►  May (23)
    • ►  April (14)
    • ►  March (23)
    • ►  February (25)
    • ►  January (28)
  • ►  2009 (173)
    • ►  December (27)
    • ►  November (24)
    • ►  October (26)
    • ►  September (23)
    • ►  August (26)
    • ►  July (21)
    • ►  June (23)
    • ►  May (3)

Thank you

Thank you

Contact Form


© The English Kitchen.
Customized by My Fairy Blog Mother.