
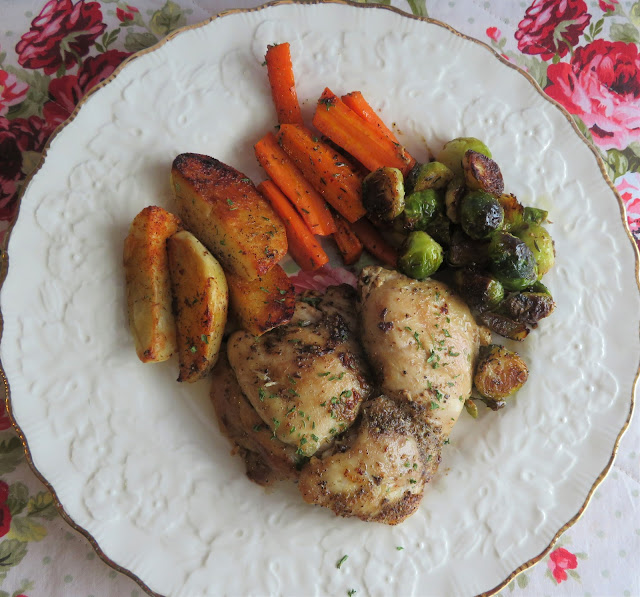

This fabulous sheet pan supper is hearty, healthy and sized just for one person! Filled with flavor it makes a perfect midweek supper for the singleton, although certainly you could double, triple, or quadruple it to feed more people if you wish!
Hearty and full of flavor it is a simple meal that the whole family is sure to love!
.JPG "Sheet Pan Chicken Thighs with Veggies")
Not only is it simple and easy to make, but it is also very healthy and filled with plenty of delicious colors, flavors and textures.
.JPG "Sheet Pan Chicken Thighs with Veggies")
.JPG "Sheet Pan Chicken Thighs with Veggies")
.JPG "Sheet Pan Chicken Thighs with Veggies")
.JPG "Sheet Pan Chicken Thighs with Veggies")
Everything cooks altogether . . . roasting in a hot oven so you end up with beautifully crispy tender, an yet lightly caramelized carrots . . .
.JPG "Sheet Pan Chicken Thighs with Veggies")
Perfectly roasted and caramelized Brussels sprouts. Oh, I do so love a roasted Brussels sprout, don't you? These are beautifully done.
.JPG "Sheet Pan Chicken Thighs with Veggies")
Even the potato wedges are cooked to perfection. Crisp and golden brown on the outsides, and fluffy and meltingly tender inside.
This is a recipe I downsized and adapted from one I found on The Feathered Nester. I thought I had taken out a chicken breast to cook, but it ended up being two boneless skinless thighs.
Scratch plan "A" and move to plan "B."
.JPG "Sheet Pan Chicken Thighs with Veggies")
WHAT YOU NEED TO MAKE SHEET PAN CHICKEN THIGHS WITH VEGGIES for one
There is nothing extraordinary here. Just everyday simple kitchen ingredients.
For the vegetables:
- 1 medium potato, peeled and cut into quarters
- 1 medium carrot, peeled and cut into 1/2 inch thick sticks
- a handful of Brussels sprouts, trimmed and halved
- 2 tsp light olive oil
- garlic powder, onion power, dried thyme, salt and pepper to taste
- a pinch of sweet paprika (for the potatoes)
For the chicken:
- 2 small boneless, skinless chicken thigh fillets
- salt and black pepper to taste
- 1/2 tsp poultry seasoning
- 2 tsp butter
.JPG "Sheet Pan Chicken Thighs with Veggies")
At the end of the day you can use whatever vegetables you have in the house and that you enjoy. For me it happened to be carrots and sprouts. Broccoli would work well as would cauliflower or green beans. Zucchini would work well.
You could use sweet potatoes, turnips or butternut squash as well. Just make sure that you cut your vegetables all the same size and allow for extra cook time for the harder vegetables. Some vegetables take longer to cook than others. Rutabaga or turnips are ones which take a bit longer.
Small wedges of cabbage would also be very nice, onions, etc. Really the world is your oyster when it comes to choice!
.JPG "Sheet Pan Chicken Thighs with Veggies")
I used very simple seasonings for my vegetables and my chicken. You could vary on these of course. If you want a Tex Mex kind of a result, use typical spices such as cumin, coriander and chili. A squeeze of lime juice would be lovely squeezed over the chicken at the end in this case.
Today I used only onion and garlic powders. (Make sure you use powders not salts.) I also used some dried thyme on the vegetables and my own homemade Bell's poultry seasoning mix on the chicken.
.JPG "Sheet Pan Chicken Thighs with Veggies")
You could use chicken breast meat instead of the thighs, but do bear in mind that they will not take as long to cook, unless your breast is particularly thick.
If your chicken breast is quite thick, beat it to an even flatness between two sheets of plastic cling film. I would do this anyways just to make sure that everything cooks evenly.
.JPG "Sheet Pan Chicken Thighs with Veggies")
If you wanted to you could brush the chicken with some sort of sauce prior to cooking and throughout the cook time. BBQ Sauce, Honey Mustard, Maple, Honey, etc. Again go with what you enjoy.
Today I left them plain with just the seasonings and a pat of butter to help and keep them moist.
.JPG "Sheet Pan Chicken Thighs with Veggies")
HOW TO MAKE SHEET PAN CHICKEN THIGHS WITH VEGGIES for one
Nothing could be quicker or easier! If you have all of your vegetables prepped ahead of time, it goes even faster.
Preheat your oven to 425*F/ 220*C/ gas mark 7. Line a small, rimmed baking sheet with aluminum foil.
Toss your vegetables together in a bowl along the oil. Lay the vegetables (individually) out onto the baking tray, sprinkling some paprika on the potato wedges. Sprinkle the remaining seasonings overall.
Lay the chicken thighs on the baking sheet. Keep them rolled up to begin. Top each with a slice of butter and then season with some, salt, pepper and poultry seasoning.
.JPG "Sheet Pan Chicken Thighs with Veggies")
Roast in the preheated oven for 15 minutes. Using a spatula turn your vegetables over. (If some appear done, remove to a bowl and then return at the end of cook time to heat through. Depending on the size of your sprouts, they can cook faster than the carrots and potatoes.)
Open out the chicken thighs and roast everything for a further 10 to 15 minutes until the chicken is tender and cooked through (juices will run clear), and your vegetables are done to your liking.
Serve hot.
.JPG "Sheet Pan Chicken Thighs with Veggies")
I really enjoyed this hearty and yet very simple meal. After all the hustle bustle of December, it was nice to be able to enjoy a meal that wasn't labor or planning intensive!
My carrots were crispy tender, the sprouts melted in my mouth, the potatoes were perfectly crisp, and that chicken was cooked to perfection as well. I needed nothing else!
.JPG "Sheet Pan Chicken Thighs with Veggies")
If you are interested in additional smaller sized recipes for the singleton or couple, you may want to consider the following:
LEMON & GARLIC CHICKEN FOR ONE - This recipe is for a delicious moist and well flavored chicken breast which marinades for a time in a delicious tenderizing marinade and then is simply roasted to perfection in a moderate oven. As simple as it is this marinated lemon garlic chicken breast is truly delicious! Fabulous served on a bed of cooked orzo or rice.
DEEP DISH CHOCOLATE CHIP COOKIE FOR ONE -Crispy edged and gooey centred. This is best eaten warm, and I have a personal preference for vanilla ice cream with this, rather than anything else. So dangerous that you might even want to share it rather than eat it all on your own.
Yield: 1
Sheet Pan Chicken Thighs with Veggies
Prep time: 10 MinCook time: 30 MinTotal time: 40 Min
This quick and easy sheet pan supper is delicious and healthy and yields enough to feed one person generously. Simply double or triple the amounts to feed more people.
Ingredients
For the vegetables:
- 1 medium potato, peeled and cut into quarters
- 1 medium carrot, peeled and cut into 1/2 inch thick sticks
- a handful of Brussels sprouts, trimmed and halved
- 2 tsp light olive oil
- garlic powder, onion power, dried thyme, salt and pepper to taste
- a pinch of sweet paprika (for the potatoes)
For the chicken:
- 2 small boneless, skinless chicken thigh fillets
- salt and black pepper to taste
- 1/2 tsp poultry seasoning
- 2 tsp butter
Instructions
- Preheat your oven to 425*F/ 220*C/ gas mark 7. Line a small, rimmed baking sheet with aluminum foil.
- Toss your vegetables together in a bowl along the oil. Lay the vegetables (individually) out onto the baking tray, sprinkling some paprika on the potato wedges. Sprinkle the remaining seasonings over all.
- Lay the chicken thighs on the baking sheet. Keep them rolled up to begin. Top each with a slice of butter and then season with some, salt, pepper and poultry seasoning.
- Roast in the preheated oven for 15 minutes. Using a spatula turn your vegetables over. (If some appear done, remove and then return at the end to heat through. Depending on the size of your sprouts, they can cook faster than the carrots and potatoes.)
- Open out the chicken thighs and roast everything for a further 10 to 15 minutes until the chicken is tender and cooked through (juices will run clear), and your vegetables are done to your liking.
- Serve hot.

Thanks so much for visiting. Do come again!
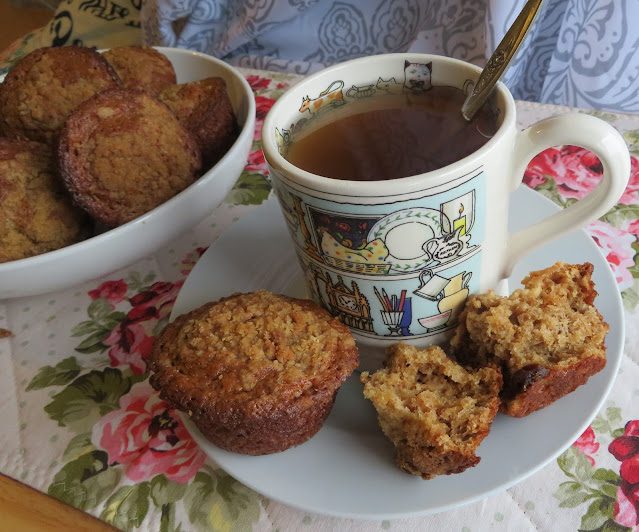

I wanted to make myself some muffins to keep in the freezer for my breakfasts over the next few weeks. Something not too large or too sweet or too filled with fat. In other words, somewhat healthy.
I happened upon this recipe for Maple Bran Muffins in a cookery book by Ken Haedrich entitled Maple Syrup Cookbook. I purchased my copy second hand on a used book site.

I have been a huge fan of Ken's cookbooks for a number of years now. I had several that I purchased in the 1990's and then took over to the UK with me. Of course, they got left behind when I had to come back to Canada.
I am slowly trying to replace at least some of the books that got left, and this was one of them.
One thing I really love about Ken's baking recipes is his propensity for using simple, uncomplicated ingredients, fats, natural sweeteners, whole grain flours, etc. Wholesome baking.
.JPG "Maple Bran Muffins")
One reason that this recipe appealed to me was that it was a known contest winner, having won a 1999 recipe contest sponsored by the Wisconsin Maple Association. (The winning entry was submitted by Joan Lukes of Merrin, Wisconsin.)
Another reason this recipe appealed was because it used no fats whatsoever with the exception of 1 TBS of butter in the topping, so each muffin would only contain 1/12 of a TBS of fat.
.JPG "Maple Bran Muffins")
Also, I love the flavor of maple and I adore bran muffins. This seemed like a really winning combination to me!
.JPG "Maple Bran Muffins")
WHAT YOU NEED TO MAKE MAPLE BRAN MUFFINS
With the exception of perhaps the Maple syrup, you probably have everything you need in the kitchen right now to make these delicious muffins.
- 1 cup (140g) plain all-purpose flour
- 1 tsp baking soda
- 1 cup (41g) bran flakes
- 1/3 cup (50g) raisins
- 1/2 cup (58g) chopped toasted walnuts (optional)
- 1 cup (240ml) pure maple syrup
- 1 cup (120g) dairy sour cream
- 2 large free-range eggs
For the topping:
- 3 TBS all purpose, plain flour
- 2 TBS firmly packed soft light brown sugar
- 1 TBS butter
.JPG "Maple Bran Muffins")
I like to use a "B" grade Maple Syrup. It's a bit darker in color than regular maple syrup and has a stronger flavor than regular maple syrup.
Dark and intensely flavored, it is produced later in the season than regular Maple Syrup.
Regular Maple Syrup comes in three levels of Grade "A", light amber, medium amber and dark amber, depending on when during the Maple Season it is harvested. The earlier in the season the lighter the color and the more delicate the flavor.
"B" grade is perfect for baking and cooking with, its boldness working well with meats, sweet potatoes, baked beans, desserts, muffins, breads, etc.
.JPG "Maple Bran Muffins")
The use of sour cream works with the baking soda to give these muffins a bit of a rise. They will not rise really tall, however. (Just so you know.) They are the perfect sized breakfast muffin.
I used regular full fat sour cream, but light sour cream will also work.
I used Bran Flakes cereal and unbleached flour. I did not add the nuts this time, just the raisins.
.JPG "Maple Bran Muffins")
As you can see, they are not huge muffins, but a medium sized muffin, which is just right or breakfast along with a bowl of fruit, or for a mid-morning snack with your mid-morning cuppa!
The buttery brown sugar streusel on top adds just a tiny bit of a moreish crunch. You could use maple sugar for even more maple flavor!
.JPG "Maple Bran Muffins")
HOW TO MAKE MAPLE BRAN MUFFINS
Muffins are probably one of the easiest things to make in the area of quick breads. Make sure not to overmix the ingredients as the end result will be a tougher muffin.
Preheat the oven to 400*F/200*C/ gas mark 6. Butter a 12-cup medium muffin tin really well or spray with non-stick cooking spray. Set aside.
Rub the butter, flour, and brown sugar together for the topping in a small bowl until the mixture is crumbly. Set aside.
.JPG "Maple Bran Muffins")
Whisk the maple syrup, sour cream and eggs together in a bowl. Set aside.
Whisk the flour and baking soda together in a bowl. Add the bran flakes, raisins and walnuts (if using.) Give everything a good stir.
Add the wet ingredients to the dry ingredients and mix together just to combine. Spoon the batter (it will be loose) into the muffin cups filling them 3/4 full.
Sprinkle a portion of the topping on top of each muffin.
Bake in the preheated oven for 15 to 30 minutes until risen and golden brown. Serve warm.
Leftovers can be stored in an airtight container for several days or frozen for longer. Gently reheat in the microwave for a few seconds.
.JPG "Maple Bran Muffins")
HINTS AND TIPS FOR PERFECT MUFFINS
1. Mix wet and dry ingredients separately in different bowls and then mix together.
2. Do not over beat/mix your batter. Mix only to combine. The best batter is expected to be a bit lumpy, thick, and floury.
3. Don't overfill your muffin cups. 3/4 full is ideal.
4. If you don't have enough batter to fill all your cups, fill the empty ones with water. This promotes even baking in your muffins and will prevent your pan from buckling.
5. Leave the baked muffins to cool in the pan for five minutes before removing them from the pan. Do not let them sit in the pan until cold. This will give you soggy muffins.
6. Muffins freeze wonderfully. If you cannot eat them all in one day, wrap each one tightly with plastic wrap, and freeze together in a zip lock baggie. That way you can remove just however many you want at any given time without having to thaw them all out.
.JPG "Maple Bran Muffins")
I really enjoyed these muffins. The flavor of the maple was just right, and I loved the slight sweetness of the sticky raisins studding the muffins.
They were so good that I confess I had two for breakfast. I couldn't help myself!
.JPG "Maple Bran Muffins")
Some other muffin recipes which you might enjoy are:
These are the PERFECT breakfast muffins. Quick and easy to make. Delicious. I highly recommend. Simple and filled with fiber. You can use ordinary Special K cereal, or you can be a bit more extravagant and use one of the varieties which contain fruit. This recipe makes half a dozen fabulous muffins.
Prepare yourself to fall in love with this small batch muffin recipe with makes six gorgeously delicious muffins. They embody all the flavors of your favorite cinnamon rolls, except they are muffins, not a yeast bread. I am of the school that cinnamon flavored anything is good. It doesn't really matter too much what it is, and these are OMG good!
Yield: 12 medium muffins
Maple Bran Muffins
Prep time: 10 MinCook time: 15 MinTotal time: 25 Min
A delicious little muffin that is low in fat and high in fiber and taste! Sweetened naturally with maple syrup, these are a real winner of a muffin!
Ingredients
- 1 cup (140g) plain all-purpose flour
- 1 tsp baking soda
- 1 cup (41g) bran flakes
- 1/3 cup (50g) raisins
- 1/2 cup (58g) chopped toasted walnuts (optional)
- 1 cup (240ml) pure maple syrup
- 1 cup (120g) dairy sour cream
- 2 large free-range eggs
For the topping:
- 3 TBS all purpose, plain flour
- 2 TBS firmly packed soft light brown sugar
- 1 TBS butter
Instructions
- Preheat the oven to 400*F/200*C/ gas mark 6. Butter a 12-cup medium muffin tin really well or spray with non-stick cooking spray. Set aside.
- Rub the butter, flour, and brown sugar together for the topping in a small bowl until the mixture is crumbly. Set aside.
- Whisk the maple syrup, sour cream and eggs together in a bowl. Set aside.
- Whisk the flour and baking soda together in a bowl. Add the bran flakes, raisins and walnuts (if using.) Give everything a good stir.
- Add the wet ingredients to the dry ingredients and mix together just to combine. Spoon the batter (it will be loose) into the muffin cups filling them 3/4 full.
- Sprinkle a portion of the topping on top of each muffin.
- Bake in the preheated oven for 15 to 30 minutes until risen and golden brown. Serve warm.
- Leftovers can be stored in an airtight container for several days or frozen for longer. Gently reheat in the microwave for a few seconds.


Skillet Ham & Rice. I had a small quantity of cooked ham that I wanted to use up today and I had been eyeballing this recipe I found the other week in a Taste Of Home special issue magazine called Cooking for Two.
The recipe was attributed to Susan Zivec of Regina, Saskatchewan. It appealed to me because not only did it use a very few ingredients, but I had everything I needed to make it in my store cupboard and my refrigerator.
.JPG "Skillet Ham & Rice")
Taste of Home Magazine was a magazine I subscribed to for a number of years prior to moving over to the UK. I have bought a few issues since my return to Canada and I have to say its not the same as it used to be.
When I left Canada the recipes in the magazine were presented in recipe card format, so very easy to clip out and pop into the recipe box. That is no longer the case.
.JPG "Skillet Ham & Rice")
I much preferred the old format, but then I am not a person who really embraces change. Not all change is for the better and I think the recipe cards were a lot handier to use and, in my opinion, more attractive.
Of course, the recipes are still very sound I believe. Sent in by cooks who consider them to be their best and winners one and all. Very much like the community cookbook of old. Those have always been my favorite kind of cookbooks.
.JPG "Skillet Ham & Rice")
After all of the rich food of the holidays I was craving something very simple today. Quick, easy and delicious.
This recipe promised to be just that. Quick, easy and delicious.
.JPG "Skillet Ham & Rice")
WHAT YOU NEED TO MAKE SKILLET HAM & RICE
Not very many ingredients are needed, which is something which really appealed to me.
- 1 tsp olive oil
- 1 medium onion, peeled and chopped
- 1 cup sliced fresh mushrooms (about 7 or 8 medium mushrooms)
- 1 cup cubed fully cooked ham
- 1/8 tsp black pepper
- 1/2 cup (120ml) chicken stock
- 1/4 cup (60ml) water
- 3/4 cup (69g) uncooked instant rice
- 2 spring onion, washed trimmed and sliced
- 2 TBS shredded Parmesan Cheese
.JPG "Skillet Ham & Rice")
I used Crimini mushrooms. Any kind of button type of mushroom would work well. What you don't want to use are portabella or baby portabella. Not unless you remove the gils. They will color this dish a god-awful color in my opinion.
Instant rice (Minute Rice) is not something that is readily available in the UK. You can use a pouch of ready cooked rice, but you will not need to add all the stock or water in that case as you won't be cooking the rice. Just use a tablespoon or two of stock to flavor the rice or use a chicken flavored cooked rice pouch.
It will also be ready a lot sooner in that case as well as the rice is already cooked, and you will merely be heating it through.
In North America you can use the instant brown rice if you are wanting more fiber and nutrition in the dish. This is what I did.
.JPG "Skillet Ham & Rice")
I used ham leftover from New Years. I just trimmed off any fat and cut it into 1/2-inch cubes. The cooking onion was peeled and chopped into a 1/4-inch dice.
The spring onions were cleaned, trimmed and sliced crosswise thinly. I used prepacked shredded Parmesan cheese today.
.JPG "Skillet Ham & Rice")
HOW TO MAKE SKILLET HAM & RICE
This was very quick and easy to make which really appealed to my post-holiday lazy streak!
Heat the oil in a large non-stick skillet. Add the onion and mushrooms and cook over medium high heat until tender.
Stir in the ham, ground pepper, chicken stock and water. Bring to the boil. Stir in the rice.
Reduce the heat to a simmer. Cover and cook until the rice is tender. This will take about 5 minutes.
Fluff the cooked rice with a fork. Scatter cheese and spring onion over top and serve immediately.
.JPG "Skillet Ham & Rice")
The ease and speed of preparation for this dish really appealed to me as did the size. Only feeding two people it was the perfect size for me to enjoy today and then the leftovers tomorrow.
If you wanted to you could bulk it out with some cooked vegetables. Peas and carrots would be nice as would chopped cooked broccoli. These would also add a nice pop of color.
.JPG "Skillet Ham & Rice")
Another thing I loved was that it was a dish that was very low in fat. And aren't we all looking for dishes that are that little bit lower in fat in the month of January. Also if you use low sodium chicken stock and ham, you can watch your salt intake.
I did not use any salt in the recipe, but I seldom do these days and I am quite used to there not being any salt. You need to add salt according to your taste, but do remember ham can be quite salty.
Altogether this was a really tasty, quick and easy supper. All you need on the side is a salad or something similar. Perhaps a cooked vegetable. Quick, easy, delicious and sized for two. This works for me!!
.JPG "Skillet Ham & Rice")
Are you a fan of cooking for two? An empty nester or singleton like myself? If so, you might also enjoy the following recipes which are tailored just for two.
CLASSIC POT ROAST FOR TWO - You might think Pot Roast would be off the menu if you are a smaller family. Who wants to be eating pot roast all week. This tasty version is sized perfectly for two people to enjoy one main meal and then some leftovers the next day. It's delicious, and includes potatoes, carrots and a delicious gravy.
WHITE CHICKEN CHILI FOR TWO - This is one of my absolute favorite chicken dishes. I am a huge fan of Tex-Mex Flavors. I have a real love of all of it, tacos, chili, enchiladas, etc. It all pleases me beyond belief. Tender pieces of chicken, white beans, and corn in a rich and delicious green chili sauce. With a bit of sour cream on top and some grated cheddar this always goes down a real treat!
Yield: 2
Skillet Ham & Rice
Prep time: 5 MinCook time: 20 MinTotal time: 25 Min
This is a delicious combination of ham, rice and mushrooms. Quick, easy and fabulously tasty!
Ingredients
- 1 tsp olive oil
- 1 medium onion, peeled and chopped
- 1 cup sliced fresh mushrooms (about 7 or 8 medium mushrooms)
- 1 cup cubed fully cooked ham
- 1/8 tsp black pepper
- 1/2 cup (120ml) chicken stock
- 1/4 cup (60ml) water
- 3/4 cup (69g) uncooked instant rice
- 2 spring onion, washed trimmed and sliced
- 2 TBS shredded Parmesan Cheese
Instructions
- Heat the oil in a large non-stick skillet. Add the onion and mushrooms and cook over medium high heat until tender.
- Stir in the ham, ground pepper, chicken stock and water. Bring to the boil. Stir in the rice.
- Reduce the heat to a simmer. Cover and cook until the rice is tender. This will take about 5 minutes.
- Fluff the cooked rice with a fork. Scatter cheese and spring onion over top and serve immediately.

Thanks so much for visiting. Do come again!
Subscribe to:
Posts (Atom)



Social Icons