


One thing which I am really going to miss here in Canada is the beautiful fish that I had access to in the UK. I am sure that I will be able to source some somewhere, but so far haven't really been able to.
I used to get my fish in the UK from an online fish monger and their products were excellent. I was always really happy with what I received.

I was spoilt for choice when it came right down to it. I truly was. Salmon, Cod, Halibut, shell fish, etc. Everything I ever received was truly beautiful!
I did find some frozen cod loins in the Superstore the other day. Two in a package, the photograph on the outside looked promising, and I am happy to say that what was inside was not in the least bit disappointing.

They were lovely and thick and wild sourced, which is what I look for when it comes to fish. Wild sourced fish is superior in flavor to farmed.
I have been waiting for just the right moment to cook it and today was the day. It was raining cats and dogs outside. The remnants of that hurricane which is blowing through. We are really blessed in the Valley I live in. We don't really get much in the way of extreme weather.

This recipe today is for a delicious Lemon Butter Cod, with Asparagus and Orzo pasta. It is a lovely recipe, all cooked in one pan. No fuss no muss and perfectly sized for two people.
The cod loins came individually wrapped and frozen in a small sealed bag, which is perfect for thawing out your fish. I just took the bag of fish and popped it into a pan of cold water and within an hour had a perfectly thawed piece of fish.

One thing to note when you are cooking fish, especially nice fish like this, is that there are two sides. I know, duh. Hear me out.
One side is called the presentation side, or the side that you will want to place right side up on the serving plate.

This is the best looking side of the fish, the other side will not be quite as attractive, or be flat, etc. The domed side is usually the presentation side.
You will need to dust your fish with some seasoning and salt and pepper before browning it to perfection in a bit of light olive oil over medium high heat.

You can add the fish as soon as the oil starts to shimmer. Be careful that the oil is not too hot or the fish will over cook on the outside but still be raw on the insides.
Three minutes on both sides, for fish that is about 1 inch thick, is the perfect amount of time needed to cook the fish to perfection. You will end up with tender, moist fish that flakes beautifully and is not dry in the least.

Take the fish out and keep it warm under a sheet of foil on a plate while you cook the remainder of the recipe.
Fresh slices of lemon are added to the pan along with some butter and browned quickly on both sides, before removing them to sit with the fish.

This helps to flavor the remainder of the dish and also provides for a delicious garnish with the finished dish.
Next you will be adding cuts of asparagus, some garlic and dry orzo pasta to the pan. Cooking and stirring until the garlic gets really fragrant and the orzo begins to brown.

Finally some chicken stock and a bit of lemon juice is added. The mixture should be cooked at a slow boil, stirring frequently, until the orzo is al dente.
It will take about 10 minutes altogether.

At the end of that time you can add the fish back to the pan along with the lemon and any accumulated juices.
It only needs to heat through. A final dusting of dill weed and your dinner is served!

It truly is delicious. I love all in one meals like this where everything cooks all in one pan. Only one pan to wash up.
Food doesn't get much better than this. You can serve extra lemon with this for squeezing over top if you wish, and if you are really lucky and have fresh dill, you can simply garnish it with a few springs of the fresh dill.

I am a person who really loved cod and haddock, well any mild flavored white fish really. I do like salmon also, but to a lesser degree.
Some of my favorite fish recipes are:
Gremolata Baked Cod - Oven baked cod loins with a crisp gemolata breadcrumb topping. Quick, easy and delicious.

Pan Fried Cod - my favorite. Cod loins pan fried in butter with some fresh sprigs of thyme.

Lemon and Garlic Butter Baked Cod - This involves seasoning the fish and popping it into a baking dish. You can butter the baking dish if you wish, but I never do. Spooning a simple lemon, olive oil and garlic sauce over top, dotting it with cold buter nd a few lemon slices and then baking it to perfection.
Cod Fillets with Chili and Lime - moist, flaky and beautifully flavored. Quick and easy too. But the again most fish cooks very quickly.

So there you have it, fish for Friday with a beautiful all-in-one dish of cod, asparagus and orzo pasta. All beautiful flavored with lemon and garlic.
Fish for Friday never tasted so good!
Lemon Butter Cod
Yield: 2
Prep time: 10 MinCook time: 20 MinTotal time: 30 Min
This simple dish of pan fried cod with lemon, asparagus and orzo pasta is perfectly delicious!
Ingredients
- 1 TBS light olive oil
- 2 (6 ounce) wild cod loin fillets
- fine sea salt and freshly ground black pepper to taste
- 1 1/2 TBS all purpose flour
- 1 TBS butter
- 1 small lemon sliced
- 1 small clove of garlic, peeled and grated
- 8 spears of asparagus, washed, trimmed and cut into 1 inch pieces
- 1/2 cup (60g) of uncooked orzo pasta
- 1 1/3 cups (320ml) chicken stock
- 1/2 TBS lemon juice
- dried dill weed to sprinkle on top
Instructions
- Heat the oil in a heavy bottomed skillet over medium high heat. Season the fish all over and dust with the flour.
- Once the oil begins to shimmer, add the fish, presentation side down. Cook for three minutes. Carefully turn over and brown on the other side, another 3 to 4 minutes.
- Remove from the pan to a place, lightly tent and keep warm.
- Add the butter to the skillet and then add the lemon slices as soon as it begins to foam. Brown the lemon for one minute each on both sides. Remove from the pan to the plate with the fish and keep warm.
- Add the garlic, asparagus cuts, and orzo to the pan drippings. Cook, stirring until the garlic is very fragrant and the orzo begins to brown. Add the chicken stock and lemon juice.
- Increase the heat to high and cook, stirring occasionally until the orzo is just al dente, about 10 minutes.
- Return the fish to the pan, along with the lemon slices and any collected juices. Heat through. Sprinkle with some dill weed and serve immediately.


This cheesy, creamy broccoli and cauliflower casserole makes the perfect side dish for any meal and it is perfectly sized for just two people! What's more it uses no cream soup.
Instead the creamy cheesy sauce is made completely from scratch. You get crispy tender cauliflower and broccoli florets, in a rich, yet simple sauce, topped with a buttery cheesy crumb.

Broccoli and Cauliflower are two of my favorite vegetables, making this one of my favorite vegetable casseroles! Combine that with simple methods and ingredients, and you are on to a real winner here!
In fact I love this so much, I often eat it as my main course. Because, although it is sized for two people, they are very generous servings.

Broccoli and Cauliflower were not vegetables that we ever had in our home when we were growing up. Largely because my father was not overly fond of them, and also because they were not as readily available then as they are now.
I am sure I eat one or the other of them at least two or three times a week, usually broccoli. Over in the UK we had tender stem broccoli as well as purple sprouting broccoli. I have not seen those here yet, so I expect they are not available.

I think I was rather spoilt in the UK as far as what was available to me to use food-wise. I sort of took it for granted I'm afraid.
With the UK being the gateway to Europe we were blessed to have some of the nicest produce, cheeses, and meats available to us. People like to complain about English food, but really, I never found there to be anything to complain about!

I still have yet to find Parmesan cheese that I can grate myself. Maybe I am not looking in the right places. I am sure it is much easier in larger urban centers.
I love in a very small somewhat rural area, with a small population. The shops tend to get in only what sells. And obviously people are more than content to use already grated cheeses.

Thank goodness I do have more to use than the Parmesan in the green plastic container! That is a blessing in and of itself. But I still have only ready grated to use. Sigh . . .
Oh how I miss the smell of freshly grated Parmesan and having Parmesan rinds to add to my soups and sauces. Oh well, such is life and there are a great many other blessings I do have to enjoy.

I am really enjoying fresh local vegetable season. I frequent a farmer's market close to my home called Gouchers and they have beautiful fruits, vegetables and even eggs, jams, jellies, and frozen meats, etc. raised and produced by local farmers.
I have never been disappointed. I bought my bean bacon there the other week to make my homemade beans and it was lovely. Home smoked.

This week I bought this broccoli and cauliflower to use in this tasty and easy cheesy broccoli cauliflower casserole.
You will need to steam your vegetables. This is very easily done in a steaming basket over boiling water. It will take about 6 minutes to get the proper crispy tender.

Alternately you can boil them, which won't take quite as long, but you will really have to drain them well so your casserole doesn't end up watery. There is nothing more unpalatable than a watery vegetable casserole.
The creamy cheesy sauce is also very easy and quick to make. I have given instructions on how to make it in a saucepan, but truth be told, I normally do it in the microwave.

In a saucepan, if you have the burner temperature turned too high, you can end up with a sauce that scorches on the bottom if you aren't careful. You need to be constantly stirring it or else it will catch.
In the microwave there is not that problem. First I melt the butter in a large glass beaker, and then whisk in the flour. Microwave it again for 30 seconds, I then slowly whisk in the butter.

Return to the microwave and cook for about 3 minutes on high, whisking the sauce every 30 seconds. Cook only until the sauce bubbles and begins to thicken.
Do keep a close watch on it and make sure you use a large enough beaker to cook it in as milk doubles in size very quickly once it boils!

Once the sauce is thickened you can slowly whisk in the remaining ingredients. I add the cheddar a bit at a time, whisking it in with each addition until it melts into the sauce. If you think your sauce is too thick, you can add a bit more milk, or cream if you want a really rich sauce.
Once you have your sauce cooked, you can fold it together with your vegetables, working gently until everything is combined and then pour the whole lot into a buttered baking dish.

That crispy topping is this tasty casserole's crowning glory! Its crispy and buttery and cheesy. Nothing complicated about it. Its just panko, melted butter and grated parmesan.
You could also use regular dry bread crumbs or even cracker crumbs. I use panko because I always have it in my kitchen, but really, just use what you have. Cornflake crumbs also work.
That's the fun thing about cooking. I like to use simple ingredients that can easily be switched out if need be.
I pride myself on always cooking a delicious and edible meal and this tasty casserole can be just that or at the very least a part of that! It goes really well with chicken, fish and pork. Heck, it goes really well with anything!
Broccoli and Cauliflower Casserole
Yield: 2
Prep time: 15 MinCook time: 30 MinTotal time: 45 Min
Cheesy, creamy broccoli and cauliflower casserole, perfectly sized for two people. A crunchy butter topping adds extra texture!
Ingredients
- 1/2 pound (226g) cauliflower florets
- 1/4 pound (113g) broccoli florets
- 1 TBS butter
- 1 TBS flour
- 1 cup (240ml) milk
- 2 TBS cream cheese
- 1/4 tsp garlic powder
- 1/4 tsp onion powder
- pinch black pepper
- pinch salt
- 1/2 cup (60g) grated sharp cheddar cheese
For the topping:
- 30g (1/4 cup) panko bread crumbs
- 1/2 TBS butter, melted
- 2 TBS grated Parmesan cheese
Instructions
- Preheat the oven to 375*F/ 190*C/ gas mark 5. Butter a small shallow casserole dish or a 9 inch glass pie plate. Set aside.
- Mix all of the ingredients for the bread crumb topping together and set aside.
- Steam the broccoli and cauliflower in the basket of a steamer until al dente, about 6 minutes. Set aside.
- Melt the butter in a saucepan. Whisk in the flour and cook for about a minute. Slowly whisk in the milk, whisking constantly. Cook over medium heat, whisking constantly until the mixture bubbles and thickens. Whisk in the cream cheese, onion and garlic powders and seasoning. Gradually add the cheddar, whisking well after each addition.
- Remove from the heat. Fold in the vegetables and turn the mixture into the prepared baking dish. Sprinkle the crumb evenly mixture over top.
- Bake in the preheated oven for 25 to 30 minutes, until golden and bubbly. Let stand for five minutes then serve.


Today I am sharing a lovely old-fashioned date cookies recipe, which is one of my absolute all time favorite recipes! It won't be long now before school starts up again and what better time to share a cookie recipe than now!
This recipe for date drop cookies is one which I have been making for years and years. No surprise, we are great date lovers in my family. We cannot resist anything with dates in it!

Simply put, we love dates and anything that contains dates, which is good news really as dates are incredibly healthy. Known as "nature's candy," they are filled with loads of nutrients and dietary fiber.
One thing which I have always loved is putting date syrup on my granola and yogurt in the mornings. I haven't been able to find any here just yet, but I live in hope! It was something I always kept in my larder back in the UK.

I may even resort to making my own, so watch this space!
When I was growing up we always loved it when our mother would make us Date Squares. She usually only made them at Christmas time and they were a real treat.
The recipe she used was my Great Aunt Orabelle's recipe, which was her mother's recipe. You can find the small batch recipe for those bars here. You can also find the full recipe here.

I also have a recipe for my sisters Raw Date Squares on site. You can find that recipe here, and I don't mind saying that they are pretty darned delicious and healthy as well.
One of the nicest date things I have ever tasted was when I went to the Borough Food Market in London, England. One stand had chocolate covered dates. OH MY GOODNESS! They were the best things ever! I have been dreaming about them ever since!


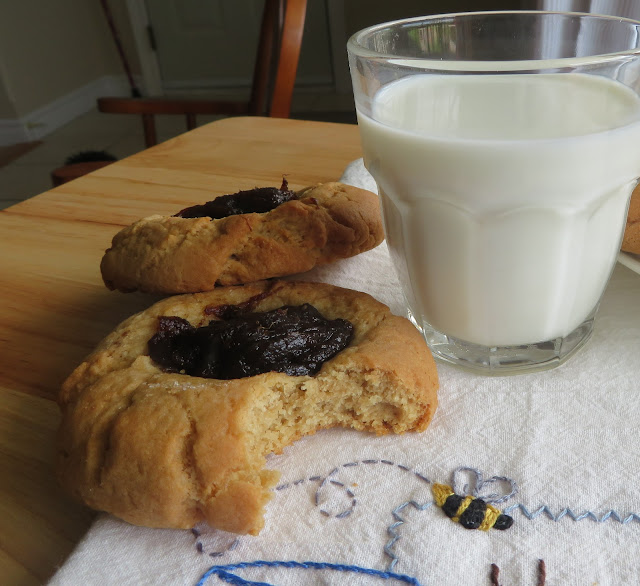
Dangit! Now I am sitting here wishing I hadn't small batched the recipe. haha I could easily eat a full recipe of these delicious cookies all by myself, but then again, there is nothing to stop me from baking this small batch recipe again, and again . . . and again!

But I digress, back to these cookies. After all, that's why you are here.
You begin by making a lush date filling. Its actually really easy to make and uses only dates, water and a tiny bit of sugar. Make sure you pit your dates before weighing/measuring them.

Its really easy to cut your dates into bits using kitchen scissors. That is my preferred method. I usually cut each date into at least quarters. Just mix it with the water and sugar and then bring to the boil, then simmer until the dates melt into the water and you end up with a lovely thick, smooth mixture.
You will need it to cool before you proceed.

The cookies themselves are a pretty basic brown sugar drop cookie. You begin by creaming brown sugar and butter together.
I always use room temperature butter in my cookies. It blends perfectly. You could soften refrigerator cold butter in the microwave, but do not let it melt. Melting the butter would mess with the integrity of your cookie.

As you can see these are a really nice sized cookie. Not too big and not too small.
You drop the cookie dough onto a lined baking sheet, make a slight hollow in the center and then fill the hollow with some of the date filling. Easy peasy lemon squeasy.

These cookies are the perfect "milk and cookie" cookie! Just right for afterschool snacks, or for popping into lunch bags.
They also freeze really well, either baked or unbaked. To freeze them unbaked, just prepare them to the point of baking and pop the baking tray into the freezer. Once the filled cookies are frozen solid, transfer them to an airtight freezer container, with some wax paper in between the layers.

They can be frozen this way for up to six months. When you are ready to bake them, just pop them out of the freezer and leave them at room temperature for about an hour and bake as per the recipe.
You can also bake them and freeze them after baking. Again, freeze in a single layer and then pop into freezer containers, with some wax paper in between to keep them from sticking to each other.

One thing I have learned through the years is that freezing cookies is not a deterrent to keep me from eating the cookies. I like frozen cookies just as much as regular cookies!
Yes, I am a huge glutton. I remember one year when the children were growing up I had to do my Christmas baking twice. I thought I would get a heads up on the holidays and get started early and freeze them. You can guess the rest! 😁

You needn't limit yourself to filling these with the date filling. You can also fill these with jam or marmalade, or apple jelly. All are delicious!
You can also substitute the dates with chopped dried figs for another variation on the theme. As well you can use chopped dried apricots, raisins, or even a combination of dried fruits.

Fresh cookies are the best, don't you think? What's your favorite kind of cookie? I really want to know!
 Tahitian Coconut Breakfast RollsThis content (written and photography) is the sole property of The English Kitchen. Any reposting or misuse is not permitted. If you are reading this elsewhere, please know that it is stolen content and you may report it to me at: mariealicejoan at aol dot com
Date Filled Drop Cookies (small batch)
Yield: Make 12
Prep time: 20 MinCook time: 12 MinTotal time: 32 Min
These soft brown sugar drop cookies are topped with a lovely sweet and sticky date filling. Everyone loves these! They are beautiful with a cold glass of milk.
Ingredients
For the filling:
- 4 ounces dried pitted dates, chopped
- 3 fluid ounces water
- 1/8 cup sugar
For the cookie batter:
- 1/4 cup (60g) butter, at room temperature
- 1/2 cup (100g) soft light brown sugar, packed
- 1 large free range egg yolk, freeze the white for another use
- 2 TBS warm water
- 1/2 tsp vanilla
- 1 cup (140g) plain all purpose flour
- 1/3 tsp baking soda
- pinch salt
Instructions
- First make the filling. Put all of the ingredients into a sauce pan over medium heat. Bring to the boil. Reduce the heat to low and simmer, stirring often, until the mixture is fairly smooth and thick. Set aside to cool.
- Preheat the oven to 350*F/180*C/ gas mark 4. Line a large baking sheet with some baking paper and set aside.
- Cream together the butter and sugar until light and fluffy, using an electric hand mixer. Beat in the water, egg yolk and vanilla. Whisk together the flour, salt and soda. Beat this into the creamed mixture until thoroughly combined.
- Scoop the mixture into 12 equal portions on the baking sheet, leaving at least two inches in between each.
- Using the back of a wet teaspoon, make a small hollow in the center of each cookie. Spoon 1 teaspoon of the date filling into each hollow.
- Bake in the preheated oven for 10 to 12 minutes until golden brown. Remove to a wire rack to cool completely before eating.

Subscribe to:
Posts (Atom)





Social Icons