


This Chicken Pot Pie Casserole is loaded with plenty of tender pieces of chicken and vegetables encased in a rich homemade sauce and topped with a buttery, flakey homemade buttermilk biscuit topping.
And its perfectly sized for just two people. Why should only large families get to enjoy meals like this???

I am on a mission to small batch as many recipes as I can for my readers. The reality is that more and more people are finding themselves in smaller households, where there may only be one or two people in the family.
I, myself, am a singleton. I was finding that I was having to throw away far too much food because it just wasn't getting eaten. I hate waste.
.JPG "Chicken Pot Pie Casserole")
But I also happen to enjoy good food. I don't want to relegate myself to eating small single sized frozen dinners. Not only are they expensive for what you are getting, but the truth is not very many of them taste very good!
Why settle for less than you have to, especially when you can very easily create delicious smaller sized meals for the smaller sized family.
.JPG "Chicken Pot Pie Casserole")
This delicious and hearty casserole not only makes great use of leftover cooked vegetables, but it also uses leftover cooked chicken.
The fabulous sauce/gravy is completely made from scratch and is beautifully flavored with herbs. The buttermilk biscuit topping is also made completely from scratch.
.JPG "Chicken Pot Pie Casserole")
This is a winner all round!
.JPG "Chicken Pot Pie Casserole")
WHAT YOU NEED TO MAKE CHICKEN POT PIE CASSEROLE FOR TWO
There is nothing outrageously out of the ordinary here. Simple wholesome ingredients put together in a most delicious way.
For the gravy:
- 1 1/2 TBS butter
- 1 1/2 TBS flour
- 1/4 tsp fine sea salt
- 1/4 tsp pepper
- 1/4 tsp celery salt
- 1/4 tsp garlic powder
- 1/4 tsp onion powder
- 1/4 tsp summer savory (can use marjoram)
- 1/4 tsp thyme
- 1/4 tsp parsley flakes
- 3/4 cup (180ml) whole milk
- 3/4 cup (180ml) chicken stock
.JPG "Chicken Pot Pie Casserole")
For the filling:
- 1 cup (140g) diced cooked chicken meat
- 1 cup (142g) cooked mixed vegetables (I used carrot, peas, corn, green beans, swede and shelled edamame)
For the biscuit topping:
- 1 cup (140g) plain all purpose flour
- 1/2 TBS sugar
- 1/4 tsp bicarbonate of soda
- 1 tsp baking powder
- 1/4 tsp salt
- 1/2 cup ice cold buttermilk
- 4 TBS butter, melted
- butter to brush on top
.JPG "Chicken Pot Pie Casserole")
It might look like a long list of ingredients, but in reality it is mostly herbs and seasonings when it comes to the sauce. It is a very simple béchamel composed of chicken stock and milk. It is rich. You could also use leftover gravy in its place if you happen to have any.
I cooked the vegetables myself. I used about 2 TBS of each, diced carrot, diced swede (rutabaga), frozen peas, frozen corn, frozen cut green beans and frozen shelled edamame. You could also use an equivalent amount of frozen mixed vegetables thawed.
.JPG "Chicken Pot Pie Casserole")
HOW TO MAKE CHICKEN POT PIE CASSEROLE FOR TWO
Melt the butter for the sauce in a saucepan. Whisk in the flour. Cook for one minute and then add all of the herbs and seasonings, combining well. Slowly whisk in the milk and chicken stock.
Cook, whisking constantly, until the mixture bubbles and thickens. Keep warm. (You want to keep this warm so that when you place the biscuit dough on top it cooks on the bottom without becoming soggy.)
Preheat the oven to 425*F/220*C/gas mark 7. Butter a small casserole dish. (Mine is a shallow 6 by 8 inches in size.)
.JPG "Chicken Pot Pie Casserole")
Toss the chicken and vegetables together in the casserole dish.
Sift the flour together with the sugar, salt, baking powder, and baking soda into a bowl. Stir together the cold buttermilk and melted butter. Add this all at once to the flour mixture. Stir until the mixture pulls away from the side of the bowl and the flour is incorporated. The dough should be stiff and not wet. If it is, add more flour (1/2 TBS at a time).
Tip out onto a lightly floured surface. Knead gently a couple times and then pat out into a small rectangle, 1 1/2 -2 inches tall, and 4 inches or so square. Cut into four squares using a very sharp knife.
.JPG "Chicken Pot Pie Casserole")
Pour the hot sauce over top of the chicken and vegetables in the casserole dish allowing it to sink through to the bottom. Place the biscuit squares on top of the filling and brush lightly with butter.
Place the casserole dish on top of a small baking tray and pop into the preheated oven. Bake for 20 to 25 minutes until the filling is bubbling and the biscuits are golden brown.
.JPG "Chicken Pot Pie Casserole")
If you are a smaller family, you may be interested in some of my other main dishes which I have downsized to feed one or two people.
SAVOURY GARLIC CHICKEN - With its delicious white wine and garlic sauce, this recipe takes the humble chicken breast to a special level of tastiness. Fabulous served with some rice and a vegetable on the side.
CLASSIC POT ROAST FOR TWO - This fabulous pot roast lacks nothing in comparison to its full sized counterpart. Delicious gravy, tender meat and just enough for two people as a first meal and some leftover roast to make a hash or some such the day after.
EASY CHICKEN PARM FOR TWO - Deliciously tender and flavour filled crisp coated chicken breasts, baked atop a flavourful mix of spaghetti and marinara, and topped with oozing mozzarella and Parmesan cheeses.
.JPG "Chicken Pot Pie Casserole")
This was fabulous. I enjoyed it hot from the oven with a tasty salad on the side. The other half was packed into an airtight freezer container and frozen for a future date.
To eat it then I will thaw it overnight in the refrigerator and then pop it into a casserole dish, reheating it for about 20 minutes in a moderate oven. (350*F/180*C)
It so much better to have something like this in the freezer to eat than a frozen ready-made dinner. That's my story and I'm sticking to it!!
Chicken Pot Pie Casserole for Two
Yield: 2
Prep time: 20 MinCook time: 25 MinTotal time: 45 Min
Tender pieces of chicken in a lush gravy along with plenty of vegetables and topped with flaky butter biscuits. Why should only large families get to enjoy delicious things like this!
Ingredients
For the gravy:
- 1 1/2 TBS butter
- 1 1/2 TBS flour
- 1/4 tsp fine sea salt
- 1/4 tsp pepper
- 1/4 tsp celery salt
- 1/4 tsp garlic powder
- 1/4 tsp onion powder
- 1/4 tsp summer savory (can use marjoram)
- 1/4 tsp thyme
- 1/4 tsp parsley flakes
- 3/4 cup (180ml) whole milk
- 3/4 cup (180ml) chicken stock
For the filling:
- 1 cup (140g) diced cooked chicken meat
- 1 cup (142g) cooked mixed vegetables (I used carrot, peas, corn, green beans, swede and shelled edamame)
For the biscuit topping:
- 1 cup (140g) plain all purpose flour
- 1/2 TBS sugar
- 1/4 tsp bicarbonate of soda
- 1 tsp baking powder
- 1/4 tsp salt
- 1/2 cup ice cold buttermilk
- 4 TBS butter, melted
- butter to brush on top
Instructions
- Melt the butter for the sauce in a saucepan. Whisk in the flour. Cook for one minute and then add all of the herbs and seasonings, combining well. Slowly whisk in the milk and chicken stock.
- Cook, whisking constantly, until the mixture bubbles and thickens. Keep warm.
- Preheat the oven to 425*F/220*C/gas mark 7. Butter a small casserole dish. (Mine is a shallow 6 by 8 inches in size.)
- Toss the chicken and vegetables together in the casserole dish.
- Sift the flour together with the sugar, salt, baking powder, and baking soda into a bowl. Stir together the cold buttermilk and melted butter. Add this all at once to the flour mixture. Stir until the mixture pulls away from the side of the bowl and the flour is incorporated. The dough should be stiff and not wet. If it is add more flour (1/2 TBS at a time).
- Tip out onto a lightly floured surface. Knead gently a couple times and then pat out into a small rectangle, 1 1/2 -2 inches tall, and 4 inches or so square. Cut into four squares using a very sharp knife.
- Pour the hot sauce over top of the chicken and vegetables in the casserole dish allowing it to sink through to the bottom.
- Place the biscuit squares on top of the filling and brush lightly with butter.
- Place the casserole dish on top of a small baking tray and pop into the preheated oven.
- Bake for 20 to 25 minutes until the filling is bubbling and the biscuits are golden brown.

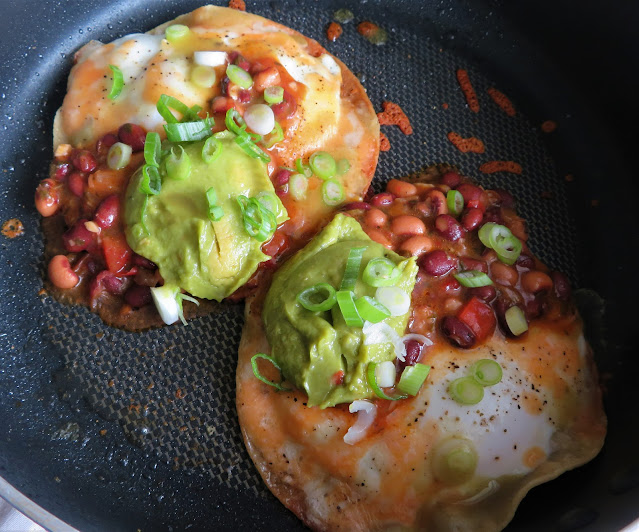

These crispy fried egg tacos are very popular on TikTok at the moment. Quick and easy to make and oh so delicious, there is no surprise there.
They actually remind me of the Crispy Tortilla Eggs that I have been making for just about always. I guess you could call Fried Egg Tacos, Crispy Tortilla Eggs on steroids because they take that simple concept one step further!

What you have here are corn tortillas fried in a bit of oil until crisp and golden brown. A fresh egg gets dropped on top along with some cheese and then they are covered and steamed until the egg is cooked to your liking.
Set whites and slightly runny yolk here folks. You can top the finished tacos as you wish.
.JPG "Fried Egg Taco")
The toppings are where you can really get inventive! Sliced avocado and salsa. Why not!
Today I chose to top mine with Texas Caviar and guacamole. I also added some chopped spring onions and a hefty splash of green Tabasco. (I adore green Tabasco!)
.JPG "Fried Egg Taco")
I was awfully tempted to add a dib dab of sour cream, but decided to leave them as is. I can tell you they were delicious.
You would think that after sharing recipes on here pretty much 365 days a year for over 11 years I would run out of things to share with you, but it just isn't so.
Every now and then I run across something that is so totally delicious that I just have to share it! So it is with these!
.JPG "Fried Egg Taco")
WHAT YOU NEED TO MAKE FRIED EGG TACO
Simple, simple, simple . . .
- 1 TBS canola oil
- 2 (6-inch) corn tortillas
- 2 large free range eggs
- 1/4 cup (30g) cheddar cheese, grated
- 1 TBS water
- salt and black pepper to taste
.JPG "Fried Egg Taco")
To garnish: (Here is where you can go wild!)
- guacamole
- Texas Caviar
- tomato salsa
- chopped spring onion
- green Tabasco sauce
.JPG "Fried Egg Taco")
It goes without saying that you want to use the freshest eggs possible for this dish. My sister and I were lucky enough to find a supplier of fresh free range eggs on the Mount Hanley Road not too far from where I live.
They are not too big at the moment as the hens have just started laying, but they are fabulously tasty eggs. Eggs are one instance where you really do get what you pay for!
.JPG "Fried Egg Taco")
I refuse to support an industry (caged hens) that I find appalling. So long as I can do it I will buy only free range eggs. You need to pick your battles and that is one of mine.
I used corn tortillas, gluten free, that I got at our local Sobey's store. I am sure you could also use flour tortillas, but the corn ones do get lovely and crisp.
.JPG "Fried Egg Taco")
I used grated strong cheddar cheese. The stronger the cheese the better the flavor. You could also use a Tex Mex blend if you were so inclined. Spicy or not.
Texas Caviar. This delicious salsa like mix of beans, tomatoes onions, peppers were a perfect topping. Not unlike Huevos Rancheros, this tasty topping was an excellent choice for topping the finished tortillas.
.JPG "Fried Egg Taco")
In the UK your breakfast eggs are often accompanied with baked beans so I thought why not Texas Caviar. It worked beautifully.
Failing to have fresh avocado in the house I thought . . . why not guacamole! Rich. Creamy. Delicious! With just a bit of spice.
.JPG "Fried Egg Taco")
Finally I added some chopped spring onion and a few splashes of the green Tabasco sauce. I love both of those things on my Mexican eats.
The onions add just a bit of tasty fresh green sharpness and the Tabasco, well a nice mild jalapeno heat that works very well here.
.JPG "Fried Egg Taco")
I now understand all the fuss. (I had wondered.) These were quite simply fabulous! That crisp corn tortilla . . . the egg . . . those toppings. Everything worked together blissfully and deliciously!
Just in time for Cinco De Mayo too. Quick and easy, I highly recommend you give them a go!
Fried Egg Taco
Yield: 1
Prep time: 2 MinCook time: 8 MinTotal time: 10 Min
These go together very quickly and are incredibly delicious. They make a nice breakfast, lunch or light supper!
Ingredients
- 1 TBS canola oil
- 2 (6-inch) corn tortillas
- 2 large free range eggs
- 1/4 cup (30g) cheddar cheese, grated
- 1 TBS water
- salt and black pepper to taste
To garnish: (any or all)
- guacamole
- Texas Caviar
- tomato salsa
- chopped spring onion
- green Tabasco sauce
Instructions
- Add the vegetable oil to a large non-stick skillet and heat it over medium heat. Add the corn tortillas. Cook for 10 to 15 seconds, then carefully flip them over.
- Allow the tortillas to cook over medium heat for 4 to 5 minutes until they are starting to bubble and turn brown on the underside.
- Carefully crack an egg on top of each tortilla. Cover and cook for two minutes. Uncover and scatter the cheese around the eggs, trying to keep as much of the cheese as you can on the tortillas.
- Add the water to the skillet and cover. Cook for a further minute to minute and a half. They are done when the cheese has melted, the whites of the eggs have set, but the yolks are still runny. Season with some salt and black pepper.
- Remove each taco from the skillet onto a plate using a wide spatula. Garnish as desired and serve immediately.
- Enjoy!

Thanks so much for visiting! Do come again!
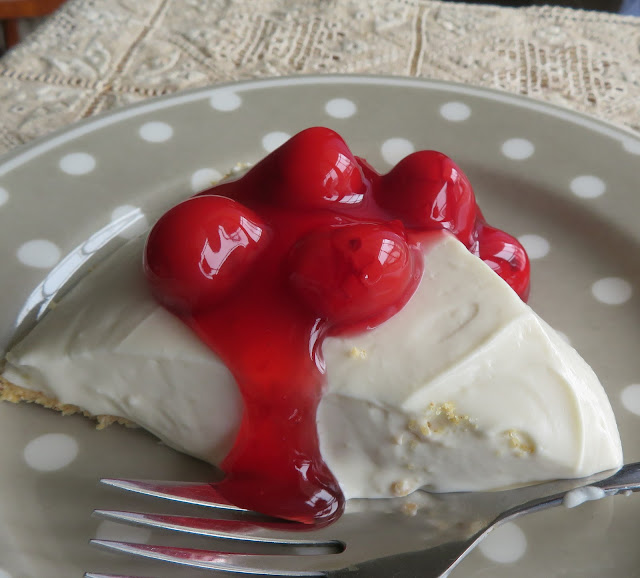

Oh how my mom loved cheesecake. Next to carrot cake and coconut cream pie it was one of her favorite things to eat. One time she asked me if I had a recipe for a simple and easy no bake cheesecake.
I was only too happy to oblige by sharing this easy No Bake Cheesecake recipe with her! I never did get to make it for her in person, but I like to think that she did make it for herself from time to time.
.JPG "No Bake Cheesecake")
That is one thing (amongst many things) that always impressed me about my mother. Although she lived on her own for many, many years, she always did cook a meal for herself almost every day.
If funny now, here I am almost mirroring her situation and living on my own, all alone for the first time in my life! I am gaining an even deeper appreciation for her life and how she lived it. Life does have a way of surprising you!

Before we know it the hot temperatures of summer will be upon us. Another month and we will be complaining that it is far too hot and muggy.
That is when desserts such as this simple one will come in very handy. Desserts where all you have to do is stir a few things together and stick them in the refrigerator to set up!
Quick and easy recipes such as this one are nice to have up your sleeve when you having company over and you want to feed them something tasty without having to break into a sweat!
.JPG "No Bake Cheesecake")
WHAT YOU NEED TO MAKE NO BAKE CHEESECAKE
Just a few simple things and you, too, can make this lush dessert pie/cake!
- 1 9-inch graham cracker pie crust
- 16 ounces (500g) full fat cream cheese, at room temperature (2 large packages)
- 14 ounce can (397g) tin of sweetened condensed milk (not evaporated milk)
- 1/3 cup (40g) full fat dairy sour cream
- 1 tsp vanilla (optional)
To serve (Optional):
- 1 tin of fruit pie filling
- whipped cream

I recognize that in the UK a ready made graham cracker crust will not be readily available. And actually in all truth I much prefer a home made one myself. They are a lot sturdier.
If you want to make your own homemade crust you will need:
6 TBS butter, melted (86g)
1 1/2 cups fine graham cracker crumbs (in the UK 135g Digestives, made into fine crumbs)
1/4 cup fine granulated sugar (50g)
.JPG "No Bake Cheesecake")
Just combine all of the ingredients together with a fork until the crumbs are evenly moistened and press the mixture into the bottom and sides of a 9-inch pie tin, pressing them in evenly. You can chill this for a bit if you like in order for it to set.
I find the homemade crust sets a lot firmer than the store made ones.
Don't use half fat or low fat ingredients for this cheesecake. In for a penny in for a pound. I cannot vouch for whether they will work well or not.
.JPG "No Bake Cheesecake")
When I am talking about sweetened condensed milk here I am talking about what is called condensed milk in the UK. It is thick and very sweet and not to be confused with evaporated milk which is very thin and comes in a much bigger tin!
It does call for sour cream. Again use full fat. It is the sour cream which helps this to thicken and set up. Do NOT be tempted to leave it out. You need the acid from it.
I always enjoy cherry pie filling with my cheesecake. But you can top it with whatever you like. At the Big Scoop they top their cheesecake with whipped cream.
.JPG "No Bake Cheesecake")
HOW TO MAKE NO BAKE CHEESECAKE
The most difficult part of this quick and easy recipe is waiting for it to set up in the refrigerator. I recommend at least three hours for it to do so, and in reality the longer you leave it the better.
Overnight is really good if you can wait that long!
.JPG "No Bake Cheesecake")
Using an electric mixer (hand or stand) beat the cream cheese together until smooth and fluffy, scraping the sides of the bowl occasionally.
Slowly beat in the sweetened condensed milk until everything is smooth and well amalgamated. Stir in the sour cream.
.JPG "No Bake Cheesecake")
Pour the mixture into the prepared pie crust, smoothing the top. Cover and chill in the refrigerator for at least three hours.
Longer is better. Overnight is ideal! (If you can wait that long!)
Cut into wedges to serve along with your favorite fruit filling spooned over top, whipped cream, etc. I love chilled cherry pie filling myself!
.JPG "No Bake Cheesecake")
If you are fond of easy desserts that don't require a whole lot of cooking you might enjoy these ones below:
EASY LEMON REFRIGERATOR DESSERT - If you can use a hand mixer, then you can make this and your family will be so impressed with the end result, they will think you slaved all day! It boasts a base of shortbread fingers, lightly soaked and then topped with a lush lemon filling. I like to spoon jam over top to serve.
EASY BLACKBERRY & LEMON DESSERT - All you need for these are a few simple things. Berries, water, sugar, Greek Yogurt, cream, lemon curd and some crisp meringues. Easy peasy. Not a lot of sugar either. Only 2 TBS, which is quite reasonable.
.JPG "No Bake Cheesecake")
LUSH AND CREAMY LEMON MOUSSE - As simple as folding prepared lemon curd into softly whipped cream . . . that's it! How much easier could you get than that!
LEMON CREAM PIE - This is an all time family favorite and very much requested any time of the year. We all love LOVE this one!
.JPG "No Bake Cheesecake")
So there you have it. A quick and easy dessert for the weekend. I put mine together early this morning and was able to enjoy it by early afternoon. When something goes together as quickly as this, its not a very big hardship to take 15 minutes to put it together.
Your family will surely thank you for your efforts. No need to tell them how very easy it was to make! It can be our little secret!
No Bake Cheesecake
Yield: 8
Prep time: 15 MinInactive time: 3 HourTotal time: 3 H & 15 M
This is a delicious no bake dessert that goes together in 15 minutes. The hardest part of this is waiting for it to chill and set up! It can also be done in individual jars with crumbs on the bottom and fruit filling on top for a quick and easy single serving dessert.
Ingredients
- 1 9-inch graham cracker pie crust
- 16 ounces (500g) full fat cream cheese, at room temperature (2 large packages)
- 14 ounce can (397g) tin of sweetened condensed milk (not evaporated milk)
- 1/3 cup (40g) full fat dairy sour cream
- 1 tsp vanilla (optional)
To serve (Optional):
- 1 tin of fruit pie filling
- whipped cream
Instructions
- Using an electric mixer (hand or stand) beat the cream cheese together until smooth and fluffy, scraping the sides of the bowl occasionally.
- Slowly beat in the sweetened condensed milk until everything is smooth and well amalgamated. Stir in the sour cream.
- Pour the mixture into the prepared pie crust, smoothing the top.
- Cover and chill in the refrigerator for at least three hours. Longer is better.
- Cut into wedges to serve along with your favorite fruit filling spooned over top.

Thank you so much for visiting! Do come again!
Subscribe to:
Posts (Atom)





Social Icons