Pages

  • Contact Me
  • MAKE YOUR OWN (a list of make your own mixes)
  • Recipe Index
  • Privacy Policy
  • Advertising and Disclosure
  • Post Index

Search This Blog

Powered by Blogger.

Social Icons

The English Kitchen

Pages

  • Home
  • About Me
  • Cook Booklets
  • Categories
  • _Kitchen Wisdom
  • _In The Larger and Pantry
  • _Couldn't Live Without
  • _Kitchen Wish List
  • Additional Recipes
  • _Vegetarian
  • _Salads
  • _Breads
  • _Sandwiches

Crispy Herb Turkey Thighs (Air Fryer)

Friday, 3 June 2022

Crispy Herb Turkey Thighs (Air Fryer)


I am a person who just loves Turkey. I could eat it any time, any where, any how!  Living on my own, having a turkey dinner can be somewhat of a challenge because unless I am having company, a turkey is just too much for me to cope with.

When my children (I have five) were growing up, their father and I would often hop over the border to the US and pick up turkeys to put in the freezer. They were cheaper and you could bring back one for every person in the car. Not that we ever did, seven turkeys is a bit much for anyone, but we did always bring back 3 or 4 for the freezer.


Crispy Herb Turkey Thighs (Air Fryer)


I love American turkey. I confess I never had a dry one.  They were always exceptional.  But I digress.  Cooking a whole turkey just doesn't happen for me anymore.


I do often see turkey pieces in the grocery store though and the other day I picked up a package of two turkey thighs, Butterball with the idea in mind that I was going go cook and enjoy them.  I have always loved the dark meat of the turkey most of all! 


Crispy Herb Turkey Thighs (Air Fryer) 


I decided I wanted to cook them in my air fryer.  Who wants to heat up the oven for two turkey thighs?  Not me!


OH, and now the days are warmer, who wants to heat up the oven anyways if you can possibly get away without having to. The air fryer is the way to go! 


Crispy Herb Turkey Thighs (Air Fryer) 


Turkey is such a versatile and flavor filled meat. Why should it be reserved just for the holidays?  I say we should cook it more often. In the UK you could often buy small boneless turkey breast roasts, or turkey steaks, ground turkey, etc.

They don't seem to do that here. The smallest bits I have seen are these bone in thighs, and half breasts. You can also get ground turkey, which makes fabulous turkey burgers. 


I love turkey burgers. I'll choose one of them over a beef burger any day! One of my favorites are these Cheddar and Spinach Turkey Burgers. They are so darned good!  Flavorful and juicy!


Crispy Herb Turkey Thighs (Air Fryer) 


I borrowed this recipe for cooking turkey thighs in the air fryer from a blog called Whole Lotta Yum, and adapted it for use and with dual measurements/temperatures both in North America and in the UK.


I am still really just learning how to use my air fryer and the first time I cook anything in it I like to have some guidance. Her recipe worked very well, with perfect results. 


herbs de provence


I had everything in the kitchen to make the recipe with the exception of Herbs de Provence.  I would not let that little thing stop me however. I simply made my own mixture up.

I love making my own spice and herb blends. I have included the recipe to make your own Herbs de Provence in the recipe notes!  It worked a charm and is so beautifully fragrant. 


Crispy Herb Turkey Thighs (Air Fryer) 


WHAT YOU NEED TO MAKE CRISPY HERB TURKEY THIGHS (AIR FRYER)

Its pretty simple really, aside from the air fryer. You kinda do need one of those, although for sure these could be cooked in the oven. It will just take appreciably longer!! 


  • 2 to 3 turkey thighs (1/2 pound each) skin on, bone in
  • 2 TBS light olive oil
  • 1/4 tsp garlic powder
  • 1/4 tsp salt
  • 1/4 tsp black pepper
  • 1/4 tsp Herbs de Provence (see note)
  • 1 TBS butter, melted


Crispy Herb Turkey Thighs (Air Fryer)


The original recipe called for garlic salt. I don't keep garlic salt in the house, but I do always have garlic powder, so I used half salt and half garlic powder.

As I said, I made my own Herbs de Provence.  I did not use the lavender flowers in the recipe. I confess I am not overly fond of eating lavender. 


Crispy Herb Turkey Thighs (Air Fryer)


She specified olive oil in her recipe. I don't waste extra virgin olive oil in cooking unless I know it is going to make a big difference in the end result flavor-wise. I tend to use light olive oil, which is still olive oil, but not from the first press.

 I save the good stuff for other things. 


Crispy Herb Turkey Thighs (Air Fryer)


HOW TO COOK CRISPY HERB TURKEY THIGHS (AIR FRYER)

I love air fryer cooking. It is so simple and straight forward.  If you follow these instructions and timings you should have perfect results!


Begin by preheating your  air fryer to 370*F/187*C for 5 minutes.

While the air fryer is preheating, whisk the olive oil and all of the seasonings together in a small bowl to combine.

Crispy Herb Turkey Thighs (Air Fryer)


Pat the turkey thighs dry on both sides with some paper kitchen toweling. This will help to get the skin really crispy. Brush them well on both sides with the herbed oil and then place into a lightly oiled air fryer basket, skin side down.

Air Fry for 10 minutes at 370*F/187C. Carefully flip them over. Air fry for a further 15 to 20 minutes until cooked through and the juices run clear. The internal temperature should be at least 165*F/74*C. (180*F/85*C is better and the meat will be even more tender.)

Brush with the melted butter and leave to rest for 10 minutes before slicing and serving.


Crispy Herb Turkey Thighs (Air Fryer)


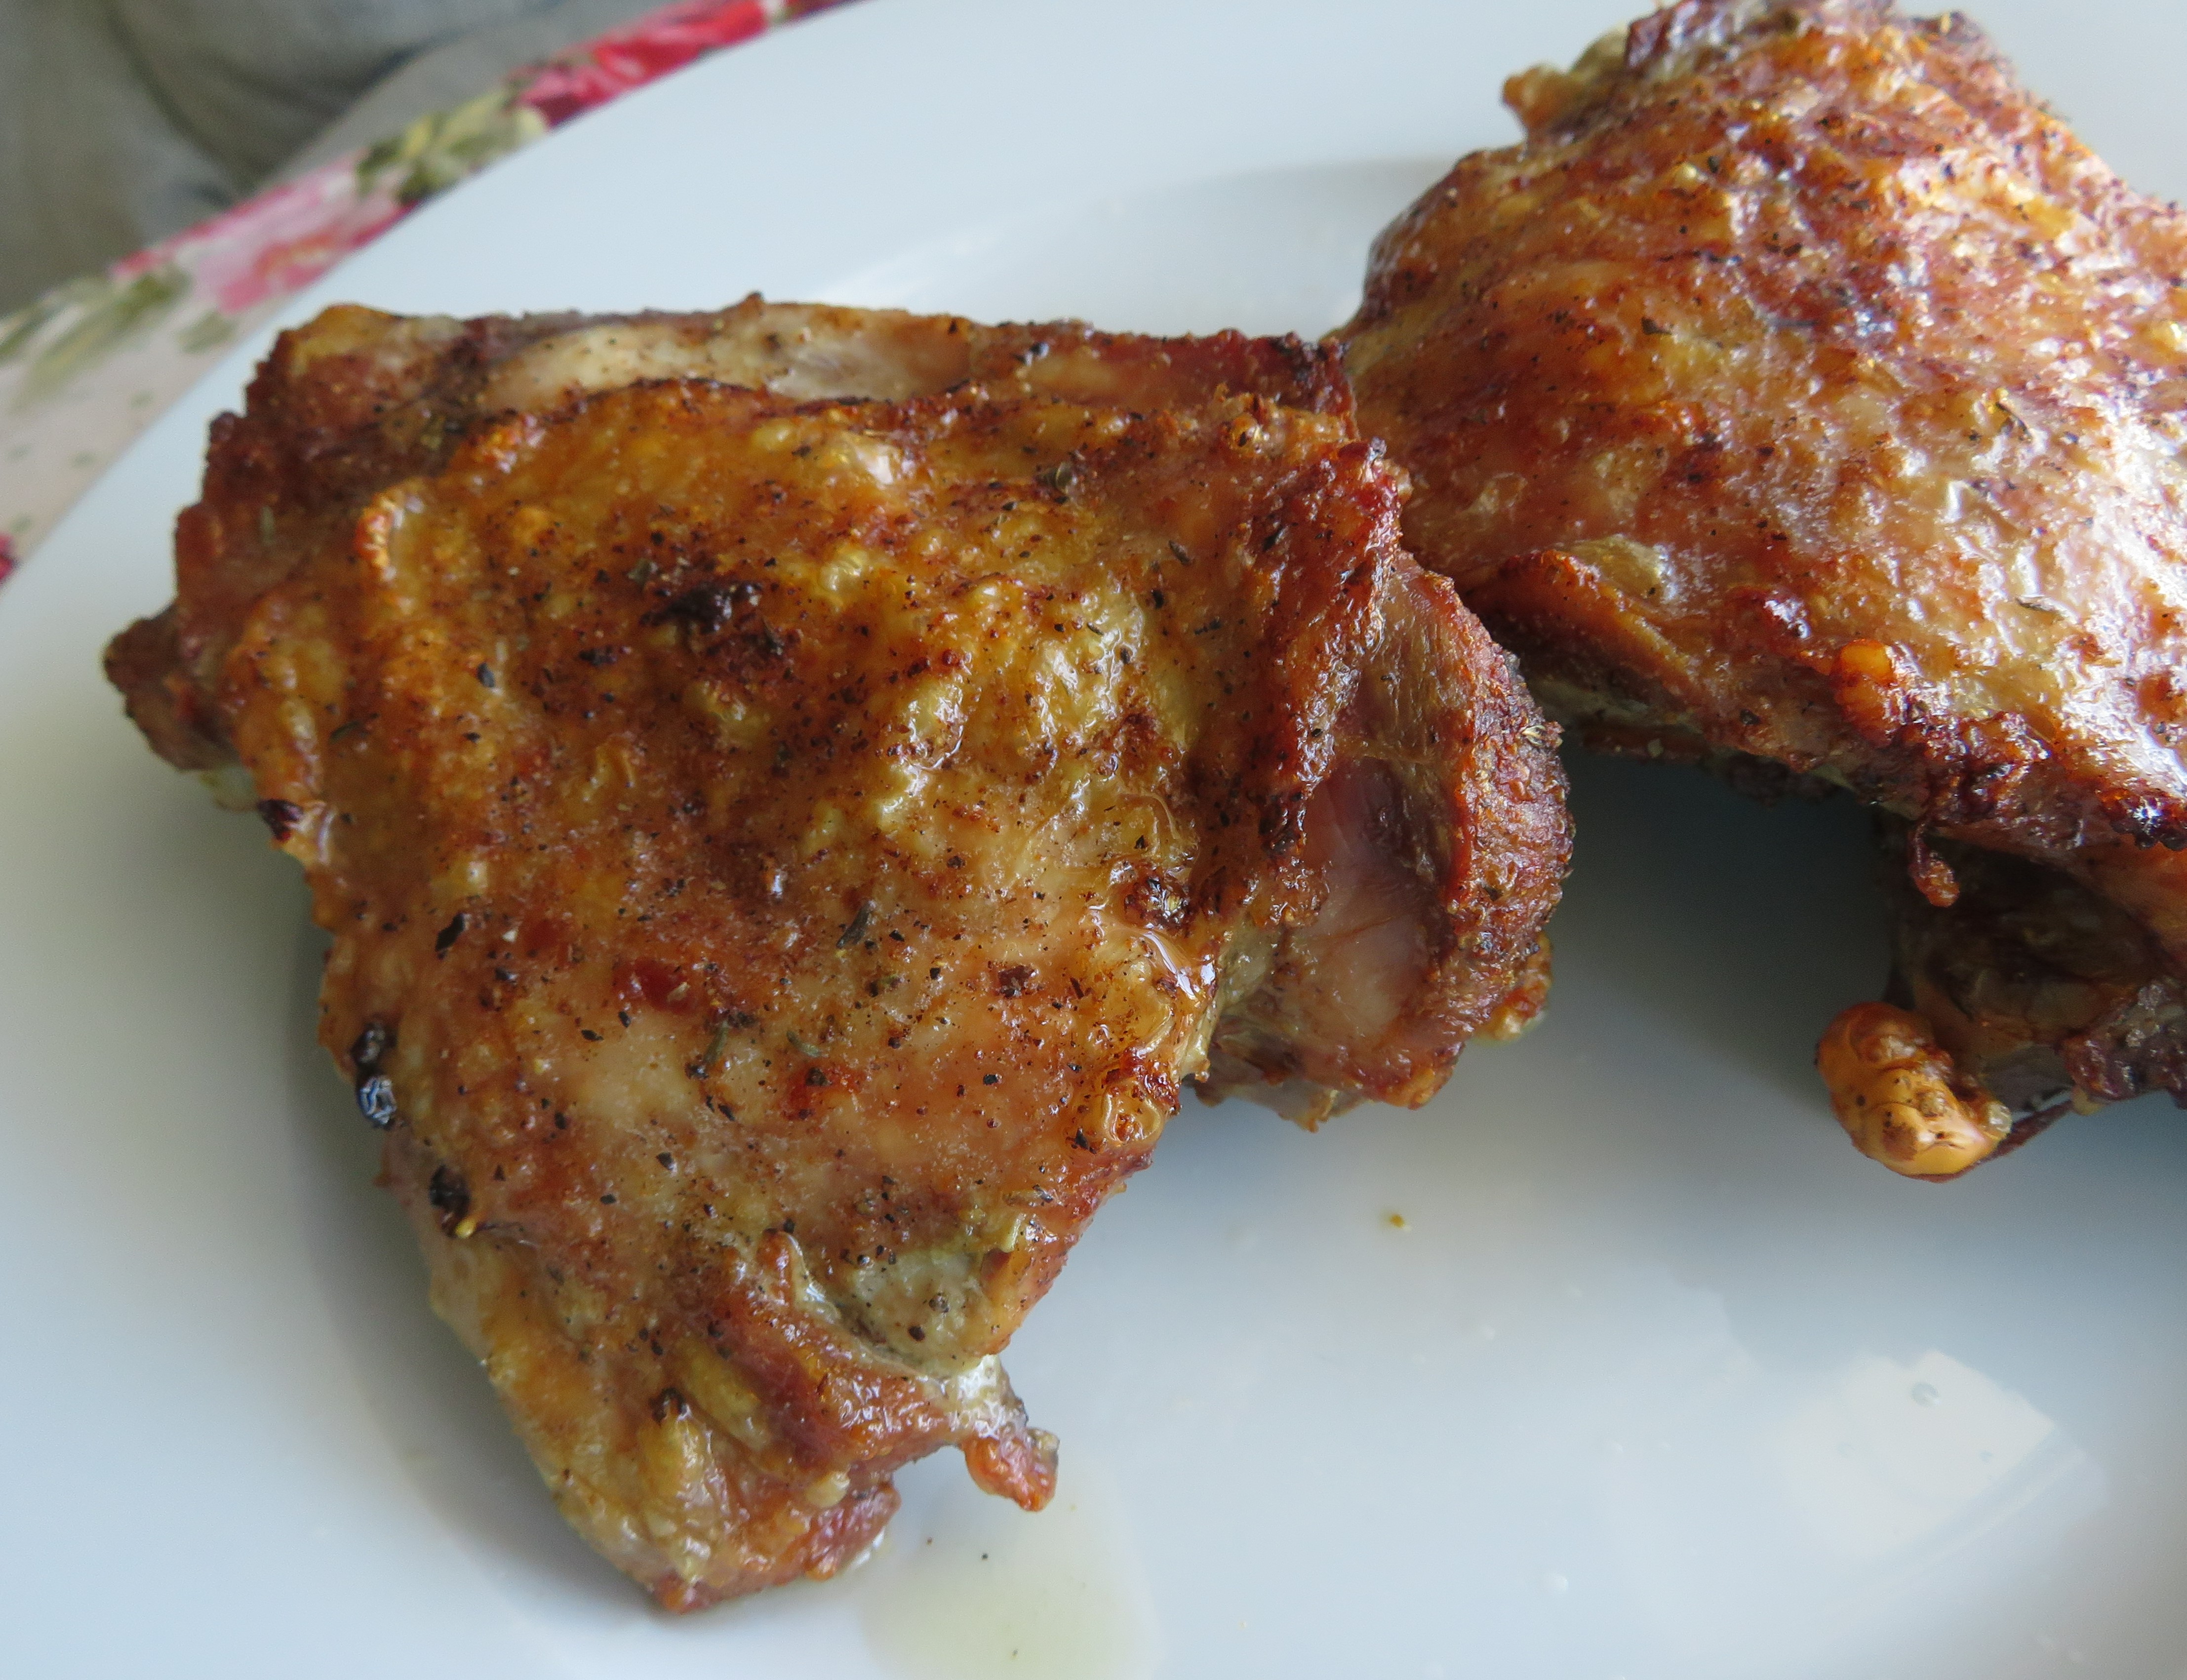
And that's it. Done!  These were so delicious. Succulent and beautifully flavored with a lovely crisp skin. I served them simply with some potato salad and coleslaw for the perfect summer supper.

Of course I did not eat both of them myself. I ate about 2/3 of the smaller one.  The rest I have refrigerated to use in a casserole over the next day or so. Or maybe even a hot sandwich. It all depends on my mood!

I any case I highly recommend cooking turkey thighs in the air cooker. They were excellent!!


Crispy Herb Turkey Thighs (Air Fryer)

Crispy Herb Turkey Thighs (Air Fryer)

Yield: 3 to 4
Author: Marie Rayner
Prep time: 5 MinCook time: 30 MinInactive time: 10 MinTotal time: 45 Min
Crispy skinned, well flavored and super tender inside. Done in a little more than half an hour, not counting resting time. These are fabulously tasty!

Ingredients

  • 2 to 3 turkey thighs (1/2 pound each) skin on, bone in
  • 2 TBS light olive oil
  • 1/4 tsp garlic powder
  • 1/4 tsp salt
  • 1/4 tsp black pepper
  • 1/4 tsp Herbs de Provence (see note)
  • 1 TBS butter, melted

Instructions

  1. Preheat the air fryer to 370*F/187*C for 5 minutes.
  2. Whisk the olive oil and all of the seasonings together in a small bowl to combine.
  3. Pat the turkey thighs dry on both sides with some paper kitchen toweling. This will help to get the skin really crispy. Brush them well on both sides with the herbed oil and then place into a lightly oiled air fryer basket, skin side down.
  4. Fry for 10 minutes at 370*F/187C. Carefully flip them over. Air fry for a further 15 to 20 minutes until cooked through and the juices run clear. The internal temperature should be at least 165*F/74*C. (180*F/85*C is better and the meat will be even more tender.)
  5. Brush with the melted butter and leave to rest for 10 minutes before slicing and serving.

Notes

You can easily make your own Herbs de Province. Take 1 TBS fennel seed and 2 TBS dried rosemary. Grind to a powder in a spice grinder or mortar and pestle. Stir in 1/4 cup dried thyme, 3 TBS dried marjoram, 3 TBS summer savory (optional), 1 TBS dried tarragon, 1 TBS dried basil, 1 tsp dried chervil (optional), 1 tsp dried mint, and 1 tsp dried food grade lavender flowers (optional). Mix well to combine and store in a dark place in an air tight container for up to six months.

Did you make this recipe?
Tag @marierayner5530 on instagram and hashtag it # TheEnglishKitchen
Crispy Herb Turkey Thighs (Air Fryer)


This content (written and photography) is the sole property of The English Kitchen. Any reposting or misuse is not permitted. If you are reading this elsewhere, please know that it is stolen content and you may report it to me at: mariealicejoan at aol dot com 


 Thanks so much for visiting! Do come again! 


 Follow me on Bloglovin
read article

Norwegian Rhubarb Cake

Thursday, 2 June 2022


Norwegian Rhubarb Cake


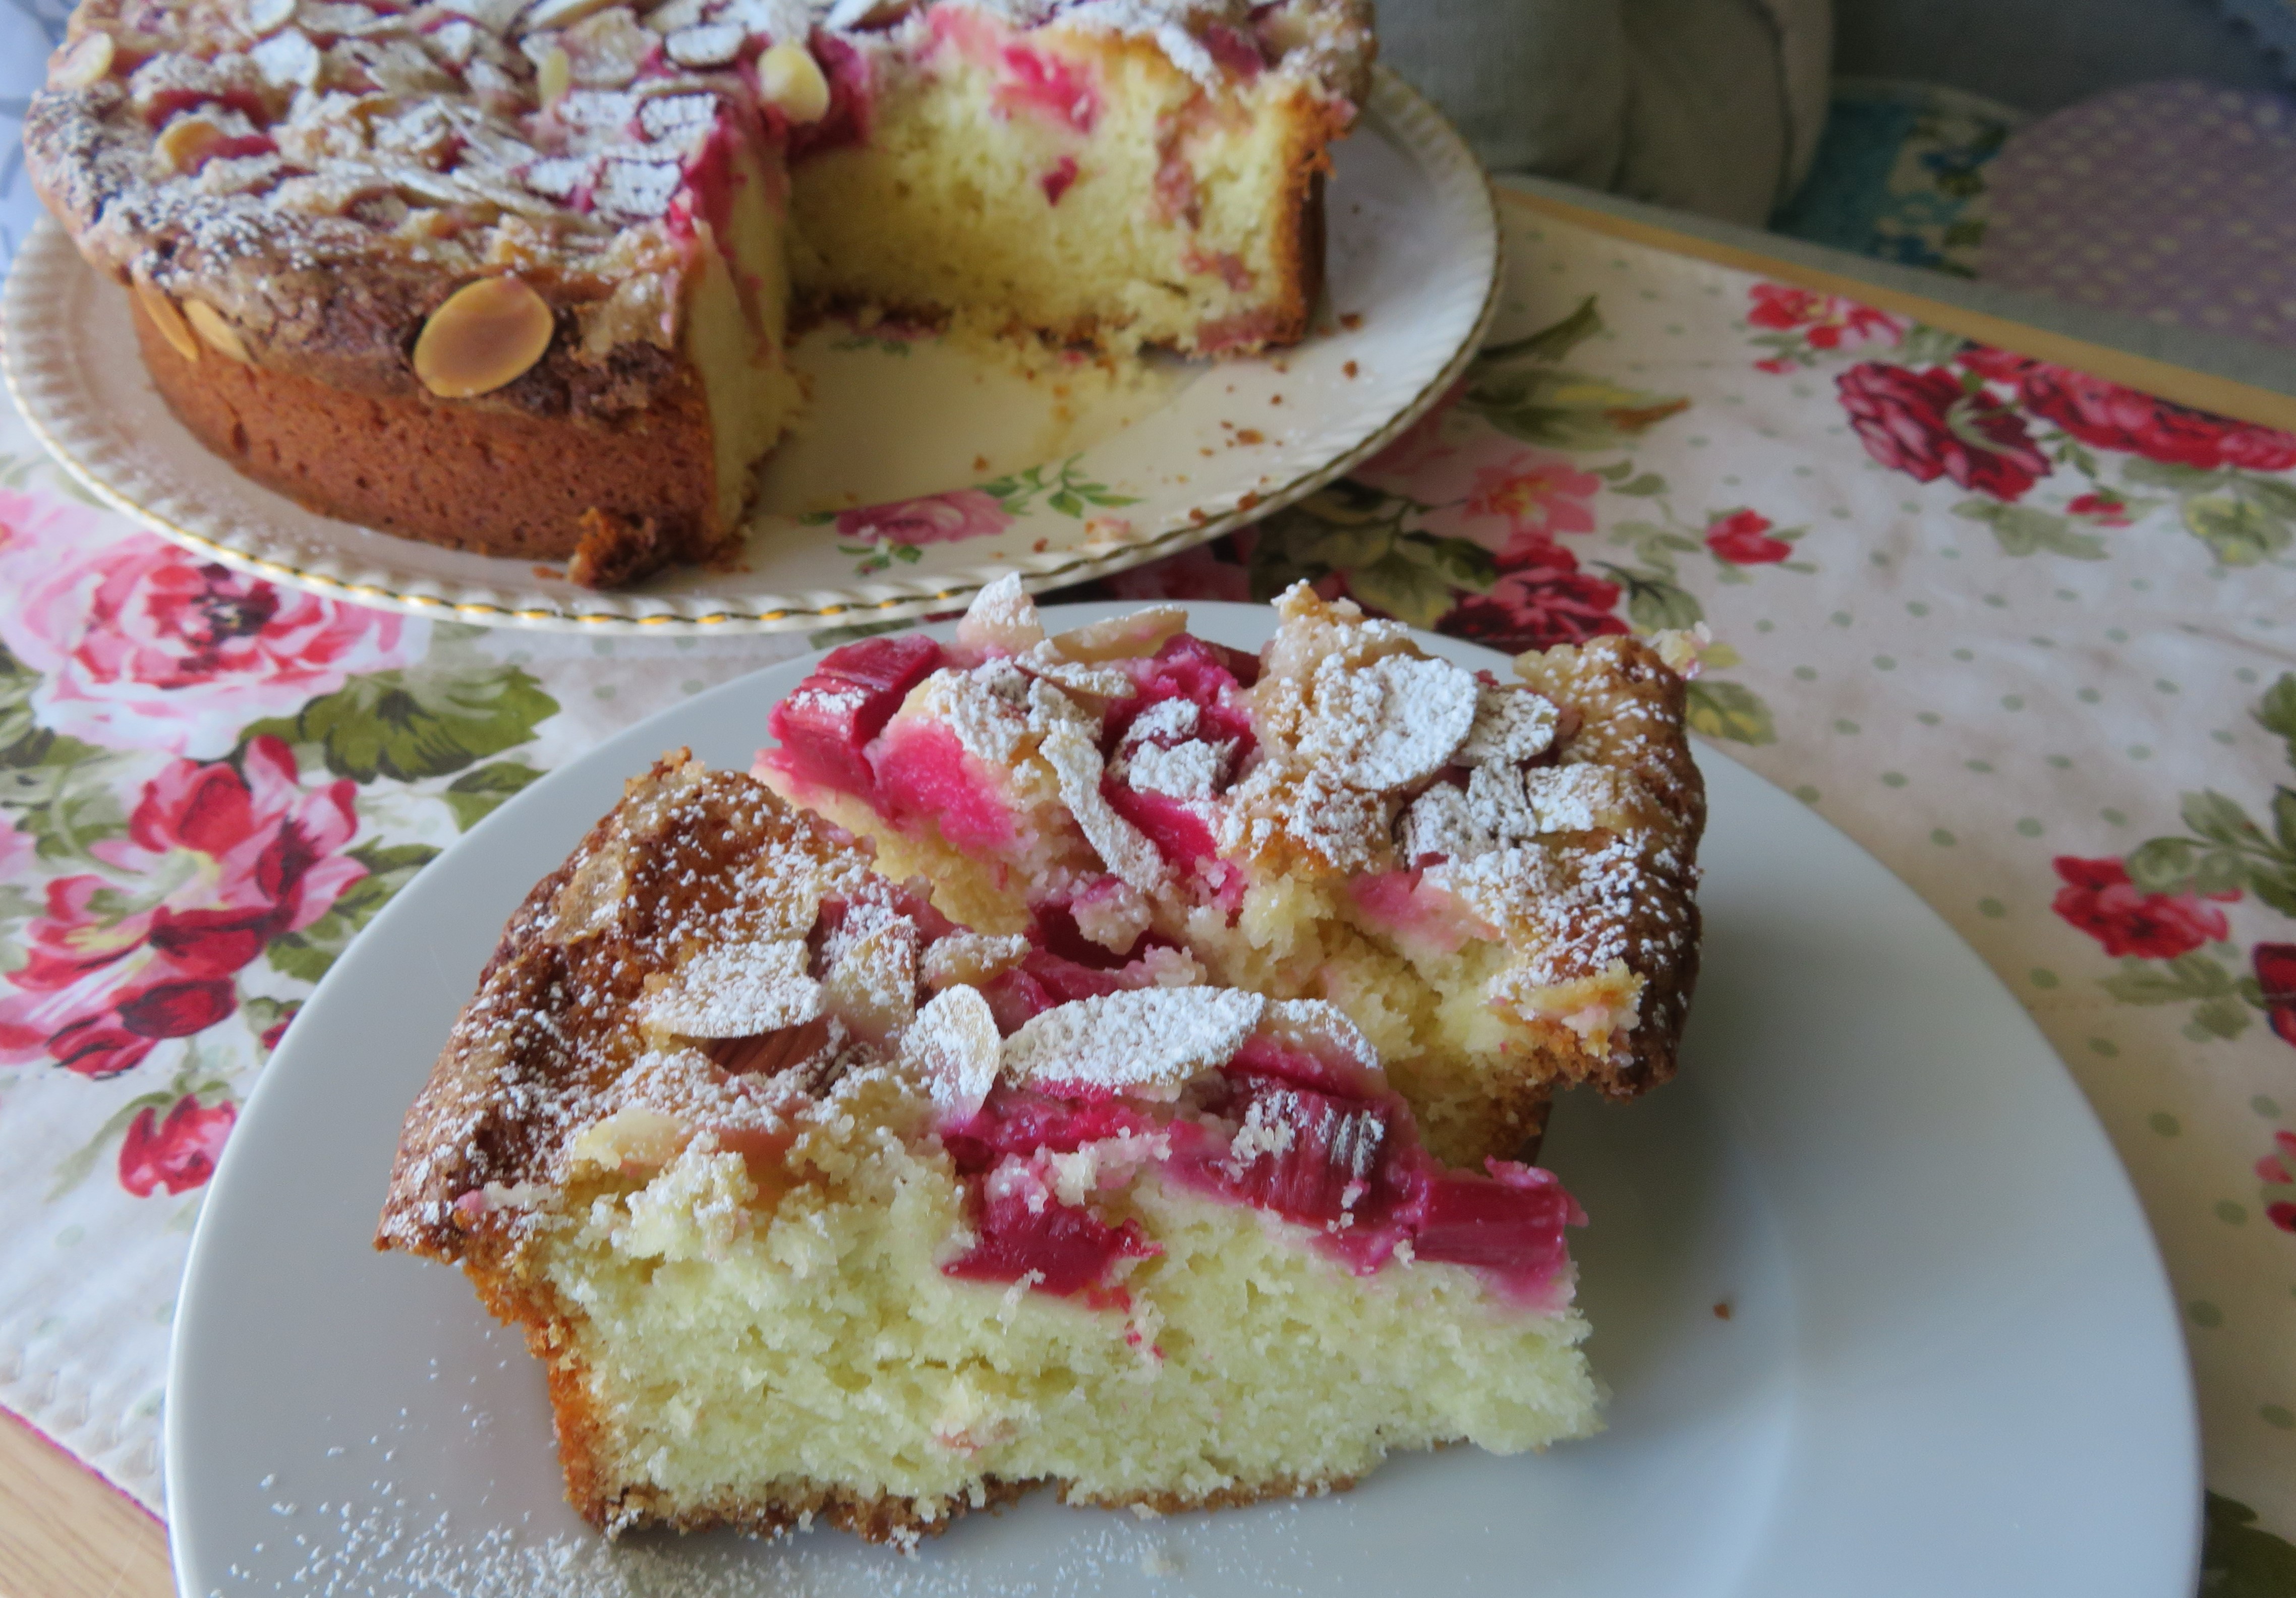
My sister and I popped into the local farm market the other day and I picked up some beautiful fresh rhubarb. It was so bright pink/red that I could not wait to use it!  I had in mind to make a cake of some sort.

I was going to make a Rhubarb Upside Down Cake, which would have showcased the red color of the rhubarb perfectly, and then I remembered this delightful cake!


Norwegian Rhubarb Cake 


The recipe for this cake comes from the pages of my Big Blue Binder and it is quite simply a fabulous recipe.   Its a pretty basic no frills cake, but don't let the simplicity of it fool you into thinking its not special!

This is a beautiful cake with a soft delicate crumb.  It melts in the mouth.  Top that with the earthy tang of tart rhubarb and the sweet crunch of sugar and almonds and you have a pretty unbeatable combination!


Norwegian Rhubarb Cake 


There are no bells and whistles with this cake. No frills. No streusel crumb, or custard filling. Its just a simple cake.


You might even be tempted to overlook it, but that will all change once you bit into it. Each mouthful is a delightful combination of flavors and textures.


Its equally at home on the breakfast table with a hot drink for breakfast or brunch, or for elevensies . . .  but add a scoop of vanilla ice cream or some softly whipped cream and it is transformed into a delicious dessert with the taste of spring in every mouthful!
 

Norwegian Rhubarb Cake


Rhubarb is a really hearty perennial, and has always been a real favorite with me.  When I was a child my mother would treat my siblings and I to a stalk each of it in the spring and a small bowl of sugar.
 

We loved it. We would sit there dipping the cut end of our stick of rhubarb into the sugar and biting it off, sucking all the sugar off as we went.   What a treat that was for us. Our cheeks would be aching with the tartness of it, but every bite was pure delight!


Norwegian Rhubarb Cake 


    WHAT YOU NEED TO MAKE NORWEGIAN RHUBARB CAKE

Other than the rhubarb you will only need basic store cupboard/baking cupboard ingredients, and if you are lucky enough to grow your own rhubarb, you won't need to pop to the store for anything! 


  • 1 1/2 cup (210g) plain all purpose flour
  • 1 1/2 tsp baking powder
  • pinch of salt
  • 3/4 cup (150g) butter
  • 3/4 cup (150g) fine granulated sugar
  • 2 large free range eggs
  • 1/2 cup (120ml) whole milk
  • 2 cups (250g) fresh rhubarb, cut into 1/2 inch pieces
  • 2 TBS granulated sugar
  • 2 TBS flaked almonds
  • icing sugar to dust


Norwegian Rhubarb Cake 


My sticks of rhubarb were not overly large. Its  still young rhubarb, and so very tender, and brightly colored. I used roughly three sticks.

If you don't have fine granulated sugar, you can give it a quick whirl in the food processor to break it down a bit.

Just use regular all purpose flour. (plain flour in the UK)  I use large eggs, always free range. There is no need to add any flavoring, but if you wanted to you could add 1 tsp vanilla.  Its not really necessary though.

Norwegian Rhubarb Cake


HOW TO MAKE NORWEGIAN RHUBARB CAKE

This is a very delicious and simple to make cake. You best prepare to fall in love.

Preheat the oven to 350*F/180*C/ gas mark 4. Butter a deep 8-inch round cake tin and line the bottom with baking paper. (A spring-form or other loose-bottomed pan works great here.)

Cream the butter and sugar together with an electric whisk until light and fluffy. Beat in the eggs a bit at a time until well combined.

Sift the flour, baking powder and salt together. Add to the creamed mixture, alternately with the milk, making three dry and two wet additions. Blend well together and then spread in the prepared tin.

Norwegian Rhubarb Cake 


Arrange the pieces of rhubarb over the top of the cake pushing them in a tiny bit. Try not to overlap them. Sprinkle with the 2TBS of sugar and the almonds. (I try to do the rhubarb in a circular pattern.)

Bake for 30 to 40 minutes, until a tooth pick inserted in the center comes out clean. Leave to cool in the pan for 10 minutes before removing.

Dust with icing sugar and serve warm, cut into wedges. Cream or ice cream are awfully nice with this.

Norwegian Rhubarb Cake


If you are lucky enough to have a glut of rhubarb, you may find that these other rhubarb recipes will come in handy!


RASPBERRY AND RHUBARB EVE'S PUDDING - A delicious fruit filling which bakes beneath the thatch of a lush rich cake topping.  This is excellent served with ice cream or pouring cream. Raspberry and rhubarb are great mates!


ROLY POLY RHUBARB PUDDING - Biscuit (scone) dough is wrapped around a rhubarb filling, jelly roll style, cut and sliced and then baked in a pan with a sweet sauce poured over top. This is a fabulously hearty and delicious dessert! 


ROASTED RHUBARB AND PROPER CUSTARD - A quintessentially  most British dessert. Much beloved.  The rhubarb is all soft, tart and sweet and the custard spooned over top adds a really special touch. The two flavors set each other off perfectly.


I adore rhubarb season!  Don't you???


Norwegian Rhubarb Cake

Norwegian Rhubarb Cake

Yield: Makes one 8-inch round cake
Author: Marie Rayner
Prep time: 15 MinCook time: 40 MinTotal time: 55 Min
Nothing fancy here. Just an incredibly delicious, simple cake with a delicate crumb. The tang of rhubarb on top, plus the crunch of almonds and sugar make this the ideal cake to enjoy with a hot drink!

Ingredients

  • 1 1/2 cup (210g) plain all purpose flour
  • 1 1/2 tsp baking powder
  • pinch of salt
  • 3/4 cup (150g) butter
  • 3/4 cup (150g) fine granulated sugar
  • 2 large free range eggs
  • 1/2 cup (120ml) whole milk
  • 2 cups (250g) fresh rhubarb, cut into 1/2 inch pieces
  • 2 TBS granulated sugar
  • 2 TBS flaked almonds
  • icing sugar to dust

Instructions

  1. Preheat the oven to 350*F/180*C/ gas mark 4. Butter a deep 8-inch round cake tin and line the bottom with baking paper.
  2. Cream the butter and sugar together with an electric whisk until light and fluffy. Beat in the eggs a bit at a time until well combined.
  3. Sift the flour, baking powder and salt together. Add to the creamed mixture, alternately with the milk, making three dry and two wet additions. Blend well together and then spread in the prepared tin.
  4. Arrange the pieces of rhubarb over the top of the cake pushing them in a tiny bit. Try not to overlap them. Sprinkle with the 2TBS of sugar and the almonds.
  5. Bake for 30 to 40 minutes, until a tooth pick inserted in the center comes out clean.
  6. Leave to cool in the pan for 10 minutes before removing.
  7. Dust with icing sugar and serve warm. Cream or ice cream are awfully nice with this.
Did you make this recipe?
Tag @marierayner5530 on instagram and hashtag it # TheEnglishKitchen
Norwegian Rhubarb Cake


This content (written and photography) is the sole property of The English Kitchen. Any reposting or misuse is not permitted. If you are reading this elsewhere, please know that it is stolen content and you may report it to me at: mariealicejoan at aol dot com 


 Thanks so much for visiting! Do come again! 


 Follow me on Bloglovin
read article

Mom's Pancakes

Wednesday, 1 June 2022

Mom's Pancakes


I have to say right up front that I think my recipe for my mom's pancakes is the best pancake recipe ever. I know everyone thinks that their mom makes the best pancakes!  But I am not kidding you when I say that this recipe is the best.

It makes the lightest, fluffiest pancakes on earth. They are so light and fluffy they practically float off the plate. They are also very easy to make.  There is nothing complicated here.  They also turn out perfectly each and every time you make them!  I guarantee! 


Mom's Pancakes 


Once you try this recipe you may be so happy with the results that you simply won't want to try another recipe again, but then again . . .  can you ever have too many pancake recipes?  I think not!

What you have here though is a bare bones, no-nonsense, no fuss no muss, basic pancake recipe.  The bar against which you will judge all others.


Mom's Pancakes 


My mom was a bare bones, no-nonsense kind of a cook. If something needed special ingredients she wouldn't give it the time of day. There was nothing like vanilla in her pancakes. They were plain and simple, and they were delicious.

What made them even more so was the fact that we only got them once a year.  On pancake day.  We would so have loved them at other times but that was mom. She didn't want to spoil us.


Mom's Pancakes 


She would cook them on this large circular aluminum griddle pan she got with her Wear-Ever cook set back in 1954.  Those pans lasted my mother all of her lifetime, and my sister still uses them. 


where-ever cookware


These are the original papers that came with the set of pans. Mom still had it. You can see on the receipt that they cost my parents $298.25.  That was a considerable amount of money in 1954.

My mother never parted with money easily, so you can be sure that she felt these pans were worth it, and I can tell you she used them for over 60 years!  A few of them warped a bit on the bottom, but for the most part they remained useful for all that time.

Like I said my sister still uses some of them, in particular the turkey roaster.  That roaster oven roasted over 100 turkeys in its lifetime!  And every one of them perfect! 


Mom's Pancakes 


WHAT YOU NEED TO MAKE MOM'S PANCAKES

Mom never went in for anything fancy. Just plain simple, every day ingredients.   


  • 2 cups (280g) plain all purpose flour
  • 2 TBS sugar
  • 4 tsp baking powder
  • 1/2 tsp baking soda
  • 1/4 tsp salt
  • 1 3/4 cups (420ml) whole milk
  • 2 large free range eggs
  • 2 TBS melted butter or vegetable oil
  • butter for cooking

Mom's Pancakes 


Mom would have never added vanilla to her pancakes.  She never added anything else either. Not blueberries or lemon zest, nada, zip.

You can always add blueberries or other fruits if you wish. Just make sure whatever you add is cut small enough to cook in the allotted time.  

If you like your pancakes a bit sweeter, by all means add more sugar.

Mom's Pancakes 


You can replace 1/2 cup of the flour with whole wheat flour if you wish. (70g)  These will not rise quite as much as they would when using all white flour.


Mom's Pancakes 


HOW TO MAKE MOM'S PANCAKES 

Nothing could be easier.  Yours will turn out perfectly if you follow this recipe.


Whisk the milk, eggs, and melted butter together in a beaker. Whisk the dry ingredients together in a bowl. Make a well in the center. Add the wet ingredients and whisk together until combined. Lumps are okay! The mixture should be thick but pourable. If you think it is too thick, add a bit more milk.


Preheat a large flat bottomed skillet over medium heat. Add some butter to the pan. Once the butter begins to foam ladle in the pancake batter using 1/4 cup measure for each pancake. 


Cook on one side over medium heat until bubbles form on the surface and begin to pop. (this will take about 2 minutes) Flip over and cook on the other side until golden brown. (a further 2 minutes)Serve with butter to melt over top and pure maple syrup.


Mom's Pancakes


Just look at how light and fluffy they are! Now that's what I call a perfect pancake.  I can tell you, they say that the first pancake is always a throwaway?  I never have throwaways with mom's recipe.

They really do turn out perfect every time!


Mom's Pancakes 


My children loved pancakes and they were something which I prepared for them fairly often. Some of their favorites were:


SILVER DOLLAR PANCAKES - small bite sized pancakes. Light and fluffy. The size of a silver dollar and crisp edged these are fabulously tasty and so much fun to eat! These are real family favorites!


BLUEBERRY BUTTERMILK PANCAKES - Tangy with buttermilk, light and filled with an abundance of fresh berries! I like to scatter the finished pancakes with even more berries when they are done!


BLUEBERRY & LEMON SHEETPAN PANCAKE - these delicious pancakes bake on a sheetpan. They have a lemon curd swirl and are stuffed with fresh berries. Very easy to make, leaving your hands free to get on with something else! 


Mom's Pancakes


You can very easily double this recipe to make a larger batch. Just keep the ones you cook warm in a low oven on a baking sheet. (175*F/80*C)

You can easily make these ahead and freeze them for future use. Just separate each cooled pancake by a small square of waxed paper and stack them in a tightly closed freezer bag. Easy to remove one at a time an quickly reheat in the microwave, toaster or even the oven.


Mom's Pancakes

Mom's Pancakes
Yield: 4
Author: Marie Rayner
Prep time: 10 MinCook time: 3 MinTotal time: 13 Min
These pancakes are light and fluffy. So easy to make from scratch. This is the best pancake recipe ever.

Ingredients

  • 2 cups (280g) plain all purpose flour
  • 2 TBS sugar
  • 4 tsp baking powder
  • 1/2 tsp baking soda
  • 1/4 tsp salt
  • 1 3/4 cups (420ml) whole milk
  • 2 large free range eggs
  • 2 TBS melted butter or vegetable oil
  • butter for cooking

Instructions

  1. Whisk the milk, eggs, and melted butter together in a beaker.
  2. Whisk the dry ingredients together in a bowl. Make a well in the centre. Add the wet ingredients and whisk together until combined. Lumps are okay! The mixture should be thick but pourable. If you think it is too thick, add a bit more milk.
  3. Preheat a large flat bottomed skillet over medium heat. Add some butter to the pan.
  4. Once the butter begins to foam ladle in the pancake batter using 1/4 cup measure for each pancake. Cook on one side over medium heat until bubbles form on the surface and begin to pop. (this will take about 2 minutes) Flip over and cook on the other side until golden brown. (a further 2 minutes)
  5. Serve with butter to melt over top and pure maple syrup.
Did you make this recipe?
Tag @marierayner5530 on instagram and hashtag it # TheEnglishKitchen
Mom's Pancakes


Because of one commentor below I felt compelled to go and make a batch today (February 13, 2024) and here is a photograph.  They turned out perfect, made exactly as written per the recipe. 

Mom's Pancakes 2024


You have to be doing something wrong. Maybe your measuring cups are not right?  I have used the following cups:


liquid measuring cup


This is the exact brand of liquid measuring cups I use for all of my baking.


dry measure cups


And these are the dry measuring cups and spoons that I use for all of my baking.


This content (written and photography) is the sole property of The English Kitchen. Any reposting or misuse is not permitted. If you are reading this elsewhere, please know that it is stolen content and you may report it to me at: theenglishkitchen@mail.com 


Thanks so much for visiting! Do come again!

 Follow me on bloglovin
read article
new entries old entries
Subscribe to: Posts (Atom)

If You Like What You See

If you like what you see and wish to donate to help pay for butter, sugar, eggs and whatnot, every little bit is appreciated. Thanks!
PRIVACY POLICY

Buy the Book!

If you are a Baking Enthusiast and a fan of British Baking you are going to love this new book I wrote. From fluffy Victoria sponges to sausage rolls, the flavors of British baking are some of the most famous in the world. Learn how to create classic British treats at home with the fresh, from-scratch, delicious recipes in The Best of British Baking. Its all here in this delicious book! To find out more just click on the photo of the book above!

Translate


This is a book I wrote several years ago, published by Passageway Press. I am incredibly proud of this accomplishment. It is now out of print as my publisher went out of business after Covid, but you can still find used copies for sale here and there. If you have a copy of it, hang onto it because they are very rare. This was a real labor of love for me and a dream come true as I had always wanted to write a book since I was a child. Hopefully I will be able to republish it one day. If you know of a publisher who is looking for something let me know!

Welcome, I'm Marie

Welcome, I'm Marie
Canadian lover of all things British. I cook every day and like to share it with you!
A third of my life was spent living in the UK. I learned to love the people, the country and the cuisine. I have always been an Anglophile. You will find plenty of traditional British recipes here in my English Kitchen. There are lots of North American recipes also, but then again, I am a Canadian by birth. I like to think of my page as a happy mix of both. If you are looking for something and cannot find it, don't be afraid to ask! I am always happy to help and point you in the right direction, even if it exists on another page, or in my extensive collection of cookbooks. I moved back to Canada in the year 2020 and have been busy building a new life for myself back in my homeland. I am largely retired now, except for this little space on the internet that I call home. I hope you will stay a while and have a good boo around. There's lots of deliciousness here to explore!

Search This Blog

Featured

Cheesy Tuna Casserole for One (Easy Single‑Serve Recipe)
  If you’re craving cozy comfort without the leftovers, this Cheesy Tuna Casserole for One is the perfect small‑batch meal. Made with tender...

Popular Posts

  • Fried Cabbage with Bacon & Onions
      I have always loved fried cabbage.  I first had it when I was in high school.  We cooked it in our Home Economics Class. It was just ...
  • Sticky Lemon Chicken
    I am always on the look out for a good chicken breast recipe.  We eat a lot of chicken in this house, and it mostly comes in the form of...
  • Lemon Friands
    Anyone who knows me, knows that I am a nut for anything lemon flavoured. It's always been one of my absolute favourite taste thril...
  • Quick and Easy Bacon and Egg Tarts
       You might not think that you have time to do a bacon and egg breakfast on a weekday, but this recipe here today proves that just isn...
  • Mary Berry's Cheese Scones
    I wanted to make some scones to enjoy the other day.  I have made quite a few scones here on the blog and I love them all. I do like to try ...

My Favourite Places

  • Welcome Home Kitchen Blog
  • Cookbooklets
  • Categories
  • _Kitchen Wisdom
  • _In the Larder and Pantry
  • _Couldn't Live Without
  • _Kitchen Wish List

Archive

  • ▼  2026 (215)
    • ▼  August (7)
      • Cheesy Tuna Casserole for One (Easy Single‑Serve R...
      • Aunt Betty’s Old‑Fashioned Fruit Cobbler (Easy & D...
      • Chicken with Cherry Tomatoes and Capers (Easy Skil...
      • Cheesy Cauliflower Bake (Easy Comfort Food Casserole)
      • Easy Chicken Shawarma Bowls (Fresh, Flavorful & Pe...
      • Meals of the Week, July 26th to August 1st, 2026
      • Mini Lemon & Raspberry No‑Bake Cakes (Easy Summer ...
    • ►  July (30)
    • ►  June (30)
    • ►  May (31)
    • ►  April (28)
    • ►  March (31)
    • ►  February (27)
    • ►  January (31)
  • ►  2025 (358)
    • ►  December (28)
    • ►  November (30)
    • ►  October (32)
    • ►  September (29)
    • ►  August (29)
    • ►  July (29)
    • ►  June (30)
    • ►  May (31)
    • ►  April (30)
    • ►  March (31)
    • ►  February (28)
    • ►  January (31)
  • ►  2024 (349)
    • ►  December (29)
    • ►  November (30)
    • ►  October (29)
    • ►  September (29)
    • ►  August (26)
    • ►  July (26)
    • ►  June (30)
    • ►  May (31)
    • ►  April (30)
    • ►  March (30)
    • ►  February (29)
    • ►  January (30)
  • ►  2023 (341)
    • ►  December (27)
    • ►  November (28)
    • ►  October (27)
    • ►  September (28)
    • ►  August (25)
    • ►  July (31)
    • ►  June (30)
    • ►  May (31)
    • ►  April (28)
    • ►  March (31)
    • ►  February (28)
    • ►  January (27)
  • ►  2022 (366)
    • ►  December (26)
    • ►  November (29)
    • ►  October (30)
    • ►  September (29)
    • ►  August (32)
    • ►  July (33)
    • ►  June (29)
    • ►  May (33)
    • ►  April (30)
    • ►  March (29)
    • ►  February (31)
    • ►  January (35)
  • ►  2021 (370)
    • ►  December (36)
    • ►  November (31)
    • ►  October (31)
    • ►  September (31)
    • ►  August (30)
    • ►  July (32)
    • ►  June (35)
    • ►  May (27)
    • ►  April (29)
    • ►  March (31)
    • ►  February (27)
    • ►  January (30)
  • ►  2020 (315)
    • ►  December (30)
    • ►  November (23)
    • ►  October (31)
    • ►  September (29)
    • ►  August (27)
    • ►  July (29)
    • ►  June (26)
    • ►  May (26)
    • ►  April (26)
    • ►  March (25)
    • ►  February (23)
    • ►  January (20)
  • ►  2019 (314)
    • ►  December (20)
    • ►  November (22)
    • ►  October (21)
    • ►  September (30)
    • ►  August (31)
    • ►  July (25)
    • ►  June (30)
    • ►  May (33)
    • ►  April (25)
    • ►  March (28)
    • ►  February (24)
    • ►  January (25)
  • ►  2018 (330)
    • ►  December (29)
    • ►  November (28)
    • ►  October (31)
    • ►  September (29)
    • ►  August (31)
    • ►  July (32)
    • ►  June (28)
    • ►  May (20)
    • ►  April (26)
    • ►  March (31)
    • ►  February (25)
    • ►  January (20)
  • ►  2017 (352)
    • ►  December (29)
    • ►  November (30)
    • ►  October (31)
    • ►  September (35)
    • ►  August (25)
    • ►  July (30)
    • ►  June (29)
    • ►  May (31)
    • ►  April (30)
    • ►  March (28)
    • ►  February (28)
    • ►  January (26)
  • ►  2016 (391)
    • ►  December (33)
    • ►  November (31)
    • ►  October (30)
    • ►  September (34)
    • ►  August (37)
    • ►  July (35)
    • ►  June (28)
    • ►  May (33)
    • ►  April (31)
    • ►  March (34)
    • ►  February (33)
    • ►  January (32)
  • ►  2015 (388)
    • ►  December (34)
    • ►  November (32)
    • ►  October (34)
    • ►  September (35)
    • ►  August (43)
    • ►  July (31)
    • ►  June (28)
    • ►  May (31)
    • ►  April (32)
    • ►  March (32)
    • ►  February (26)
    • ►  January (30)
  • ►  2014 (425)
    • ►  December (38)
    • ►  November (38)
    • ►  October (41)
    • ►  September (31)
    • ►  August (30)
    • ►  July (36)
    • ►  June (39)
    • ►  May (42)
    • ►  April (38)
    • ►  March (33)
    • ►  February (27)
    • ►  January (32)
  • ►  2013 (378)
    • ►  December (40)
    • ►  November (35)
    • ►  October (36)
    • ►  September (32)
    • ►  August (30)
    • ►  July (30)
    • ►  June (31)
    • ►  May (28)
    • ►  April (25)
    • ►  March (33)
    • ►  February (30)
    • ►  January (28)
  • ►  2012 (376)
    • ►  December (34)
    • ►  November (35)
    • ►  October (35)
    • ►  September (32)
    • ►  August (35)
    • ►  July (28)
    • ►  June (31)
    • ►  May (29)
    • ►  April (29)
    • ►  March (30)
    • ►  February (29)
    • ►  January (29)
  • ►  2011 (332)
    • ►  December (32)
    • ►  November (29)
    • ►  October (28)
    • ►  September (28)
    • ►  August (27)
    • ►  July (28)
    • ►  June (28)
    • ►  May (25)
    • ►  April (26)
    • ►  March (28)
    • ►  February (26)
    • ►  January (27)
  • ►  2010 (286)
    • ►  December (32)
    • ►  November (30)
    • ►  October (31)
    • ►  September (25)
    • ►  August (23)
    • ►  July (5)
    • ►  June (27)
    • ►  May (23)
    • ►  April (14)
    • ►  March (23)
    • ►  February (25)
    • ►  January (28)
  • ►  2009 (169)
    • ►  December (26)
    • ►  November (24)
    • ►  October (26)
    • ►  September (23)
    • ►  August (25)
    • ►  July (21)
    • ►  June (21)
    • ►  May (3)

PRIVACY POLICY
© The English Kitchen.
Customized by My Fairy Blog Mother.