

What if I told you, you could make a delicious, light, flaky savoury scone using only three ingredients? Its true! You can and these lovely scones are just that!
I almost couldn't believe it when I read the recipe. Three ingredients? How could that be? What would they turn out like? I just had to try them out first hand. Three Ingredient Cheese Scones.

I was very pleasantly surprised. I did not expect such positive results. These were light, flaky and savoury. Chock full of cheese.
Light, flaky and savoury scones that really do use only three ingredients. Not only that, but they go together in a flash! What more could a person ask for!

These literally go together in about five minutes. Seriously! I kid you not!
You can put these together in about 5 minutes, pop them into the oven, bake and be enjoying them in less than half an hour. I was literally amazed at the speed and ease of preparation!

All you need is self-raising flour (self-rising), grated cheddar cheese and plain yogurt. That's it! Three simple ingredients.
Three ingredients I always, always have in my refrigerator. Refrigerator basics and of course the flour. I always keep a variety of flours on hand. Plain, self-raising, whole wheat, whole wheat self-raising, and a variety of bread flours.

Did you know that you can keep your flour in the freezer? In fact when it comes to whole grain or specialty flours that you may only use occasionally, it is the best way to keep them without them gong to waste.
Simply pop the flour into a sealed container and then put it into the freezer. It will keep for ages and ages. Just measure it out for any recipe you need it for and bring it to room temperature prior to using. Its that simple.

You can easily make your own self raising flour. Simply add 1 1/2 tsp of baking powder and 1/4 tsp salt for every 140g/1 cup of plain flour. Easy peasy!
Putting these scones together is a real doddle. You measure the cheese and the flour together into a bowl and then stir with a fork to combine. Once you have done that, you then
stir in the yogurt to make a soft dough. Pat the out to a rectangle . .
. cut . . . then bake.

I love that you simply cut the dough into rectangles rather than stamping them out with a round cutter. No waste and no rerolling of scraps.
That means that they all turn out perfect. Re-rolled/patted scones can sometimes come out a bit wonky and they won't rise quite as much. They will also be not quite as tender.

These rise really nice and tall . . . and are so flaky. Use a sharp knife to cut them into the rectangles.
I like to use a nice strong cheddar for plenty of flavour when I am baking. The stronger the cheese the more flavour. You also have the option of sprinkling more cheese on top prior to baking for a lovely finish. I say why not! More cheese please!!

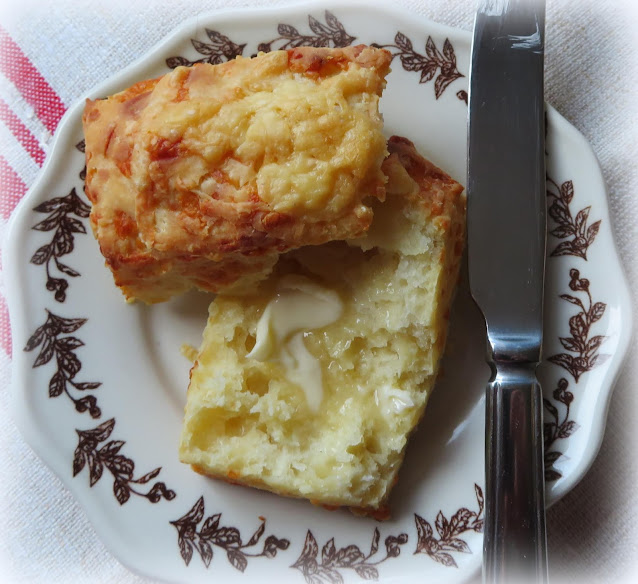
These are lovely just served plain and on their own. They are excellent split and spread with softened butter.
And why not. A bit of butter elevates the taste of anything in my opinion. Well, all things savoury at any rate!

Look at that lovely texture of these. Isn't it beautiful? I think they are just perfect!

These are wonderful served for breakfast with butter, and yes, even jam. Cheese and jam go really well together.
They are wonderful served with salads also for a nice light lunch.

They are also pretty wonderful served with soups or, or stews for dinner.
These are quitet lovely no matter what or when you serve them. I can almost guarantee that they are sure to always be well received!
Yield: 10
Three Ingredient Cheese Scones
prep time: cook time: total time:
Light, flaky cheese scones that go together in a flash. You are sure to love these, and yes they only need three ingredients!
ingredients:
- 300g self raising flour (2 cups plus 3 TBS)
- 150g grated strong cheddar cheese (1 1/4 cups)
- 250g plain yogurt ( 1 cup)
Optional:
- 5 TBS grated strong cheddar to sprinkle on top
instructions:
- Preheat the oven to 200*C/400*F/ gas mark 6. Line a baking tray with some baking paper set aside.
- Measure the cheese and flour into a bowl. Stir together with a fork to combine completely. Add the yogurt and quickly mix together to form a soft dough. Tip out onto a lightly floured surface and knead a couple of times until smooth. Pat out into a rectangle 6 by 10 inches in size, and about 1 inch thick. Cut into 10 rectangles. Place the rectangles spaced apart on the baking sheet. Sprinkle with the optional additional cheese if using.
- Bake for 18 to 20 minutes until well risen and golden brown. Scoop onto a wire rack to cool slightly before serving with plenty of cold butter for spreading. Delicious!
Created using The Recipes Generator

I found the original recipe written on a scrap of paper. I suspect I had copied it out from a magazine at the Dentists or Doctor once upon a time. I adapted it to use both Metric and American measurements. You're welcome
This content (written and photography) is the sole property of The English Kitchen. Any reposting or misuse is not permitted. If you are reading this elsewhere, please know that it is stolen content and you may report it to me at: mariealicejoan at aol dot com Thanks so much for visiting. Do come again!


Oh my I will have to try these ones!
ReplyDeleteWho doesn't love a nice warm cheese scone slathered in butter LOL
You must bake them Vicky! They're so good warm from the oven, and yes, slathered with butter! xo
DeleteHi dear i just baked them and they got stiff what should i do if after baking they turn out stiff? I did exactly as u mentioned they dont look and feel scones id appreciate ur experienced advice
DeleteThis is Marie here. If they are too stiff after baking, rather than light, I think you probably handled the dough too much or added too much flour. Without actually being in your kitchen and seeing what you did I can’t say for sure. Did you use full fat or low fat yogurt? Did you bake by weight or use cups, etc.
DeleteI have a vegetable and bean soup for dinner tonight and I shall make these to go with it - I have everything I need at home and I adore a hot cheesy treat. I'll let you know how I got along. I can already see me adding a pinch of cayenne pepper - I'm a recipe fiddler just like you.
ReplyDeleteA pinch of cayenne would be a great addition Marie. Your soup sounds fabulous! I love a good bean soup! xoxo
DeleteThey were just as you promised - really quick and easy, plus they rose well so were light and fluffy. And they were delicious. I did add a pinch of cayenne and it married well with the flavours in the soup. I was thinking that if I served them with a minestrone or something like that, I could add some Italian herbs as well. It's a terrific basic recipe and so simple to make. Thank you.
DeleteI am so pleased that you are pleased Marie! Yay! Love your suggestions to amp them up a bit as well! You're quite welcome! xoxo
DeleteI bet they are wonderful..have never made a cheese scone..biscuits yes..Thanks Marie!
ReplyDeleteYou're welcome Monique! Hope you bake them and enjoy! xoxo
DeleteI just printed this one too. I might have to make these this weekend -- I actaully have all the ingredients at hand!
ReplyDeleteOh, you are in for a real treat! I hope you enjoy them Jeanie! xoxo
DeleteCould one press into circle and cut dough as triangles?
ReplyDeleteStill likely yield 10?
Marie,Thank you for your generous sharing.
I can't see why not! Let me know how you get on! xoxo PS - I wouldn't cut into 10 in that case, maybe 8?
DeleteI've made these! They are fab, light, tasty and made v quickly!
ReplyDeleteSo happy they are enjoyed Dexter!
DeleteDo you use full fat yoghurt?
ReplyDeleteI do use full fat yoghurt!
DeleteSorry, it's me again. I am Marion by the way! It looks like you add 3 tablespoons!! Baking soda. I just can't make scones so need to be led by the nose. Do I add anything to the SR flour?
ReplyDeleteMarion here. Ignore my post it's just dawned on me what you mean. Doh!!
ReplyDeleteNo worries Marion! I hope you like the scones! xo
DeleteWill definitely be trying these this weekend will have to shop for yogurt, not a regular in my fridge not keen on it especially plain!!
ReplyDeletePlain yogurt is useful for so many things! Cakes, biscuits, scones, and you can eat it with granola and fruit for breakfast! A drizzle of date syrup and yummo!
DeleteHi, Could you bake these on top of a stew like a cobbler?
ReplyDeleteNever having done so I cannot say with any certainty that you can, but you could try, the bottoms would be soggy however.
DeleteI see that you don’t use butter, which I though was always part of the ingredients for scones. Does this mean I cannot use nonfat Greek yogurt?
ReplyDeleteThe yogurt takes the place of butter and milk, plus the acid in the yogurt works with the leavening to give you a good rise. I always use full fat yogurt myself. I have never used nonfat so I can't really answer your question. Sorry!
DeleteAs someone who was always in awe of my grandmother's scones, and struggled to replicate...this recipe is perfect ! Thank you
ReplyDeleteYou are most welcome! I am pleased you enjoyed them. Thank you so much for taking the time to comment on your experience! xo
DeleteDo these freeze well after being baked ?
ReplyDeleteYes they do. Wrap tightly and they will keep very well, frozen, for up to three months.
DeleteCan greek or icelandic yogurt be used? Love your recipes
ReplyDeleteThank you so much. I normally use Greek yogurt so yes.
DeleteGave these a go. Only had fat free yogurt. I had to use more yogurt than recipe required, prob because no other fat in the bowl. Did add a small amount of garlic powder and chives to batter. Baked up though, very tasty. They were a bit tough, probably from trying so hard to get the dough together. Will try again with full fat yogurt.
ReplyDeleteThanks for giving these a go. I find that sometimes when baking things like scones or biscuits, you do need to add either extra liquid or even more flour. I suspect the weather often has something to do with it. I am glad you enjoyed their flavor. I do recommend using full fat yogurt for the best results! xo
DeleteHi Marie, Just saw your Marmite Cheese Scones recipe - have you tried adding the 1 Tbs marmite to this recipe? Would it work?
ReplyDeleteI have not, although I can't see why you couldn't. 1 TBS of Marmite might be a bit much. I would recommend using half that amount and removing the same amount of yogurt to make up for it. Let me know how you get on! xo
Delete