

I know that Cabbage Rolls are not traditional English food. I think they are probably something that originated in Eastern Europe, but they are something that we have enjoyed for many years in my family.
When I was a child, it was always a real treat when my mom had Cabbage Rolls on the menu. She made hers quite differently than most.
They were cooked in a huge Wearever Aluminum pot on top of the stove all day, and she always added potatoes, carrots, and wedges of cabbage to the pot along with the cabbage rolls.
My dad never liked the cabbage. I never liked the meat . . . but we made a deal with each other every time my mom made them. I gave him my meat, and he gave me his cabbage. We were both happy.

Oh how delicious those vegetables were on my plate . . . the potatoes lightly mashed with my fork, and then all of them spread with cold butter and sprinkled with salt and pepper. The butter melting and mingling with the vegetable juices and tomatoes . . .
Oh my . . . just the thought of them makes my mouth water.
I make mine quite differently than my mother did. She never put rice in hers, but I like rice in mine. I also add minced streaky bacon to the meat mixture, which gives it an added layer of flavour.

She only ever used tinned tomatoes to cook hers in. I have developed a delicious and slightly sweet and sour tomatoey sauce to cook mine in.

Her's were cooked on top of the stove. Mine are baked in the oven, so that those tasty little rolls absorb all the delicious flavours from the sauce and become meltingly tender.

Both quite different from the other . . . but equally as delicious. I do hope you will give these a try before the weather becomes too warm for oven meals.
That beautiful Spring Cabbage that is in the shops right now, (the pointed sweetheart variety) is just perfect for these!!

*Cabbage Rolls*
Makes 12
This is our favourite cabbage roll recipe. Delicious, moist and meaty with a fabulous sweet and sour sauce. These always go down a real treat. I often double and triple the recipe when I take them to pot luck suppers. I always bring home an empty dish.
1 pound extra lean minced beef
1/4 cup raw long grain rice
1 large egg, beaten
1 medium onion, peeled and grated
1 carrot, peeled and grated
1 fat clove of garlic, peeled and crushed
1 tsp salt
1/2 tsp freshly ground black pepper
1/2 pound smoked streaky bacon, minced
12 wilted cabbage leaves, thick veins trimmed to thin
For the sauce:
80g soft light brown sugar, (1/2 cup packed)
2 ounces fresh lemon juice
8 ounces passata
Place the meat into a bowl and mix together with the rice, egg, onion, carrot, garlic, salt, pepper and bacon. Mix well.
Shape into 12 equal sized ovals.
Place each oval at the wide end of a wilted cabbage leaf. Roll up, tucking in the sides to completely encase the meat.
Place, folded side down, into a greased baking dish.
Mix together the brown sugar, lemon juice and tomato sauce. Pour this sauce over the rolls. Cover tightly with a lid.
Preheat the oven to 190*C/375*F. Place the casserole into the heated oven and bake for 1 hour. Uncover at the end of that time and bake for 20 minutes longer. Serve hot.

There's something here today that you will seldom see in my kitchen. Yes, that's right, that is a chocolate cake.

And not just any chocolate cake either . . . but a scrummily delicious chocolate cake made with milky way chocolate bars.

Oh my but this is wonderful. We had company last night for dinner and this is what I made for dessert. I know . . . Todd hates chocolate cake . . .

Never fear, I made something else for him. (To be revealed soon)

This cake uses a cake mix, but there is no shame in that, seriously. The end result is so darned delicious that nobody will care that you cheated a little bit.

The satisfied looks on their faces once they put that first forkful into their mouths will say it all.
Moreish. Scrumptious. Heavenly Bliss.

You will want to make this again, although I do have to warn you now . . . one slice will not be enough. Seriously.

*Milky Way Cake*
Serves12 to 16 (depending on how big you cut the slices!)
Printable Recipe
A deliciously moist cake that uses delicious milky way chocolate bars in the batter and in the frosting! Scrummy!
for the cake:
6 (21.9g) milky way bars
2 TBS plus 8 ounces of water
1 package of chocolate fudge cake mix (Betty crocker)
4 ounces butter, melted
3 large eggs at room temperature
1 TBS flour
100g of chocolate chunks
For the Frosting:
6 (21.9g) milky way bars
2 TBS butter
4 ounces double cream
40g bar of dark chocolate, chopped
sprinkles, chocolate curls etc. to decorate. (optional)
Preheat the oven to 160*C/325*F. Grease a 12 cup bundt pan and flour it, tapping out any excess. Set aside.
Place the milky way bars for the cake into a saucepan along with the 2 TBS water. Cook, whisking constantly, over medium low heat until the bars are melted and the mixture is smooth. Remove the pan from the heat and set aside to cool
Combine the cake mix, 1 cup of water, butter and eggs in a large bowl. Beat on medium speed with an electric mixer until the batter is well mixed and creamy smooth. Measure out about 2/3 of a cup into a bowl and stir the melted candy mixture into it. Stir in the 1 TBS of flour, mixing it in well. Mix the chocolate chunks into the remaining batter.
Place about half of the regular batter into the prepared pan. Make a bit of a well in it all the way around the pan. Spoon the chocolate bar mixture into this, taking care not to let it touch the sides of the pan at all. Spread the remaining regular batter over top. Smooth it over.
Bake for 45 to 50 minutes, until the cake springs back when lightly touched, about 45 to 50 minutes. Remove from the oven to a wire rack to cool for 20 minutes or so, before removing from the pan. Finish cooling on a wire rack before transferring to a plate to proceed.
Place the milky way bars for the frosting, aloong with the chopped dark chocolate, butter and cream into a sauce pan. Cook and stir over medium heat until smooth. It may look lumpy, but persevere, it will smooth out. Allow to cool slightly before spooning over the cake. Sprinkle with any decorations you may want to use immediately. Allow to set before cutting into slices to serve.
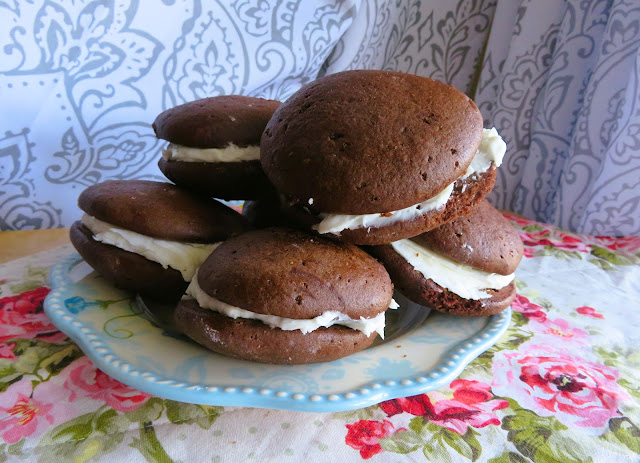

This recipe for Amish Chocolate Whoopie Pies that I am sharing with you today is one that I have been using for a very long time. I adapted the original recipe from one which I round in the book by Marcia Adams entitled Cooking from Quilt Country.
I used to watch her program by the same name on our local PBS station many, many years ago. I have long had a fascination with the Amish and this cooking show was one I really enjoyed. When I found the books from the series, I just had to get them. There are two. This one is the first one.

One might be tempted to ask, do something like Whoopie Pies belong in an English Kitchen. I would say absolutely. Whoopie Pies are becoming very popular here in the UK so why not have one of the original recipes to work from!
Actually this recipe makes prize winning Whoopie Pies! One year back in the mid 1990's my sister and I both independently entered Whoopie Pies made from this exact recipe into our local County Fairs and won Blue Ribbons with them! (We lived in different counties.)

Along with the blue ribbons came a cash award and an apron and pot holder set from Fry's Cocoa. I was thrilled, but not surprised. These cookies had always been prize winning in my home! It was just nice to see that opinion validated! They really are the best whoopie Pies!
Whoopie Pies are not without their own controversy! There are no less than five American states that claim to be the originator of the Whoopie Pie! (Maine, Massachusetts, New Hampshire, Pennsylvania and Virginia all claim to be where they began! You can read more about that here.
As far as I am concerned, it doesn't really matter where the came from. It only matters that they taste good! This is a small batch recipe and makes only half a dozen or so Whoopie Pies.

Simple every day baking ingredients. It is rather a lengthy list, but don't be put off by that. There are two parts to the recipe. The cakes and the filling.
For the cookies:
- 2 cups (280g) plain all purpose flour
- 1/2 tsp baking soda (bicarbonate)
- 1/2 tsp baking powder
- 1/2 tsp salt
- 1/2 TBS cream of tartar
- 1/2 cup (60g) unsweetened cocoa powder
- 1/4 cup (60g) butter, softened
- 1/4 cup (50g) lard, softened
- 1 cup (200g) granulated sugar
- 1 tsp vanilla extract
- 1 large free range egg
- 2/3 cup (160ml) soured milk (see note)

For the filling:
- 1/4 cup (35g) plain all purpose flour
- 3/4 cup (180ml) milk
- 3/4 cup (170g) butter
- pinch salt
- 1 tsp vanilla extract
- 1 3/4 cups (230g) sifted icing sugar

I have never made these without using both butter and lard, so I cannot attest to how well they would work without using both, or using all of one or the other. I suspect the mixture is the secret to how soft and delicious the cake part is.
I use Fry's cocoa powder. Do not be tempted to use chocolate drinking mix powder. They are not the same thing, and are not interchangeable. The drinking mix has things like sugar and dry milk powder added to it.

These are not complicated. You make the cookie parts first and then the filling afterwards. Maybe a bit time consuming, but worth every minute!
Preheat the oven to 375*F/190*C/ gas mark 5. Line several baking sheets with aluminum foil and set aside.
Sift the flour together with the cocoa powder, soda, salt and cream of tartar. Set aside.
In the bowl of a stand mixer, beat the lard and butter together with the sugar and vanilla until well blended. Beat in the egg, blending well together.
Add the flour mixture to the creamed mixture alternately with the flour mixture, beginning and ending with flour. Do not overmix.
Using 1/4 cup measure for each cookie, drop them onto the prepared baking sheets. One in each corner and one in the middle. (You may need to work in batches.) Make sure they are 4 inches apart from each other.
Bake in the preheated oven for 6 minutes. Reverse the cookie sheets and bake for 10 minutes longer. You will know they are done when you can lightly touch the with your finger and they spring back quickly.
Slide the foil off the baking sheet and leave to stand for 2 minutes. Then carefully scoop off with a spatula to a wire rack. You can trim them to an even roundness if you like with a pair of scissors.

To prepare the filling, whisk the flour and the milk together in a sauce pan until smooth. Cook over medium heat, whisking constantly until the mixture becomes thick and bubbly in the center. Reduce to a simmer and simmer for 2 minutes over low heat. Remove and set aside to cool.
Place the butter in a large mixer bowl and beat until softened. Add the salt, vanilla and sugar gradually and beat for 2 minutes. Beat in the cooked mixture, adding it 1 large spoonful at at time. Once its all been added, beat for 1 minute at high speed. It should be smooth, light and fluffy. If it seems a bit too soft, chill it until it firms up.
Sandwich the cookies together in pairs with some of this filling in the middle, dividing it equally amongst the cookies, and pressing them gently together.
Chill and then wrap each cookie individually. Store in the refrigerator, but do bring to room temperature before eating.
Notes
If you do not have sour milk, add 3/4 TBS of cider vinegar to the milk and leave to stand for half an hour.

These are totally delicious. You get lovely rich chocolate cake cookie layers and a rich and creamy filling. When put together these lovely bakes are like an Oreo Cookie on Steroids! I really hope you will be tempted to give them a go! You won't be sorry. I promise!
Some other Whoopie Pie Recipes on here that you might enjoy are:
BAKEWELL WHOOPIE PIES - My thoroughly British version of a Whoopie Pie. These tasty little cakes have all the characteristics of a traditional Bakewell tart . . . an delicious cake batter, containing ground almonds . . . raspberry jam, the almond icing on top and the glace cherry. Totally tasty!
APPLE CIDER DONUT WHOOPIE PIES - A very autumnal version consisting of two sweet apple cider reduction cakes, rolled in butter an cinnamon sugar and then sandwiched together with a cream cheese frosting! Again, totally delicious!
Yield: Makes about 6 or7 large double cookies
Amish Chocolate Whoopie Pies
Prep time: 20 MinCook time: 16 MinTotal time: 36 Min
More like little chocolate cake sandwiches rather than cookies, I don't know anyone that doesn't love these.
Ingredients
For the cookies:
- 2 cups (280g) plain all purpose flour
- 1/2 tsp baking soda (bicarbonate)
- 1/2 tsp baking powder
- 1/2 tsp salt
- 1/2 TBS cream of tartar
- 1/2 cup (60g) unsweetened cocoa powder
- 1/4 cup (60g) butter, softened
- 1/4 cup (50g) lard, softened
- 1 cup (200g) granulated sugar
- 1 tsp vanilla extract
- 1 large free range egg
- 2/3 cup (160ml) soured milk (see note)
For the filling:
- 1/4 cup (35g) plain all purpose flour
- 3/4 cup (180ml) milk
- 3/4 cup (170g) butter
- pinch salt
- 1 tsp vanilla extract
- 1 3/4 cups (230g) sifted icing sugar
Instructions
- Preheat the oven to 375*F/190*C/ gas mark 5. Line several baking sheets with aluminum foil and set aside.
- Sift the flour together with the cocoa powder, soda, salt and cream of tartar. Set aside.
- In the bowl of a stand mixer, beat the lard and butter together with the sugar and vanilla until well blended. Beat in the egg, blending well together.
- Add the flour mixture to the creamed mixture alternately with the flour mixture, beginning and ending with flour. Do not overmix.
- Using 1/4 cup measure for each cookie, drop them onto the prepared baking sheets. One in each corner and one in the middle. (You may need to work in batches.) Make sure they are 4 inches apart from each other.
- Bake in the preheated oven for 6 minutes. Reverse the cookie sheets and bake for 10 minutes longer. You will know they are done when you can lightly touch the with your finger and they spring back quickly.
- Slide the foil off the baking sheet and leave to stand for 2 minutes. Then carefully scoop off with a spatula to a wire rack. You can trim them to an even roundness if you like with a pair of scissors.
- To prepare the filling, whisk the flour and the milk together in a sauce pan until smooth. Cook over medium heat, whisking constantly until the mixture becomes thick and bubbly in the center. Reduce to a simmer and simmer for 2 minutes over low heat. Remove and set aside to cool.
- Place the butter in a large mixer bowl and beat until softened. Add the salt, vanilla and sugar gradually and beat for 2 minutes. Beat in the cooked mixture, adding it 1 large spoonful at at time. Once its all been added, beat for 1 minute at high speed. It should be smooth, light and fluffy. If it seems a bit too soft, chill it until it firms up.
- Sandwich the cookies together in pairs with some of this filling in the middle, dividing it equally amongst the cookies, and pressing them gently together.
- Chill and then wrap each cookie individually. Store in the refrigerator, but do bring to room temperature before eating.
Notes
If you do not have sour milk, add 3/4 TBS of cider vinegar to the milk and leave to stand for half an hour.


It's going to be Easter in just a few short weeks. I love Easter and have many fond memories from when I was a child . . . it's one of my favourite holidays.

The Easter Bunny always left us a whole lot of goodies . . . chocolate Easter Bunnies, chocolate Easter Eggs, those marshmallow filled candy eggs and if we were really lucky a fresh new bag of marbles or a jug of bubbles to blow.

Growing up I often saw photos of Pineapple Upside Down cakes in my mother's ladies magazines and on the telly, but it was not something that my mother ever baked. I suppose she might have considered it somewhat exotic, and she was a good, but plain cook.

Exotic was not really in her vocabulary when it came to food, and my dad really wouldn't have liked anything out of the ordinary anyways.

I always thought they looked so delicious and once I was grown up and living on my own, and raising a family, I often baked Pineapple Upside Down Cakes as a special treat. I used an old cast iron skillet and they were always very well received by everyone. We used to have them with dollops of sweetened whipped cream on top, or scoops of cold Vanilla Ice Cream.

I don't have an iron skillet over here. I have been looking for one, but haven't come across one yet. They are much too heavy to bring back on a plane when I go to Canada for visits. I thought Todd was going to have a heart attack the last time we went when I tried to stuff a full size turkey roaster in my bag. It took me a while to convince him that I wasn't nuts and that once you stuffed it and surrounded it with clothing it didn't take up much more room than a piece of paper would . . . well, at least that was my theory anyways.

The other night I baked my honey bun a delicious upside down pudding . . . a rich and buttery cake with a lucious toffee, apricot and hazelnut topping baked right in. Oh my but it was good.

Of course he enjoyed it with lashings of double cream . . .

And why not. In for a penny . . . in for a pound is what I always say!!!

*Upside Down Pudding*
Serves 6 to 8
Printable Recipe
Sometimes known as upside down cake, this is a delicious creamed cake mixture that is baked over top of a scrummy brown sugar and fruit base. Once it is baked and turn out, the fruit makes a very attractive picture with it's lovely rich butter, sugar and nut topping. You could also use pear halves and walnuts instead of the apricots and hazelnuts.
225g unsalted butter, divided, plus extra for buttering the pan ( cup)
50g soft light brown sugar (1/4 cup packed)
14 to 16 hazelnuts
600g of tinned apricot halves, drained well (large tin, 21 ounces)
170g demerara sugar (14 TBS)
3 large free range eggs, beaten
170g self raising flour (1 1/4 cup)
56g ground hazelnuts (1/3 cup)
2 TBS milk
custard or thick cream to serve
Preheat the oven to 180*C/350*F. Butter a 10 inch round cake tin and base line it with nonstick baking paper.
Cream 60g/1/4 cup of the butter together with the soft light brown sugar until pale and fluffy. Spread over the base of the prepared tin. Put a hazelnut into the hollow of each apricot half and invert onto the base. The apricots should completely cover the surface.
Cream the remaining butter and the demerara sugar together until pale and fluffy. Beat in the eggs, a little at a time, beating well after each addition. Sift the flour and then gently fold it into the creamed mixture, along with the nuts and milk, using a metal spoon. Spread the finished batter over the fruit.
Bake in the centre of the heated oven for 45 minutes, or until golden brown and well risen. Run a knife around the edge of the pudding and invert onto a armed plate to serve.
Serve warm and cut into wedges along with some custard or thick cream.


(Just look at the beautiful crown on those babies!!)
Here in the UK, tomorrow is Mothering Sunday. That special Sunday during the year when Mothers all over the United Kingdom get spoiled and cosseted by the families that love them 0h-so-very-much!!

My children are over in Canada, so they don't actually realize that this is Mothering Sunday as the North American one falls on the second Sunday in May, but no worries . . . that just means that I get to celebrate it twice!!

Todd always spoils me to death on the March one . . . and my kiddies spoil me to death again in May.
Yes, lucky is my middle name!!

I always like to bake something special for Mothering Sunday. Something special that I normally wouldn't have any other time of the year. Ok, so these are good any time at all, not just on special days . . .

But I guarantee if you bake them tomorrow morning for your mum . . . she'll love you to pieces!!!

They are guaranteed to bring you extra brownie points and put you in her good books for at least the rest of the year, and next year . . .
She'll be wanting you to bake some more! (Don't worry, I'm sure she won't mind sharing them! Mum's that are worth baking muffins for are always the sharing kind of mum's for sure!!)

*Jam Doughnut Muffins*
Makes 12
Printable Recipe
All the flavours of a delicious jam doughnut without any of the faff of frying. We love these!
melted butter for greasing the muffin tin
10 ounces plain flour
1 TBs baking powder
pinch salt
4 ounces caster sugar
1/2 of a grated nutmeg (more or less as desired)
4 ounces caster sugar
2 eggs, beaten
7 fluid ounces milk
3 ounces butter, melted and cooled
1 tsp vanilla extract
4 TBS strawberry or raspberry jam
To finish:
4 ounces butter melted
6 ounces granulated sugar
1 TBS ground cinnamon
Preheat the oven to 200*C/400*F. Butter a 12 cup medium muffin tin. Set aside.
Sift together the flour, baking powder, and salt. Whisk in the caster sugar and nutmeg.
Beat together the eggs, milk and cooled butter. Stir all at once into the flour mixture, mixing only until just combined. Do not overmix.
Spoon half of the batter into each of the prepared muffin cups. Top each with a teaspoon of jam, making sure it doesn't touch the sides. Spoon the remaining batter over top. Bake in the heated oven for about 20 minutes, until well risen and golden brown and firm to the touch.
While the muffins are baking prepare the finishing touches. Melt the butter in a bowl. Set aside. Whisk the sugar and cinnamon together in another bowl.
When the muffins are baked, leave to cool in the tins for about 5 minutes. Remove one at a time and dip the tops of each muffin into the melted butter and then roll them into the cinnamon sugar. Serve warm with a nice hot cuppa.
(Any leftovers can be reheated in the microwave for several seconds.)

I had never eaten Chorizo before I moved over here to England. It was not something I had ever heard of or even seen. I am a Chorizo convert and have come to love the delicious smokey flavour it brings to the dishes I use it in.

It also gives a lovely colour to the pan juices. It is now something that I would never be without in my larder, as it is so very versatile . . . in tortillas, casseroles, pasta sauces, scrambled eggs, stir fries . . . soups.

I found this recipe card recently in my local Waitrose grocery store. I was immediately taken with the photo on the front, and then, when I read the list of ingredients, I just knew I had to make it.

(Just look at that scrummy cabbage . . . mmmm . . . )
I love the Waitrose recipe cards. The recipes that they share on them are always deliciously wonderful.

The original recipe called for sherry or brandy, but since I am a Mormon, those are not things I regularly have in my kitchen in any quantity. I am happy to say that I substituted sherry vinigar with great success.
This was deliciously scrummy and a recipe that I will make again and again.

Company worthy even . . .
Trust me.

*Roasted Chicken with Chorizo and Spring Cabbage*
Serves 4
Printable Recipe
Moist and delicious chicken flavoured with the smokey flavours of chorizo, garlic and sweet spring cabbage.
4 free range chicken quarter portions
4 large cloves of garlic, unpeeled
250g Spanish Chorizo sausage, peeled and diced
1 TBS olive oil
2 TBS sherry vinegar
sea salt and freshly ground black pepper
1 pointed spring cabbage, trimmed, cored and shredded
Preheat the oven to 200*C/400*F. Place the chicken pieces into a shallow oven casserole dish. Add the garlic cloves and diced chorizo, scattering them amongst the chicken pieces. Drizzle with the olive oil, vinegar and season to taste with some salt and pepper. Roast in the heated oven for 15 minutes.
Remove the chicken from the oven. Remove to a plate. Stir the cabbage into the pan juices, then place the chicken back on top. Return to the oven and roast for an additional 35 to 40 minutes, or until the chicken is golden brown and cooked through and the juices run clear.
Remove from the oven and place the chicken on a heated serving plate. Keep warm. Slip the garlic cloves out of their skins and mash. Stir the mashed garlic into the cabbage mixture. Taste and adjust seasoning as necessary. Serve the chicken with a portion of the cabbage/chorizo mixture and some fluffy mashed potatoes.

If you have never seen a Spring Cabbage, or Sweetheart Cabbage as it is sometimes known, it looks like this. Quite common in grocery stores over here in the UK from about now. It is long and pointed, and quite loose leaved, quite unlike the normal cabbage which is round and very tightly leaved. It has a lovely mild flavour. You can substitute regular cabbage if you are unable to get the spring cabbage, with no problems.
Subscribe to:
Posts (Atom)





Social Icons