Pages

  • Contact Me
  • MAKE YOUR OWN (a list of make your own mixes)
  • Recipe Index
  • Privacy Policy
  • Advertising and Disclosure
  • Post Index

Search This Blog

Powered by Blogger.

Social Icons

The English Kitchen

Pages

  • Home
  • About Me
  • Cook Booklets
  • Categories
  • _Kitchen Wisdom
  • _In The Larger and Pantry
  • _Couldn't Live Without
  • _Kitchen Wish List
  • Additional Recipes
  • _Vegetarian
  • _Salads
  • _Breads
  • _Sandwiches

How to Cook Chicken in the Microwave

Wednesday, 3 March 2021

Chicken and Dumpling Casserole

No doubt about it, we eat a lot of chicken in this house. We love chicken and in all honesty, you cannot find a meat protein that is more adaptable than chicken.  It is one of those meats that quite easily goes with a multitude of flavors and cuisines. 

More often than not I will cook chicken pieces.  Either the breasts, or quarters, or thighs.  We are also very fond of chicken casseroles.  For those I often need either leftover roast chicken to use, or I will specifically cook and shred chicken breasts to use.  

I often buy whole packs of chicken breasts when they are on offer at the shops and poach or cook them, packing the meat into two cup containers, and freezing them. That way I always have a quantity of cooked chicken ready to use in a tasty dish at any given time.

One of the easiest ways to cook this chicken is in the microwave. If you know how to cook chicken in the microwave you will never be short of cooked shredded chicken. It is very simple to do and very quick. The chicken always comes out moist and delicious. Perfect for shredding or dicing. 
 
How to Cook Chicken in the Microwave 

When I worked at the Manor, I was always poaching chicken to be used in recipes, sandwiches, etc. My boss used to get me to poach them in a mixture of vermouth, stock and peppercorns.  And yes, in the microwave.  This method is very similar, but does not use vermouth.

You can poach chicken in the crock pot, instant pot, or in a saucepan on top of the stove as well. It does always yield moist and easy to shred chicken. 

Cooking it in the microwave, however, is simply the best and quickest way of doing it. 

I usually cook four breasts at a time.  Why breasts?  Because they lend themselves beautifully to this manner of cooking and they have the mildest flavor which makes them perfect for dishes and recipes in which you need to use cooked chicken.

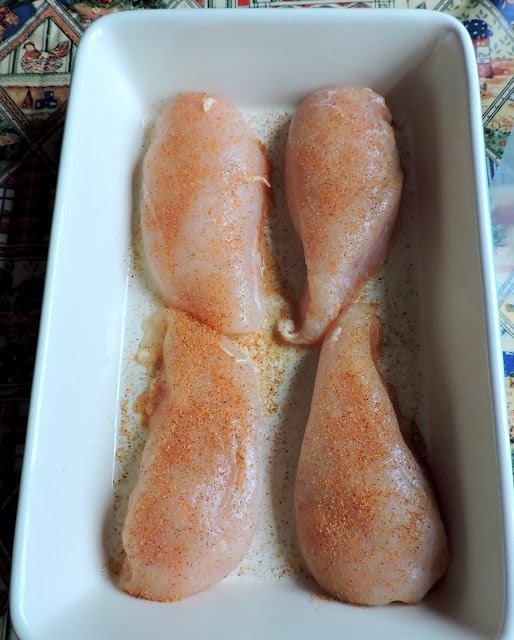
You will need a microwave safe dish which is large enough to hold your chicken breasts in one layer, with a bit of space available around each of them.  I simply season my chicken all over with either just salt and pepper, or  any other seasoning pertinent to the type of casserole you are wanting to make.

For instance if you are looking for a Mexican style casserole, then I would use Tex Mex seasoning, etc. If you are wanting to use them in a regular casserole just use ordinary sea salt and pepper, or seasoning salt.

Place them into the casserole dish with the widest side facing the outside of the dish.  Microwaves cook from the outer edges in towards the center of the dish.  The outer edges will begin to cook first.  That is why it is important to put the wide edge at the outside so that the narrower ends don't become over-cooked and dry. (See above photograph for perfect placement.)

You will need to add water, stock, or some other liquid in a quantity that will come to a level approximately 1/3 of the way up the breast.

How to Cook Chicken in the Microwave 

Once you have done that cover the dish with a single sheet of waxed paper or parchment paper.  You can also use a sheet of plastic wrap.

The goal here is to create a steam bath.  As the liquid in the casserole begins to boil, it creates steam which in turn helps to cook and poach the chicken perfectly, always with a tender and moist finish. 

Cook the in the microwave on high for four to five minutes per piece of chicken.

How to Cook Chicken in the Microwave 

The exact timings will depend on the size and thickness of your chicken and how many breasts you have in the casserole dish.  Do note however, if you are using plastic cling film/wrap you should leave a corner of the casserole dish open to vent it.

How to Cook Chicken in the Microwave

They come out perfectly cooked and ready for other uses. I like to check the internal temperature just to make sure they are cooked through properly with a meat thermometer. It is best to check this by using a meat thermometer.  The proper temperature should be 165*F/74*C. 


Microwave Poached Chicken Breasts

Microwave Poached Chicken Breasts

Yield: variable
Author: Marie Rayner
Two tasty ways to poach chicken breasts in the microwave. Both work very well, giving you delicious and succulent cooked chicken ready to use in a multitude of chicken casseroles, etc.

Ingredients

Method One:
  • 4 boneless, skinless chicken breasts
  • 2 T chicken broth, white wine, citrus juice or water
Method Two:
  • 60ml orange juice (1/4 cup)
  • 2 TBS butter
  • 1/2 tsp pepper
  • 1/2 tsp salt
  • 4 boneless, skinless chicken breasts

Instructions

  1. For method one: Trim the chicken breasts; place in a microwave-safe 9-inch glass pie plate, and arrange them with the thicker portions toward the outside of the dish. Drizzle with the chicken broth. Cover with microwave-safe plastic wrap. Make a vent for the dish by turning a small section of plastic wrap back on itself, leaving a slender vent on one side of the plate. Microwave on high for 6 to 8 minutes, turning after 4 minutes. Let stand covered until ready to serve.
  2. For method two: In an 8 x 8 inch microwave safe baking dish, mix orange juice, butter, pepper and salt. Microwave on high for 2 minutes. Place chicken in baking dish. Spoon liquid mixture over chicken and cover dish with wax paper. Microwave on high for 12 minutes. Let stand 5 minutes before serving.
  3. You can of course use other seasonings and liquids. The secret is to have the tight cover so the juices do not evaporate in cooking.
Did you make this recipe?
Tag @marierayner5530 on instagram and hashtag it #marierayner5530
Created using The Recipes Generator

Now that you have some delicious cooked chicken you may be wondering how you can use it. You can of course shred or dice it, pack it into airtight containers and freeze it. In any case here are some of my favorite suggestions on how to use some of it. All are delicious! 

Chicken and Dumpling Casserole 

CHICKEN AND DUMPLING CASSEROLE

A fabulously tasty casserole that is quick and easy to make. Shredded chicken gets drizzled with a dumpling batter, with a liquid gravy poured over top. Like magic it makes a saucy chicken in gravy topped with dumplings. Serve with your favourite sides for midweek meal. Sized for two people, but you can easily double this recipe. (Click recipe title to go to the recipe) 

Chicken Enchilada Bake 
CHICKEN ENCHILADA BAKE 

This cheesy layered chicken enchilada casserole makes for a really quick, easy and delicious dinner time entrée. All you need is chicken, beans, sauce, cheese, and tortillas. Serve it with your favorite enchilada toppings for a real family pleaser! Click on recipe title to take you to the recipe. 

Hunter's Chicken and Chips

HUNTER'S CHICKEN AND CHIPS 

There are basically only four steps to follow for this fabulously tasty casserole.  Making it is as simple as throwing some frozen oven chips into the oven to bake and then topping with shredded cooked chicken. You dress the shredded cooked chicken with barbeque sauce. Then you layer them in a casserole dish with some cheese and salad dressing and then top with some bacon bits and crispy onions. Click title to go to this easy and delicious recipe. 

Crunchy Chicken Casserole 

CRUNCHY CHICKEN CASSEROLE 

Simple and satisfyingly delicious. Creamy and rich with lots of crunch. All you need on the side is a cooked vegetable and perhaps some crusty bread.  Click on recipe title to go to the recipe. 

CHICKEN AND MUSHROOM CASSEROLE WITH CRUSTY DUMPLINGS 

CHICKEN AND MUSHROOM CASSEROLE WITH CRUSTY DUMPLINGS 

Chunks of tender chicken, salty bacon, onions and browned mushrooms in a tasty sauce, topped with flavorful chive suet dumplings and baked in the oven until the casserole is all hot and bubbly and the dumplings are crusty and lightly browned.  Click on title to go to recipe. 

Hot Chicken Salad 
BACK TO THE 60'S HOT CHICKEN SALAD

This was a very popular luncheon dish for Ladies Who Lunch back in the 1960's and 70's.  Simple and yet very delicious! Rich and creamy with plenty of crunch and flavour. Click on title to get this fabulously tasty recipe.

Chicken Crumble Pot Pie 
CHICKEN CRUMBLE POT PIE 

Chicken . . .  Check!  Pot Pie . . .  Check!!  Crumble . . .  Check !!!  The three together  . . .  well that just spells Winner Winner Chicken Dinner to me! Click on the recipe title to go to this fabulous family friendly recipe!   

Buffalo Chicken Quesadillas 

BUFFALO CHICKEN QUESADILLAS 

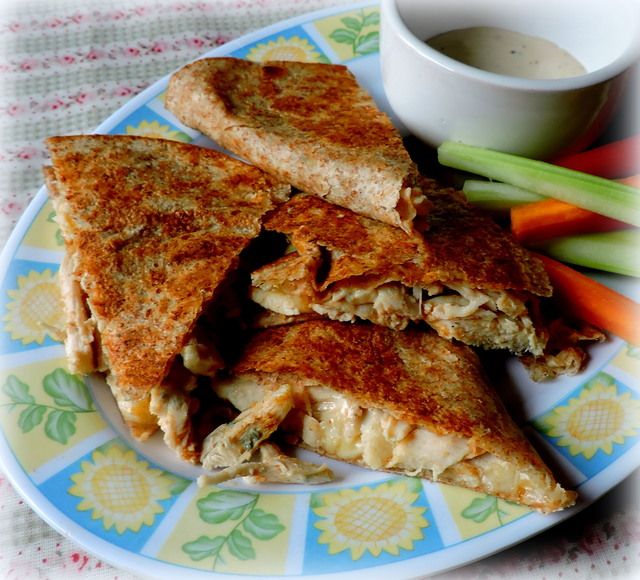
If you like quesadillas and buffalo wings, you will  love, LOVE these simple Buffalo Chicken Quesadillas!  All the flavour of the wings, with less faffing about. I like to serve the with a tasty blue cheese dressing for dipping and some vegetable sticks. See recipe title for link to recipe. 

Chicken Divan Casserole 
CHICKEN DIVAN CASSEROLE 

It's like having a bit plate of broccoli cheese and chicken all in one go . . . of course the crisp cracker and cheese topping is awfully scrummy as well. It  is an economical, delicious casserole that is so simple to make! By using low fat ingredients you can also keep it fairly healthy. Click title to go to recipe link. 

Amish Chicken Casserole 

AMISH CHICKEN CASSEROLE

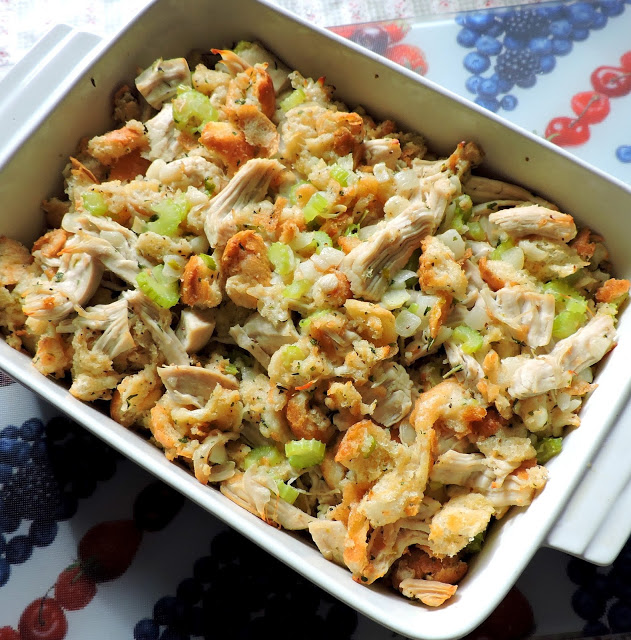
I saved the best for last. Amish Chicken Casserole is one of my absolute all time favorite chicken casseroles.   Not only is is a great way to use up stale bread, but you can also use up leftover cooked chicken or even turkey, or you can cook chicken specifically just to use in it.   This is delicious every which way but loose!  Click recipe title to go to link. I like to serve it with some gravy, boiled new potatoes and vegetables on the side. 

Amish Chicken Casserole 

This content (written and photography) is the sole property of The English Kitchen. Any reposting or misuse is not permitted. If you are reading this elsewhere, please know that it is stolen content and you may report it to me at mariealicejoan at aol dot com. 

Follow my blog with Bloglovin


read article

Traditional Irish Champ

Tuesday, 2 March 2021

Irish Champ 


Easy traditional Irish Champ is the perfect recipe to enjoy during the month of March when we will be celebrating the wearing of the green, Saint Patrick's Day! The Irish love their potatoes and there is no end to the ways they love to enjoy them. 


Champ and Colcannon are two of the most favourite ways and are both very similar. Champ is a potato/spring onion dish, whereas Colcannon has cooked cabbage in it as well as the onions. I love, LOVE them both!


Irish Champ 


I have seen Champ done with sauteed leeks and spring onions, but this version of Champ I am sharing today uses only spring onions (scallions.)  It is delicious either way.


Oddly enough, in the old days, champ used to be made with stinging nettles. They were a plant which grew abundantly in most places and which was free for the picking. Make sure you wear gloves if you do try to pick and use them because they do sting and will blister your skin and hands.


Normally Dock leaves grown near nettles, so you can swipe one of those over the sting to take it away. Interestingly enough when nettles are cooked, this removes the sting, so there is no worry with eating them.


This begs an answer to the question . . . Just who was it that decided that something which stung the skin could be safely eaten???  Yes . . .  I do have a curious mind.


Irish Champ 


Over the years, Spring Onions, or scallions as they are also known, have become the standard to use in the making of champ. I just think it is a fabulously tasty dish.  We really do love it!


Everyone in my immediate family has had our DNA done now and we have discovered a healthy amount of Irish DNA in our family tree (with the exception of our dad who is 91% French). This gives us all the more reason to celebrate our Irish roots this year!


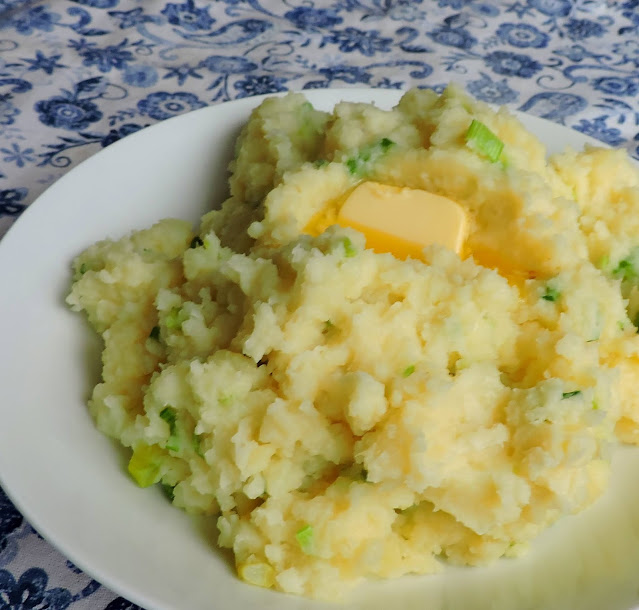
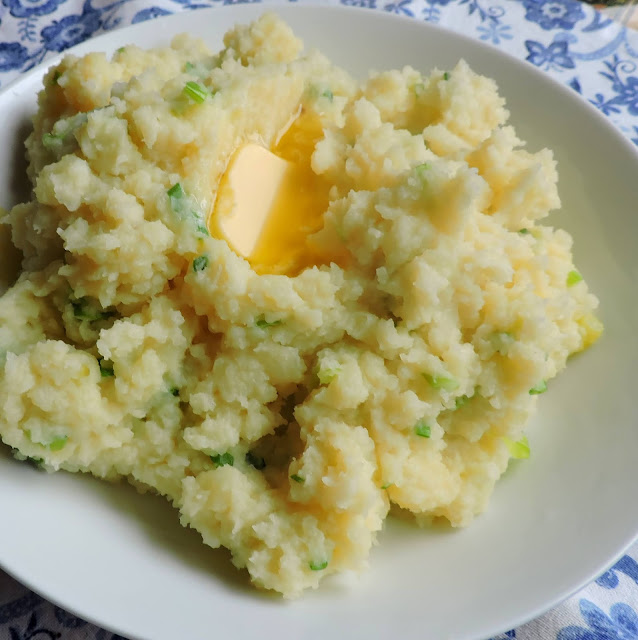
Mashed potatoes with warm milk, spring onions and butter beaten into them.  It's so tasty.   The Irish know how to do potatoes and do them well!


Traditional Irish Champ 


You can use leftover boiled potatoes to make this quite easily. Just reheat the potatoes in an amount of whole milk. Once heated through, mash and add the remaining ingredients. Easy Peasy.


Today I started from scratch. 


For this you will want to use a floury type of potato, like a Russet or Maris Piper, King Edward. You do NOT want a new potato or waxy potato. They do NOT mash well. Trust me on this.


Traditional Irish Champ 


Once you have the right kind of potato, everything else is a doddle. Simply peel the potatoes, cut into chunks, and cook them in some lightly salted boiling water. 


You will need to cook them until they are fork tender, but not falling apart in the water. Take care not to overcook them. It should take roughly 15 - 20 minutes depending on the size of your potato chunks.


Traditional Irish Champ 


Once they are cooked you will need to drain them very well and then return them to the pot.  I like to let them sit in the heat of the pot over the residual heat of the burner to finish drying them out, with a clean tea towel thrown over top of the pan. 


This allows the steam to be released without it being dropped back into the pan, whilst still keeping he potatoes heated.


Traditional Irish Champ 


I always warm the milk when I am doing mash of any kind.  It doesn't take long to do it in the microwave. Just heat it on high for about a  minute.  I add the spring onions to the milk before heating it.


This helps to take any sharp flavour away from the onion and makes them just right for stirring into the mashed potatoes.  It also helps to infuse the flavor of the onion into the milk beautifully. A quantity of butter is also stirred in, plus some salt and pepper. You can use white or black pepper.


Irish Champ 


The Irish used to serve this in a big bowl, hot from the stove. 


A big knob of butter would be melting into the middle of it so that the family could dip their pieces of bread into the butter and scoop up some potatoes to eat with it at the same time.   


It sounds all warm and cosy to me, although nowadays with Covid, perhaps not a wise thing to do.


Traditional Irish Champ 


I tend to serve it as a side dish these days.  It goes with just about everything.  Lamb is especially nice.  Grilled Chops, or some roasted lamb would be lovely.


Today we had it with grilled and glazed bangers/sausages. If you can get real Irish ones so much the better!! 


Traditional Irish Champ 


In working with the green theme, I served some steamed green beans on the side.  It was a really lovely meal. Really lovely.


I will always regret that during my stay in the UK, I never did get to visit Ireland, and it was so close too. I have heard that it is a beautiful country with too many shades of green in its landscape to count.


Traditional Irish Champ 


The closest I ever got was enjoying the company of a few Irishmen on the train back from London one time. Those Irish sure have the gift of the gab, especially when they've been enjoying  a Guinness or two or three.  Very pleasant folk to be sure!


Irish Champ

Irish Champ
Yield: 4
Author: Marie Rayner
prep time: 5 Mincook time: 25 Mintotal time: 30 Min
An old Irish Dish, consisting of fluffy white mashed potatoes infused with plenty of butter, milk and spring onions.

Ingredients

  • 1 kg (2 1/4 pounds) floury potatoes, peeled and halved
  • 225ml whole milk (1 cup)
  • 1 bunch spring onions, thinly sliced (6 to 8 scallions)
  • 1/2 tsp salt
  • 1/4 tsp white pepper
  • 50g (2 ounces) butter
  • a knob of butter to serve

Instructions

  1. Place the potatoes into a large pot and fill with enough cold water to cover. Lightly salt the water, bring to the boil and cook until fork tender, about 20 minutes.
  2. Drain the tender potatoes well. Return them to the pot and shake over the residual heat of the burner to dry them out. Place a clean tea towel over top to absorbe any access moisture.
  3. Place the milk into a large glass measuring cup along with the spring onions. Heat gently in the microwave for about 1 minute.
  4. Mash the potatoes well with the butter until smooth. Stir in the milk and spring onions to combine well together. Season with salt and white pepper.
  5. Pile into a bowl and top with a knob of butter. Serve immediately.
Did you make this recipe?
Tag @marierayner5530 on instagram and hashtag it #EnglishKitchen
Created using The Recipes Generator
Traditional Irish Champ


This content (written and photography) is the sole property of The English Kitchen. Any reposting or misuse is not permitted. If you are reading this elsewhere, please know that it is stolen content and you may report it to me at: mariealicejoan at aol dot com Thanks so much for visiting. Do come again! 

Follow my blog with Bloglovin

read article

Swiss Steak

Monday, 1 March 2021

Swiss Steak 

This classic Swiss Steak recipe has been a family favourite of ours for as long as we can remember. It is something my mother used to make for us, something I made for my own children and something we all still enjoy. 

Swiss Steak is made with pieces of rump or round steak, pounded and cooked in a rich tomato sauce until it is fork tender.  This is pure and simple comfort food. Prepare to fall in love.

Swiss Steak 

Now there are pobably as many swiss steak with tomatoes recipes out there as there are women who love to cook!  Each will have an element of similarity to each other. 

This vintage steak recipe is one that we have been cooking in our family for what seems like forever and I can assure you that it is rich and delicious.

Swiss Steak 

Swiss steak is a method of slow cooking what is normally a tougher cut of beef, such as a round steak, until it is fork tender.  Usually in a lush tomato sauce. 

Pounded and braised, you just cannot get any more delicious of a supper entree than this one! Its quite simply the best.

Swiss Steak 

I am not really sure why it is called Swiss Steak, because there is certainly nothing to do with Switzerland in the recipe. Its a misnomer I expect.  At its very simplest, it involves browning a tough piece of meat and then braising it either in the oven or on top of the stove, until it is meltingly tender.

I have done it both ways myself. In the oven and on top of the stove. Both ways are perfection.  
 
There are also as many ways of doing this as there are cooks.  My ex mother in law used to do hers with plenty of onions and tomato soup, and baked it in the oven. My mother always used onions and canned tomatoes, and cooked it on top of the stove. Both were excellent.

Swiss Steak 

Two basic keys to the success of this dish lay in the pounding of the meat and in the slow braise. Both are elementary to this dish.  

As a young girl I would love it when my mom would let me pound the steak. She had a lovely meat pounder that she used.  For many years I did not. I always used the edge of a bread or side plate. It worked wonderfully. 

Swiss Steak 

I use a dedicated meat pounder now.  Use the dimpled side of it so that it really gets the flour into the meat. You want to pound and pound, adding flour, until the steak can no longer absorbe the flour you are pounding in to it. 

I cut the steak into serving sized pieces, seasoning them all over with salt and black pepper. I then pound, and pound and pound. This is key.  I believe the pounding helps to break down the tougher fibres in the meat.


Swiss Steak 

The flour helps to create a nice brown crust on the meat and create flavour in the braising liquid. It won't stay on the meat, it kind of dissolves into the gravy, helping to thicken it. I like to brown it long and slow over a moderate heat. 

Once all of your pieces are pounded and browned, you can add your liquid and other ingredients. Onions are a must. I always add plenty of onions, but you can also add sliced peppers, mushrooms, shallots, etc. They will help to flavour the gravy.  

You also want to use a good tinned tomato. I tend to use the chopped tinned tomatoes in tomato juice these days. My mom always used just plain old whole tomatoes in water, but she didn't really have a choice, that's all there was.

My sister likes to use stewed tomatoes, which have onions and peppers in them, and sometimes herbs. I just use plain chopped tomatoes in juice, but a good one.  Cirio are my favourite.

Swiss Steak 

You can leave it old school with just tomatoes and onions and perhaps some peppers and really not add much of anything else. But I do always add a splash of something like Worcestershire Sauce, and sometimes some chili sauce or horseradish to give it a bit of zestiness.

I cannot begin to tell you how very delicious this is.  It is incredibly so, and such a simple thing too.

Swiss Steak 

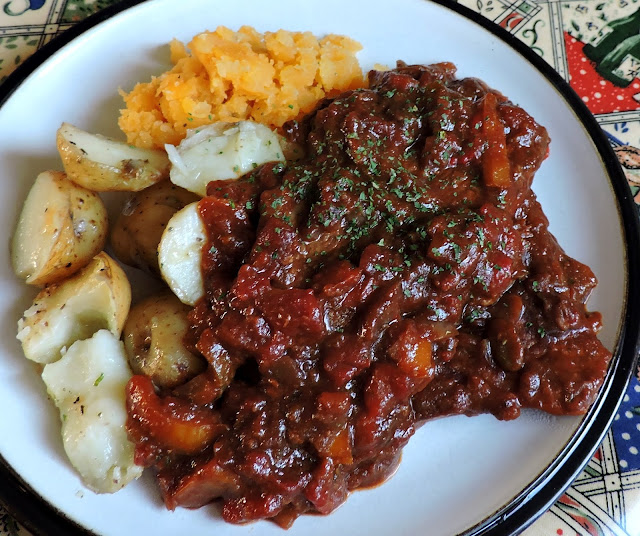
Can you see how very tender that meat is? It literally melts in your mouth. Normally I would serve it with a nice fluffy mound of buttery mashed potatoes. That is our side dish of choice. Today I had none, but some baby new potatoes. 

One must make do with what one has these days and be glad of it. New potatoes, simply boiled and buttered it was along with some mashed swede. It was delicious. Comforting. Lovely. 
 
Life doesn't get much better than being able to sit down with and enjoy a tasty plate of this. It is truly the BEST.


Swiss Steak

Swiss Steak

Yield: 6
Author: Marie Rayner
prep time: 15 Mincook time: 2 Hourtotal time: 2 H & 15 M
This was one of our favourite meals when I was growing up, and again, when I was bringing up my own family. My kids still request it when I have the opportunity to cook for them.

Ingredients

  • 1 1/2 pounds of beef rump or round steak, cut into serving size pieces
  • 1/2 (70g) cup flour
  • salt and pepper to taste
  • 1 fat clove of garlic, peeled and crushed
  • 2 large spanish type onions, peeled and thinly sliced
  • 4 cups canned chopped tomatoes, undrained
  • 1 tsp Worcestershire Sauce

Instructions

  1. Season the pieces of steak with salt and pepper and pound the flour into them with the edge of a bread plate, or a meat pounder, pounding on both sides and pounding until no more flour can be absorbed by the meat. This step is what makes the meat meltingly tender.
  2. Melt the butter in a large skillet and brown the pieces of steak on both sides, removing as done to a plate. Once all the steak is browned, sauté the onions in the drippings along with the garlic.
  3. Return the steak to the skillet along with the tomatoes and Worcestershire sauce . Season to taste with salt and pepper. Bring to a boil, then reduce heat and simmer at a very low temperature, covered, for about an hour and a half, to two hours, until the steak is tender and the sauce is slightly thickened.

notes:

The above recipe is by no means rigid. Feel free to add your own twist to it, perhaps a dash of balsamic vinegar, or a squirt of tomato catsup or brown sauce. I sometimes add a dash of horseradish, and some sliced peppers, or even some North American Chili sauce. That's what makes comfort food comfort food. It is an indelible print of our souls.

Did you make this recipe?
Tag @marierayner5530 on instagram and hashtag it #EnglishKitchen
Created using The Recipes Generator
Swiss Steak

This content (written and photography) is the sole property of The English Kitchen. Any reposting or misuse is not permitted. If you are reading this elsewhere, please know that it is stolen content and you may report it to me at: mariealicejoan at aol dot com Thanks so much for visiting. Do come again! 


Follow my blog with Bloglovin
read article
new entries old entries
Subscribe to: Posts (Atom)

If You Like What You See

If you like what you see and wish to donate to help pay for butter, sugar, eggs and whatnot, every little bit is appreciated. Thanks!
PRIVACY POLICY

Buy the Book!

If you are a Baking Enthusiast and a fan of British Baking you are going to love this new book I wrote. From fluffy Victoria sponges to sausage rolls, the flavors of British baking are some of the most famous in the world. Learn how to create classic British treats at home with the fresh, from-scratch, delicious recipes in The Best of British Baking. Its all here in this delicious book! To find out more just click on the photo of the book above!

Translate


This is a book I wrote several years ago, published by Passageway Press. I am incredibly proud of this accomplishment. It is now out of print as my publisher went out of business after Covid, but you can still find used copies for sale here and there. If you have a copy of it, hang onto it because they are very rare. This was a real labor of love for me and a dream come true as I had always wanted to write a book since I was a child. Hopefully I will be able to republish it one day. If you know of a publisher who is looking for something let me know!

Welcome, I'm Marie

Welcome, I'm Marie
Canadian lover of all things British. I cook every day and like to share it with you!
A third of my life was spent living in the UK. I learned to love the people, the country and the cuisine. I have always been an Anglophile. You will find plenty of traditional British recipes here in my English Kitchen. There are lots of North American recipes also, but then again, I am a Canadian by birth. I like to think of my page as a happy mix of both. If you are looking for something and cannot find it, don't be afraid to ask! I am always happy to help and point you in the right direction, even if it exists on another page, or in my extensive collection of cookbooks. I moved back to Canada in the year 2020 and have been busy building a new life for myself back in my homeland. I am largely retired now, except for this little space on the internet that I call home. I hope you will stay a while and have a good boo around. There's lots of deliciousness here to explore!

Search This Blog

Featured

Brown Sugar Quick Bread – Perfect for Tea Time
  I have a delicious quick bread recipe to share with you today!  No yeast required, just simple store cupboard ingredient, put together in ...

Popular Posts

  • Fried Cabbage with Bacon & Onions
      I have always loved fried cabbage.  I first had it when I was in high school.  We cooked it in our Home Economics Class. It was just ...
  • Sticky Lemon Chicken
    I am always on the look out for a good chicken breast recipe.  We eat a lot of chicken in this house, and it mostly comes in the form of...
  • Lemon Friands
    Anyone who knows me, knows that I am a nut for anything lemon flavoured. It's always been one of my absolute favourite taste thril...
  • Quick and Easy Bacon and Egg Tarts
       You might not think that you have time to do a bacon and egg breakfast on a weekday, but this recipe here today proves that just isn...
  • Mary Berry's Cheese Scones
    I wanted to make some scones to enjoy the other day.  I have made quite a few scones here on the blog and I love them all. I do like to try ...

My Favourite Places

  • Welcome Home Kitchen Blog
  • Cookbooklets
  • Categories
  • _Kitchen Wisdom
  • _In the Larder and Pantry
  • _Couldn't Live Without
  • _Kitchen Wish List

Archive

  • ▼  2025 (245)
    • ▼  September (6)
      • Brown Sugar Quick Bread – Perfect for Tea Time
      • Old-Fashioned Cornflake Cookies Recipe – Just Like...
      • How to Make Spicy Portuguese Potatoes – Authentic ...
      • Simple Chicken Valdostana Recipe – A Quick & Easy ...
      • Simple Tomato & Lentil Soup – Nourishing, Budget-F...
      • Delicious Air Fryer Ham & Cheese Toastie – Ultimat...
    • ►  August (29)
    • ►  July (29)
    • ►  June (30)
    • ►  May (31)
    • ►  April (30)
    • ►  March (31)
    • ►  February (28)
    • ►  January (31)
  • ►  2024 (349)
    • ►  December (29)
    • ►  November (30)
    • ►  October (29)
    • ►  September (29)
    • ►  August (26)
    • ►  July (26)
    • ►  June (30)
    • ►  May (31)
    • ►  April (30)
    • ►  March (30)
    • ►  February (29)
    • ►  January (30)
  • ►  2023 (342)
    • ►  December (27)
    • ►  November (28)
    • ►  October (27)
    • ►  September (28)
    • ►  August (25)
    • ►  July (31)
    • ►  June (30)
    • ►  May (31)
    • ►  April (28)
    • ►  March (31)
    • ►  February (28)
    • ►  January (28)
  • ►  2022 (366)
    • ►  December (26)
    • ►  November (29)
    • ►  October (30)
    • ►  September (29)
    • ►  August (32)
    • ►  July (33)
    • ►  June (29)
    • ►  May (33)
    • ►  April (30)
    • ►  March (29)
    • ►  February (31)
    • ►  January (35)
  • ►  2021 (372)
    • ►  December (36)
    • ►  November (31)
    • ►  October (31)
    • ►  September (31)
    • ►  August (30)
    • ►  July (32)
    • ►  June (35)
    • ►  May (28)
    • ►  April (29)
    • ►  March (31)
    • ►  February (28)
    • ►  January (30)
  • ►  2020 (317)
    • ►  December (30)
    • ►  November (23)
    • ►  October (31)
    • ►  September (29)
    • ►  August (27)
    • ►  July (30)
    • ►  June (26)
    • ►  May (26)
    • ►  April (26)
    • ►  March (25)
    • ►  February (23)
    • ►  January (21)
  • ►  2019 (334)
    • ►  December (20)
    • ►  November (23)
    • ►  October (23)
    • ►  September (31)
    • ►  August (32)
    • ►  July (25)
    • ►  June (32)
    • ►  May (34)
    • ►  April (29)
    • ►  March (30)
    • ►  February (28)
    • ►  January (27)
  • ►  2018 (363)
    • ►  December (30)
    • ►  November (30)
    • ►  October (31)
    • ►  September (29)
    • ►  August (31)
    • ►  July (34)
    • ►  June (30)
    • ►  May (30)
    • ►  April (28)
    • ►  March (33)
    • ►  February (27)
    • ►  January (30)
  • ►  2017 (372)
    • ►  December (32)
    • ►  November (32)
    • ►  October (32)
    • ►  September (36)
    • ►  August (29)
    • ►  July (30)
    • ►  June (30)
    • ►  May (31)
    • ►  April (32)
    • ►  March (29)
    • ►  February (29)
    • ►  January (30)
  • ►  2016 (410)
    • ►  December (35)
    • ►  November (32)
    • ►  October (33)
    • ►  September (35)
    • ►  August (37)
    • ►  July (36)
    • ►  June (32)
    • ►  May (35)
    • ►  April (31)
    • ►  March (36)
    • ►  February (34)
    • ►  January (34)
  • ►  2015 (396)
    • ►  December (34)
    • ►  November (32)
    • ►  October (34)
    • ►  September (36)
    • ►  August (43)
    • ►  July (32)
    • ►  June (29)
    • ►  May (33)
    • ►  April (33)
    • ►  March (32)
    • ►  February (26)
    • ►  January (32)
  • ►  2014 (431)
    • ►  December (38)
    • ►  November (38)
    • ►  October (41)
    • ►  September (32)
    • ►  August (31)
    • ►  July (36)
    • ►  June (40)
    • ►  May (42)
    • ►  April (39)
    • ►  March (34)
    • ►  February (27)
    • ►  January (33)
  • ►  2013 (385)
    • ►  December (41)
    • ►  November (36)
    • ►  October (36)
    • ►  September (32)
    • ►  August (30)
    • ►  July (32)
    • ►  June (31)
    • ►  May (29)
    • ►  April (25)
    • ►  March (33)
    • ►  February (30)
    • ►  January (30)
  • ►  2012 (384)
    • ►  December (34)
    • ►  November (38)
    • ►  October (35)
    • ►  September (33)
    • ►  August (35)
    • ►  July (28)
    • ►  June (33)
    • ►  May (30)
    • ►  April (29)
    • ►  March (30)
    • ►  February (30)
    • ►  January (29)
  • ►  2011 (338)
    • ►  December (32)
    • ►  November (29)
    • ►  October (28)
    • ►  September (28)
    • ►  August (28)
    • ►  July (29)
    • ►  June (28)
    • ►  May (26)
    • ►  April (26)
    • ►  March (29)
    • ►  February (27)
    • ►  January (28)
  • ►  2010 (288)
    • ►  December (32)
    • ►  November (30)
    • ►  October (32)
    • ►  September (25)
    • ►  August (24)
    • ►  July (5)
    • ►  June (27)
    • ►  May (23)
    • ►  April (14)
    • ►  March (23)
    • ►  February (25)
    • ►  January (28)
  • ►  2009 (173)
    • ►  December (27)
    • ►  November (24)
    • ►  October (26)
    • ►  September (23)
    • ►  August (26)
    • ►  July (21)
    • ►  June (23)
    • ►  May (3)

Contact Form


© The English Kitchen.
Customized by My Fairy Blog Mother.