Pages

  • Contact Me
  • MAKE YOUR OWN (a list of make your own mixes)
  • Recipe Index
  • Privacy Policy
  • Advertising and Disclosure
  • Post Index

Search This Blog

Powered by Blogger.

Social Icons

The English Kitchen

Pages

  • Home
  • About Me
  • Cook Booklets
  • Categories
  • _Kitchen Wisdom
  • _In The Larger and Pantry
  • _Couldn't Live Without
  • _Kitchen Wish List
  • Additional Recipes
  • _Vegetarian
  • _Salads
  • _Breads
  • _Sandwiches

Spice Cake with a Spicy Mocha Frosting

Monday, 4 October 2021

Spice Cake with a Spicy Mocha Frosting

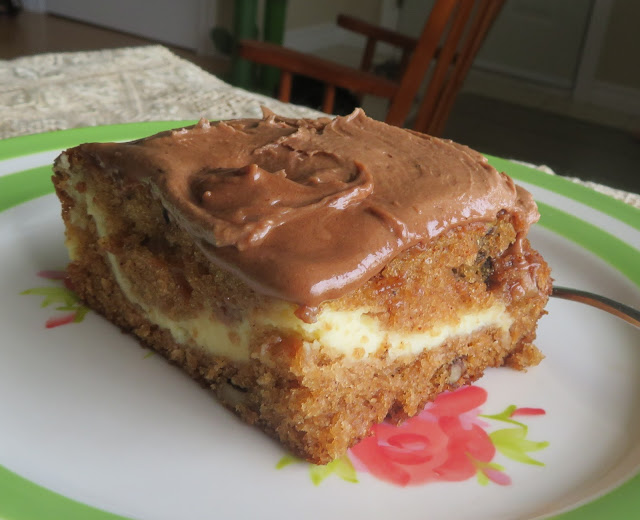
 Spice Cake with a Spicy Mocha Frosting.  The recipe I am sharing with you today is for a delicious nut studded spice cake with a fabulous old fashioned mocha icing.

I love snack cakes and this is one of the best. Not only is it one of my favorite spice cakes, but it has a ribbon of cream cheese filling running through the middle of it.

Spice Cake with a Spicy Mocha Frosting 
Back before I moved over to the UK you used to be able to buy these small recipe magazines put out by Pillsbury, Betty Crocker etc. in the grocery stores. They would be situated near the tils.  

Something for you to peruse while you were waiting for your turn to empty your shopping trolley onto the conveyor belt.  I could never resist looking at them.  

Spice Cake with a Spicy Mocha Frosting 
I had collected quite a few through the years.  Sadly I lost them all when I moved back to Canada last autumn, save a few of them that I somehow had the forethought to pop into my luggage.

This recipe comes from one entitled Fall Baking by the people who make Gold Medal  flour. It was published in 2000, and was always one of my favorite of those little books. 

Spice Cake with a Spicy Mocha Frosting 
I cut the original recipe in half.  The original made a 13 by 9 inch cake.  Far too much cake for just me, and in all truth so is an 8-inch square cake. Its a good thing I have some family to share it with!

Spice cake is something I have always loved.  Flavored with warm baking spices,  it is just a cake I have always enjoyed, in any way shape or form.

Spice Cake with a Spicy Mocha Frosting

Flavored with cinnamon, ginger, nutmeg, cloves and all spice, some cakes will also use molasses to sweeten them. This cake does not.

Instead it uses brown sugar, which also goes very well with warm baking flavors.


Spice Cake with a Spicy Mocha Frosting 
The batter is enriched by the use of sour cream, which produces a lovely, moist cake. I know there are some people who don't like the word moist. I am not one of them.

I embrace moistness. To me moist spells delicious!

Spice Cake with a Spicy Mocha Frosting 
What makes this cake a bit unique however is that it has that ribbon of cheesecake running through the middle of it. Oh my goodness.

What's not to fall in love with when you are talking about something like that?  Spice cake, moist and spicy . . .  cheesecake, rich and decadent.  Oh my my  . . . 
 

Spice Cake with a Spicy Mocha Frosting 
WHAT YOU NEED TO MAKE SPICE CAKE WITH SPICY MOCHA FROSTING

Simple ordinary ingredients most of us always have in our homes, that's what! 

For the cake:
  • all purpose flour
  • brown sugar
  • sour cream
  • chopped toasted walnuts
  • butter
  • water
  • warm baking spices (cinnamon, cloves, allspice, nutmeg and ginger)
  • baking soda and baking powder
  • salt
  • egg (1) 

Spice Cake with a Spicy Mocha Frosting 
The filling uses equally simple ingredients and only three of them:

  • cream cheese
  • sugar
  • egg yolk

And then the frosting is simple as well:

  • icing sugar
  • butter
  • cocoa powder
  • hot water
  • cinnamon
  • instant coffee
You see, nothing complicated there in the least.

Spice Cake with a Spicy Mocha Frosting 
HOW TO MAKE SPICE CAKE WITH A SPICY MOCHA FROSTING

Again, this is a very simple cake to make. You want to make the cheesecake filling before you start the cake.  This is easily done by whisking them all together until smooth.

Likewise the cake batter is also very easy to make.  Once more, you simply whisk everything together until smooth.

I do like to use toasted nuts in all of my bakes. This isn't really necessary, but I like the extra nuttiness that results from toasting them.  Again a simple thing, spread on a baking sheet in a single layer, in a moderate oven for about 8 minutes.  Let them cool before using.

Spice Cake with a Spicy Mocha Frosting 
I often do a whole bag at a time, keeping them in an airtight container in the freezer so they don't go rancid. Ready to take out and use whenever I need toasted nuts.

Once you have the filling and the cake batter done, it is a simple matter of layering them in a prepared baking tin. I used an 8-inch square tin which was buttered and lined with baking paper.


Spice Cake with a Spicy Mocha Frosting 
You may wonder why I always line my tins if I am buttering them anyways. Its simple really.  It helps me to be able to safely lift the baked cake out of the tin when it is done. 

This is a matter of practicality when you are talking about smaller 8-inch cakes and bakes such as brownies and other bars. Also, if you don't want the grid marks on the top of your cakes and bakes, being able to lift them out prevents that.

Spice Cake with a Spicy Mocha Frosting  

Layering the cake layers and cheesecake layers is probably the most complicated part of this recipe, but even that is easy to do.

Just spoon and spread half of the cake batter in the prepped pan.  Dot the cheesecake filling over top and then spread it as evenly as you can over the cake batter.  This is quite easy if you use the back of a metal spoon.

Spice Cake with a Spicy Mocha Frosting 
Finally the remaining cake batter is spread over top of the cheesecake layer.  Again, done in dollops and spread with the back of a spoon.

That's it just bake and then let it cool.  If you frost the cake before it is completely cold, the frosting will melt. 

The frosting is as easy as measuring everything into a bowl and whipping it all together until it is smooth and light and fluffy.  Spread that on the top of the cake and you are done!

Spice Cake with a Spicy Mocha Frosting


This really is a lovely cake. Moist and delicious and filled with Autumn flavors, all spicy and warm.  I loved the mocha frosting, but then again my favorite chocolate bar is the coffee crisp bar. I may not drink coffee, but I do enjoy eating it.

Altogether this is a fabulous snack cake. If you are not fond of mocha, then just leave out the coffee in the frosting.  It will still be a really tasty cake. I really hope that you will be inspired to bake it and that when you do, you enjoy it as much as I have!


Spice Cake with a Spicy Mocha Frosting

Spice Cake with a Spicy Mocha Frosting

Yield: 9
Author: Marie Rayner
Prep time: 15 MinCook time: 40 MinTotal time: 55 Min
A small batch recipe for a snacking spice cake that has a ribbon of cream cheese running through it and a lush mocha cinnamon frosting on top. Delicious!

Ingredients

For the cake:
  • 1 cup (140g) of all purpose plain flour
  • 3/4 cup (150g) packed light brown sugar
  • 1/2 cup (60g) dairy sour cream
  • 1/4 cup (28g) chopped toasted walnuts
  • 1/4 cup (60g) butter, softened
  • 1/4 cup (60ml) water
  • 1 tsp ground cinnamon
  • 1/4 tsp ground nutmeg
  • 1/4 tsp ground allspice
  • 1/4 tsp ground cloves
  • 1/4 tsp ground ginger
  • 3/4 tsp baking soda
  • 1/2 tsp baking powder
  • pinch of salt
  • 1 large free range egg
For the cheesecake filling:
  • 1/2 package (4 ounces) cream cheese, softened
  • 3 TBS sugar
  • 1 large free range egg yolk
For the mocha spice frosting:
  • 1 cup (130g) sifted icing sugar
  • 2 TBS butter, softened
  • 1 TBS cocoa powder, sifted (not drink mix)
  • 1 TBS hot water
  • 1/2 tsp ground cinnamon
  • 1/4 tsp instant coffee (dry)

Instructions

  1. Preheat the oven to 350*F/180*C/ gas mark 4.  Butter an 8-inch square cake tin and line with baking paper.
  2. Make the cream cheese filling by popping all of the ingredients into a bowl and beating together until smooth.
  3. Make the cake batter by combining all of the cake ingredients in a bowl and beating with an electric whisk until smooth, stopping to scrape the bowl occasionally.
  4. Spread half of the cake batter in the tin.  Dollop the cream cheese filling over top and then spread it out as well as you can in an even layer.  Finish with the remaining cake batter, spreading it evenly over top as much as possible.
  5. Bake for 35 to 40 minutes, or until a toothpick inserted in the center comes out clean and the top springs back when lightly touched.
  6. Leave to cool in the tin for 10 minutes, then lift out onto a wire rack to cool completely. 
  7. Once the cake is cooled, measure all of the frosting ingredients into a bowl and beat together with an electric whisk until smooth and spreadable.  Spread this mixture over top of the cake.
  8. Cut into squares to serve.  Delicious!
Did you make this recipe?
Tag @marierayner5530 on instagram and hashtag it #TheEnglishKitchen
All of the content you see here on this page, both photography and written, are the sole property of The English Kitchen, Marie Rayner. Any reposting or misuse is not permitted. If you are reading this elsewhere, please know that it is stolen content and you may report it to me at mariealicejoan at aol dot com 

Follow me on Bloglovin
read article

Cinnamon & Jam Biscuits

Sunday, 3 October 2021

 
Cinnamon  & Jam Biscuits


Cinnamon and Jam Biscuits.  I am almost embarrassed to show you this simple recipe today, but what the heck, when have I ever let embarrassment stop me from sharing with you?  Never, that's when.  Why start now.


I had seen a few recipes like this on the world wide web, and I had a tin of refrigerated biscuits about to expire so I thought why now. I will give them a go!


Cinnamon  & Jam Biscuits 


Plus I got up much later this morning than I usually do. Combine that with the General Conference of my church and the time that takes to watch . . .  and you find me, a person who was looking to make something not only delicious, but quick and easy to eat. 


So I decided to make these Cinnamon and Jam Biscuits which promised to deliver on all counts.  Quick to make. Easy to prepare. Delicious to eat.


Cinnamon  & Jam Biscuits


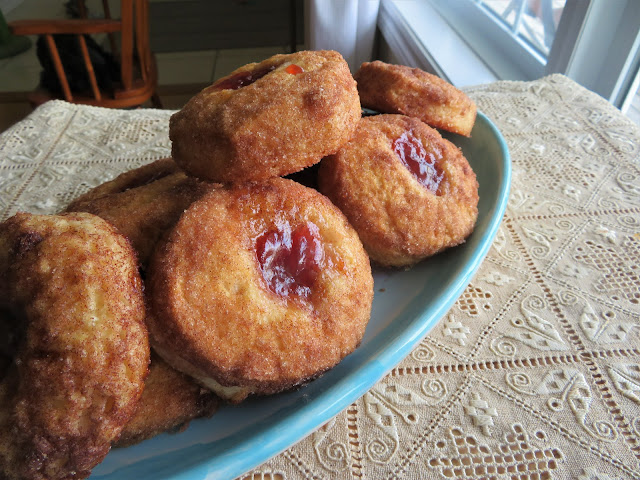
 I was not disappointed.  They were quick to make. Incredibly quick.  They were easy to make. Very easy.  


And yes, they were delicious. So much so that I wish I had a houseful of people to help me eat them up. Alas I have only two kittens and these kittens don't eat things like this . . .  sigh . . .  its a tough job but somebody has to do it.


Cinnamon  & Jam Biscuits 


All kidding aside, I didn't eat all of these. I am very fortunate that I live in a neighborhood with some elderly people who are always only too happy to enjoy the abundance from my table that I can't possibly use up myself.


And I am always only too happy to share with them.  Its a win/win situation.  So back to the Biscuits.


Cinnamon  & Jam Biscuits 


These really are very easy to make. So much so that you probably won't even break into a sweat making them. If you can open a biscuit can, melt some butter, dip and roll then you can very easily make these tasty delights. 


You do need a can of refrigerated biscuits, the buttermilk ones if you can possibly get them. They break up into 10 biscuits. Alternately you can make some biscuit dough from scratch, and I have an excellent recipe to do just that here. 


Cinnamon  & Jam Biscuits


Just make the dough and then cut it into round biscuits and then proceed as per this recipe. 


And on another note here I am referring to biscuits here as in North American biscuits (scones) not British biscuits (cookies)!  Not the same thing at all!


Cinnamon  & Jam Biscuits


The biscuits for this recipe get rolled first in melted butter. Just the tops and the edges. You then roll the tops and edges into Cinnamon sugar and  place them onto a baking sheet.


You actually don't need to butter or line the baking sheet, but I always do, just in case.  When sugar is involved, I always line.


Cinnamon  & Jam Biscuits


Once you have done this, you take the end of a wooden spoon handle or a thimble and press a deep hole into the centre of each biscuit.  Not all the way through, but about 2/3 of the way through to the bottom.


A portion of jam then gets spooned into the hole. Just a teaspoon. Don't be tempted to use any more than that.  Experience has taught me through the years that hot jam expands exponentially and you don't want that mess.


Cinnamon  & Jam Biscuits


This is truly a case where less IS more.  Trust me on this.


Today I used my sister's homemade strawberry jam, but you can use any kind of jam you enjoy. You can even use lemon curd.  Lovely, just so you know!


Cinnamon  & Jam Biscuits  


Don't let the simplicity of these biscuits, whether you use a refrigerated biscuit or make your biscuits from scratch, fool you into thinking that they are not something special.  They are indeed very special.


Simple and quick, with only a few ingredients, but still a wonderful way to let the ones around you know that you love them enough to want to bake them something special to eat.


Cinnamon  & Jam Biscuits 


These are not something to be embarrassed of serving, but instead something that shows you care.  After all it is really the simple things in life which bring us the most pleasure, and I can assure you that these will bring plenty of pleasure.


From that beautiful buttery cinnamon sugar crust to that sweet dimple of jam in the center, these are something you and your whole family will enjoy.


Cinnamon  & Jam Biscuits


I promise you that.


Food does not have to be complicated to taste good.  These simple treats are proof positive of that fact. Light, fluffy, spicy, sweet.  In short, scrumptiously tasty!


Easy Cinnamon & Jam Biscuits

Easy Cinnamon & Jam Biscuits

Yield: makes 10 biscuits
Author: Marie Rayner
Prep time: 15 MinCook time: 15 MinTotal time: 30 Min
A snap to make using refrigerated buttermilk biscuits, sugar, cinnamon and your favorite jam.

Ingredients

  • 1/2 cup (100g) granulated sugar
  • 1 tsp ground cinnamon
  • 1/4 cup (60g) butter melted
  • 1 tube refrigerated buttermilk biscuits, separated into 10 biscuits
  • 10 tsp your favorite jam

Instructions

  1. Preheat the oven to 375*F/ 190*C/ gas mark 5.  Line a baking sheet with some parchment paper. Set aside.
  2. Place the sugar and cinnamon into a bowl and mix well together.
  3. Place the melted butter in another bowl.
  4. Dip the tops and sides of each biscuit into the melted butter and then roll the sides and tops in the cinnamon sugar. Place well apart on the baking sheet.
  5. Using the end of a wooden spoon or a thimble make a deep indentation in the center of each biscuit. Place a teaspoon of jam into each.
  6. Bake in the preheated oven for 15 to 18 minutes until golden brown and puffed up.  Allow to cool for 15 minutes before eating. (Jam is very hot)
Did you make this recipe?
Tag @marierayner5530 on instagram and hashtag it #TheEnglishKitchen
Cinnamon  & Jam Biscuits
All of the content you see here on this page, both photography and written, are the sole property of The English Kitchen, Marie Rayner. Any reposting or misuse is not permitted. If you are reading this elsewhere, please know that it is stolen content and you may report it to me at mariealicejoan at aol dot com 

Follow me on Bloglovin
read article

Highland Waffles

Saturday, 2 October 2021


Highland Waffles 
Highland Waffles.  This is an old, old recipe that was handwritten into my Big Blue Binder. There was no reference as to where it comes from, and I can't find another recipe online, so your guess is as good as mine! 

I can only tell you that I have had this recipe for about 40 years or so and today is the first time I have ever made them.  I can tell you it won't be the last!
 

Highland Waffles 
For those who don't know, my Big Blue Binder is a large vinyl three ring binder that I have been lugging around with me since I was a young girl. It has travelled all the way across Canada and back again.

As well as across the Atlantic ocean and back again. It is filled with all of my tried and trues, recipes gleaned from family and friends, copied out of magazines and newspapers, etc.  A real culinary collection of this, that and everything else.

Highland Waffles 
I have been interested in food and cooking since I was a young girl. Mom used to let me clip the recipes from out of her ladies magazines.  Not that I was going to realistically cook any of them back then.

Although I did achieve a liking for the raw cake mix from my Robin Hood Bake set, lol. Always a foodie, although not always as discerning as I am now!

Highland Waffles 
I was looking for something to cook for breakfast this weekend, that would be a little heartier than my weekday breakfasts of toast or cereal.  I wanted something special.

I was looking through my binder and came across this recipe and thought why not! It was about time I tried out my waffle maker!  I don't want it gathering dust!

Highland Waffles 
There were a few things that really appealed to me about these waffles. One, they use pancake mix. I had bought a box of pancake mix but not used it yet.

Two, it had oatmeal in it, albeit quick oats, but what the heck. I used one of the pouches of instant oatmeal that are single servings. It was just the right size for half a recipe

Oh yes, I did half a recipe, which was the other thing which appealed. It was an easy recipe to cut in half. (I do give full sizes of ingredients needed in the notes of the recipe, so no worries there!)

Highland Waffles 

WHAT YOU NEED TO MAKE HIGHLAND WAFFLES

I expect these are called Highland Waffles because they use Scottish ingredients like oats and dried currants, but no Scotsman worth the wool in their kilt would use instant oats, or pancake mix for that matter! lol 

  • pancake mix
  • quick oats
  • dried currants or raisins
  • free range eggs
  • mil
  • molasses
  • melted butter


Highland Waffles 
HOW TO MAKE HIGHLAND WAFFLES

These are as simple to make as whisking together the dry ingredients in a bowl, and whisking together the wet ingredients in a beaker.  Add the wet to the dry and combine.

Not until totally smooth, just until combined and you don't have any huge streaks of dry ingredients showing.

The waffle iron does the rest of the job. Just heat your iron according to the manufacturers directions and pour the batter onto the iron in quarter cupful's.  Cook until golden brown on both sides.

Highland Waffles 
These go together in a flash and are so simple to make, really. Are you like me?  My first couple of waffles are always oddly shaped. 

Until I get the hang of just how much waffle batter to add and where to place it on the waffle maker.  Or is it just me who always messes up the first one or two, looks-wise.

Highland Waffles 

There is nothing wrong with the way they taste. They are just not perfectly round. It doesn't really matter, because they all taste fabulous, no matter the shape! 

The oatmeal gives them a somewhat nutty flavor that is really nice!  They also get a hint of smokiness and sweetness from the use of molasses in the batter. 

Highland Waffles  
If you are in the UK and have a difficult time finding molasses I have the perfect substitute for you. I found when I lived there that if you mixed together equal parts of golden syrup and dark treacle you got something very similar to molasses.

Dark treacle on its own is far too strong a flavor. I can remember making molasses cookies with dark treacle when I first moved over there and had to throw them all away.  Nasty!  Far too strong. 

It was a real learning curve for me for sure, this getting use to the difference between North American ingredients and British/European ingredients.

Highland Waffles

I became somewhat of an expert in substituting the differences, and now I am on this side of the pond I am doing it in reverse. There is always a way to get around it if you know what you are talking about!

In any case I hope you will give these delicious waffles a go!  Quick and easy to make. Wholesome, nutty and hearty with oats. Lightly sweetened with molasses and studded with dried currants or raisins.

Highland Waffles

Highland Waffles

Yield: 2
Author: Marie Rayner
Prep time: 5 MinCook time: 20 MinTotal time: 25 Min
Hearty with oats and studded with sweet currants, these delicious waffles make a wonderful change from the regular brand. I will give the measurements for 4 servings in the notes.

Ingredients

  • 3/4 cup (110g) pancake mix
  • 1/4 cup (30g) quick oats
  • 1/8 tsp cinnamon
  • 1/8 cup (20g) dried currants (or raisins)
  • 1 large free range egg, beaten
  • 3/4 cup (180ml) milk
  • 1 heaped TBS molasses
  • 3 TBS melted butter
To serve:
  • Maple syrup
  • butter
  • berries or chopped fruit 

Instructions

  1. Whisk all of the dry ingredients together in a bowl. Whisk the wet ingredients together in a beaker. Add the wet to the dry ingredients and combine both together just to combine. Its okay if there are a few lumps.
  2. Heat the waffle iron according to your manufacturers directions. Spray with some non-stick cooking spray.
  3. Ladle the waffle batter into the waffle maker by 1/4 cupsful. Bake until golden brown on both sides. Keep warm in a low oven while you bake the remaining waffles.
  4. Serve the waffles warm with some butter for spreading on top, maple syrup and fresh fruit.

Notes:

For four servings: 1 1/2 cup (220g) pancake mix, 1/4 tsp cinnamon, 1/2 cup (60g) quick oats, 1/4 cup (40g) dried currants or raisins, 2 large free range eggs beaten, 1 3/4 cup (420ml), 1/4 cup (60ml) molasses, 1/3 cup (80ml) melted butter

Did you make this recipe?
Tag @marierayner5530 on instagram and hashtag it #TheEnglishKitchen
All of the content you see here on this page, both photography and written, are the sole property of The English Kitchen, Marie Rayner. Any reposting or misuse is not permitted. If you are reading this elsewhere, please know that it is stolen content and you may report it to me at mariealicejoan at aol dot com  
 
Follow me on Bloglovin
read article

Melting Onions

Friday, 1 October 2021

Melting Onions 
I am in the process of testing side dishes for the up and coming holidays and this week I really wanted to try this recipe I found in a book by Diana Henry.  The name of the book is Pure Simple Cooking.

It is filled to overflowing with an abundance of simple recipes which require very few ingredients and not a lot of effort.  When you are talking holiday meals, any recipe which meets those requirements is a plus for me!

 
Melting Onions 
I adore onions.  They are quite simply one of my favorite vegetables and they go really well with roasts of any kind!  Turkey, beef, chicken, lamb, pork, even ham.  

These delectable onions would be a perfect side dish with any one of those meats.  And when I say delectable, I mean delectable. These onions simply melt in the mouth.

Melting Onions 
Are you the person who always wants to pig out on that onion which has roasted in the middle of your roast chicken?   (and who isn't!) If so, then this recipe is built just for you!

I don't know why I am always amazed when such simple ingredients and techniques come out crazy delicious. I shouldn't be.  We all know its the simple things in life which bring us the most pleasure after all!

Melting Onions

Caramelized onions are one of my favorite things to eat, but they are rather time consuming and you do have to keep a close watch on them.  Worth the effort, but still . . . 

When you are cooking a roast dinner you have plenty of other things to do, without having to babysit a skillet of onions!  With a tiny bit of prep, these quite simply cook themselves!  Easy peasy!  
 

Melting Onions 
As you all know by now, I am a no fuss no muss kind of a girl.  You can call it lazy if you want to, but the truth is I like recipes that can get me in and out of the kitchen with little or no effort.  

Yes, they have to taste delicious, but recipes that cook themselves?  Sign me up!

Melting Onions 
WHAT DO YOU NEED TO MAKE MELTING ONIONS

Very simple ingredients are needed to make these onions and you only need four ingredients.

  • medium sized brown onions, skins on
  • olive oil
  • salt and pepper
  • salted butter
That's it, pure and simple!

Melting Onions 
HOW DO YOU MAKE MELTING ONIONS

Nothing could be easier to make.  With just a tiny bit of prep, these can be in the oven and roasting in no time at all.

First of all you will need six medium sized brown onions.  By brown onion I mean onions with brown skins.  You need to do a bit of prep on them, but not a lot.  

Wash them really well and dry them and then trim all those hairy bits from the root end.  You can just cut them off as close to the root as possible. You want essentially to make sure that the root end stays intact.

Melting Onions 
Although it is not essential you will also want to trim a bit from the stem end of the onion. I like to cut a thin slice from the top, discarding it. 

You then need to make a deep cross cut down the height of the onion towards the root end, only going down 3/4 of the way.

Make sure you don't cut them all the way through the bottom. You want them to stay together. 

Melting Onions  
You then rub them all over with some extra virgin olive oil. This is when you want an oil with some flavor, so extra virgin olive oil is perfect.  You will also be seasoning them with some salt and pepper.

I like to use fine sea salt and freshly ground black pepper.

Melting Onions 
Once you have rubbed and seasoned them you need to pop them into a roasting dish that is small enough to hold them all snugly in a single layer.  

This helps to keep them intact during the long roasting time.  I used a 6 inch cake tin because I was only roasting 3 onions today for testing purposes.

Melting Onions 

They are then covered tightly with some more foil and popped into a moderately hot oven. (375*F/190*C)   Initially they need to roast for a fairly long period of time. 70 minutes.

But essentially, they are cooking themselves. You can just walk away and get on with whatever else you need to be doing.

Melting Onions 
At the end of the that time you remove from the oven and add some butter.  Just plain salted butter.  

I cut it into slivers and inserted it into the cuts of the onions so that the flavor gets right in there.

Melting Onions 
Back into the oven they go for another 25 minutes, until that butter gets all nut brown and golden and the onions get to the point where they really do melt in the mouth. 

You will need to baste them a couple of times with the melted butter. Not a problem.  The end result is something that brings pure and simple taste satisfaction.

Melting Onions

You can also turn these delectable little morsels . . .  cheesy melted onions  . . . by adding some grated strong cheddar cheese and popping them back into the oven just long enough for the cheese to melt.

Cheese and onion are perfect partners and this makes for a fabulous finish for what is essentially one of the simplest and most delicious sides dishes you could ever put together. I highly recommend!

PS - Do caution your guests to peel off the skins prior to eating. The onions slip out of them very easily. This tiny bit of hassle is well worth it. Trust me on this.

Melting Onions

Melting Onions

Yield: 6 as a side dish (can easily be halved)
Author: Marie Rayner
Prep time: 8 MinCook time: 1 H & 32 MTotal time: 1 H & 40 M
These will be the star of the show! These delicious onions melt in your mouth.

Ingredients

  • 6 medium onions, skins left on
  • 1/4 cup (60ml) olive oil
  • salt and black pepper to taste
  • 1/4 cup (60g) salted butter

Instructions

  1. Preheat the oven to 375*F/190*C/gas mark 5.  Have ready a baking dish that you can fit all the onions in upright, snugly.
  2. Carefully trim the bizarre bits from the root end of the onion, leaving the root and skins intact.  Trim a sliver from the other end as well. Make a cross cut into each onion 3/4 of the way down the height of the onion, taking care not to cut all the way to the bottom.
  3. Rub the onions all over with the oil, season with salt and pepper and then fit snugly into a small ovenproof dish.  Cover tightly with aluminum foil.
  4. Roast for 70 minutes.  Uncover.  Divide the butter amongst the onions, sliding it down into the centers.  Bake for a further 25 minutes, basting them with the melted butter a few times.  Serve at once.

Notes:

You can turn these into melting onions with cheese by adding some grated or cut strong cheddar (about 6 ounces) and stuffing it into the centers of each onion when done. Return to the oven just until the cheese has melted. Delicious!


You can also add herbs to these. Fresh thyme leaves are especially nice.

Did you make this recipe?
Tag @marierayner5530 on instagram and hashtag it #TheEnglishKitchen
Melting Onions
This content (written and photography) is the sole property of The English Kitchen. Any reposting or misuse is not permitted. If you are reading this elsewhere, please know that it is stolen content and you may report it to me at: mariealicejoan at aol dot com 

Follow me on Bloglovin
read article
new entries old entries
Subscribe to: Posts (Atom)

If You Like What You See

If you like what you see and wish to donate to help pay for butter, sugar, eggs and whatnot, every little bit is appreciated. Thanks!
PRIVACY POLICY

Buy the Book!

If you are a Baking Enthusiast and a fan of British Baking you are going to love this new book I wrote. From fluffy Victoria sponges to sausage rolls, the flavors of British baking are some of the most famous in the world. Learn how to create classic British treats at home with the fresh, from-scratch, delicious recipes in The Best of British Baking. Its all here in this delicious book! To find out more just click on the photo of the book above!

Translate


This is a book I wrote several years ago, published by Passageway Press. I am incredibly proud of this accomplishment. It is now out of print as my publisher went out of business after Covid, but you can still find used copies for sale here and there. If you have a copy of it, hang onto it because they are very rare. This was a real labor of love for me and a dream come true as I had always wanted to write a book since I was a child. Hopefully I will be able to republish it one day. If you know of a publisher who is looking for something let me know!

Welcome, I'm Marie

Welcome, I'm Marie
Canadian lover of all things British. I cook every day and like to share it with you!
A third of my life was spent living in the UK. I learned to love the people, the country and the cuisine. I have always been an Anglophile. You will find plenty of traditional British recipes here in my English Kitchen. There are lots of North American recipes also, but then again, I am a Canadian by birth. I like to think of my page as a happy mix of both. If you are looking for something and cannot find it, don't be afraid to ask! I am always happy to help and point you in the right direction, even if it exists on another page, or in my extensive collection of cookbooks. I moved back to Canada in the year 2020 and have been busy building a new life for myself back in my homeland. I am largely retired now, except for this little space on the internet that I call home. I hope you will stay a while and have a good boo around. There's lots of deliciousness here to explore!

Search This Blog

Featured

How to Make the Best Orange Glazed Dinner Ham
    I recently bought a small dinner ham at the grocery store. It was on special. Normally I don't really buy these hams, but I just cou...

Popular Posts

  • Fried Cabbage with Bacon & Onions
      I have always loved fried cabbage.  I first had it when I was in high school.  We cooked it in our Home Economics Class. It was just ...
  • Sticky Lemon Chicken
    I am always on the look out for a good chicken breast recipe.  We eat a lot of chicken in this house, and it mostly comes in the form of...
  • Lemon Friands
    Anyone who knows me, knows that I am a nut for anything lemon flavoured. It's always been one of my absolute favourite taste thril...
  • Quick and Easy Bacon and Egg Tarts
       You might not think that you have time to do a bacon and egg breakfast on a weekday, but this recipe here today proves that just isn...
  • Mary Berry's Cheese Scones
    I wanted to make some scones to enjoy the other day.  I have made quite a few scones here on the blog and I love them all. I do like to try ...

My Favourite Places

  • Welcome Home Kitchen Blog
  • Cookbooklets
  • Categories
  • _Kitchen Wisdom
  • _In the Larder and Pantry
  • _Couldn't Live Without
  • _Kitchen Wish List

Archive

  • ▼  2025 (255)
    • ▼  September (16)
      • How to Make the Best Orange Glazed Dinner Ham
      • Best-Ever British Teatime Treats: 10 Classic Never...
      • Meals of the Week, September 7th to 13th, 2025
      • Peanut Butter Parfaits
      • Oven Swiss Steak
      • How To Make Ghee - Quick, Easy & Economical
      • Five Meatball Recipes Guaranteed to Make You Drool
      • Easy Curried Orange Chicken – An Old Family Favori...
      • The Best Cauliflower Broccoli Casserole Recipe For...
      • Meals of the Week, August 31st - September 6th, 2025
      • Brown Sugar Quick Bread – Perfect for Tea Time
      • Old-Fashioned Cornflake Cookies Recipe – Just Like...
      • How to Make Spicy Portuguese Potatoes – Authentic ...
      • Simple Chicken Valdostana Recipe – A Quick & Easy ...
      • Simple Tomato & Lentil Soup – Nourishing, Budget-F...
      • Delicious Air Fryer Ham & Cheese Toastie – Ultimat...
    • ►  August (29)
    • ►  July (29)
    • ►  June (30)
    • ►  May (31)
    • ►  April (30)
    • ►  March (31)
    • ►  February (28)
    • ►  January (31)
  • ►  2024 (349)
    • ►  December (29)
    • ►  November (30)
    • ►  October (29)
    • ►  September (29)
    • ►  August (26)
    • ►  July (26)
    • ►  June (30)
    • ►  May (31)
    • ►  April (30)
    • ►  March (30)
    • ►  February (29)
    • ►  January (30)
  • ►  2023 (342)
    • ►  December (27)
    • ►  November (28)
    • ►  October (27)
    • ►  September (28)
    • ►  August (25)
    • ►  July (31)
    • ►  June (30)
    • ►  May (31)
    • ►  April (28)
    • ►  March (31)
    • ►  February (28)
    • ►  January (28)
  • ►  2022 (366)
    • ►  December (26)
    • ►  November (29)
    • ►  October (30)
    • ►  September (29)
    • ►  August (32)
    • ►  July (33)
    • ►  June (29)
    • ►  May (33)
    • ►  April (30)
    • ►  March (29)
    • ►  February (31)
    • ►  January (35)
  • ►  2021 (372)
    • ►  December (36)
    • ►  November (31)
    • ►  October (31)
    • ►  September (31)
    • ►  August (30)
    • ►  July (32)
    • ►  June (35)
    • ►  May (28)
    • ►  April (29)
    • ►  March (31)
    • ►  February (28)
    • ►  January (30)
  • ►  2020 (317)
    • ►  December (30)
    • ►  November (23)
    • ►  October (31)
    • ►  September (29)
    • ►  August (27)
    • ►  July (30)
    • ►  June (26)
    • ►  May (26)
    • ►  April (26)
    • ►  March (25)
    • ►  February (23)
    • ►  January (21)
  • ►  2019 (334)
    • ►  December (20)
    • ►  November (23)
    • ►  October (23)
    • ►  September (31)
    • ►  August (32)
    • ►  July (25)
    • ►  June (32)
    • ►  May (34)
    • ►  April (29)
    • ►  March (30)
    • ►  February (28)
    • ►  January (27)
  • ►  2018 (363)
    • ►  December (30)
    • ►  November (30)
    • ►  October (31)
    • ►  September (29)
    • ►  August (31)
    • ►  July (34)
    • ►  June (30)
    • ►  May (30)
    • ►  April (28)
    • ►  March (33)
    • ►  February (27)
    • ►  January (30)
  • ►  2017 (372)
    • ►  December (32)
    • ►  November (32)
    • ►  October (32)
    • ►  September (36)
    • ►  August (29)
    • ►  July (30)
    • ►  June (30)
    • ►  May (31)
    • ►  April (32)
    • ►  March (29)
    • ►  February (29)
    • ►  January (30)
  • ►  2016 (409)
    • ►  December (35)
    • ►  November (32)
    • ►  October (33)
    • ►  September (34)
    • ►  August (37)
    • ►  July (36)
    • ►  June (32)
    • ►  May (35)
    • ►  April (31)
    • ►  March (36)
    • ►  February (34)
    • ►  January (34)
  • ►  2015 (396)
    • ►  December (34)
    • ►  November (32)
    • ►  October (34)
    • ►  September (36)
    • ►  August (43)
    • ►  July (32)
    • ►  June (29)
    • ►  May (33)
    • ►  April (33)
    • ►  March (32)
    • ►  February (26)
    • ►  January (32)
  • ►  2014 (431)
    • ►  December (38)
    • ►  November (38)
    • ►  October (41)
    • ►  September (32)
    • ►  August (31)
    • ►  July (36)
    • ►  June (40)
    • ►  May (42)
    • ►  April (39)
    • ►  March (34)
    • ►  February (27)
    • ►  January (33)
  • ►  2013 (385)
    • ►  December (41)
    • ►  November (36)
    • ►  October (36)
    • ►  September (32)
    • ►  August (30)
    • ►  July (32)
    • ►  June (31)
    • ►  May (29)
    • ►  April (25)
    • ►  March (33)
    • ►  February (30)
    • ►  January (30)
  • ►  2012 (384)
    • ►  December (34)
    • ►  November (38)
    • ►  October (35)
    • ►  September (33)
    • ►  August (35)
    • ►  July (28)
    • ►  June (33)
    • ►  May (30)
    • ►  April (29)
    • ►  March (30)
    • ►  February (30)
    • ►  January (29)
  • ►  2011 (338)
    • ►  December (32)
    • ►  November (29)
    • ►  October (28)
    • ►  September (28)
    • ►  August (28)
    • ►  July (29)
    • ►  June (28)
    • ►  May (26)
    • ►  April (26)
    • ►  March (29)
    • ►  February (27)
    • ►  January (28)
  • ►  2010 (288)
    • ►  December (32)
    • ►  November (30)
    • ►  October (32)
    • ►  September (25)
    • ►  August (24)
    • ►  July (5)
    • ►  June (27)
    • ►  May (23)
    • ►  April (14)
    • ►  March (23)
    • ►  February (25)
    • ►  January (28)
  • ►  2009 (173)
    • ►  December (27)
    • ►  November (24)
    • ►  October (26)
    • ►  September (23)
    • ►  August (26)
    • ►  July (21)
    • ►  June (23)
    • ►  May (3)

Contact Form


© The English Kitchen.
Customized by My Fairy Blog Mother.