


Strawberry season will soon be upon us. Its not quite here yet. Normally I don't use strawberries much when they are out of season, preferring to enjoy them when they are grown locally.
I was having my father over for lunch however and so I wanted to make him a bit of a treat for lunch. I saw these berries at a good price at our local shops and thought he might enjoy some fresh strawberry tarts!
.JPG "Fresh Strawberry Tarts")
These are such a quick and simple make. You will be quite surprised actually at just how quickly they go together.
You use crisp flaky baked tart shells, which you then fill with a simple creamy filling. Finally they are topped with fresh berries and brushed with warm seedless strawberry jam to give them a bit of a glistening glimmer and sweetness!
.JPG "Fresh Strawberry Tarts")
These are actually so simple that you might be a bit embarrassed to serve them, but I say go ahead!!! Serve them!
The easiness with which they are prepared need only be our little secret, just between you and I. Nobody else needs to know how very easy to make they are! Shhh!!! Mum's the word!
.JPG "Fresh Strawberry Tarts")
WHAT YOU NEED TO MAKE FRESH STRAWBERRY TARTS
Its a simple list really. You may even have everything you need in the kitchen right now!
- fresh strawberries (the amount depends on the size of the berries
- 1 small package of cream cheese, at room temperature (85g or 3 ounces)
- 3 TBS sour cream
- 1 TBS icing sugar, sifted
- 6 crisp baked tartlet shells
- 2 TBS seedless strawberry jam, gently heated
.JPG "Fresh Strawberry Tarts")
These are actually much nicer when you have the smaller berries to make them with as you can place them into the tarts, tip sides up. Very pretty.
I had only largish berries to use today and so I sliced them. If you want really, really pretty pop a small whole berries in the center and then place larger slices around it them. They look just like a pretty flower!
.JPG "Fresh Strawberry Tarts")
I used Tenderflake brand frozen tart shells. I just thawed and baked them for 19 minutes at 375*F/190*C/ gas mark 5. Use whatever brand shells you have available.
If you are really keen you can make your tart shells from scratch, but I was in a hurry so used the frozen and then baked them.
.JPG "Fresh Strawberry Tarts")
Use full fat ingredients . . . sour cream and cream cheese. I have never made these with lighter ingredients so I cannot say with any certainty that the filling will hold up otherwise.
Also you want seedless jam, not jam with the seeds in it. You could also use seedless raspberry if that is what you have. All you want is something that will give your tarts a pretty glimmer and glow!
You could finely grate some fresh lemon zest into the cream filling as well if you wanted to. Its all a matter of preference. For my dad I wanted to keep things simple.
.JPG "Fresh Strawberry Tarts")
HOW TO MAKE FRESH STRAWBERRY TARTS
Nothing really could be easier. These may be the simplest strawberry tarts you could ever make!
First make the cream filling. Whisk together the cream cheese, sour cream and icing sugar until well blended. Divide this equally between the tart shells, smoothing it over.
Wash and trim the berries. Pat dry.
If your berries are large you will need to slice them. If they are small you can use them whole. Place them decoratively on top of the cream filling.
Brush the tops of the tarts with the warmed jam. Refrigerate for several hours prior to serving.
.JPG "Fresh Strawberry Tarts")
The most difficult part of making these is waiting for them to set up. But once they are set, they are beautiful and incredibly delicious.
You could also use raspberries if you wanted to. Or even a mix of berries. Red and blue would be great for patriotic holidays along with that creamy white filling!
Almost like flag tarts!
.JPG "Fresh Strawberry Tarts")
I quite like making quick and easy tarts like this one. Some others that you might enjoy are:
MIXED BERRY AND CREAMY CUSTARD TARTS - Fresh berries in sweet tart shells along with a dollop of a rich and creamy custard filling.
BERRY CUTIE PIES - Little bite sized tarts with a sweet berry filling, topped with pastry hearts. Very pretty and really delicious.
.JPG "Fresh Strawberry Tarts")
These went down a real treat with dad. He never even noticed that there was cream cheese in the filling. (He says he doesn't like cream cheese.) Or if he did, he never said. He gobbled it up anyways with a nice pile of squirty cream on top!
I can hardly wait for the fresh local berries to be ripe. I miss our strawberries in the UK. In my opinion the UK has the best tasting strawberries on the planet. We used to grow our own in our garden and they were lovely.
Fresh and delicious with the warmth of the sun still upon their skin. A little taste of heaven on earth! I was truly spoilt!
Fresh Strawberry Tarts
Yield: 6
Prep time: 15 MinInactive time: 2 HourTotal time: 2 H & 15 M
These are so simple and so tasty. People will think you slaved away for hours to make them. Little do they know . . . you cheated!
Ingredients
- fresh strawberries (the amount depends on the size of the berries
- 1 small package of cream cheese, at room temperature (85g or 3 ounces)
- 3 TBS sour cream
- 1 TBS icing sugar, sifted
- 6 crisp baked tartlet shells
- 2 TBS seedless strawberry jam, gently heated
Instructions
- First make the cream filling. Whisk together the cream cheese, sour cream and icing sugar until well blended. Divide this equally between the tart shells, smoothing it over.
- Wash and trim the berries. Pat dry.
- If your berries are large you will need to slice them. If they are small you can use them whole. Place them decoratively on top of the cream filling.
- Brush the tops of the tarts with the warmed jam. Refrigerate for several hours prior to serving.

Thanks so much for visiting. Do come again!
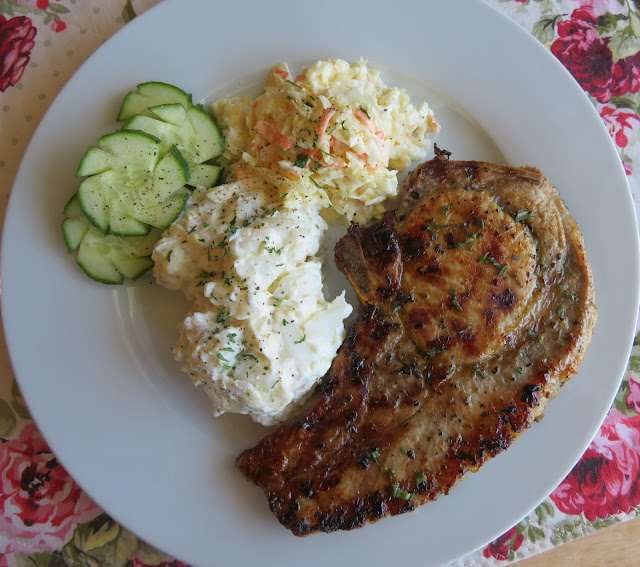

Red meat is not something I eat very often. Mostly I eat chicken and fish. Every once in a while I do crave a good pork chop however.
My mom used to cook pork chops for us once in a while when we were growing up and you could have used them to shingle a roof, they were that dry! haha We still enjoyed them because they weren't something that we got very often.
.JPG "Easy Greek Pork Chops")
Of course back in those days there was a real fear of eating under-cooked pork. Nobody wanted to get sick, so pork was usually cooked very well done.
The same fear no longer exists as our pork is a lot safer than it was back then. I still don't like to cook it pink if there is any bone involved, but I no longer feel the need to cook it to death either.
These delicious chops are tender and juicy and filled with lovely flavors. No over cooking or undercooking. They are just perfect.
.JPG "Easy Greek Pork Chops")
This easy Greek Pork Chop recipe is marinated so that you can achieve maximum flavor and tenderness without having to cool them long and slow. In fact, aside from the marinating time, you can have these done and on the table in not much more than fifteen minutes.
And they are juicy and tender, with beautiful Greek flavors. Oregano, garlic, lemon, olive oil, rosemary . . . so flavorful!
The marinate time is at the very least 20 minutes, but you can marinate your chops for up to 24 hours. Obviously the longer the more the flavors of the marinade will penetrate your meat and the more tender they will be!
.JPG "Easy Greek Pork Chops")
WHAT YOU NEED TO MAKE EASY GREEK PORK CHOPS
Its a very simple list. So simple I am betting you have exactly what you need in your kitchen to cook this delicious recipe today!
- 2 thick cut, bone in pork loin chops
- 1/4 cup (60ml)olive oil
- 1/4 cup (60ml) fresh lemon juice
- 1 1/2 tsp dried oregano
- 1 tsp chopped fresh rosemary
- 2 cloves garlic, peeled and minced
- 1 tsp salt
- 1/2 tsp black pepper
.JPG "Easy Greek Pork Chops")
By thick pork chops I mean chops that are at least 1/2 inch thick. I also always like to cook with bone in chops if I can. The meat is just tastier with the bone in and there is much less risk of them drying out.
I like to use fresh lemon juice. It just tastes better. I also like to use fresh garlic. If you are using dried rosemary, then cut the amount in half, or it might overwhelm the flavor of the marinade. I recommend using fresh if you have it.
.JPG "Easy Greek Pork Chops")
HOW TO MAKE EASY GREEK PORK CHOPS
When I say these are easy, I really mean easy. You really can't get much simpler than this. Marinated and then grilled, the work required is really minimal.
Pat the chops dry and then clip the fatty edge of the chop at 1/2 inch intervals. I use kitchen scissors. This simple trick helps to prevent your chops from curling or buckling when you cook them. If your fatty edge is really thick, you can trim it back a bit as well. Also if there is still a rind on the chops, trim that off.
%20-%20Copy.JPG "Easy Greek Pork Chops")
Whisk the remaining recipe ingredients together in a shallow dish until well combined. Add the chops, turning to coat them in the marinade.
Cover and leave to marinate on the counter top for half an hour. Alternately, cover and chill in the refrigerator for up to 24 hours. Do allow to come to room temperature prior to cooking.
%20-%20Copy.JPG "Easy Greek Pork Chops")
You can cook these in one of three ways. Outdoors on the BBQ grill, indoors on a grill pan/skillet, or in an electric grill.
Preheat a skillet/griddle pan, electric grill, or BBQ grill until quite hot. Add the chops and cook for 5 to 6 minutes per side (skillet/griddle pan, BBQ) or for 5 to 6 minutes total (electric grill) until they are golden brown and cooked through. You can sear the fat edge if desired, by using a pair of tongs to hold it flat against the heat source.
Remove to a warm plate, lightly tent with foil, and leave to rest for 5 minutes. Serve hot with your favorite sides.
%20-%20Copy.JPG "Easy Greek Pork Chops")
Today I served the chops with Mom's Potato Salad and Creamy Cheese Slaw. Both were excellent with these tasty chops. I also added some sliced cucumber.
But really you could serve them with any number of sides. Baked potatoes, rice, pasta, scalloped potatoes, Greek Salad. They would work well with just about anything.
%20-%20Copy.JPG "Easy Greek Pork Chops")
Some other favorite pork chop recipes that I have on here include:
PORK CHOPS WITH CREAM GRAVY - This is a real favorite with the men in my family, especially when served with piles of fluffy mashed potatoes!
DEVILED PORK CHOPS - Tasty. tender and flavor filled with a nice crispy crumb.
PORK CHOPS AND APPLESAUCE -An old family favorite. Tender and juicy chops with a fabulous crumb coating, served with a delicious homemade applesauce.
%20-%20Copy.JPG "Easy Greek Pork Chops")
This is actually a small batch recipe but you can very easily double or even triple it to feed more people. It actually makes a great BBQ option when you have guests over for supper and is an excellent midweek supper option!
I really hope that you will want to cook these really delicious chops for yourself! I think you will be more than pleased with them. Simple food, simple ingredients and cooking method, and excellent results! What more could you want?
Easy Greek Pork Chops
Yield: 2
Prep time: 10 MinCook time: 15 MinTotal time: 25 Min
These delicious chops are marinated in a tasty marinade making for an incredibly tender and flavor filled grilled pork chop! You can do these outdoor on the grill, or on an indoor grill. Both work very well. Timings do not reflect marinating time.
Ingredients
- 2 thick cut, bone in pork loin chops
- 1/4 cup (60ml)olive oil
- 1/4 cup (60ml) fresh lemon juice
- 1 1/2 tsp dried oregano
- 1 tsp chopped fresh rosemary
- 2 cloves garlic, peeled and minced
- 1 tsp salt
- 1/2 tsp black pepper
Instructions
- Pat the chops dry and then clip the fatty edge of the chop at 1/2 inch intervals.
- Whisk the remaining ingredients together in a shallow dish until well combined. Add the chops, turning to coat them in the marinade. Cover and leave to marinade on the counter top for half an hour. Alternately, cover and chill in the refrigerator for up to 24 hours. Allow to come to room temperature prior to cooking.
- Preheat a skillet/griddle pan, electric grill, or BBQ grill until quite hot. Add the chops and cook for 5 to 6 minutes per side (skillet/griddle pan, BBQ) or for 5 to 6 minutes total (electric grill) until they are golden brown and cooked through. Sear the fat edge if desired.
- Remove to a warm plate, lightly tent with foil, and leave to rest for 5 minutes.
- Serve hot with your favorite sides.

Thanks so much for visiting. Do come again!
.JPG)
.JPG "Ham and Cheese Bow Ties")
Many years ago I used to frequent a site called Steph's Country Kitchen. She had lovely recipes on there. There were no photographs. This was in the early days of recipe pages. I think hers may well have been one of the first food blogs out there before there were even such a thing as blogs!
There was just recipes on her page, and she had some really lovely ones. What I liked the most about them was that they were every day, simple, family food type of recipes. The kinds of things your mom might have made.
.JPG "Ham and Cheese Bow Ties")
I had printed out a lot of her recipes and included them in my Big Blue Binder. Thank goodness I did not lose my Big Blue Binder when I came back to Canada.
I had the forethought to include it in one of my nine boxes that was sent over.
My Big Blue Binder is one of my life treasures, having travelled with me all over the world now. It is a compendium of all of my tried and trues and favorite recipes having been collected through the years.
.JPG "Ham and Cheese Bow Ties")
Recipes shared by family and friends, clipped from magazines, etc. Some of those recipes go right back to my childhood. It truly is a treasure. A real family heirloom, I hope!
Sadly, I no longer really need recipes that feed any more than 2 or 3 people at the maximum, and so I am downsizing some of my favorites. This is one I downsized today. The original recipe fed 6 people, and now it feeds only 2 or 3 depending on appetites.
.JPG "Ham and Cheese Bow Ties")
Is it only me, or have you noticed how expensive food is getting? It doesn't take very long for what is in your cart to add up and I am looking at ways of cutting corners and bringing down my expenses when I can. Trying to be more economical.
This is a really delicious way to make a bit of ham and some pasta go a long way! You can use sliced ham that you buy for sandwiches, but I find it much more economically sound to buy a quarter boneless ham, which is what I did today.
.JPG "Ham and Cheese Bow Ties")
You end up with ham to use in sandwiches if you want, or casseroles such as this tasty one. You can also cut it into slices and fry it for supper along with some potatoes, or for breakfast with eggs.
You will find that buying a small quarter ham pays for itself in the long run in all the ways that you can invent to use it up! There is no end to things you can do with it!
.JPG "Ham and Cheese Bow Ties")
This is a very delicious mac and cheese type of casserole made with bow tie pasta (Farfalle) and cubed ham in a lush garlicky cheese sauce. It really is very simple to make and quite, quite delicious!
I think you are really going to love this one! And not just for its incredibly tasty flavors either. It is economical and very simple to make!
.JPG "Ham and Cheese Bow Ties")
WHAT YOU NEED TO MAKE HAM AND CHEESE BOW TIES
The list of ingredients is really very simple. There is nothing too far out of the ordinary here.
- 1 cup (4 ounces/120g) uncooked bow tie pasta
- 2 TBS butter
- 1/4 tsp garlic paste (or 1 very small clove garlic crushed)
- 2 TBS plain all purpose flour
- 1/4 tsp salt
- 1/8 tsp black pepper
- 1 cup (240ml) whole milk
- 1/4 tsp Dijon mustard
- 1 1/4 cups (150g) grated medium cheddar cheese
- 2 ounces (60g) diced cooked ham
- 2 TBS grated Parmesan cheese
.JPG "Ham and Cheese Bow Ties")
You could use any kind of pasta in this really, but bow ties are really quite pretty. Today I used the type of pasta which has extra fiber added. We all need to get as much fiber into our diets as we can.
I find that you really can't tell the difference between regular pasta and the high fiber pasta. If you don't have bow ties you can use regular elbow macaroni, or fusilli. Both would work very well I think.
.JPG "Ham and Cheese Bow Ties")
I sometimes add some thawed frozen peas to this casserole as well. They add even more fiber, added nutrition and a spark of color!
Be judicious when salting this dish as both cheese and ham are salty ingredients. Salt is very difficult to take away once its been added. It is much easier for people to just add a bit of salt at the table if they need to.
I think you'll find however that my suggested amount is just right. You could also add a bit of hot sauce if you want to spice things up a bit!
.JPG "Ham and Cheese Bow Ties")
HOW TO MAKE HAM AND CHEESE BOW TIES
If you can make a cream sauce, then you can make this. I have given instructions for making the sauce in a saucepan, but truth be told I, more often than not, make it in the microwave.
Preheat the oven to 350*F/180*C/ gas mark 4. Butter a 2 cup shallow casserole dish. Set aside.
Cook the pasta according to the package directions. Drain well, rinse, drain again and then set aside.
Melt the butter until foaming in a saucepan. Add the garlic and sauté for 30 seconds. Whisk in the flour until smooth. Whisk in the mustard. Cook for about a minute.
Slowly whisk in the milk. Cook, whisking constantly, over medium heat until the mixture comes to the boil. Simmer for several minutes, stirring constantly and then whisk in the cheddar. Season with the salt and pepper.
.JPG "Ham and Cheese Bow Ties")
If you wish to do the sauce in the microwave. Melt the butter in a microwave safe jug for 30 seconds on high. Whisk in the flour and the mustard. Microwave on high for another 30 seconds.
Whisk in the milk, slowly, whisking it well in and making sure you get everything from the sides and corners.
Microwave on high for a further 1 1/2 minutes to 2 minutes, whisking every 30 seconds, until the mixture thickens and bubbles. Whisk in the cheese until it melts completely.
Season with the salt and pepper. Use as per the recipe.
.JPG "Ham and Cheese Bow Ties")
Stir the cooked pasta and ham into the sauce. Pour the mixture into the baking dish. Sprinkle the Parmesan cheese over top.
Bake uncovered in the preheated oven for 20 to 25 minutes, until bubbling and golden brown.
This is so delicious. I think it is one of my favorite of all the mac and cheese dishes that I make.
.JPG "Ham and Cheese Bow Ties")
If you are fond of mac and cheese you might enjoy these dishes as well:
MAC AND CHEESE PIE - This is a great dish to make on those nights when you are wanting to make something quick and easy but something that the family will still enjoy. Macaroni and Cheese is a popular dish with most people, but when its also a pie, that's a win/win! Plus it all cooks in the one dish. No fuss. No muss.
CROCK POT MAC AND CHEESE - For those days when you really don't want to be heating up the kitchen by turning on the oven. This is simply delicious, and is another small batch recipe.
EASY CHILI MAC AND CHEESE - If mac and cheese and chili got together and had a baby it would be this deliciously simple casserole. This is an old favorite!
Enjoy!!
Ham & Cheese Bow Ties
Yield: 3
Prep time: 15 MinCook time: 25 MinTotal time: 40 Min
This is like homemade mac and cheese, but made with fun bow tie pasta and hearty ham! This is a delicious small size recipe which can easily be doubled to serve more.
Ingredients
- 1 cup (4 ounces/120g) uncooked bow tie pasta
- 2 TBS butter
- 1/4 tsp garlic paste (or 1 very small clove garlic crushed)
- 2 TBS plain all purpose flour
- 1/4 tsp salt
- 1/8 tsp black pepper
- 1 cup (240ml) whole milk
- 1/4 tsp Dijon mustard
- 1 1/4 cups (150g) grated medium cheddar cheese
- 2 ounces (60g) diced cooked ham
- 2 TBS grated Parmesan cheese
Instructions
- Preheat the oven to 350*F/180*C/ gas mark 4. Butter a 2 cup shallow casserole dish. Set aside.
- Cook the pasta according to the package directions. Drain well, rinse, drain again and then set aside.
- Melt the butter until foaming in a saucepan. Add the garlic and sauté for 30 seconds. Whisk in the flour until smooth. Whisk in the mustard. Cook for about a minute.
- Slowly whisk in the milk. Cook, whisking constantly, over medium heat until the mixture comes to the boil. Simmer for several minutes, stirring constantly and then whisk in the cheddar. Season with the salt and pepper.
- Stir the cooked pasta and ham into the sauce. Pour the mixture into the baking dish. Sprinkle the Parmesan cheese over top.
- Bake uncovered in the preheated oven for 20 to 25 minutes, until bubbling and golden brown.

Thanks so much for visiting! Do come again!
Subscribe to:
Posts (Atom)





Social Icons