I had a frozen pie crust that I wanted to use up so I thought I would bake another pie this weekend. I don't normally bake pies, two weeks in a row, but what the hey! You only live once.
When I checked my recipes I was really surprised that I had not already shared this delicious old fashioned butterscotch pie recipe with you!!
Prepare yourself for a lifelong love affair because I have been baking and loving this pie for about 45 years now! Its the best from scratch butterscotch pie you could ever want to treat yourself to! No fooling around.
The first year I was married to my second husband (the father of my children) my mother in law gifted me with a real treasure. A small handwritten notebook of my husband and his family's favorite recipes.
My ex-MIL was an excellent cook. She was an army wife, having lived all across Canada and in Europe. My FIL was a retired army cook, so you just know good cooking ran in the family.
This little notebook was filled with her tried and trues and it has been and is a real treasure to me. The pages are well splattered and tattered with use over the years, some of the writing is even fading.
I really need to copy everything in it out into another notebook so that I can have it saved for my children as it is a part of their heritage as well. These are the recipes they grew up enjoying as well.
My MIL is still going strong at 93. She still drives and everything. I really love (d) Elizabeth. I know people like to talk nasty about MIL's, but I had the best MIL ever. She was a real dear, very kind and long-suffering.
Back to the pie. This old fashioned butterscotch pie was my ex husband's favorite pie and dessert. In fact, every year he would request me to make one for his birthday rather than a cake.
I was quite happy to do so because . . . truth be told, it is a favorite of mine also.
There is nothing artificial here. Just good old fashioned simple ingredients put together in a simple way.
Seriously, you do not need to be a chef to make or bake this easy recipe. In fact if you use a frozen pie ready made pie shell (like I did today) it gets even easier!
WHAT YOU NEED TO MAKE BUTTERSCOTCH PIE FROM SCRATCH
There is nothing out of the ordinary here.
- 1 (9-inch) baked pie crust
- Light brown sugar
- Butter
- cake flour (or a mixture of all purpose flour and cornstarch)
- 2 large free range eggs
- Full fat milk
- Pinch of salt
- Vanilla extract
You can of course make your own pie crust from scratch. I normally make my Butter & Lard Pastry. Its the best, flakiest pastry. You can get to the recipe by clicking on the name.
It makes two single crusts or enough pastry for one two crust pie. It is sincerely one of the greatest pastry recipes ever.
The filling itself is a real doddle to make. You do need to use a double boiler for this, or at least a facsimile of one.
If you have a heat proof bowl, you can easily replicate a double boiler by setting the bowl on the rim of a saucepan over simmering water. Just make sure that the water doesn't touch the bottom of the bowl.
HOW TO MAKE BUTTERSCOTCH PIE
You begin by mixing together all of the filling ingredients in the top of a double boiler. I do this by whisking together the brown sugar and flour/cornstarch mixture until they are well amalgamated, and then I whisk in the milk, salt and add the butter.
By the time you have done this any lumps in the brown sugar will be no more. This then needs to be cooked over simmering water, whisking constantly, until the mixture bubbles and thickens.
This is probably the most labor intensive part of the recipe. Standing there whisking. Don't stop whisking or you risk lumps in your filling.
Once it has bubbled and thickened you need to walk away for 20 minutes, returning periodically to give the filling another whisk. This is so that all of the flour flavor cooks out of the filling.
There is nothing nastier than a pie that tastes like flour. Blech.
Next you need to whisk in the egg yolks, but not before tempering them first. All tempering means is whisking some of the hot mixture into the beaten egg yolk to heat them up a bit.
If you add cold eggs to a hot filling you end up with omelette. You don't want omelette. You want a smooth glossy filling.
So temper your egg yolks first. Just whisk the hot filling into them, a bit at a time. I would add at least 4 TBS of the hot mixture, one at a time, whisking constantly as you add each TBS.
Once you've done that you can whisk all of the egg mixture back into the hot filling and then it needs to cook for about 5 minutes longer so that the eggs are all cooked in the filling. You don't want to be feeding raw eggs to people, even if it is only the yolks.
Easy peasy. Your filling is pretty much done. Just remove it from the heat and let it cool to lukewarm, whereupon you can whisk in the vanilla extract. I always use pure vanilla extract.
You can now spread your filling into your baked crust and get on with making the meringue. Meringue is really easy to make as well.
You will use the whites from your eggs to make your meringue. You want to start with a clean, grease free glass bowl and, using an electric hand whisk, start whisking your whites on high
Once they are foamy, you can continue to whisk them, adding the sugar a bit at a time until you have a really thick, satiny mixture, that is somewhat glossy.
It should stand up in peaks when you lift the beaters out of it. Spread this over your pie. I tend to place more in the center of the pie than I do on the edges, although you do want all of the filling covered.
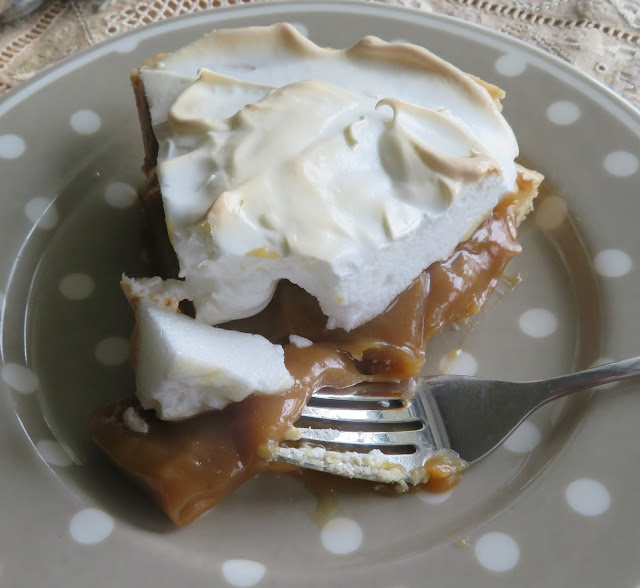
I just dollop it all over the pie and spread it out with the back of a metal spoon, making peaks here and there like little snowy mountain tops. Make sure it touches the crust of the pie all the way around That way you know your filling is absolutely covered.
Then you just pop the whole thing into a moderate oven (350*F/180*C) and brown the meringue. It doesn't take long, about 10 minutes and it will be perfect.
Seriously the most difficult part of making this pie is waiting for everything to cool down enough that you can cut into it. As you can see I have a problem with that. I can never wait quite long enough to dig in.
Ideally you should leave it for several hours. But that is in a perfect world full of people who are not gluttons and who have plenty of patience.
That is not me! Anyways, I really hope that you will be inspired to want to make this delicious pie and that if you do, you will agree with me in thinking that it is just the best Butterscotch Pie ever!

Butterscotch Pie
Yield: 8
Author: Marie Rayner
Prep time: 5 MinCook time: 40 MinTotal time: 45 Min
This is probably the best from-scratch butterscotch pie you will ever make. I stake my reputation on it. You will need a double boiler, or a bowl set in a saucepan over simmering water to make the filling.
Ingredients
For the Pie and filling:
- 1 (9-inch) baked pie shell
- 1 cup (200g) soft light brown sugar, packed
- 5 TBS flour
- 1 TBS cornstarch (cornflour)
- 2 TBS butter
- 1 cup (240ml) full fat milk
- 2 large free range egg yolks
- pinch salt
- 1 tsp vanilla
For the meringue:
- 2 large free range egg whites
- 2 TBS fine granulated sugar
Instructions
- Place the flour, brown sugar, cornstarch and salt in the top part of a double boiler. Mix all together well. Stir in the milk and add the butter. (Alternately you can do this in a heat proof bowl which you can set in a saucepan over simmering water, making sure that the bottom of the bowl does not touch the water.)
- Place over simmering water and cook, whisking constantly, until the mixture starts to thicken. Continue to cook for 20 minutes, stirring often.
- Beat your egg yolks. Temper them with a bit of the hot pie mixture, by adding some to the yolks a bit at a time, whisking it in. Whisk the tempered mixture back into the hot mixture, combining well. Cook for a further 5 minutes. Remove from the heat and allow to cool.
- Whisk in the vanilla, and then spoon the mixture into your baked crust. It will be thick, smooth and delicious.
- Beat the egg whites until they start to get really frothy. Beat on high adding the sugar in a slow stream. Continue to beat until the mixture doubles in volume and is thick and glossy and stands up in peaks.
- Spoon and spread this over the cooled pie covering the filling completely. It should read the crust edge all around. Make some decorative swirls on top.
- Preheat the oven to 350*F/ 180*C/ gas mark 4. Place the pie on a baking sheet and slid it into the oven. Bake until the meringue is golden brown, about 10 to 15 minutes.
- Allow the pie to cool completely before serving. Store any leftovers in the refrigerator.
Did you make this recipe?
Tag @marierayner5530 on instagram and hashtag it #TheEnglishKitchen
All of the content you see here on this page, both photography and written, are the sole property of The English Kitchen, Marie Rayner. Any reposting or misuse is not permitted. If you are reading this elsewhere, please know that it is stolen content and you may report it to me at mariealicejoan at aol dot com.
Normally I wouldn't share two cakes in a row on here. I hope you will forgive me. The Pumpkin cake was actually baked last week and I was only just getting around to sharing it. This lovely Old Fashioned Gingerbread was something I baked today.
And it is so fabulous, I just couldn't wait to share it. The smell alone will send you into heavenly bliss! Trust me on this!
If this is not the BEST old fashioned gingerbread recipe, I will eat my hat. (Hard to do since I don't own a hat!) But trust me when I say, its pretty darned tasty!
The recipe comes from a book which was a gift to me from a friend. Back to the Basics, by Ina Garten. She came by way of it via James Beard. Both cooks/bakers have excellent reputations and so you just know it really is the BEST of the best!
Just like my friend, Diana. Diana and I have never met in person. We only know each other through blogging and via Instagram and on Facebook. That is the power of the modern day Internet.
It may have a dark side, but the bright side is pretty wonderful. I have made many beautiful and special friends via this medium, and Diana is one of them. She has been very good to me.
Let us talk about the kindness of others. It is hard to believe that in just about a month and a half now, it will have been a year since I made that precarious journey across the Atlantic ocean back to Canada, leaving everything I owned behind.
I shake my head in amazement at how far I have come. I am here now, comfortable in my own little home and I am well settled. This is largely due to my own strength and determination and the many kindnesses of others.
People who, like Diana, lifted me up in prayer daily and who supported me emotionally in any way that they could, lending me a portion of their strength.
People who, like Diana, went even further, donating goods etc. to help me set myself back up again. The many kindnesses and generosity I have been privy to has been incredibly humbling and I am so grateful for it.
It takes a village. I have heard that expression many times, and this time I was priviledged and honored to have been on the receiving end of that communal village, which extended way beyond the boundaries of my own town, but world wide.
I will forever be grateful for all of the help I received. The prayers. The love. The support. As bad as many things in the world might seem, there is so much more that is good.
The fact that, in the midst of a Global Pandemic, when so many were hurting themselves, others reached out to me in this phenomenal way is proof that we really live in a world filled with good and caring people.
I had never thought I would need such help, but it ended up that I did, and I hope that one day I will be in the position to do a like kindness for another in need.
Diana recently said that she had a number of cookery books that she didn't need and did I want them. She would send them to me one at a time. This book was one of them. How could she have known that it was a copy of one of the many books I had to leave behind. God is good. Thank you so much Diana.
So I hope you will all forgive me for sharing a cake for the second day in a row. I think when you smell this baking you will more than forgive me. It smells AMAZING!
It tastes pretty darn amazing also! Its lovely. I actually only used 1/3 of the baking powder that I should have used. The recipe called for 3/4 tsp and I used 1/4 tsp. DUH!

That it turned out to be edible at all is nothing short of a miracle. Its very, very good, and you can know that if you make it, it will be even better.
Because you are going to add the right amount of baking powder, lol.

This has a beautiful flavor. Cinnamon, ginger, cloves and orange zest . . . perfect warm baking spices. Perfect Autumn flavors.
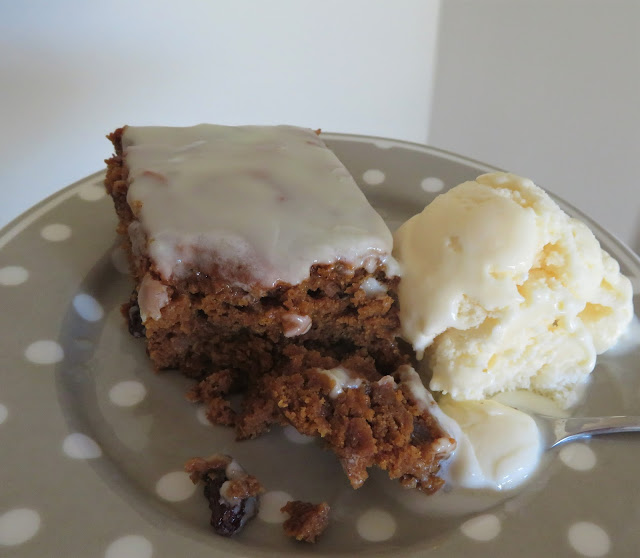
The crumb is moist and delicious from the use of sour cream. It uses plenty of molasses, which lends a lovely smoky sweetness.

The cake itself is studded with rum infused raisins. I don't have any rum, so I used boiling water and rum flavoring.
The raisins are plump and sweet and delicious.
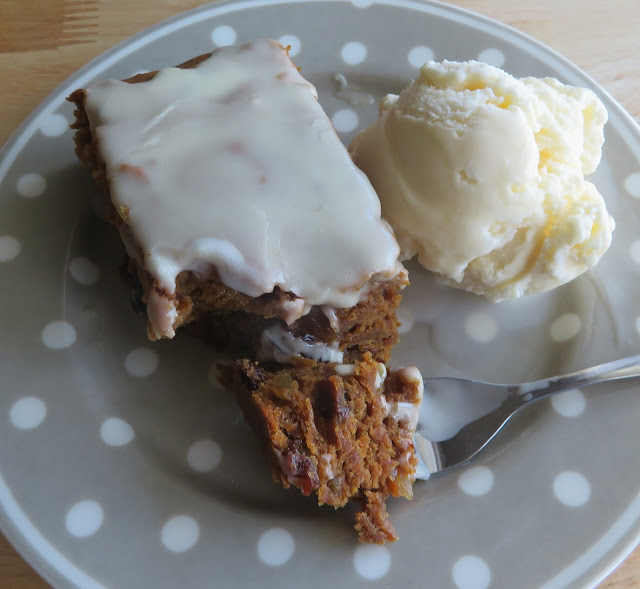
It also has a goodly amount of minced crystalized gingerroot stirred throughout, adding even more ginger flavor and sweetness.
I love candied gingerroot. Quite often if I have an upset stomach I will chew on a piece of it. Ginger is quite simply one of my favorite things.
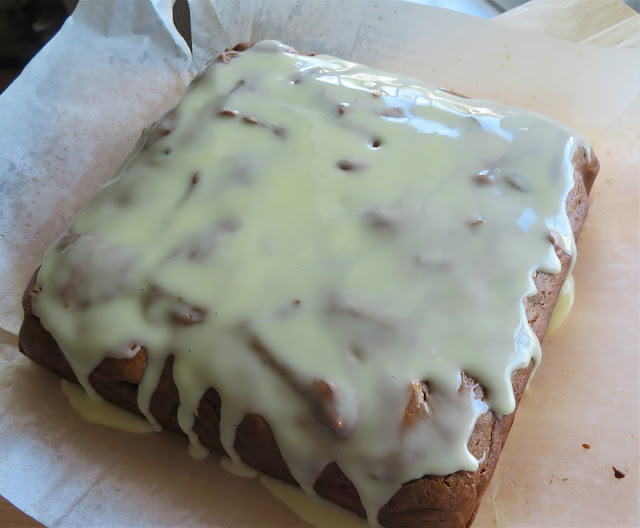
The crowning glory of this cake is the lovely orange glaze. It is simply wonderful cut into squares and served as a special dessert with a scoop of vanilla ice cream. I really hope that you will bake it and see for yourself just how special it is!
And Diana, thank you! 💖 This was a lovely surprise.
All of the content you see here on this page, both photography and written, are the sole property of The English Kitchen, Marie Rayner. Any reposting or misuse is not permitted. If you are reading this elsewhere, please know that it is stolen content and you may report it to me at mariealicejoan at aol dot com.

Old Fashioned Gingerbread
Yield: 9
Author: Marie Rayner
Prep time: 15 MinCook time: 35 MinTotal time: 50 Min
A sweet, spicy, and sturdy cake, with lots of molasses, raisins and chopped candied ginger. This delicious cake is topped with a sweet orange glaze. The smell when it is baking is amazing!
Ingredients
For the Cake:
- ¼ cup (60ml) boiling water
- ½ tsp rum extract
- 1/2 cup (120g) butter
- ½ cup (75g) raisins
- 1 cup (240ml) molasses
- 1 cup (120g) sour cream
- 1 ½ tsp finely grated fresh orange zest
- 2 1/3 cup (325g)of plain all purpose flour
- ¾ tsp baking soda
- 1 ½ tsp ground ginger
- 1 tsp ground cinnamon
- ¼ tsp ground cloves
- ½ tsp salt
- 1/3 cup (80g) minced crystalized ginger (not the one in syrup)
For the glaze:
- 1 cup (130g) icing sugar, sifted
- 2 TBS fresh orange juice
Instructions
- Preheat the oven to 350*F/ 180*C/ gas mark 4. Butter an 8-inch square baking tin and then line with baking paper, leaving an overhang to lift the cake out with.
- Place the raisins in a small bowl with the rum extract. Pour the boiling water over top and set aside.
- Place the butter and molasses in a large bowl. Pop into the microwave for 1 minute on high. The butter should be melted. Whisk in the sour cream an orange zest.
- Sift together the flour, soda, spices, and salt. Mix into the wet ingredients with a wooden spoon, stirring together only until the mixture is smooth.
- Drain the raisins. Fold them, along with the candied ginger into the batter, then scrape the batter into the prepared pan, smoothing the top over.
- Bake for 35 to 40 minutes until a toothpick inserted in the center of the cake comes out clean. Leave to cool in the pan for 10 minutes, then lift out on a wire rack to cool completely.
- For the glaze, which together the icing sugar and orange juice until smooth. Pour over the gingerbread, allowing it to drip down the sides. Leave to set (if you can!) before cutting into 9 squares to serve.
Did you make this recipe?
Tag @marierayner5530 on instagram and hashtag it #TheEnglishKitchen
Pumpkin Olive Oil Cake. I have never made an olive oil cake before, but when I saw this recipe in Yossi Snacking Cakes, I knew I wanted to try. In fact this is the cake she chose to grace the cover of her book, Snacking Cakes, by Yossi Arefi.
I bought this book on a whim. I love snacking cakes. They are not overwhelming cakes, easy to make, small in stature, and usually no fuss no muss.
This recipe was adapted from that book. I have made several cakes from the book now, and I can tell you, every one has turned out beautifully.
I can't recommend the book highly enough. If you don't have it yet, you really need to get it!
In honor of this being the first week of Autumn, I wanted to bake another pumpkin cake. (Can you ever have too much pumpkin? I think not!!) When I spied this recipe I decided this was the one.
I still had pumpkin left from baking my Pumpkin, Orange & Cranberry Bread that needed using up, and this was the perfect cake to do just that!
I have never made an olive oil cake before, but I have always been intrigued by the concept. Olive oil cakes are very popular in Italy, and are in fact considered to be signature cakes in some areas.
Any cake containing olive oil is considered to be an olive oil cake actually. Usually the flavors used in olive oil cakes tend to be citrus flavors. This is because olive oil itself lends a bit of a citrus-like flavor to the cake.
KITTY BREAK - Nutmeg and Cinnamon were admiring me from their blanket beneath my chair. They are so loving and affectionate and love being near me. They usually purr the whole time.
I had been really missing having a pet. I know pets are an added responsibility, but the love you get in return is priceless. Now back to our regular programming.
I had not really seen olive oil as having much of a citrus flavor, but when I thought about it I came to the conclusion that it really does. Its a bit subtle, but its there.
Citrus pairs beautifully with fruits and pumpkin, so there you have it. This is a brilliant combination.
Although it was not stated in the recipe, I figured that this recipe required extra virgin olive oil and so that is what I used.
There is only 1/2 cup (120ml) in the whole cake so its not overwhelming. There is also some in the lush maple glaze on top.
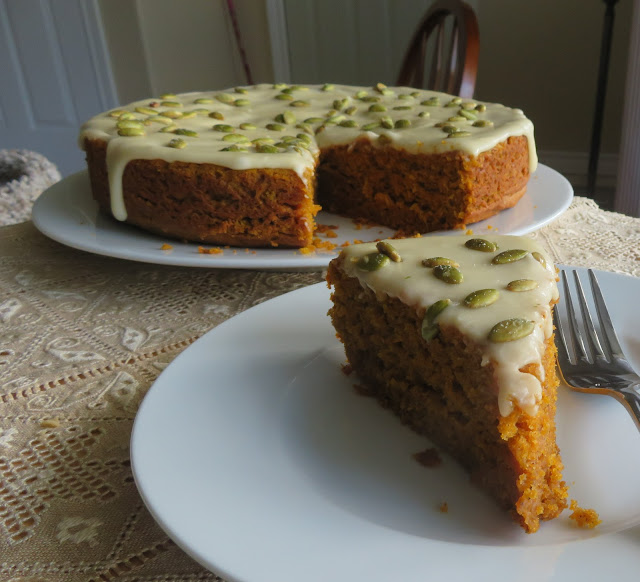
It is an incredibly moist cake, with a beautiful dense texture. Yossi says you can switch it up and add some chocolate chips, but I kept it plain.
There is plenty of spice going on in the cake. Cinnamon, nutmeg, cardamom, allspice and a gentle nudge of black pepper. Black pepper adds a lovely hint of warmth that is not at all out of place here!
You can bake this cake in a 9 X 5 X 3 inch loaf tin, or an 8-inch square baking pan, or even a 9 by 13 inch pan for a sheet type of cake. (Double the ingredients for the larger cake.)
Of course the bake times will need to be adjusted as well. For the loaf tin, 50 to 60 minutes. For the square pan it will take the same amount of time as the round.
For the 9 by 13 you will need to double the ingredients for the cake, and bake it for 30 to 40 minutes. You will also need to double the ingredients for the glaze. This would be the perfect cake for a gathering, or pot luck in that measure.
I would think with the ingredients doubled you could also bake it in a Bundt cake tin, but am not sure how long it would take to bake. I would start checking it at 40 to 45 minutes.
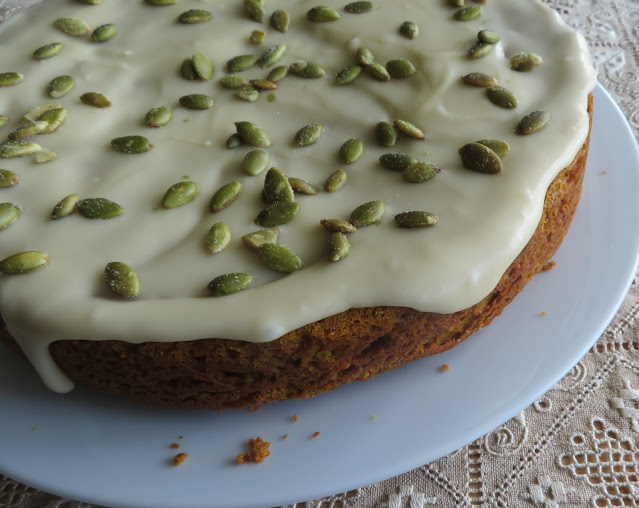
I think the roasted pumpkin seeds make a beautiful garnish on top and are quite fitting as it is a pumpkin cake after all. I used the salted ones.
She had suggested sprinkling sea salt flakes on top, but I figured if you use already salted roast pumpkin seeds, you don't need to use any sea salt flakes.
The cake itself is very easy to throw together. Its a simple matter of beating the eggs and sugar together until foamy and then adding the other wet ingredients, along with the spices.
You will need to whisk everything together until everything is really well mixed together.
I always like to sift the flour, baking powder and soda together before I add them to cakes. This makes sure that the leavenings are evenly distributed in the cake batter.
There is nothing worse than getting a mouthful of baking soda because it has all ended up in one spot in a cake. Sifting gets rid of the chance of that happening!
The glaze is very simple to make and adds a beautiful touch. Its nicely flavored with just a bit of maple syrup (use the real deal) and of course there is a bit of olive oil in the glaze also.
This gives is a velvety texture. Only add half of the hot water until you see how thick the glaze is actually going to be. You may not need the second amount.
Altogether this was a brilliant cake! With spicy flavors that complimented the pumpkin and the olive oil beautifully without going over the top. It has a really warm autumn feel and taste to it.
This would be completely at home on the dessert table with a scoop of vanilla ice cream on top, or at the tea/break table for a delicious mid morning or afternoon treat!
I found the cake, with that glaze, to be completely and utterly moreish indeed! I highly recommend.
If this isn't quite pushing your buttons, here are a few other pumpkin cakes you might enjoy:
Cinderella's Pumpkin Cake - moist, dense and delicious
Pumpkin Streusel Cake - a delicious Bundt cake with a ribbon of streusel running through it.
Pumpkin Spice Cake - Another Bundt, but this one sports a caramel praline glaze
Two Ingredient Pumpkin Cake with a Cider glaze - Yes the cake itself needs only two ingredients. Unbelievable but true!

Pumpkin Olive Oil Cake
Yield: Makes one 9-inch round cake
Author: Marie Rayner
Prep time: 10 MinCook time: 35 MinTotal time: 45 Min
This spicy pumpkin cake sports a beautifully moist texture and a lush sweet maple flavored glaze. You are sure to love this!
Ingredients
For the cake:
- 1 cup (200g) soft light brown sugar, packed
- 2 large free range eggs
- 1 cup (230g) pumpkin puree (not pie filling)
- 1/2 cup (120ml) olive oil
- 1 tsp ground cinnamon
- 1/2 tsp ground cardamom
- 1/8 tsp ground allspice
- 1/8 tsp ground nutmeg
- 1/8 tsp black pepper
- 1/4 tsp salt
- 1 1/2 cups (210g) plain all-purpose flour
- 1 tsp baking powder
- 1/2 tsp baking soda
For the glaze:
- 1 cup (130g) icing sugar, sifted
- 2 TBS olive oil
- 2 TBS pure maple syrup
- 1 to 2 TBS hot water
- salted roasted pumpkin seeds to garnish (optional)
Instructions
- Preheat the oven to 350*F/180*C/ gas mark 4. Butter a 9-inch round cake tin and line the bottom with some baking paper. Set aside.
- Sift together the flour, baking powder and baking soda. Set aside.
- Whisk the brown sugar and eggs together until pale in color and foamy. (1 minute) Beat in the pumpkin, olive oil, baking spices, pepper and salt. Mix well together until smooth and totally amalgamated. Stir in the flour mixture until smooth.
- Pour the batter into the prepared pan, smoothing over the top. Tap the pan gently on the counter top a few times to release any air bubbles.
- Bake for 25 to 35 minutes until risen and golden brown. A toothpick inserted into the center should come out clean. Leave to cool in the pan on a wire rack for about 10 minutes before tipping out to cool completely.
- Place the cake onto a plate for serving. Whisk together all of the glaze ingredients until smooth, only adding enough hot water to make a thick, but pourable glaze.
- Pour the glaze evenly over the cake and sprinkle with the pumpkin seeds. Leave to set for 20 minutes before serving.
- Store any leftover cake in a tightly covered container for up to three days.
Notes:
If desired 1/2 cup (85g) of chocolate chips can be folded into the cake batter just prior to pouring the batter into the cake tin.
Did you make this recipe?
Tag @marierayner5530 on instagram and hashtag it #TheEnglishKitchen
Subscribe to:
Posts (Atom)










Social Icons