Pages

  • Contact Me
  • MAKE YOUR OWN (a list of make your own mixes)
  • Recipe Index
  • Privacy Policy
  • Advertising and Disclosure
  • Post Index

Search This Blog

Powered by Blogger.

Social Icons

The English Kitchen

Pages

  • Home
  • About Me
  • Cook Booklets
  • Categories
  • _Kitchen Wisdom
  • _In The Larger and Pantry
  • _Couldn't Live Without
  • _Kitchen Wish List
  • Additional Recipes
  • _Vegetarian
  • _Salads
  • _Breads
  • _Sandwiches

Easy Oven Baked Breakfast Tacos - For One

Monday, 31 August 2026


Oven Baked Breakfast Tacos


Sometimes the best breakfasts are the ones we make just for ourselves — simple, cozy, and full of flavour. These Easy Oven Baked Breakfast Tacos for One are exactly that kind of morning treat. With minimal prep and just a handful of everyday ingredients, you can enjoy warm, melty, perfectly baked tacos without fuss or leftovers. 


They’re ideal for busy mornings, slow weekends, or anytime you want something satisfying that feels a little special. Quick to assemble, easy to customize, and baked all in one dish, this small‑batch recipe proves that cooking for one can be every bit as delicious.


Oven Baked Breakfast Tacos 


As most of you know, my daughter Eileen lived with me for six months this year before finally moving into her apartment in July. It was a wonderful time for us.  We both loved the experience.  Now we have movie/sleepover weekends. I usually pick her up on Saturday just after lunch. We spend an afternoon doing something together, usually cooking supper, and then we have a night to watch one of our favorite films and enjoy a few movie snacks.  


On Sunday morning I like to make her a special breakfast.  She is not hard to please and really appreciates my efforts.  By the time she gets up I will usually have already eaten, and may even be on my way out the door to go to church, so quick and easy is usually the breakfast of choice. It can be waffles or pancakes, eggs on toast, etc.  really anything that she enjoys.


This weekend I made her Oven Baked Breakfast Tacos. She loves spicy foods. Scrambled eggs are also her favorite way to enjoy an egg. This easy breakfast was right up her alley with soft, buttery flour tortillas filled with a crisp potato, onion and pepper mixture, topped with creamy scrambled egg, melty cheese and crisp smoky bacon pieces. 


She enjoyed them along with some thick sour cream and tomato salsa to spoon over top.  I had gotten the "gold" sour cream which was really thick and rich.  Both items went with the tacos perfectly.  I think this was easily her favorite breakfast so far.


You could vary these tacos very easily by adding a layer of warm refried beans, a squeeze of lime juice or even a splash of Tabasco. I like the green version. So yummy. 


In any case these were delicious and a great way to begin a morning. You can also prep everything ahead of time, ready to layer and heat just prior to you wanting to serve breakfast.  Quantities are for one serving but can easily be multiplied to serve more!


Oven Baked Breakfast Tacos


INGREDIENTS NEEDED
TO MAKE
🌮EASY OVEN BAKED BREAKFAST TACOS🌮


There is nothing too out of the ordinary required for these simple, yet delicious, tacos. Amounts given are for one serving. Simply multiply to serve more.


  • 1 slice of steaky bacon
  • 1/2 TBS avocado oil
  • 1 cup cubed potato
  • 1 TBS each diced onion, green pepper, red pepper
  • 1/2 TBS taco seasoning mix (see notes)
  • 2 soft 6-inch tortillas
  • soft butter for spreading
  • 2 large eggs, beaten
  • salt and black pepper to taste
  • 4 TBS grated double cheddar cheese (a mix of white and orange, medium cheddars)
  • your favorite taco toppings to serve


Oven Baked Breakfast Tacos


🌮INGREDIENTS NOTES🌮


Pan Fried Potatoes with onions and peppers

These create the hearty, flavour-packed base of the tacos. The mix of potatoes, onions, and red pepper adds sweetness, texture, and colour. You can swap in sweet potatoes if you want a hint of natural sweetness.


Flour Tortillas (6-inch)

Soft, pliable, and perfect for holding generous fillings. If you prefer a more traditional taco feel or need a gluten-free option, corn tortillas work beautifully.


Large Eggs

They bring creaminess, protein, and that classic breakfast comfort. If you are looking for a dairy-free or plant-based option, scrambled tofu also works surprisingly well in this type of taco.


Oil (avocado, vegetable, or olive)

Used to cook the potato/pepper/onion mixture and the eggs. Each oil will bring a slightly different flavor profile. If you want extra flavor in the eggs, you can use a bit of butter to fry them in.


Grated Cheese
Use a cheese that melts beautifully giving your tacos a gooey lush finish. You can easily switch the cheese up by using a Pepper Jack if you wish.


Taco Toppings

Eileen chose salsa and sour cream for a rich finishing touch. You can also use guacamole if you wish or any other taco topping you enjoy such as chopped spring onions, black olives, chopped coriander leaf, etc.


Oven Baked Breakfast Tacos


HOW TO MAKE
🌮EASY OVEN BAKED BREAKFAST TACOS🌮


These really are not a difficult make.

  1. Preheat the oven to 375*F/190*C/ gas mark 5. Have ready a small casserole dish large enough to hold each filled taco standing up. (Mine is a small rectangular casserole, about 2 inches deep and approximately 4 by 7 inches in size.)
  2. Heat a non-stick skillet and cook the bacon over medium heat until crisp to your desired doneness. Remove from the skillet to a piece of paper toweling to drain. (Remember it will be cooking further in the oven so you won't want it too crisp.)
  3. Wipe out the skillet and add the avocado oil. Heat over medium heat. Add the potatoes once the oil is hot. Sprinkle with the taco seasoning. (You can make my own homemade taco seasoning if you wish. Check out the notes on the printable recipe card.)
  4. Cook, stirring frequently, until beginning to brown. (about 10 minutes) Add the onions and peppers and cook for a further 5 minutes or so. Tip out into a bowl. (You should be able to pierce your potatoes easily with the tip of a sharp knife and they should be golden brown.)
  5. Wipe out the skillet. Tip in the eggs and dry scramble until just softly set. Remove from the heat. Season lightly with salt and pepper. (Remember they will be cooking further in the oven so don't make them too hard or they will dry out.)
  6. Butter the tortillas on one side. Place the tortillas, butter side out, standing up and open against each other in the baking dish. (The butter adds flavor and keeps them from sticking together or to the dish.)
  7. Divide the potato mixture between each open tortilla. Top with half of the eggs. (Just divide them equally between each tortilla.)
  8. Sprinkle half of the cheese over top of each. Crumble the bacon and sprinkle over the cheese. (If you wanted to you could sprinkle some chopped spring onions on top as well. Always nice.)
  9. Bake in the preheated oven for 10 minutes.
  10. Serve hot with your favorite taco toppings. (Eileen chose sour cream and tomato salsa. She said this was delicious!)


Oven Baked Breakfast Tacos


🌮SAFETY WHEN CHOOSING AND USING EGGS🌮


Great tasting egg dishes and safe to eat egg dishes depend on buying and using eggs in fresh and top condition. Here are a few guidelines to follow.


  • Purchase clean, fresh eggs, from refrigerated cases, and reputable sources.
  • When you bring them home, refrigerate eggs promptly, with the large ends up.
  • For best quality, use your eggs within one week or purchase. They will be safe to eat for up to five weeks after purchase in most cases.
  • Discard any eggs that are broken or cracked. They may have been contaminated with harmful bacteria called salmonella.
  • Serve hot egg dishes right away.
  • Refrigerate chilled egg dishes immediately after mixing and keep them refrigerated until you are ready to serve them.
  • Chill leftover or make-ahead dishes using eggs promptly.
  • Using uncooked eggs or slightly cooked egg (as in a Caesar salad dressing) may be harmful to the very young or the elderly. Use caution in these instances.


Oven Baked Breakfast Tacos 


🌮FREQUENTLY ASKED QUESTIONS 🌮


CAN I DOUBLE OR TRIPLE THIS RECIPE?

Yes, absolutely. Simple double or triple the ingredients amounts and then use a larger baking dish.


CAN I MAKE THESE BREAKFAST TACOS AHEAD OF TIME?

Yes! You can cook the potatoes, bacon, and scrambled eggs ahead of time and store them in the fridge. When you’re ready to assemble, just give everything a quick warm‑up in the microwave before filling the tortillas. This makes them ideal for meal prep and busy mornings.


CAN I CUSTOMIZE THE FILLINGS?

Absolutely! While the recipe uses potatoes, onions, peppers, eggs, bacon, and cheese, you can swap in crispy hash browns, chorizo, Monterey Jack, or even add salsa or guacamole. Some people like a layer of refried beans.


CAN I USE HARD TACO SHELLS?

You can, but we prefer soft taco for these. You could also use soft corn tortillas if you prefer.


WHAT CAN I SERVE WITH THESE?

We like to enjoy ours with sour cream and salsa. They are hearty enough on their own, but you may want to add some fresh fruit, muffins, or a simple cheese and veggie tray for the really hearty eater.


CAN I ADJUST THE SEASONING?

Yes — feel free to use more or less taco seasoning depending on your spice preference.


Oven Baked Breakfast Tacos 


🌮A FEW MORE BREAKFAST RECIPES TO ENJOY🌮


Here are a few other delicious breakfast options using eggs that you might also enjoy!!


ONE PAN BREAKFAST - A hearty, comforting breakfast made all on one pan — golden roasted potatoes, savoury sausages, and buttery toast baked with perfectly runny “eggs in the hole.” Everything cooks together for a no‑fuss, no‑mess morning meal that feels special but couldn’t be simpler. It’s cozy, satisfying, and just right for two (or even one).


WAFFLE BREAKFAST SANDWICH -  A warm, golden waffle wrapped around a savoury breakfast sausage, a perfectly cooked egg, and melty cheddar — this Waffle Breakfast Sandwich is the ultimate grab‑and‑go comfort. Crisp waffles, salty sausage, and that soft, cheesy egg come together in a sweet‑and‑savory stack that feels like a treat but takes only minutes to make. Enjoy it plain or dip into maple syrup for that irresistible Canadian twist.


Oven Baked Breakfast Tacos  


Pin this delicious recipe to your BREAKFAST or EGG recipe boards and remember to FOLLOW ME on Pinterest, Facebook, or Instagram! 


That way you can be assured that you are always up to date with fresh content as soon as I post it. You can also sign up to receive a weekly newsletter from Grow. Thank you! 


Yield: One Serving
Author: Marie Rayner
Oven Baked Breakfast Tacos (For One)

Oven Baked Breakfast Tacos (For One)

Prep time: 10 MinCook time: 30 MinTotal time: 40 Min

This recipe makes one serving of delicious Breakfast Tacos. Quick and easy to make, you can multiply ingredients to make as many servings as you wish!

Ingredients

  • 1 slice of steaky bacon
  • 1/2 TBS avocado oil
  • 1 cup cubed potato
  • 1 TBS each diced onion, green pepper, red pepper
  • 1/2 TBS taco seasoning mix (see notes)
  • 2 soft 6-inch tortillas
  • soft butter for spreading
  • 2 large eggs, beaten
  • salt and black pepper to taste
  • 4 TBS grated double cheddar cheese (a mix of white and orange, medium cheddars)
  • your favorite taco toppings to serve

Instructions

  1. Preheat the oven to 375*F/190*C/ gas mark 5. Have ready a small casserole dish large enough to hold each filled taco standing up.
  2. Heat a non-stick skillet and cook the bacon over medium heat until crisp to your desired doneness. Remove from the skillet to a piece of paper toweling to drain.
  3. Wipe out the skillet and add the avocado oil. Heat over medium heat. Add the potatoes once the oil is hot. Sprinkle with the taco seasoning.
  4. Cook, stirring frequently, until beginning to brown. (about 10 minutes) Add the onions and peppers and cook for a further 5 minutes or so. Tip out into a bowl.
  5. Wipe out the skillet. Tip in the eggs and dry scramble until just softly set. Remove from the heat. Season lightly with salt and pepper.
  6. Butter the tortillas on one side. Place the tortillas, butter side out, standing up and open against each other in the baking dish.
  7. Divide the potato mixture between each open tortilla. Top with half of the eggs.
  8. Sprinkle half of the cheese over top of each. Crumble the bacon and sprinkle over the cheese.
  9. Bake in the preheated oven for 10 minutes.
  10. Serve hot with your favorite taco toppings.

Notes

Make Your Own Taco Seasoning: Mix together 1 TBS mild chili powder, 1 tsp ground cumin, 1 tsp garlic powder, 1 tsp paprika, 1/2 tsp oregano and 1/2 tsp of onion powder, 1/4 tsp salt and 1/4 tsp black pepper. Store in an airtight container out of the light for up to 6 months.

Did you make this recipe?
Tag @marierayner5530 on instagram and hashtag it #EnglishKitchen

Oven Baked Breakfast Tacos


This content, written and photography, is the sole property of The English Kitchen. Any reposting or misuse is not permitted. If you are reading this elsewhere, please know that it is stolen content and you may report it to me at mariealicejoan at aol dot com.  


Thanks for visiting! Do come again!! 


 If you like what you see here, why not consider signing up for my newsletter and/or subscribing/following me on Grow. You can also bookmark my recipes via the Grow platform. Check out the heart on the right hand side of the screen.   


read article

Meals of the Week, August 23rd to 29th, 2026

Sunday, 30 August 2026

Meals of the Week, August 23rd to 29th, 2026


Hello everyone and welcome to my weekly Meals of the Week post for this past week, which is pretty much the last week of August. It was a week full of family dinners as my brother and sister-in-law were still down for the first few days before returning to Ottawa and then one of their daughters happened to come down for a day to spend with us as well. She was visiting friends in Halifax.  It was so nice to see her and my sister and I were really pleased that she went out of her way to spend time with us. Not many young people these days seem to want to spend time with oldies like us! Family times are the best of times!


One of the main reasons I started doing these meals of the week roundups was because I found myself all of a sudden living on my own and having to cook for just one person. The temptation when you are living on your own can be to eat ready-meals, or frozen meals, from tin cans, or to eat out.  Not exactly healthy food.


Most ready meals, etc. are loaded with fat, sugar and salt.  I did not want that to be me. I enjoy cooking and eating far too much for that to be satisfying to me in any way.


I had to change some of the way I was cooking and eating, of course. I needed to get much more inventive with the way  I cooked and planned my meals.  I downsized a lot of my recipes and now basically my recipes only make one or two servings.  I have found that very easy to do.


I also am a Senior who is living with the budget constraints of having to live on an old age pension. Hence a lot of what I cook is now quite budget friendly as well.


I do not ever want my food to become boring.  I want it to remain exciting. I want the meals that I plan to be something I look forward to every day. I also want them to be fairly healthy.  I am bringing you along on the journey.


I like to think that my meals and menus are varied and interesting, economical and fairly healthy. I hope that by my sharing them I can inspire you to do the same! And without further adieu here are my main meals of the week for the past seven days. I hope you will see something that you will want to cook for yourself and if you do, share it with us!


Honey BBQ Roasted Chicken Thighs


SUNDAY, August 23rd - Sunday Dinner with the family

On Sunday we all gathered at my sisters for Sunday Dinner. She cooked a simple meal of oven baked chicken, rice and veggies. It was delicious as always.


In it's place I am sharing my recipe for Honey BBQ Roasted Chicken Thighs. These Roasted Honey BBQ Chicken Thighs are the perfect blend of sweet, smoky, and savoury — a simple, family‑friendly dish that turns everyday ingredients into something truly irresistible. Bone‑in, skin‑on thighs roast up beautifully juicy, while a rub of BBQ seasoning, garlic, onion powder, and black pepper builds deep flavour right from the start. A drizzle of olive oil helps everything crisp, and the finishing touch — a glossy coat of warm liquid honey — caramelizes in the oven to create that signature sticky‑sweet BBQ glaze everyone loves.


These go wonderfully with some rice, potatoes or noodles on the side and a salad or vegetables. The last time we made them we enjoyed them with some potato salad and coleslaw. Always delicious!


Instant Pot Bolognese


MONDAY, August 24th - Family Dinner at my sisters

This was my brother and sister-in-laws last night with us and so we gathered at my sister's again.  She made a huge pot of spaghetti sauce and spaghetti along with salad.  There was also bread for anyone who wanted it.

In it's place I am sharing my recipe for Instant Pot Bolognese. This Instant Pot Bolognese is a rich, hearty, deeply flavoured meat sauce that tastes like it’s been simmering all afternoon — yet it comes together in under an hour thanks to the pressure cooker . Made with three kinds of meat — ground beef, spicy Italian sausage, and pancetta — plus onions, celery, carrot, garlic, herbs, red wine, tomatoes, and a splash of cream, it cooks down into a beautifully thick, velvety ragù bursting with authentic Italian warmth. 

Its the kind of sauce that clings lovingly to pasta, feels cozy and indulgent, and delivers all of the slow-simmered flavor you adore with none of the waiting. Of course you can also cook it the traditional way. It will just take longer.

We were sorry to have to say farewell to David and Christine. When you get to our age every goodbye is special because you just don't know when you will see each other again, if ever. I suppose you could say that at any age I guess. 


Curried Pineapple Glazed Ham/Gammon Steaks


TUESDAY, August 25th - Curried Pineapple Glazed Ham/Gammon Steaks


This was a dish that I love and something that I had not made for myself in a very long time. In this recipe the steaks are browned and then kept warm while you make the sauce. This sauce is very simple.  You can use fresh pineapple as I have did, or well drained tinned pineapple in juice.  Both work very well.


Tender and juicy hams steaks with a lush sweet and spicy pineapple sauce that goes so deliciously well. I enjoyed this with some steamed rice and fresh garden beans on the side. A mix of green and yellow.  I froze the leftovers to make some pineapple fried rice sometime at a later date. (Just chop up the ham and pineapple sauce and add to your favorite fried rice recipe. Delicious!)


The Ultra Turkey Club Sandwich


WEDNESDAY, August 26th - Dinner at the Big Scoop with the family


Wednesday nights we always go out together as a family to a local restaurant that our father likes to go to.  This week our niece Alison was visiting with us so she went along for the meal as well. There was Dad, Cindy, Eileen, Hazel, myself and Alison.  We all had a great time. Family times are the best of times.


Dad and Hazel both had the grilled haddock dinner. Cindy had fish & chips, Eileen had the six layer lasagna, Alison had chicken strips with frings and I had the club sandwich with some sweet potato fries.


In it's place I am sharing my recipe for The Ultra Turkey Club Sandwich. This Ultra Turkey Club Sandwich is a tall, generously layered diner‑style classic built with toasted white bread, crisp streaky bacon, shaved deli turkey, juicy ripe tomatoes, shredded romaine, strong cheddar, and plenty of good mayonnaise. Every bite delivers that perfect mix of fresh, salty, creamy, and crunchy, just like the overflowing club sandwiches you’d get at a proper diner — only this one is sized perfectly to share. Simple ingredients, big flavour, and pure comfort in every stacked slice.


I had mine at the restaurant with sweet potato fries, but any kind of fries go well, or even a handful of potato chips and some pickle slices. You can't go wrong! This is a hefty sandwich that is large enough to feed two people and if you add a bowl of soup, it makes the perfect supper.


Extra Creamy Macaroni Cheese


THURSDAY - August 27th - Extra Creamy Macaroni & Cheese


I just wanted something simple for my supper on Thursday so I made a pan of Extra Creamy Macaroni and Cheese. This is comfort food at it's best! 


This Extra Creamy Macaroni and Cheese is everything comfort food should be — rich, velvety, and irresistibly cheesy, with tender pasta wrapped in a smooth, luscious sauce that clings to every curve. It’s the kind of mac and cheese that feels like a warm hug: simple ingredients, cozy flavours, and that perfect creamy texture that makes you close your eyes for a moment of pure bliss. Whether served as a main dish or alongside something hearty, it’s the kind of recipe you will want to make again and again.


I enjoyed it simply with a mixed salad on the side, and I was stuffed. You could serve this as a main or as a side. It never fails to please.


Salmon Patties


FRIDAY, August 28th - Salmon Patties with a lemon butter sauce 


Again I chose something simple for my dinner. I have always loved tinned salmon and so I used some to make myself some Salmon Patties.  These Salmon Patties are simple, quick, and wonderfully old‑fashioned, made with pantry staples and tender flaked salmon folded into a light batter of eggs, cream, cornmeal, spring onions, and a touch of seasoning. Fried gently in butter until golden brown, they come out crisp on the edges and soft inside — the kind of cozy, comforting supper that feels like true home cooking at its simplest and tastiest.


I always like to make a simple lemon and butter sauce to serve with them.  On this day I enjoyed them with leftover macaroni and cheese from the day before and another tossed salad, but peas also go very well. I usually serve mac and cheese with these, but anything goes well. Rice, potatoes, noodles. Pick your carb and enjoy!


Roasted Split Turkey Breast for Two


SATURDAY, August 29th - Roasted Split Turkey Breast for Two

My daughter Eileen came over for her weekend sleepover with me. I wanted to cook us something really special and I had picked up a small turkey breast at the store when I was there on Thursday and cooked it for us as a special supper which we both really enjoyed.


This Roasted Split Turkey Breast is a simple, herb‑buttered, oven‑roasted beauty that delivers tender, juicy meat every time. A generous blend of thyme, rosemary, sage, parsley, and basil is whisked into butter and oil, then rubbed under and over the skin for maximum flavour and crispness . Thanks to the smaller cut and that rich herb coating, the turkey roasts quickly, staying wonderfully moist and perfectly cooked — never dry, always delicious.  It does not take near as long to cook as a conventional full turkey would take. It’s an easy, economical, and deeply satisfying meal for two, with enough leftovers for sandwiches or a small casserole the next day. 


We enjoyed it with some mashed potatoes, stuffing/dressing, gravy, carrots, green beans and then we had strawberry rhubarb pie for dessert.  It was a real feast!


I just love these weekends that I get to spend with my daughter. They are so much fun. We eat good food, we watch good movies and we just enjoy each other's company. They are great! 


And there you have it!  My meals of the week for the past seven days. That's a whole lot of good eating and it was made all the better for having shared most of it with family. I hope that you will be inspired to want to cook a few of the recipes for yourself!
 

This content, written and photography, is the sole property of The English Kitchen. Any reposting or misuse is not permitted. If you are reading this elsewhere, please know that it is stolen content and you may report it to me at mariealicejoan at aol dot com.  


Thanks for visiting! Do come again!! 


 If you like what you see here, why not consider signing up for my newsletter and/or subscribing/following me on Grow. You can also bookmark my recipes via the Grow platform. Check out the heart on the right hand side of the screen.   


read article

Easy No Knead Light Rye Bread (Quick Homemade Loaf)

Saturday, 29 August 2026

Easy No Knead Rye Bread 


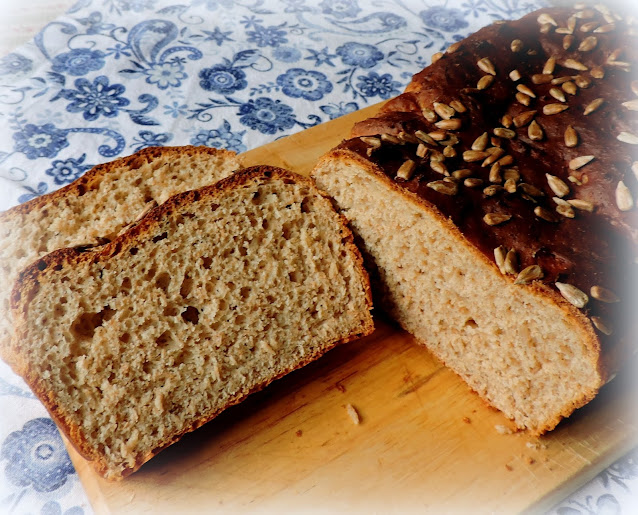
If you’ve ever wished for a homemade loaf of bread that’s quick, reliable, and completely fuss‑free, this Easy No Knead Light Rye Bread is about to become a favourite. Ready in under two hours and mixed entirely with an electric whisk — no kneading required — it delivers a beautifully light, rustic loaf with the wholesome flavours of honey, whole wheat, and dark rye. 


The crumb is soft, the crust tender, and the method wonderfully simple: just mix, rise, and bake. Whether enjoyed warm with butter, lightly toasted, or paired with a dab of honey, this easy rye bread proves that homemade bread doesn’t need to be complicated to be delicious. 


Easy No Knead Rye Bread 


What if I told you that you could have a lovely, deliciously rustic and flavourful loaf of homemade yeast bread sitting on your table in less than 2 hours! Would you believe me??


What if I also told you that you wouldn't have to knead it at all . . .  that an electric whisk would do all the work for you!  Then, would you believe me???

Well, you better start believing because it is absolutely true!  Not only is this loaf, light and delicious . . . but it is also quick and easy . . .

Filled with the goodness of whole grains and the natural sweetness of honey  . . .  with a beautiful light crumb . . .  and wonderful flavours . . .  honey, whole wheat, rye  . . .  and no kneading involved at all.

This has to be one of the easiest loaves of bread you could ever bake and you don't need a bread machine and you won't have to break your back making it.  


You just simply pop all of the ingredients in the bowl and let an electric mixer do all the work for you.  Scrape it into your prepared bread tin and top with some sunflower seeds and let it rise . . . about 40 to 50 minutes is all it takes, and then a 45 minute back in the oven . . .  Presto chango, you have yourself a lovely loaf of bread!! You're welcome!!


Seriously this is a really nice loaf and very easy to make.  I have adapted this recipe from a recipe I found in one of the magazine inserts for Robin Hood Flour from 2007, 25th Anniversary Baking Event, Baking is Back. The original recipe used Nutri Flour Blend, which is no longer available. I haven't been able to find it anyways.  I adapted it to use a combination of three wholesome flours, which worked very well in its place. 


Easy No Knead Rye Bread 


🍞INGREDIENTS NEEDED🍞
TO MAKE
🍞EASY NO KNEAD LIGHT RYE BREAD🍞


This does use a few different types of flour, but it is well worth getting them in to make this delicious loaf!  You can also use just plain and whole wheat if you wish and you will still have a great loaf.

  • 2 1/4 tsp quick rise yeast
  • 3/4 cup (175ml) very warm milk (3/4 cup)
  • 2 - 3 TBS liquid honey (It all depends on your personal preference of sweetness)
  • 2 TBS sunflower oil
  • 1 large free range egg
  • 1 tsp salt
  • 2 cup (240g) strong plain flour (2 cups)
  • 1/4 cup (60g) each strong whole wheat and dark rye flours
  • 1/2 cup (125g) plain yogurt
  • 2 TBS sunflower seeds


Easy No Knead Rye Bread  


🍞NOTES ON INGREDIENTS🍞


Quick‑rise yeast

This fast‑acting yeast helps the dough rise quickly, which is why the whole loaf can be ready in under two hours. It’s activated in very warm milk and honey to give it a strong start.


Very warm milk

The warm milk wakes up the yeast and gives the bread a tender crumb. Using milk instead of water adds richness and softness to the finished loaf.


Liquid honey

Honey adds natural sweetness and helps feed the yeast. The recipe allows you to adjust the amount depending on how sweet you like your bread.


Sunflower oil

A small amount of oil keeps the crumb soft and moist without making the bread heavy. It also helps the dough mix smoothly.


Free‑range egg

The egg enriches the dough, giving it structure and a lovely light texture. It also contributes to the bread’s golden colour.


Salt

Just a teaspoon balances the sweetness of the honey and enhances the flavour of the grains.

Strong plain flour

This high‑protein flour forms the backbone of the loaf, giving it strength and helping it rise tall. It’s added in two stages to create the right batter consistency.


Whole wheat flour

Whole wheat adds nuttiness, fibre, and wholesome flavour. It also deepens the colour of the crumb. The recipe notes you can use all whole wheat if you prefer.


Dark rye flour

Rye brings a rustic, earthy flavour and contributes to the bread’s “light rye” character. It pairs beautifully with honey and whole wheat.


Plain yogurt

Yogurt adds moisture and tenderness, helping the loaf stay soft. Its acidity also supports a better rise and a finer crumb.


Sunflower seeds

Sprinkled on top before rising, they add a lovely crunch and make the loaf look beautifully rustic.


Easy No Knead Rye Bread 


    HOW TO MAKE
🍞EASY NO KNEAD LIGHT RYE BREAD🍞


This really is a very simple loaf of bread to make. Perfect for beginners too! There really is no  kneading required!


  1. Butter an 8" by 4 1/2" bread tin and line it with baking parchment. Set aside. (As this is a somewhat sticky dough, the parchment will help to prevent the bread from sticking to the pan.)
  2. Measure the yeast, warm milk and honey into a bowl. Let sit for 5 to 7minutes. Add the oil, egg, (120g) 1 cup of the white flour. and (60g) 1/2 cup each of the strong whole wheat and dark rye flours. (I used a fairly largish bowl.)
  3. Beat on low with an electric whisk to blend. Increase speed to high and beat for one minute. (I used my electric hand whisk. No need to break out the big gun.)
  4. Scrape bowl and beat for a further minute. Add the remaining flour 1cup (120g) and the yogurt.
  5. Beat until well combined. Spoon into the prepared bread tin. (It will be quite sticky.)
  6. Cover with greased paper or plastic cling film. Set in a warm place to rise until the dough reaches the edge of the pan, about 40 to 50 minutes. (Don't let it get much higher. I sit it into my oven with the light on.)
  7. Preheat the oven to 190*C/375*F/ gas mark 5.
  8. Bake the bread in the preheated oven for about 45 minutes, until golden brown, well risen and the bread sounds hollow on the underside when thumped. (Inner temperature should be 190°F to 210°F (88°C to 99°C)
  9. Remove from the pan and allow to cool on a wire rack. (Store in an airtight container.)


Easy No Knead Rye Bread 


🍞HINTS AND TIPS FOR SUCCESS🍞


Use very warm milk to wake up the yeast

The yeast is mixed with very warm milk and honey to get it bubbling and active before mixing the dough . If the milk is too cool, the rise will be slower.


Let the yeast sit long enough to foam

Give the yeast mixture 5–7 minutes to activate before adding the remaining ingredients . This ensures a strong rise and a lighter loaf.


An electric hand mixer works perfectly

No kneading needed — the mixer does all the work. I use my hand mixer not a stand mixer, and it works beautifully.


Beat the dough well for structure

The recipe calls for beating the dough on low to blend, then on high for a full minute, scraping the bowl, and beating again . This replaces kneading and helps develop gluten.


Use the right pan size

An 8" × 4½" loaf tin is ideal for this recipe, helping the dough rise tall and bake evenly.


Let the dough rise just to the edge of the pan

The dough should rise until it reaches the top edge — usually 40–50 minutes in a warm spot . Over‑rising can weaken the structure.


Top with sunflower seeds for texture

Sprinkling sunflower seeds before rising adds a lovely rustic crunch and makes the loaf look bakery‑beautiful.


Check for doneness by thumping the bottom

The loaf is ready when it’s golden brown, well risen, and sounds hollow when tapped underneath .


Cool fully for the best crumb

Let the bread cool on a wire rack so the crumb sets properly and the crust stays soft and tender .


Customize the flour blend if needed

You can use all whole wheat flour instead of the whole wheat/rye mix if that’s what you have on hand — the recipe adapts well.


Easy No Knead Rye Bread 


🍞FREQUENTLY ASKED QUESTIONS🍞


DO YOU REALLY NOT HAVE TO KNEAD THIS BREAD?

That’s right — no kneading at all! An electric whisk does all the work for you, blending and developing the dough without any manual effort. 


HOW LONG DOES THIS BREAD TAKE FROM START TO FINISH?

Less than 2 hours — including mixing, rising, and baking. It’s one of the quickest yeast loaves you can make.


WHAT GIVES THIS BREAD IT'S LOVELY FLAVOR?

A combination of honey, whole wheat flour, and dark rye flour creates a rustic, slightly sweet, wholesome flavour profile


CAN I USE WHOLE WHEAT FLOUR INSTEAD OF RYE?

Yes — the recipe notes that you can use all whole wheat flour if you prefer or if rye isn’t available.


WHAT KIND OF MIXER SHOULD I USE?

A simple electric hand mixer works perfectly — no need for a stand mixer


HOW CAN I TELL IF THE BREAD IS FULLY BAKED?

 It should be golden brown, well risen, and sound hollow when you thump the underside. 


WHAT SIZE BREAD PAN SHOULD I USE?

An 8" × 4½" bread tin lined with parchment is ideal for this loaf.


IS THIS A GOOD RECIPE FOR BEGINNING BREAD BAKERS?

Absolutely — it’s quick, easy, and requires no kneading. Even readers who don’t consider themselves bakers have had great success with it.


Easy No Knead Rye Bread 


🍞MORE YEAST BREAD RECIPES TO ENJOY🍞


Here are a few more simple yeast bread recipes that you might also enjoy!


MILK BREAD - A beautifully soft, tender white loaf with a tight, even crumb and a rich homemade flavor that makes it perfect for sandwiches and toast. Made in the bread machine, it’s wonderfully reliable — a simple lean dough enriched with whole milk that helps the bread rise higher, stay softer, and develop a delicate, slightly sweet flavor. It bakes up into a golden, fluffy loaf that keeps well for several days and tastes incredible whether enjoyed fresh, lightly toasted, or turned into comforting cheese‑on‑toast.


OATMEAL BATTER BREAD - A wonderfully old‑fashioned, wholesome loaf that’s quick to make and beautifully light in texture. Warm milk, molasses, and yeast create a tender, slightly sweet base, while oats and whole wheat flour add hearty flavor and a rustic charm. Because it’s a batter bread, the mixer does all the kneading, giving you a soft, airy crumb without any fuss . It rises right in the loaf tin and bakes into a golden, comforting bread that’s perfect for toasting, sandwiches, or enjoying warm with butter and jam.


Easy No Knead Rye Bread  


Pin this delicious recipe to your BAKING or BREAD recipe boards and remember to FOLLOW ME on Pinterest, Facebook, or Instagram! 


That way you can be assured that you are always up to date with fresh content as soon as I post it. You can also sign up to receive a weekly newsletter from Grow. Thank you! 


Yield: 16 servings
Author: Marie Rayner
Easy No Knead Light Rye Bread

Easy No Knead Light Rye Bread

Prep time: 1 H & 5 MCook time: 45 MinTotal time: 1 H & 50 M

This is simple and easy, just as it says. The fact that it is also delicious makes it a winner/winner!

Ingredients

  • 2 1/4 tsp quick rise yeast
  • 3/4 cup (175ml) very warm milk (3/4 cup)
  • 2 - 3 TBS liquid honey (It all depends on your personal preference of sweetness)
  • 2 TBS sunflower oil
  • 1 large free range egg
  • 1 tsp salt
  • 2 cup (240g) strong plain flour (2 cups)
  • 1/4 cup (60g) each strong whole wheat and dark rye flours
  • 1/2 cup (125g) plain yogurt
  • 2 TBS sunflower seeds

Instructions

  1. Butter an 8" by 4 1/2" bread tin and line it with baking parchment. Set aside.
  2. Measure the yeast, warm milk and honey into a bowl. Let sit for 5 to 7minutes. Add the oil, egg, (120g) 1 cup of the white flour. and (60g) 1/2 cup each of the strong whole wheat and dark rye flours.
  3. Beat on low with an electric whisk to blend. Increase speed to high and beat for one minute.
  4. Scrape bowl and beat for a further minute. Add the remaining flour 1cup (120g) and the yogurt.
  5. Beat until well combined. Spoon into the prepared bread tin.
  6. Cover with greased paper or plastic cling film. Set in a warm place to rise until the dough reaches the edge of the pan, about 40 to 50 minutes.
  7. Preheat the oven to 190*C/375*F/ gas mark 5.
  8. Bake the bread in the preheated oven for about 45 minutes, until golden brown, well risen and the bread sounds hollow on the underside when thumped.
  9. Remove from the pan and allow to cool on a wire rack.

Notes

You can use all whole wheat instead of a mix of whole wheat and rye flours.

Did you make this recipe?
Tag @marierayner5530 on instagram and hashtag it #EnglishKitchen


Easy No Knead Rye Bread 


So . . .  what are you waiting for??? Get baking!    (And I thought I was lousy at baking bread.  I'm quite proud of this!)  Happy weekend! 


This content, written and photography, is the sole property of The English Kitchen. Any reposting or misuse is not permitted. If you are reading this elsewhere, please know that it is stolen content and you may report it to me at mariealicejoan at aol dot com.  


Thanks for visiting! Do come again!! 


 If you like what you see here, why not consider signing up for my newsletter and/or subscribing/following me on Grow. You can also bookmark my recipes via the Grow platform. Check out the heart on the right hand side of the screen.   


read article
new entries old entries
Subscribe to: Posts (Atom)

If You Like What You See

If you like what you see and wish to donate to help pay for butter, sugar, eggs and whatnot, every little bit is appreciated. Thanks!
PRIVACY POLICY

Buy the Book!

If you are a Baking Enthusiast and a fan of British Baking you are going to love this new book I wrote. From fluffy Victoria sponges to sausage rolls, the flavors of British baking are some of the most famous in the world. Learn how to create classic British treats at home with the fresh, from-scratch, delicious recipes in The Best of British Baking. Its all here in this delicious book! To find out more just click on the photo of the book above!

Translate


This is a book I wrote several years ago, published by Passageway Press. I am incredibly proud of this accomplishment. It is now out of print as my publisher went out of business after Covid, but you can still find used copies for sale here and there. If you have a copy of it, hang onto it because they are very rare. This was a real labor of love for me and a dream come true as I had always wanted to write a book since I was a child. Hopefully I will be able to republish it one day. If you know of a publisher who is looking for something let me know!

Welcome, I'm Marie

Welcome, I'm Marie
Canadian lover of all things British. I cook every day and like to share it with you!
A third of my life was spent living in the UK. I learned to love the people, the country and the cuisine. I have always been an Anglophile. You will find plenty of traditional British recipes here in my English Kitchen. There are lots of North American recipes also, but then again, I am a Canadian by birth. I like to think of my page as a happy mix of both. If you are looking for something and cannot find it, don't be afraid to ask! I am always happy to help and point you in the right direction, even if it exists on another page, or in my extensive collection of cookbooks. I moved back to Canada in the year 2020 and have been busy building a new life for myself back in my homeland. I am largely retired now, except for this little space on the internet that I call home. I hope you will stay a while and have a good boo around. There's lots of deliciousness here to explore!

Search This Blog

Featured

Easy Homemade Fresh Fruit Compote – Quick, Simple & Versatile
  Sometimes the simplest things bring the most joy, and this Fresh Fruit Compote is one of those little treasures. Made with whatever fr...

Popular Posts

  • Fried Cabbage with Bacon & Onions
      I have always loved fried cabbage.  I first had it when I was in high school.  We cooked it in our Home Economics Class. It was just ...
  • Sticky Lemon Chicken
    I am always on the look out for a good chicken breast recipe.  We eat a lot of chicken in this house, and it mostly comes in the form of...
  • Lemon Friands
    Anyone who knows me, knows that I am a nut for anything lemon flavoured. It's always been one of my absolute favourite taste thril...
  • Quick and Easy Bacon and Egg Tarts
       You might not think that you have time to do a bacon and egg breakfast on a weekday, but this recipe here today proves that just isn...
  • Mary Berry's Cheese Scones
    I wanted to make some scones to enjoy the other day.  I have made quite a few scones here on the blog and I love them all. I do like to try ...

My Favourite Places

  • Welcome Home Kitchen Blog
  • Cookbooklets
  • Categories
  • _Kitchen Wisdom
  • _In the Larder and Pantry
  • _Couldn't Live Without
  • _Kitchen Wish List

Archive

  • ▼  2026 (240)
    • ▼  September (1)
      • Easy Homemade Fresh Fruit Compote – Quick, Simple ...
    • ►  August (31)
    • ►  July (30)
    • ►  June (30)
    • ►  May (31)
    • ►  April (28)
    • ►  March (31)
    • ►  February (27)
    • ►  January (31)
  • ►  2025 (358)
    • ►  December (28)
    • ►  November (30)
    • ►  October (32)
    • ►  September (29)
    • ►  August (29)
    • ►  July (29)
    • ►  June (30)
    • ►  May (31)
    • ►  April (30)
    • ►  March (31)
    • ►  February (28)
    • ►  January (31)
  • ►  2024 (349)
    • ►  December (29)
    • ►  November (30)
    • ►  October (29)
    • ►  September (29)
    • ►  August (26)
    • ►  July (26)
    • ►  June (30)
    • ►  May (31)
    • ►  April (30)
    • ►  March (30)
    • ►  February (29)
    • ►  January (30)
  • ►  2023 (341)
    • ►  December (27)
    • ►  November (28)
    • ►  October (27)
    • ►  September (28)
    • ►  August (25)
    • ►  July (31)
    • ►  June (30)
    • ►  May (31)
    • ►  April (28)
    • ►  March (31)
    • ►  February (28)
    • ►  January (27)
  • ►  2022 (366)
    • ►  December (26)
    • ►  November (29)
    • ►  October (30)
    • ►  September (29)
    • ►  August (32)
    • ►  July (33)
    • ►  June (29)
    • ►  May (33)
    • ►  April (30)
    • ►  March (29)
    • ►  February (31)
    • ►  January (35)
  • ►  2021 (370)
    • ►  December (36)
    • ►  November (31)
    • ►  October (31)
    • ►  September (31)
    • ►  August (30)
    • ►  July (32)
    • ►  June (35)
    • ►  May (27)
    • ►  April (29)
    • ►  March (31)
    • ►  February (27)
    • ►  January (30)
  • ►  2020 (315)
    • ►  December (30)
    • ►  November (23)
    • ►  October (31)
    • ►  September (29)
    • ►  August (27)
    • ►  July (29)
    • ►  June (26)
    • ►  May (26)
    • ►  April (26)
    • ►  March (25)
    • ►  February (23)
    • ►  January (20)
  • ►  2019 (312)
    • ►  December (20)
    • ►  November (22)
    • ►  October (21)
    • ►  September (30)
    • ►  August (31)
    • ►  July (25)
    • ►  June (30)
    • ►  May (33)
    • ►  April (25)
    • ►  March (26)
    • ►  February (24)
    • ►  January (25)
  • ►  2018 (326)
    • ►  December (29)
    • ►  November (28)
    • ►  October (31)
    • ►  September (27)
    • ►  August (30)
    • ►  July (32)
    • ►  June (28)
    • ►  May (19)
    • ►  April (26)
    • ►  March (31)
    • ►  February (25)
    • ►  January (20)
  • ►  2017 (348)
    • ►  December (29)
    • ►  November (30)
    • ►  October (30)
    • ►  September (35)
    • ►  August (23)
    • ►  July (30)
    • ►  June (29)
    • ►  May (31)
    • ►  April (29)
    • ►  March (28)
    • ►  February (28)
    • ►  January (26)
  • ►  2016 (387)
    • ►  December (33)
    • ►  November (31)
    • ►  October (30)
    • ►  September (33)
    • ►  August (34)
    • ►  July (35)
    • ►  June (28)
    • ►  May (33)
    • ►  April (31)
    • ►  March (34)
    • ►  February (33)
    • ►  January (32)
  • ►  2015 (388)
    • ►  December (34)
    • ►  November (32)
    • ►  October (34)
    • ►  September (35)
    • ►  August (43)
    • ►  July (31)
    • ►  June (28)
    • ►  May (31)
    • ►  April (32)
    • ►  March (32)
    • ►  February (26)
    • ►  January (30)
  • ►  2014 (425)
    • ►  December (38)
    • ►  November (38)
    • ►  October (41)
    • ►  September (31)
    • ►  August (30)
    • ►  July (36)
    • ►  June (39)
    • ►  May (42)
    • ►  April (38)
    • ►  March (33)
    • ►  February (27)
    • ►  January (32)
  • ►  2013 (378)
    • ►  December (40)
    • ►  November (35)
    • ►  October (36)
    • ►  September (32)
    • ►  August (30)
    • ►  July (30)
    • ►  June (31)
    • ►  May (28)
    • ►  April (25)
    • ►  March (33)
    • ►  February (30)
    • ►  January (28)
  • ►  2012 (376)
    • ►  December (34)
    • ►  November (35)
    • ►  October (35)
    • ►  September (32)
    • ►  August (35)
    • ►  July (28)
    • ►  June (31)
    • ►  May (29)
    • ►  April (29)
    • ►  March (30)
    • ►  February (29)
    • ►  January (29)
  • ►  2011 (332)
    • ►  December (32)
    • ►  November (29)
    • ►  October (28)
    • ►  September (28)
    • ►  August (27)
    • ►  July (28)
    • ►  June (28)
    • ►  May (25)
    • ►  April (26)
    • ►  March (28)
    • ►  February (26)
    • ►  January (27)
  • ►  2010 (286)
    • ►  December (32)
    • ►  November (30)
    • ►  October (31)
    • ►  September (25)
    • ►  August (23)
    • ►  July (5)
    • ►  June (27)
    • ►  May (23)
    • ►  April (14)
    • ►  March (23)
    • ►  February (25)
    • ►  January (28)
  • ►  2009 (169)
    • ►  December (26)
    • ►  November (24)
    • ►  October (26)
    • ►  September (23)
    • ►  August (25)
    • ►  July (21)
    • ►  June (21)
    • ►  May (3)

PRIVACY POLICY
© The English Kitchen.
Customized by My Fairy Blog Mother.