

The other day my sister baked some fabulous gluten free, sugar free, keto and diabetic friendly chocolate chip cookies. I thought to myself, they can't be very good, but she dropped a half a dozen over to me and I was amazed!
Not only were they really delicious, but they were also quite satisfying to my sweet tooth. I had to get the recipe!
.JPG "Keto Chocolate Chip Cookies")
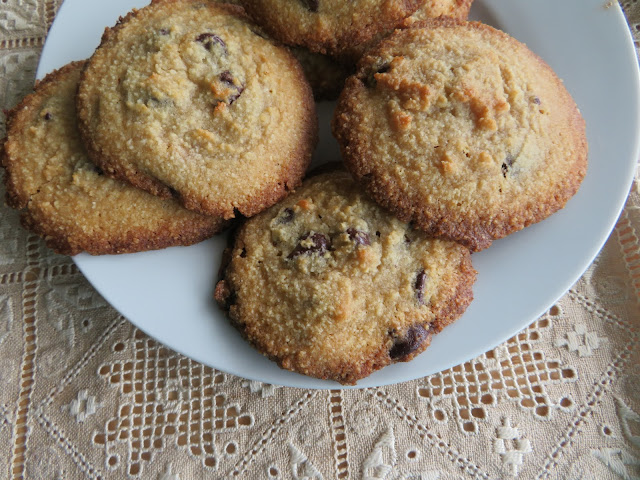
This Keto Chocolate Chip Cookie recipe is probably one of the best that I have tried in recent weeks. Not only are they crispy edged, but they don't have a lingering aftertaste.
They are crisp edged, buttery, chewy centered and stogged full of lovely chocolate chips. I had been waiting all week to bake them and finally got around to it today! Yay!
.JPG "Keto Chocolate Chip Cookies")
I hope that you can see just how crisp edged they are and their beautiful texture from the photo above. My photos didn't turn out really great. I am sorry for that.
Don't let them put you off from trying these fabulous cookies!
.JPG "Keto Chocolate Chip Cookies")
WHAT YOU NEED TO MAKE KETO CHOCOLATE CHIP COOKIES
Pretty much all of the usual suspects if you keep a keto kitchen, if you don't well you may have to buy some specialty items.
- 1/2 cup (120g) butter at room temperature
- 1/4 cup (42g) coconut oil, melted
- 1 -2 TBS coconut flour (optional, but make for a fluffier cookie)
- 1/3 cup (70g) Swerve granulated sweetener
- 1/4 cup (50g) Swerve light brown sugar sweetener
- 1 large free range egg
- 1 tsp vanilla extract
- 1/2 tsp almond extract
- 2 cups (165g) almond flour
- 1/2 tsp baking soda
- 1/2 tsp fine sea salt
- 1 cup (160g) Lily's dark chocolate chips
.JPG "Keto Chocolate Chip Cookies")
I use ordinary salted butter. I can't afford to have two kinds of butter in my kitchen. I find that salted butter works just fine, so long as I cut back a bit on the salt asked for in the recipe.
Coconut oil can be bought in just about any grocery store. I buy the solid and them melt it to use in this recipe. On a side note, its really nice on dry skin also. My elbows have never looked nicer and I smell good enough to eat!
My cats also eat it. I keep a little bowl of it out for them. It helps with hair balls.
.JPG "Keto Chocolate Chip Cookies")
I use Swerve sugars, they are sweeteners that measure one for one like regular sugar. You can also use monkfruit granular sweeteners, I buy mine online, but you can also buy them at the grocery store. The important thing is that they are one for one measure sweetener.
Almond flour. I use the Kirkland brand that I get from Costco. You can use ground almonds but bear in mind they will be a bit coarser than the almond flour and you may need more to get the right consistency.
.JPG "Keto Chocolate Chip Cookies")
Coconut Flour. Although this is an optional ingredient, it will help to make your cookies fluffier. I used Bob's Red Mill Coconut Flour.
You can also grind regular unsweetened dried coconut to a powder in your spice grinder or coffee grinder.
You can use any brand sugar free chocolate chips. There are many great options available at the supermarket these days.
.JPG "Keto Chocolate Chip Cookies")
You can even get sugar free baking chips in other flavors these days. Butterscotch, vanilla, milk chocolate. The world is your oyster!
I did buy my Lily's chocolate chips online. They were a bit cheaper. If you would like to know where, just message me and I will tell you where I got them.
.JPG "Keto Chocolate Chip Cookies")
HOW TO MAKE KETO CHOCOLATE CHIP COOKIES
Not quite as straight forward as making regular chocolate chip cookies, but not very difficult to make anyways.
The important thing is to make sure you get everything mixed together evenly.
.JPG "Keto Chocolate Chip Cookies")
Preheat the oven to 350*F/180*C/ gas mark 4. Line a large baking sheet with some baking paper. Set aside. Don't skip the paper. They will stick.
Beat the butter and coconut oil together until well amalgamated with an electric hand mixer. Beat in the egg, vanilla, almond extract and both sugars. (You can also add the optional coconut flour here as well.) (It is important that your butter not be melted, but only soft.)
.JPG "Keto Chocolate Chip Cookies")
Whisk together the almond flour, baking soda and salt, mixing well together. Add the butter mixture and mix well together with an electric hand mixer.
Fold in the chocolate chips. Scoop onto the baking sheet using a cookie scoop. Leave at least 2 inches between each cookie. (You can alternately roll into balls about the size of a walnut.)Bake for 9 to 11 minutes.
Leave to cool completely on the baking sheet before storing in an airtight container.
.JPG "Keto Chocolate Chip Cookies")
I baked mine for the full 11 minutes and as you can see the end result was really scrumptious. Crisp an golden brown on the bottom. The tin I baked these on was a darker tin. I suspect that helped to make them crisper.
If you are not bothered about sugars you may want to try my recipe for regular chocolate chip cookies. You can find that one here.
I also have a recipe on here that makes only four perfect chocolate chip cookies. Any more than that would be dangerous as these are incredibly tasty!
.JPG "Keto Chocolate Chip Cookies")
Alas I am paying for the sins of my misspent youth now and having to really watch my carbs and sugars. Its nice to know that I can still indulge myself every now and then on a bit of a treat however, and have it fall within the perimeters of my diet.
If you are looking for a sugar free, gluten free, diabetic and keto friendly chocolate cookie? Well, you've just struck gold!
Keto Chocolate Chip Cookies
Yield: 24
Prep time: 10 MinCook time: 11 MinTotal time: 21 Min
These no sugar, keto and diabetic friendly chocolate chip cookies melt in the mouth. Delicious!
Ingredients
- 1/2 cup (120g) butter at room temperature
- 1/4 cup (42g) coconut oil, melted
- 1 -2 TBS coconut flour (optional, but make for a fluffier cookie)
- 1/3 cup (70g) Swerve granulated sweetener
- 1/4 cup (50g) Swerve light brown sugar sweetener
- 1 large free range egg
- 1 tsp vanilla extract
- 1/2 tsp almond extract
- 2 cups (165g) almond flour
- 1/2 tsp baking soda
- 1/2 tsp fine sea salt
- 1 cup (160g) Lily's dark chocolate chips
Instructions
- Preheat the oven to 350*F/180*C/ gas mark 4. Line a large baking sheet with some baking paper. Set aside.
- Beat the butter and coconut oil together until well amalgamated with an electric hand mixer. Beat in the egg, vanilla, almond extract and both sugars. (You can also add the optional coconut flour here as well)
- Whisk together the almond flour, baking soda and salt, mixing well together. Add the butter mixture and mix well together with an electric hand mixer.
- Fold in the chocolate chips.
- Scoop onto the baking sheet using a cookie scoop. Leave at least 2 inches between each cookie. (You can alternately roll into balls about the size of a walnut.)
- Bake for 9 to 11 minutes.
- Leave to cool completely on the baking sheet before storing in an airtight container.

Thanks so much for visiting. Do come again!


I have to say I am really enjoying using my air fryer. I have finally gotten to terms with it and am now cooking quite a few different things in it with success.
Today I decided to try cooking a whole chicken, aka roast chicken in it and I have to say it turned out beautiful. Moist and tender with a really lovely crisp skin!

The skin did get rather dark, but it still tasted really delicious. As well the meat beneath the skin was tender, juicy and succulent.
You do have to bear in mind that you won't be able to roast just any chicken in the air fryer. It needs to fit into the basket comfortably and none of it can touch the top of the air fryer.
.JPG "Air Fryer Roast Chicken")
I was really lucky this week they had whole roasting chickens on offer at the local shops and I was able to pick up a smaller one which was perfectly sized for roasting in the air fryer. It was 1.6 KG in weight, which is about 3 1/2 pounds.
My sister got one also and she is going to cook hers in her air fryer using the rotisserie attachment. I didn't have any butcher's twine or I would have tried the same. (Reminder to self, order some butchers twine. )
She is brining hers first. This could be a complete game changer!

I wanted to tell you a bit about my Air Fryer as so many people had asked. Mine is a Kuraidori Multi Function Air Cooker/Fryer.
It does much more than just air fry, you can also bake in it, although so far I have not tried baking anything in mine! I have just been using the air fry function! It works very much like a small convection oven.
I am sure I will get a LOT of use from it this summer when the temperatures rise and I am not wanting to heat up my big oven!

It is the brand of appliance that is carried at Home Hardware here in Canada. It uses high-speed hot air circulation to produce crispy, cooked foods without oil. Featuring a fryer basket, two grill inserts, a rotisserie spindle and a non-stick pizza pan, this versatile air cooker makes it easy to get creative in the kitchen.
You can set the timer control for up to 60 minutes and keep an eye on dinner through the transparent door panel. This air cooker comes with cooking program presets and a clear digital LED display for ease of use.

You can see here the basket inside the cooker, which I have sitting on the oven rack thing, over the drip pan. I have found it to be very easy to use and very easy to clean up afterwards.
All of the bits go into the dish washer so clean up is really a breeze.

.JPG "Air Fryer Roast Chicken")

My chicken was cooked in about 50 minutes and registering at the correct temperature at its thickest part. (165*F/74*C.) It smelled gorgeous while it was cooking. I could hardly wait to get it out of there!

I am really pleased with mine, and my sister is very pleased with hers also. I have done wings, baked potatoes, baked sweet potatoes, turnip fries, stuffed baked potatoes, from scratch onion rings, oven chips, and frozen breaded chicken in mine, and everything has come out beautifully.
The other day my sister cooked spaghetti squash in hers and it was excellent! I think it is safe to say that we both highly recommend this model. I feed one person regularly from it and my sister feeds three, sometimes four.
.JPG "Air Fryer Roast Chicken")
WHAT YOU NEED TO MAKE AIR FRYER ROAST CHICKEN
Other than the chicken, a few seasonings, some oil and time there is not much else needed!
- 1 (3 1/2 pound/1.587 kg) whole chicken, giblets removed
- 2 TBS canola oil
- 1/2 TBS kosher salt
- 1/2 tsp black pepper
- 1/2 tsp garlic powder
- 1/2 tsp onion powder
- 1 tsp sweet paprika
- 1/2 tsp dried basil
- 1/2 tsp dried oregano
- 1/2 tsp dried thyme

My chicken was cooked in about 50 minutes and registering at the correct temperature at its thickest part. (165*F/74*C.) It smelled gorgeous while it was cooking. I could hardly wait to get it out of there!
I did check it about 10 minutes before the intitial cook time was up just to make sure I didn't over cook it. There is nothing worse than over-cooked, dry chicken!
.JPG)
HOW TO COOK AIR FRYER ROAST CHICKEN
Nothing could be simpler. I am so impressed with this! NO fuss NO muss!
Combine the oil an all of the seasonings in a small bowl. Set aside.
Remove the chicken from the packaging. Pat dry all over with paper towels.
Rub the chicken all over with the oil and seasonings.
Spray the air fryer basket with cooking spray. Place the chicken into the basket breast side down.
.JPG "Air Fryer Roast Chicken")
Cook at 360*F/182*C for 40 minutes. Flip over so that the breast is upright and cook for a further 10 to 15 minutes.
Check the internal temperature by sticking a meat thermometer into the thickest part of the chicken. It should register 165*F/74*C. If it isn't quite there, pop it back into the air fryer, 360*F/182*C for a further 5 to 10 minutes.
Let rest for 10 minutes, then carve and serve.
.JPG "Air Fryer Roast Chicken")
As you can see, the end result was tender and juicy, perfectly cooked chicken with a fabulously crisp and delicious skin! Roast chicken is a real favorite in my house and I am always looking for new ways to cook it. I think I have found a new favorite!
Some other favorite ways of cooking it are:
BUNDT PAN ROAST CHICKEN - The chicken is inverted on the post of a Bundt pan over a bed of vegetables resulting in juicy, flavorful, crispy-on-the-outside roasted chicken (plus veggies!) every single time.
ROAST CHICKEN WITH LEMON & HERB STUFFING - This is a real favorite here with tender juicy chicken, beautiful pan juices and a delicious herbed stuffing!
.JPG "Air Fryer Roast Chicken")
I wonder what I will cook next in my air fryer? Stay tuned, you never know what it could be!


This content (written and photography) is the sole property of The English Kitchen. Any reposting or misuse is not permitted. If you are reading this elsewhere, please know that it is stolen content and you may report it to me at: mariealicejoan at aol dot com
Air Fryer Roast Chicken
Yield: 4
Prep time: 5 MinCook time: 50 MinInactive time: 10 MinTotal time: 1 H & 5 M
I was surprised at how easy and how delicious this was. I highly recommend! If you want gravy I also recommend my Perfect Gravy from Scratch.
Ingredients
- 1 (3 1/2 pound/1.587 kg) whole chicken, giblets removed
- 2 TBS canola oil
- 1/2 TBS kosher salt
- 1/2 tsp black pepper
- 1/2 tsp garlic powder
- 1/2 tsp onion powder
- 1 tsp sweet paprika
- 1/2 tsp dried basil
- 1/2 tsp dried oregano
- 1/2 tsp dried thyme
Instructions
- Combine the oil an all of the seasonings in a small bowl. Set aside.
- Remove the chicken from the packaging. Pat dry all over with paper towels.
- Rub the chicken all over with the oil and seasonings.
- Spray the air fryer basket with cooking spray. Place the chicken into the basket breast side down.
- Cook at 360*F/182*C for 40 minutes. Flip over so that the breast is upright and cook for a further 10 to 15 minutes.
- Check the internal temperature by sticking a meat thermometer into the thickest part of the chicken. It should register 165*F/74*C. If it isn't quite there, pop it back into the air fryer, 360*F/182*C for a further 5 to 10 minutes.
- Let rest for 10 minutes, then carve and serve.

Thank you so much for visiting! Do come again!
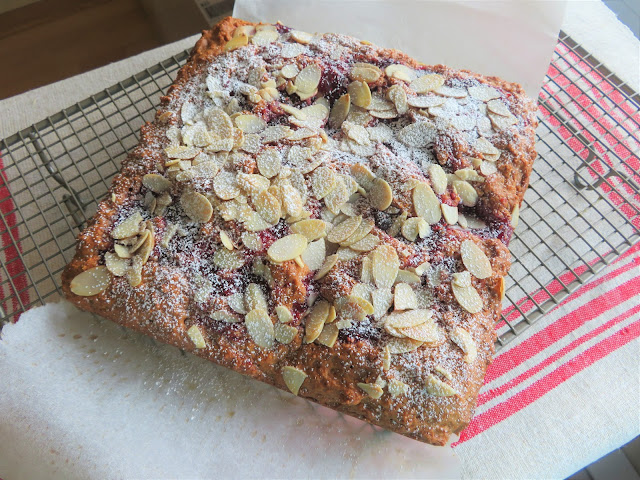

Jam Tea Cake. This is a wonderful breakfast cake that is sure to become a firm favorite with your family! Its been a favorite of mine for a great many years, and no small wonder!
Its moist and delicious from a rich sour cream, buttery and almond flavored batter. Topped with swirls of your favorite preserves and flaked almonds, it always goes down a real treat. Breakfast, brunch, coffee break, teatime, whenever!

Not only is it moist and delicious, but it goes together very quickly. This makes it ideal to whip together for last minute breakfast guests, and I can tell you, nobody has ever been able to turn down a piece of this!
It is the ideal showcase for the wonderful sweetness and flavor or homemade preserves. If you are lucky enough to have rhubarb jam in the larder, you are in for a real treat!
.JPG "Jam Tea Cake")
But it really goes beautifully with any flavor of preserves. Some favorites here are raspberry, strawberry, cherry, and mixed berry. Red colored preserves really show up nicely!
But blueberry and apricot, or peach are also nice. And don't forget lemon curd, or even, dare I say it . . . . Nutella. If you are not fond of the flavor of almond extract, you can use vanilla in its place.
.JPG "Jam Tea Cake")
WHAT YOU NEED TO MAKE JAM TEA CAKE
Simple baking cupboard ingredients. There is nothing really out of the ordinary here. That's all a part of its simple charm!
- 1 1/2 cups (210g) unbleached all purpose plain flour
- 1/3 cup (65g) granulated sugar
- 1 tsp baking powder
- 1/2 tsp baking soda (bicarbonate of soda)
- pinch of salt
- 4 TBS butter, melted
- 2 large free range eggs, beaten
- 1/2 cup (60g) dairy sour cream
- 1 1/2 tsp almond extract
- 1/2 to 2/3 cup (110g to 145g) thick fruit jam or preserves, or all fruit spread
- 1/2 cup (85g) flaked almonds
.JPG "Jam Tea Cake")
I have not made this using low fat sour cream, but I think it would probably work alright. You could also use plain unsweetened yogurt in the place of the sour cream if that is all you have.
I only keep one kind of butter in my kitchen, slightly salted. Oh how I miss the Lurpak butter I could get in the UK. It was the best.
All eggs are free range, large and organic if I can find them.
.JPG "Jam Tea Cake")
If I don't have homemade jam to use I use the best jam my money can buy. I really like the Bonne Maman Jams from France, and no, its not just because of the jar. They taste good and have plenty of fruit in them.
You can also use spreadable fruit.
.JPG "Jam Tea Cake")
HOW TO MAKE JAM TEA CAKE
This is probably one of the easiest cakes to make. It goes together just like a muffin or a quick bread in that you mix together the dry ingredients and the wet ingredients separately and then beat the two together!
.JPG "Jam Tea Cake")
Preheat the oven to 350*F/180*C/ gas mark 4. Butter an 8 inch square baking tin and line with some baking parchment leaving an overhang on two sides.
Sift the flour, soda, and baking powder into a bowl. Stir in the sugar and salt.
Whisk the melted butter, sour cream, beaten eggs, and almond extract together. Add to the dry ingredients and beat until smooth and fluffy. Spread into your pan evenly.
.JPG "Jam Tea Cake")
Dot the top with the jam. Insert a butter knife straight into the batter and swirl it in gently a few times to distribute it through the batter.
Sprinkle the flaked almonds over top.
Bake in the center of the preheated oven for 40 to 45 minutes or until a toothpick inserted in the center comes out clean. Let stand in the pan for 10 minutes before lifting out onto a wire rack to cool. Serve warm or at room temperature.
.JPG "Jam Tea Cake")
The batter is quite a thick batter. It is supposed to be thick. This is what prevents the jam from sinking all the way to the bottom.
You might think you are never going to be able to spread it out in the pan, but the back of a metal spoon helps to do this beautifully! I tend to dollop it into the pan in 9 big dollops and then spread it out from there!
Don't over swirl the jam. You want nice pockets of sweet preserves as well as a bit of swirl throughout the cake!
.JPG "Jam Tea Cake")
If you are fond of using jam in your baking there is no end to the recipes here in my kitchen using that fabulous resource. (We are real jam people!) Here are some of my favorites!
SMALL BATCH JAM CRUMBLE BARS - with the short bread base, jam filling and crumbled shortbread topping these tasty bars go down a real treat with a nice hot cuppa!
EASY JAM HEARTS - Heart shaped buttery cookies with scrumptious jam centres. No rolling out or cookie cutters needed. Dolloped on the baking sheet and shaped with your hands, they are very easy to make.
JAM DOUGHNUT MUFFINS - These are so scrumptious I once made them three times in one week! Moist and delicious with jammy centers and a cinnamon sugar coating.
.JPG "Jam Tea Cake")
This really is a fabulous breakfast cake. I guarantee your family is going to love it. Put the kettle on and make a pot of tea because a nice hot cuppa goes perfectly!
Note, I like to dust it lightly with some icing sugar to serve. It pretties it up very nicely!

Jam Tea Cake
Yield: Makes one 8-inch cake
Prep time: 10 MinCook time: 45 MinTotal time: 55 Min
This fabulous breakfast cake goes together very quickly and is a great way to use up whatever jam you have languishing in the refrigerator. I especially love to use raspberry, cherry or strawberry jam. Its also a really nice way to showcase some of your homemade preserves.
Ingredients
- 1 1/2 cups (210g) unbleached all purpose plain flour
- 1/3 cup (65g) granulated sugar
- 1 tsp baking powder
- 1/2 tsp baking soda (bicarbonate of soda)
- pinch of salt
- 4 TBS butter, melted
- 2 large free range eggs, beaten
- 1/2 cup (60g) dairy sour cream
- 1 1/2 tsp almond extract
- 1/2 to 2/3 cup (110g to 145g) thick fruit jam or preserves, or all fruit spread
- 1/2 cup (85g) flaked almonds
Instructions
- Preheat the oven to 350*F/180*C/ gas mark 4. Butter an 8 inch square baking tin and line with some baking parchment leaving an overhang on two sides.
- Sift the flour, soda, and baking powder into a bowl. Stir in the sugar and salt.
- Whisk the melted butter, sour cream, beaten eggs, and almond extract together. Add to the dry ingredients and beat until smooth and fluffy. Spread into your pan evenly.
- Dot the top with the jam. Insert a butter knife straight into the batter and swirl it in gently a few times to distribute it through the batter.
- Sprinkle the flaked almonds over top.
- Bake in the center of the preheated oven for 40 to 45 minutes or until a toothpick inserted in the center comes out clean. Let stand in the pan for 10 minutes before lifting out onto a wire rack to cool. Serve warm or at room temperature.

Thanks so much for visiting. Do come again!
Subscribe to:
Posts (Atom)


Social Icons