

One of the challenges I enjoy from receiving my Degustabox every month is coming up with unique and delicious ways to use the contents! My mother always said that was one thing I excelled at!
Taking whatever ingredients were thrown at me and coming up with something delicious! I think you will agree that this month I came up with something incredibly delicious.

I received a packet of the Salsa & Mesquite chips and I decided they would be the perfect ingredient to use in this months Degusta Box recipe! (I forgot to take a photograph of the bag of crisps with the chicken, sorry!)
I received a packet of the Salsa & Mesquite chips and I decided they would be the perfect ingredient to use in this months Degusta Box recipe! (I forgot to take a photograph of the bag of crisps with the chicken, sorry!)

Who doesn't love fried chicken? Not me, that's who! I adore the stuff, and if I can cut down the fat and hassle a tiny bit by oven frying it, so much the better.
I know that any calories saved by deep frying will have been absorbed by the use of potato chips in the coating, but . . . meh! It's Christmas!

This is sooooo easy to make as well. It's as simple as dipping the chicken in egg and milk and then shaking it in a bag of crush potato chips. Onto the baking tray . . .

And in due course you are rewarded with the most delicious oven fried chicken ever! Of course you can use any flavour of potato chips you wish, but these Salsa & Mesquite ones added an extra dose of spice and flavour to this delightfully tasty chicken!
It was sooooooooo GOOD! Tasty! Tasty!

Potato crisps/chips make the perfect crispy topping for oven fried chicken. I have used the new Kettle Cooked Salsa and Mesquite potato chips here for a nice and smoky tex mex flavour, but you can use whatever flavour of potato chips you wish! They're all decadently gorgeous!
1 large free range eggs, beaten with 2 TBS milk
150g bag of potato chips, crushed (about 2 cups crumbs)
8 pieces of chicken thighs/drumsticks
salt and black pepper to taste
cooking spray/mister

Preheat the oven to 190*C/375*F/ gas mark 5. Line a baking sheet with aluminium foil. Spray lightly with cooking spray.
Place the beaten egg and milk into a bowl and the potato chip crumbs into a bag for shaking. Roll the chicken pieces in the egg/milk and then shake them in the bag of potato chips to coat. Place presentation side down on the baking tray. Spritz with some cooking spray. Discard any beaten egg mixture and leftover crisp crumbs. (Alternately, save the remaining crumbs and sprinkle them over the chicken when you flip it over halfway through the baking time. You must still discard the egg.)
Bake for 20 minutes. Flip them over and bake for an additional 20 minutes, until the chicken is cooked through and the juices run clear.
Note: I did drumsticks and thighs. Breasts would not require the same amount of cooking time. I would cut it in approximately half the time. Chicken is done, once again, when the juices run clear.
*Salsa and Mesquite Oven Fried Chicken*
Serves 4 to 6salt and black pepper to taste
Note: I did drumsticks and thighs. Breasts would not require the same amount of cooking time. I would cut it in approximately half the time. Chicken is done, once again, when the juices run clear.


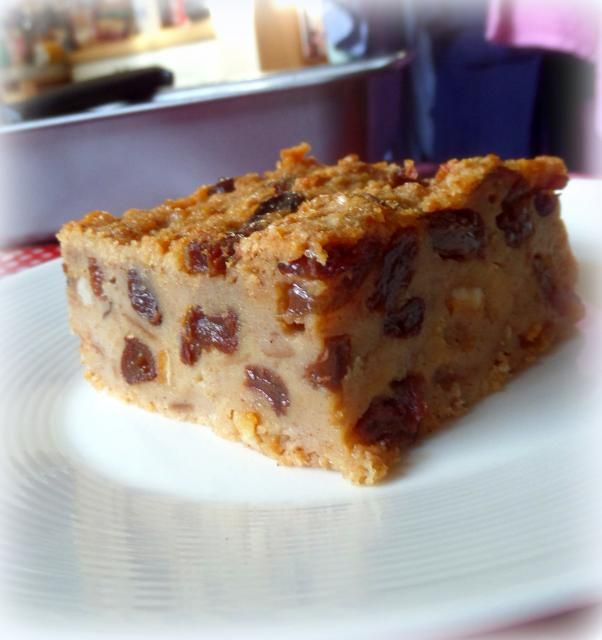
Old Tim Bread Pudding. One might be tempted to overlook this recipe as it doesn't look like anything special, but this is one of those great old fashioned recipes that is a gem in disguise.

It's one of my husband's favourites! He has always said his mother
made the best bread puddings, but after I made him this one the other
day, he's changed his mind and declared mine better than hers. I am
well pleased.
Originally designed to make the use of stale or leftover bread, this pudding isn't to be confused with it's lighter airier cousin Bread and Butter Pudding. This is the ugly stepsister of said pudding, It is stodgy, somewhat heavy, and stogged full of dried fruits and spices.

You can see from the photograph that is is quite solid and cuts nicely into squares, which makes it perfect for eating out of hand if you wish.
In fact I often see it being sold by the square in local bake shop windows. When we were in Llangollen, Wales, one time it was beautifully showcased in one of their bakery windows. Of course we had to buy a square to bring home and enjoy with his evening tea.

My husband had described this to me many times through the years, but you know how men are. Their descriptions of thing only ever very rarely actually give you a true picture.
My friend Jo who worked at the Manor with me as the housekeeper used to make this all the time, but again, I never had actually seen it first hand, until I made it for myself. It can be a bit hard to describe to people who are not familiar with it.

It is lovely warm and cut into squares. My husband enjoys it warm with custard or cream poured on top. It is equally as lovely served cold along with a nice hot cuppa.
It is very reminiscent of a fruit cake in both texture, weight, and flavour actually. The difference being it's not a cake. Its a pudding and its a delicious pudding at that.

I am not sure how old the recipe is, but I suspect that it's been around a very long time. I suspect it came about from some cook's desire not to let anything go to waste, especially stale crusts of bread.
I do hope you'll give it a go and that when you do you enjoy it as much as we do. It's relatively low in fat as well I would say. Yes, there is some butter in it, but not a lot in actuality. It is economical, delicious, and real comforting family fare.

We love this warm, but we really love this cold and cut into squares or slabs. It always goes down a real treat and is a great way to use up leftover stale bread.
When you first read the recipe you think to yourself, how could that ever be tasty. But you are wrong. It is incredibly, edibly, wonderfully delicious.
Make Your Own Mixed Spice:
You can easily make your own mixed spice: Combine 1 TBS ground cinnamon, 1 tsp each of ground coriander and nutmeg, 1/2 tsp of ground ginger, 1/4 tsp each of ground cloves and all spice. Mix well and store in an airtight container out of the light for up to 6 months.
You can easily make your own mixed spice: Combine 1 TBS ground cinnamon, 1 tsp each of ground coriander and nutmeg, 1/2 tsp of ground ginger, 1/4 tsp each of ground cloves and all spice. Mix well and store in an airtight container out of the light for up to 6 months.
Old Time Bread Pudding
Yield: Makes one 12 by 9 inch pan
prep time: 15 Mcook time: 1 H & 20 Mtotal time: 1 H & 35 M
This is very different than bread and butter pudding. Don't confuse the two. This is a very traditional and stodgily delicious blend of dried fruit, spices, bread, eggs and milk. Perfect for a winters day tucked up in side in the warmth and best served with custard or cream. It's also very good served cold and simply cut into squares.
Ingredients:
- 400g of white bread, torn into pieces (about 7 cups)
- 600ml of milk (2 1/2 cups)
- 450g of dried fruit (3 cups)
- (Use a mixture of raisins, sultanas and currants
- 100g sugar (1/2 cup)
- 50g of self raising flour (1/4 cup plus 2 TBS)
- 1 1/2 TBS mixed spice (see my right hand side bar for a recipe to make your own)
- 2 large free range eggs, beaten
- 100g of butter, melted (7 TBS)
- demerara sugar to sprinkle on top (turbinado)
Instructions:
- Preheat the oven to 150*C/300*F. Butter a rectangular pan about 12 by 9 inches well. Set aside.
- Put the bread into a large bowl. Pour the milk over top and allow it to stand for 10 minutes. At the end of that time, beat it all together with a wooden spoon. Stir in the dried fruit and sugar. Mix well together. Stir in the flour and mixed spice. Add the beaten eggs and the melted butter. Pour into the prepared pan. Sprinkle demerara sugar on top evenly. Bake for one and a half hours.
- Raise the oven temperature to 180*C/350*F/ gas mark 4 and bake for a further 10 minutes or so until the pudding is golden. Excellent served warm with custard or cream, or eaten cold.

This is one of the most popular recipes on the blog which goes to prove that people really love to try good old fashioned traditional foods and recipes. When something ain't broke why mess with it. This is perfect just as it is.
Make Your Own Mixed Spice:
You can easily make your own mixed spice: Combine 1 TBS ground cinnamon, 1 tsp each of ground coriander and nutmeg, 1/2 tsp of ground ginger, 1/4 tsp each of ground cloves and all spice. Mix well and store in an airtight container out of the light for up to 6 months.
You can easily make your own mixed spice: Combine 1 TBS ground cinnamon, 1 tsp each of ground coriander and nutmeg, 1/2 tsp of ground ginger, 1/4 tsp each of ground cloves and all spice. Mix well and store in an airtight container out of the light for up to 6 months.
This content (written and photography) is the sole property of The
English Kitchen. Any reposting or misuse is not permitted. If you are
reading this elsewhere, please know that it is stolen content and you
may report it to me at: theenglishkitchen@mail.com


The Winner of the Le Creuset Condiment Pot and The English Provender Co Chutneys
Monday, 8 December 2014
Although I am still not feeling very well, I did promise that a winner would be picked for the English Provender Co Giveaway. I printed out all the comments, cut them out and popped them into a Christmas Stocking and then got the Toddster to pick one out . . . I wish I could give one to all of my readers, but alas . . . . I cannot.

The winner of the giveaway is:
-
I am as fond of Le Creuset as I am of The English Provender Co TOO Marie. That pot is SOOOOO cute.

This is another recipe I like to bake each Christmas. It just wouldn't be Christmas without a plate of these on offer. Simple to make and yet so very impressive. Perfect for a holiday breakfast or brunch, or even for coffee breaks or elevensies.

This is a tasty little gem I clipped from an old issue of Good Food Magazine yonks ago! It looked fabulously delicious and very simple to make. As you know I can be rather lazy sometimes and simple and delicious are what works best for me!

Look at what I recently got in the Post. A Joseph Joseph Nest 7 Plus from Red Candy. For those of you not familiar with the company, Red Candy is an online mail order gift site here in the UK that specializes in Funky Home Accessories and ravishing Red Kitchen Accessories. If you are a fan of kitchen reds, then this is the place for you!

I picked up a beautiful big cauliflower at the shops this afternoon and so I decided to make us a delicious cauliflower soup for our supper. We had rather a big lunch and so we didn't really want anything too heavy.
I sometimes make a Roasted Cauliflower Soup, which is excellent! Other times I do a fantastic one with a Garlicky Brioche Bread Crumb topping, which is also very good. Today though . . . we just wanted something simple.

Christmas is fast approaching, so why not get into the festive spirit by trying your hand at these Jolly Rich Fruit Snowmen Cakes? These cute little characters have been created by Juliet Sear, exclusively for the Dr. Oetker Even Better Baking Team. At the forefront of modern cake design, Juliet aims to encourage home bakers to get into the baking spirit this Christmas and create these jolly treats. I think they aer just ADORABLE!

This isn't something that I make really often . . . as it is kind of a lot of work . . . but every once in a while I love to treat us to it.
As you all know I am a big fan of The English Provender Co. products. I often use them and tell you about my experiences. I just adore their chutneys and their luxury curds and of course their dressings and condiments. I'm really excited because they have given me an opportunity to run a Giveaway here on The English Kitchen where one of my readers will be able to win a lovely prize just in time before Christmas!
One lucky reader will win:
A beautiful Le Creuset Condiment Pot! Isn't it cute. Just the perfect way to serve your condiments at your holiday gatherings. I think this is a fabulous prize. I am as fond of Le Creuset as I am of The English Provender Co.!
As well as this lovely condiment pot you will also receive three chutneys from The English Provender Co Range. They actually have two new flavours at the moment.

Hot Chilli & Red Pepper Chutney - Naturally delicious for adding a kick to cheddar & heat to cold meat - or anything else that takes your fancy!

Moroccan Spiced Chutney - Naturally delicious for adding a touch of the exotic. Perfect with kebabs and couscous, or mix with crème fraiche for a dip with a difference.
Both sound delicious and I love the idea of mixing that Moroccan one with some creme fraiche for a tasty dip, don't you?
Anyways, in order to be in it to win it, simply leave a comment at the end of this post. I will announce a winner on Monday the 8th of December, and with any lucky the winner will be able to use this for their Christmas festivities!
Giveaway is open to entrants from the UK only. Sorry about that, but that's the way the cookie crumbles. If you are in the UK however, please enter and be in it to win it! Thank you so much!
I love it when I get to give something away!
GIVEAWAY NOW CLOSED.

The race is on now for me to develop a tasty trifle recipe for my Christmas lunch this year. Other years I have done different versions such as:
Turkish Delight Trifle Very good and very sweet. Not for the faint of heart or those who are not fond of Turkish Delight.
Turkish Delight Trifle Very good and very sweet. Not for the faint of heart or those who are not fond of Turkish Delight.

What with Thanksgiving and everything I am only getting to show you this fabulous banana bread now. It is a little bit different than my usual favourite banana bread recipe, in that it has a lovely crumb topping.
My usual one is stogged with nuts and dried cranberries. This one is quite plain except for the crumb topping.

Other than the topping, it is exactly what you would expect a banana bread to be . . . dense, moist, almost fudgy.
Other than the topping, it is exactly what you would expect a banana bread to be . . . dense, moist, almost fudgy.
Perfect for toasting under the grill and spreading with butter . . . or just eaten out of hand. Our little Spanish girl quite enjoyed this.

My husband quite enjoyed this.

I quite enjoyed this . . . and sometimes, that is enough. Three ten out of tens can't be bad.
My husband quite enjoyed this.
I quite enjoyed this . . . and sometimes, that is enough. Three ten out of tens can't be bad.
It was a combination of the loaf part of this recipe and the topping part of another recipe. Together they made a scrummy recipe.

200g sugar (1 cup)
125g of butter at room temperature (1 stick or 1/2 cup)
1 tsp vanilla
120ml of buttermilk (1/2 cup)
2 overripe bananas, peeled and mashed
280g of plain flour (2 cups)
1/2 tsp salt
1/2 baking soda
1 tsp baking powder
1 tsp ground cinnamon
Crumb Topping
2 Tbsp light brown sugar
3 Tbsp flour
1/8 tsp cinnamon
3 Tbsp white chocolate chips or chopped toasted pecans or walnuts (optional)
1 1/2 Tbsp unsalted butter, melted and slightly cooled
Preheat oven to 180*C/350*F/gas mark 4. Butter a 9″ x 5″ loaf pan and dust lightly with flour, shaking out any excess.
Sift together flour, baking powder, baking soda, salt, cinnamon, allspice, and nutmeg in a large bowl. Make a well in the center of the mixture. Cream together the butter and sugar, until light and fluffy. Beat in the banana, buttermilk, egg, and vanilla. Add to flour mixture all at once and stir just until combined. Pour batter into prepared pan and smooth top with the back of a spoon.
For the crumb topping, combine brown sugar, flour, and cinnamon in a small bowl. Add melted butter and toss mixture with a fork until crumbly. Stir in the chocolate chips or nuts if using. Sprinkle over batter and bake, rotating pan halfway through, for about 53 to 54 minutes. If bread is browning too quickly, cover with foil. The bread is done when golden and a toothpick inserted in the center comes out clean or with a few moist crumbs attached.
Remove from oven and cool in pan on a wire rack for 15 minutes. Remove bread from pan, and cool completely before slicing and serving. Store leftovers in an airtight container in the refrigerator up to 2 days; serve warm.
A deliciously different and moist banana bread with a crumb topping which adds a touch of crunch.
Delightful!
1 large free range egg, beatenDelightful!
1/4 tsp ground nutmeg
pinch allspiceCrumb Topping
2 Tbsp light brown sugar
3 Tbsp flour
1/8 tsp cinnamon
3 Tbsp white chocolate chips or chopped toasted pecans or walnuts (optional)
1 1/2 Tbsp unsalted butter, melted and slightly cooled
Preheat oven to 180*C/350*F/gas mark 4. Butter a 9″ x 5″ loaf pan and dust lightly with flour, shaking out any excess.
Sift together flour, baking powder, baking soda, salt, cinnamon, allspice, and nutmeg in a large bowl. Make a well in the center of the mixture. Cream together the butter and sugar, until light and fluffy. Beat in the banana, buttermilk, egg, and vanilla. Add to flour mixture all at once and stir just until combined. Pour batter into prepared pan and smooth top with the back of a spoon.
For the crumb topping, combine brown sugar, flour, and cinnamon in a small bowl. Add melted butter and toss mixture with a fork until crumbly. Stir in the chocolate chips or nuts if using. Sprinkle over batter and bake, rotating pan halfway through, for about 53 to 54 minutes. If bread is browning too quickly, cover with foil. The bread is done when golden and a toothpick inserted in the center comes out clean or with a few moist crumbs attached.
Remove from oven and cool in pan on a wire rack for 15 minutes. Remove bread from pan, and cool completely before slicing and serving. Store leftovers in an airtight container in the refrigerator up to 2 days; serve warm.
This content (written and photography) is the sole property of The English Kitchen. Any reposting or misuse is not permitted. If you are reading this elsewhere, please know that it is stolen content and you may report it to me at mariealicejoan at aol dot com.

I always like to offer something light for dessert over the holidays. We are eating such rich foods and to be honest after a heavy meal I often don't have enough room for cake or puddings . . . I find this delightful jelly mold fits the bill perfectly!

I have been making it for years and years. I think I got the original recipe from one of the Kraft folders you used to be able to pick up or have sent to you in the post.
They came in colours like yellow, blue and pink and the print and photographs were always in black and white.

They used to give the address to write for them on their advertisements and they always sent them to you for free! I have quite a few of them that I saved through the years.
They are good reliable recipes and have become old faithfuls for me! It often wouldn't be the holidays without making at least a few of them!

This makes the perfect holiday dessert with it's two layers. All you need is four packets of lemon jelly (jello) a tin of sweetened condensed milk and some sour cream.
Oh yes, and some fruit. I used grapes, both green and red.

It goes together quickly and simply and is so easy to dress up. I simply plunked a Christmas package decoration down in the middle of this and it looks fabulous don't you think?
And it tastes gorgeous. It was dark by the time we cut into this but trust me when I tell you it sparkles like a jewel . . . a bit of softly whipped cream to adorn each portion and you got a well impressive dessert that most will enjoy!

WHAT YOU NEED TO MAKE CREAMY LEMON LAYERED DESSERT

HOW TO MAKE CREAMY LEMON LAYERED DESSERT
Have ready a large gelatin mold which you have sprayed with nonstick cooking spray. Stir two packets of the gelatin together with 345ml of the boiling water (1 1/2 cups). Stir for about two minutes until the gelatin is completely dissolved. Pour into the prepared mold and place in the refrigerator to chill for about 5 to 8 minutes. Remove and press the grapes down into the mixture. Return to the fridge for 20 minutes or until set, but not firm.
Add the remaining water to the other two packets of gelatin. Stir for another two minutes to dissolve. Whisk in the condensed milk and sour cream to combine well. Allow to cool and slightly thicken and then pour this mixture over the other mixture in the mold. Chill for at least 2 hours or until completely firm before serving.
It's really easy to switch the flavors around with this dessert simply by swapping out the flavors of jelly and type of fruit. Try using chopped tinned peaches instead of the grapes, beautiful with the lemon. Or using a cherry jello and drained fruit cocktail or pears. You could also use orange jelly and drained mandarins. Just use your imagination and the flavors that your family will enjoy! This is a recipe that can very easily be cut in half as well.
Yield: Makes 16 servings
Creamy Lemon Layered Dessert
This is a delicious gelatin dessert that is an lighter option during the holidays.
Ingredients
- 570ml of boiling water divided (2 1/2 cups)
- 4 packets of lemon flavored gelatin, divided (4 serving size)
- 1 cup of seedless green grapes, halved
- 1 cup of seedless red grapes, halved
- 1 397g tin of sweetened condensed milk (14 oz tin)
- 120g of dairy sour cream (1 cup)
Instructions
- Have ready a large gelatin mold which you have sprayed with nonstick cooking spray.
- Stir two packets of the gelatin together with 345ml of the boiling water (1 1/2 cups). Stir for about two minutes until the gelatin is completely dissolved.
- Pour into the prepared mold and place in the refrigerator to chill for about 5 to 8 minutes. Remove and press the grapes down into the mixture. Return to the fridge for 20 minutes or until set, but not firm.
- Add the remaining water to the other two packets of gelatin. Stir for another two minutes to dissolve. Whisk in the condensed milk and sour cream to combine well.
- Allow to cool and slightly thicken and then pour this mixture over the other mixture in the mold. Chill for at least 2 hours or until completely firm before serving.
- Once it is completely chilled and you are ready to serve it, using a round bladed knife, run it around the top edge of the gelatin to loosen it. Dip the mold in warm water just to the rim for 15 seconds.
- Lift from the water and gently pull the gelatin from the edge of the mold with damp fingers. Place a damp serving plate over top of the mold and then invert the mold over the plate and shake gently to loosen the gelatin.
- Remove mold and serve.
Subscribe to:
Posts (Atom)





Social Icons