
Showing posts with label savoury bakes. Show all posts
Showing posts with label savoury bakes. Show all posts


I never had a cinnamon roll made with yeast dough the whole time I was growing up. My mother always made them with biscuit/scone dough and we loved them.
They were a real treat. I did the same thing for my children, and I am happy to say that my children are still doing this for their own kids. A tradition that has passed down through three generations!

This is Luke and Gabriel enjoying the fruits of their father's labours! Yum! So, what does this have to do with Cheese and Garlic Scrolls eh? (Like my Canadian touch there?)
Well, nothing except that the basic biscuit/scone dough is the same, which goes to tell you something . . . in case you didn't know this fact already.

A good biscuit/scone dough can be the basis for a multitude of creations! You can roll or pat it out to a rectangle and spread it with pretty much anything and you will end up with a delicious bun to enjoy anytime, anyplace, anyhow. Win-Win-WIN!!

Today I spread it with a garlic butter mixture and sprinkled cheese on top, two kinds, rolled it up, cut it into slices and baked it and presto-chango!

You have a mighty tasty bun to serve with some soup, or a salad, or (true confessions) even on their own, just because they are so darned good you cannot resist them!

These are so tender and flaky. They have just the right amount of flavour all on their own. No need to butter or spread them with anything additional. They are perfect just as they are.

Hot, cold and in between. On the first day, on the second day, and yes . . . even the third day . . . if they last that long.
There are only two of us and they do last us a bit more than one or two days, but if you have a larger family I seriously doubt you will have them around much longer than a day.
However, it is nice to know that if you do, they will still taste fabulous!

*Cheese and Garlic Scrolls*
Makes 12
Flaky and delicious. Perfect to serve with soup or stews. Perfect anytime! Best served on the day.
a bit more of softened butter for topping (about 1 TBS)
a couple more TBS Parmesan for sprinkling on top
Preheat the oven to 200*C/400*F gas mark 4. Butter a 10 inch pie dish. Set aside.
Sift the flour into a bowl with the baking powder and salt. Cut the butter into bits and drop into the floru mixture. Cut in using a pastry blender until the mixture resembled small peas. (You can also use two round bladed knives, making a cutting motion against each other.)
Add
the milk and stir together to make a soft dough. Pat out into a 8 by 12
inch rectangle. Mix together the softened butter, garlic, basil,
oregano and onion powder. Spread this over the dough. Sprinkle evenly
with both cheeses.
Roll up tightly from the long end until you have a
12 inch sausage, pinch the ends together. Cut into 12 equal slices and
place into the baking dish. Spread with a bit more softened butter and
then sprinkle with the remaining Parmesan cheese.
Bake in the preheated oven for 12 to 15 minutes until risen and golden brown. Serve warm.

Bake in the preheated oven for 12 to 15 minutes until risen and golden brown. Serve warm.

I don't care what else you are making for supper tonight, you need to run out into your kitchen and bake these today! Your family will be most appreciative!!! Bon Appetit!


Today I get to show you what I did with some of my leftover roast chicken. This is a combination that sounds quite different I am guessing. It is a pie that my MIL used to make many moons ago. Quite an unconventional filling, but very delicious. I had been craving it for a long time, but had been quite unable to find the recipe!

Funny how it goes. When you get divorced you often lose half your family and all things attached to that half of the family. Not always, but often. It was so in my case at any rate! This was a pie that I have been craving for at least 25 years now, but never thought I would ever taste again. It's delicious.

I had done searches on line in every combination possible, but never come up with any results. Then, the other day, I was going through my big blue binder and lo and behold . . . there it was, in my own handwriting. I had no idea that I had copied it down all those years ago, and I was thrilled to find it!

This pie has a triple layered crust. Bottom, middle and top. The crust is like a cross between a tea biscuit and a pastry . . . and it is lightly flavoured with onion . . .

It puffs up nicely and has a beautiful buttery texture. I could dine on the crust alone, its that good . . . but the filling ups the ante because there is not just one tasty filling in it, but two!

You fill the bottom crust with a hamburger filling . . . simple. I use extra extra lean ground beef, browned with onions, and a few seasonings. You then stir in half a tin of cream of chicken soup. You cool it and then spread it on the bottom crust and then cover it with the middle crust.

On top of that middle crust goes a filling of shredded or finely chopped cooked chicken, mixed with the other half of the tin of soup, and some more seasonings. You spread that all out to cover and then apply the top crust, tucking it in and fluting it all around . . .

A few slashes in the top to vent the pie and I brushed it with a bit of milk to give it a golden touch. It really takes a negligible amount . . . just a touch. You then bake it in a moderate oven for 35 to 40 minutes . . . until the filling gets bubbling and that crust is golden brown.

Todd always likes mash with his pies, but really this would be quite filling and ample on its own with only a salad on the side and some vegetables. I think you are really going to like this!

*Hamburger & Chicken Pie*
Serves 6
1 lb extra lean ground beef
1 medium onion, peeled and finely chopped
1/4 tsp garlic powder
salt and black pepper to taste
160ml milk (2/3 cup)
Spray
a skillet with nonstick cooking spray. Add the onion and ground beef.
Cook and stir, scrambling, until the beef is golden brown. Season to
taste with salt, pepper, garlic powder and add the parsley flakes.
Stir in the soup. Set aside to cool.
To make
the chicken filling, mix together all ingredients in a bowl. Set
aside. (I like to shred my cooked chicken for this, but minced is good
also)
Sift the flour and baking powder into a
large bowl. Stir in the onion salt. Drop in the fats and rub them in
with your fingertips until your mixture resembles fine breadcrumbs with a
few pea sized bits. Stir in the milk with a fork to form a soft
dough. Divide into three bits, with one bit being larger than the other
two. This will be the bit you use to line the bottom and sides of the
baking dish.
Preheat the oven to 190*C/375*F/ gas mark 5. Have ready a 7 by 11 inch rectangular pie baking dish.
Roll
out the largest bit of the pastry on a floured board, using a floured
rolling pin, to a size large enough to lie the bottom and sides of the
pie dish. It should only be about 1/4 inch thick. Line the dish with
this. Spread the hamburger filling on the bottom of the pastry.
Roll
out another bit of pastry large enough to just cover the hamburger
filling. It should also be 1/4 inch thick. Place on top of the meat.
Spread the chicken filling over top.
Roll out
the remaining pastry large enough to cover the chicken filling with a
bit of overhang to tuck in the sides. Place over the chicken filling
and tuck in the edges all around. Crimp the edges. Brush with a bit of
milk and slash to vet the top.

If you have an abhorrence to using tinned soup, you can make your own substitution for this by making a simple sauce.
* Condensed Cream of Chicken Soup Substitute*
substitutes for one 295g (10 3/4 oz) tinPrintable Recipe
This
is a quick, easy and delicious way to add depth of flavour to
casseroles without having to open a tin of soup. It is also fat free.
120ml milk (1/2 cup)
35g plain flour (1/4 cup)
180ml chicken broth (3/4 cup)
1/4 tsp onion powder
1/8 tsp garlic powder
salt and black pepper to taste
pinch of sweet paprika


I forget where I was, but it was a couple of weeks ago now, I was visiting with someone and they mentioned baking a quiche for supper a few nights before that.
I remember thinking to myself, I have not baked a quiche in a while and my appetite for having quiche was immediately whetted and I thought about nothing else for a few days!
Have you ever done that?

The shops here in the UK are filled with a variety of Quiches, but I have always found them largely disappointing.
Too much crust (yes, I, a crust lover, did say that!) and not enough filling.
I love crust, but there has to be an perfect balance of crust to filling to make my taste buds tingle. Store produced quiches are always sadly lacking in filling.

Too much crust and not enough filling, just doesn't do it for me, which is why I never buy ready made quiches. To me, they are a huge waste of money.
Why pay hard earned money to be disappointed. It doesn't make sense.

I used my Butter/Lard pastry recipe for this, and it was just the right amount of flaky and savoury. It also meant I had an extra crust to do something tasty with at a later date.
If you have never made the butter/lard pastry, you really need to. Once you try it you will never want to make any other kind.

I also chose to make a Salmon and Broccoli filling. Salmon and broccoli are a beautiful flavour combination.
Those two are a marriage made in heaven and something which we both enjoy together, especially when accompanied with copious amounts of tasty cheese!

And I used three kinds of cheese in this. A nutty Gruyere. A sharp Cheddar and a creamy Red Leicester for colour.
The whole thing was gorgeously tasty and we both fell in love with it. My appetite for a Quiche was sated and my husband was a happy camper also.
I love simple meals like this. Store cupboard ingredients. Easy to make. Delicious. What more could a person ask for?

*Salmon, Broccoli and Cheese Quiche*
Makes one 10-inch quiche
Makes one 10-inch quiche
This is a simple quiche with classic flavours. Salmon and broccoli go together like peas and carrots.
1 unbaked 10 inch pie crust (your own recipe or a good storebought one)
4 spring onions, trimmed and chopped
105g of cooked salmon, skinless and boneless, flaked (1 cup)
375g of grated cheese (I used Strong Cheddar, Red Leiscester, and Gruyere) (3 cups)
6 large free range eggs, beaten
6 large free range eggs, beaten
225ml of evaporated skim milk (1 cup)
salt and black pepper to taste
1/4 tsp dill weed

Pre-heat your oven to 190*C/375*F/gas mark 5. Line your pie dish with the pastry, fluting the edges as desired. Set aside. Place a baking tray in the oven to heat.
Place 240g ( two cups) of your cheese in the bottom of the crust. Sprinkle with the spring onions. Lay out the broccoli florets and scatter over the salmon decoratively. Sprinkle wth some salt and black pepper and the dillweed. Beat the eggs and milk well together. Season to taste with salt and black pepper. Pour this over your vegetables and cheese. Sprinkle the remaining cup of cheese over top.
Place on the heated baking tray and then bake for 50 to 55 minutes, until nicely browned and a knife inserted near the centre comes out clean. Let sit for 10 minutes before cutting into wedges to serve.

We both had our fill over the next few days, enough so that we were satisfied and it will be a while before I bake one again. I have never frozen a quiche, so I am not sure if it freezes properly or not. Have any of you? Bon Appetit!
This content (written and photography) is the sole property of The English Kitchen. Any reposting or misuse is not permitted. If you are reading this elsewhere, please know that it is stolen content and you may report it to me at: mariealicejoan@aol.com
Follow my blog with Bloglovin


For those of you who don't know, my father is a French Canadian, bred and born in the Saguenay Region of Quebec where he lived until he joined the Canadian Military way back when. My childhood was embroidered with the traditional foods of my mother's English/German ancestry and my father's French traditions.
Some of the French dishes may have been slightly adapted to my mother's tastes and skills in translation, but I believe at the very essence they stayed the same.


I had some leftover poached turkey and some ham which needed using the other day and so I decided to make a Ham and Turkey Pie. I thought that it would be fabulous and I was right! You could also use chicken, but with the holidays coming up I thought it would be nice to show you it with turkey.
This is so simple to make and so delicious!
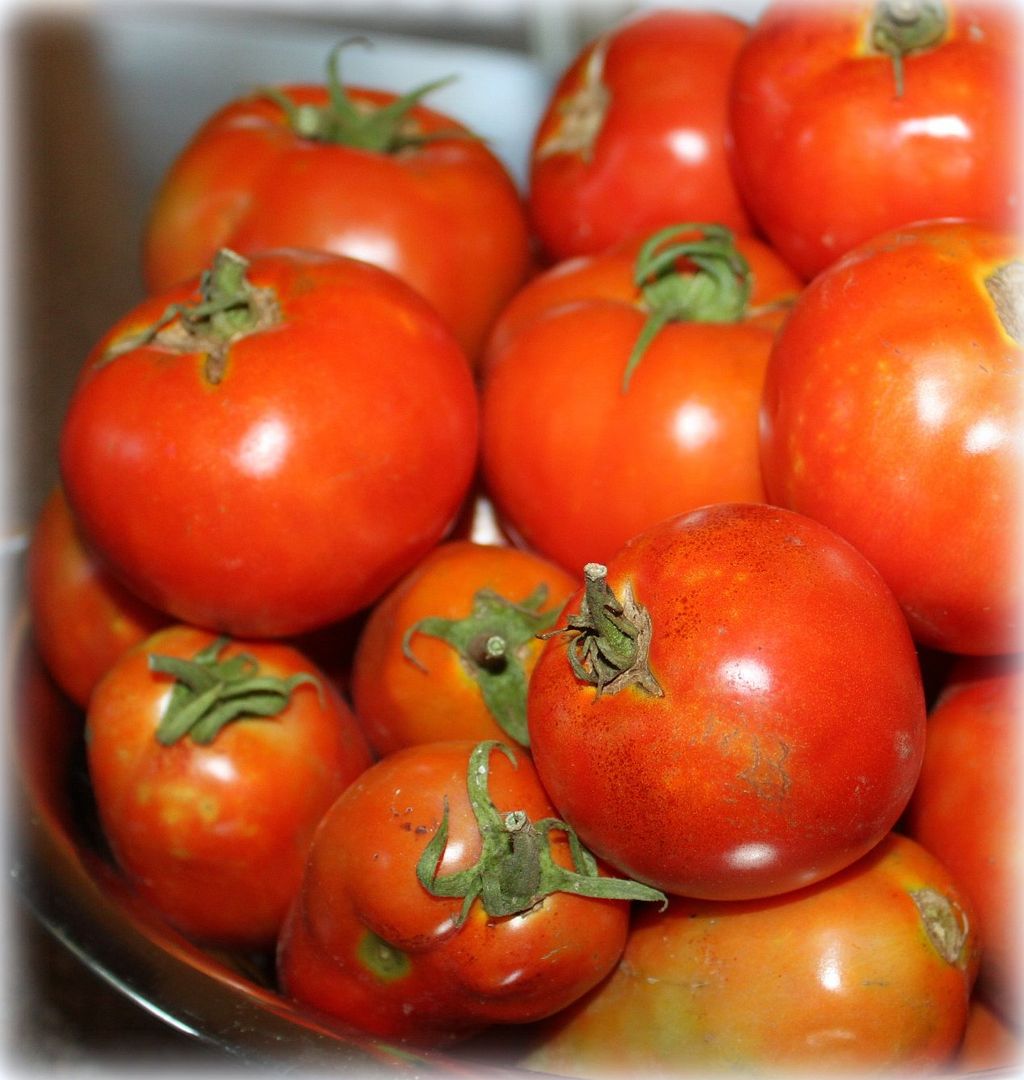
We had a windstorm a week or so ago and our tomato plants all blew over. I was force to pick them all. Most were green. I had thought to make some green tomato chow, but alas time got away from me and they ripened in the bowl before I could get that done. That was okay however because I love tomatoes and I am never at a loss as to what to do with tomatoes!
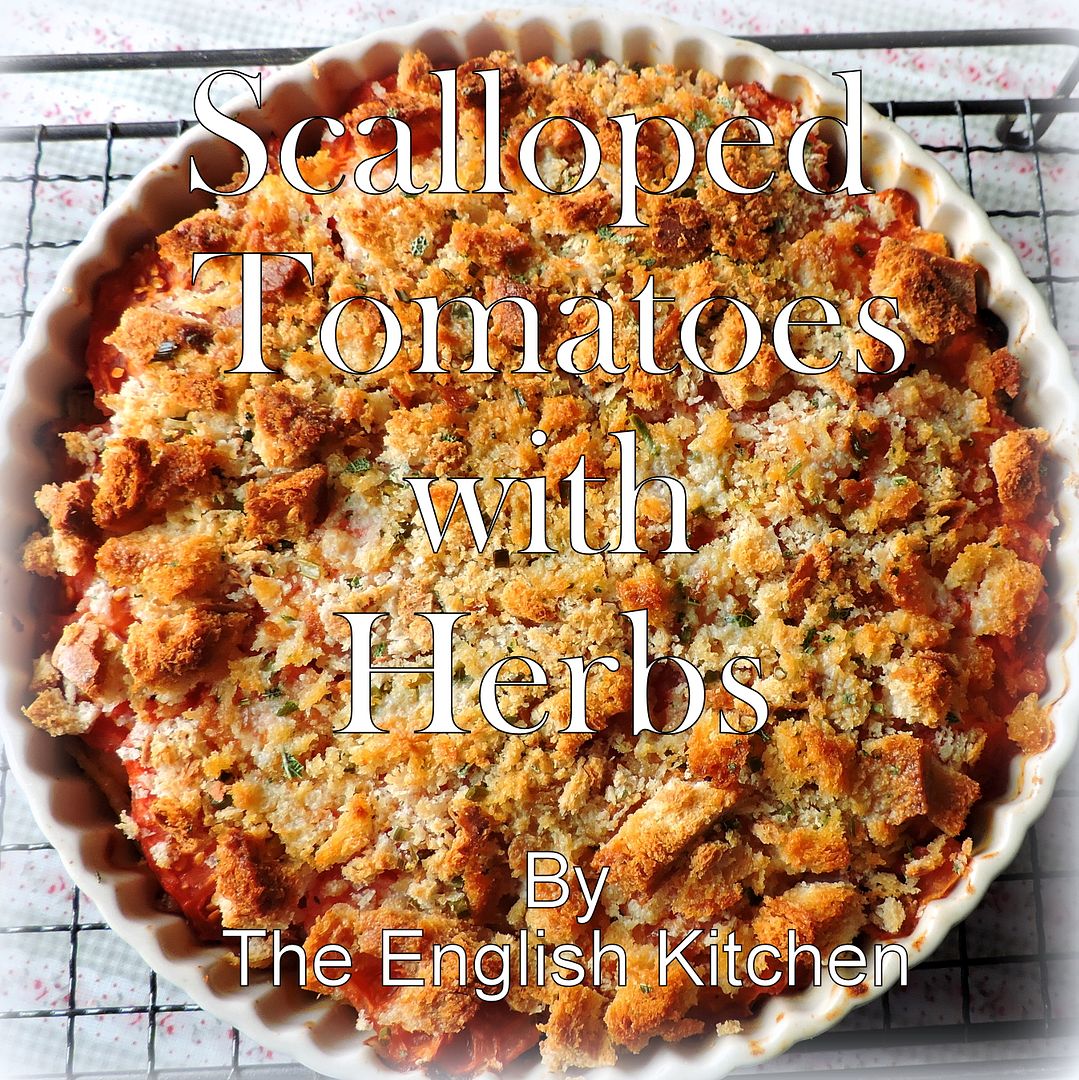
I quite simply love tomatoes and have been collecting ways to use them for years and years and years. This recipe today comes from a small green notebook which is filled with lovely home style old fashioned recipes, laboriously copied by myself years ago from books I took out from the local library. Unfortunately I was not quite so good at keeping a record of which book they came from. I can date this notebook to the years I was living in Meaford, Ontario, and I think it might have been from a book called Canadian Cookbook by Elizabeth Baird, but I could be wrong, so do forgive me if I am. In any case it is a delicious recipe.

I am a person that really loves vegetables. I always have done, and none more so than those in the brassica family . . . cabbage, broccoli, cauliflower . . .
I think of them all cauliflower is my absolute favourite. All white and tasty, I love it raw and I love it cooked, on it's own, or in a soup. Anyway you cut it, or cook it, I just love cauliflower.
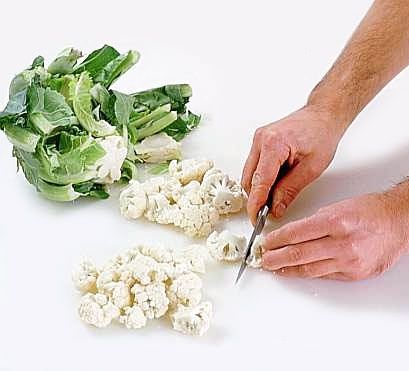
It's not a vegetable that I ever had when I was growing up. We never had broccoli either. I was an adult before I had either one, and I think my first taste of broccoli was in a Chinese stir fry, and it was absolute love at first bite.

I baked us a lovely quiche at the weekend. Who says real men don't each quiche! Todd loves them. This version was adapted from a recipe I found in a cookery book entitled Comfort Food Makeovers, put out by America's Test Kitchen.
It is a compendium of comfort food recipes defatted and made healthier. I'm all for that! Healtiher is a good thing, having it tasted delicious at the same time, is even better!

I never eat quiche when I don't think about that joke about the two older ladies in the restaurant who were perusing a menu which happened to have quiche on it.
That sounds good one of the women thought to herself and when the waiter came, she said . . . "I'd like to have a 'Quickie'!" Obviously, her pronunciation needed some work on it. ☺ Back to the recipe.
I know . . . don't quit my day job!

A lot of calories and fat are saved in this recipe through the use of some very flavorful cheeses. Parmesan which is used both in the crust and as a base for the filling. Parmesan is one of those cheeses where a little bit goes a very long way.
Gruyere is another cheese like that and by using it in the filling, you need relatively little of it when compared to other cheeses. I love the sweet, nutty flavor of Gruyere. A good substitute is Swiss cheese.

Buttermilk has also been used in the filling, which adds a richness to the custard without the calories of the usual cream which is normally used.
The use of corn flour also helps to set the custard.

The crust also gets an additional flavor boost from the use of a tiny bit of bacon fat, which you reserve when you cook the bacon.
The original recipe called for crispy cooked bacon and then crumbling it into the filling. But I opted to only partially cook it and then lay it on top of the tart prior to baking.

The end result was a very attractive and delicious Quiche that I did not feel very guilty about eating! I love it when that happens!

Delicious through and through, but with only half the calories and a third of a fat of a regular quiche!

Add
the water and process just until the dough begins to clump into large
pieces. Spray a 9-inch tart tin (with a removable base) with low fat
cooking spray. Add the dough and press it evenly over the bottom and up
the sided of the tin, Crimp edge. Wrap loosely in cling film and
freeze for 30 minutes.


I really hope you will give this a go. It's delicious! Bon Appetit!

We eat a lot of chicken in this house and I am always on the search for new ways to prepare it, so that it never becomes boring. Chicken is such a lovely protein in that it takes to other flavours very well and is so very adaptable. I discovered what looked to be a very delicious recipe for a Chicken Pot Pie Crumble on Pinterest last week. Chicken . . . Check! Pot Pie . . . Check!! Crumble . . . Check !!! The three together . . . well that just spells Winner Winner Chicken Dinner to me!

I was going through my old tin recipe boxes the other day and found this recipe for a Chicken Pot Pie that someone had written down for me years and years ago but which I had never tried. I think it may have been the little old lady that I boarded with when I first left home to go out to work, but I can't be sure. I only know that it was tucked away in the old tin recipe box that she had given me when I left her boarding house to get married.

This is the first of my week of celebrations posts! It is my birthday on Wednesday of this week and it will mark the beginning of my last year as a fifty something year old! (I know! Boo Hoo, how did that happen? I still feel sixteen inside. It's that first look in the mirror in the morning that's the kicker!)
Subscribe to:
Posts (Atom)


Social Icons